
Run the Mobile App
To run the Events mobile app, you need to setup and publish both the Visualizer app and the Kony Fabric app. Once the apps are published, you can preview the Events app using Kony Visualizer App Viewer. In this section we will guide through the steps to accomplish the set up, publish and preview the app.
Set up the Visualizer Project
To use the map and push notification services, you need to configure Google account and Engagement Service, and then provide the required details in the Visualizer Project.
This app uses Google’s Map API to provide the location of the event on a map widget. The map widget requires a map key to be set up in Visualizer's settings to view the map in an app. Follow these steps to set up a Visualizer project:
Google Developer Account Creation and Key Generation
You need to have an account in the Google Developer Console to use map services for the app. Follow these steps to create Google developer account:
- Create a project in your developer account.
- Once the app is created, switch to the APIs tab and enable Geocoding API and Maps Embed API for your project.
- Select any one of the APIs and click the Credentials tab.
- Create an API Key for your project. You can use this API key in the steps that follow.
Setting up the Key in the Visualizer project
Once you generate the key from the Google Developer Portal, you need to set it in Visualizer at the project level.
- From the main menu, click File → Settings.
- Under Application tab, scroll down and navigate to Map Widget. Set the key against the field Android Map Widget Key 2.
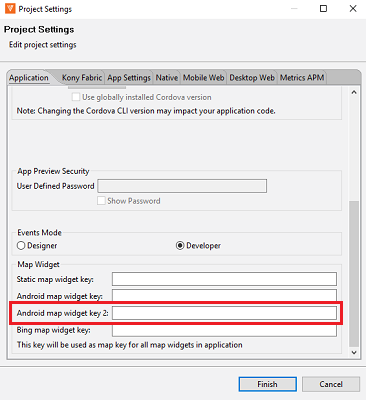
- Click Finish.
For setting up push notification in your app, you need to configure the Visualizer app and the Kony Fabric app. You must create an app in the Firebase Developer Console (for Firebase Cloud Messaging).
You can follow the given steps to create an app on the Firebase Console and make the corresponding changes in Visualizer.
Registering in Firebase Developer Console
Follow these steps to register in Firebase developer console:
Registering in Firebase Developer Console
- Log in to the Firebase Developer Console.
- On the home screen, click Add Project.
- In the Add Project dialog box that appears, you can select the project that you created to generate the map API keys or you can create a new app.
- To create a new project, type the Project name and accept the controller-controller terms. Click Create project.
Once your project is ready, click Continue. - On the Project Overview page of your project, on the left pane, click the Settings icon next to Project Overview, and select Project settings.
- On the next screen, select Cloud Messaging tab and click Add server key in the Project Credentials section.
- Once the key is generated, you will see the following in the same window: Server Key, Legacy Server Key and Sender ID.
- Use the Sender ID to setup Visualizer.
Adding senderID to project
Follow these steps to add the senderID to the Visualizer app:
- In Visualizer, expand Modules section and open file events_config.js.
- Locate the key KMS in the file and set the Sender ID that you generated in the previous section.
Selecting GCM in project settings
Follow these steps to select GCM in project settings:
- In Visualizer, navigate to Project Settings using the left pane button.
- Select the Native tab and select the Android sub-tab.
- Under the Push Notifications section, select GCM from the drop-down.
Set up the Fabric App
You need to configure Identity service for the app login and the Engagement service for push notifications to set up the Kony Fabric app. This app comes packaged with sample data. You need to upload the same to Kony Fabric before running the app.
The app requires LinkedIn credentials for logging in. For the LinkedIn log-in to work, you need to have an app in the LinkedIn developer portal. Follow the steps mentioned in Authenticating OAuth 2.0 to create and configure the LinkedIn app.
After you configure your LinkedIn app, you need to generate a Client ID and a Client Secret for the app. You need to configure the client details in Kony Fabric.
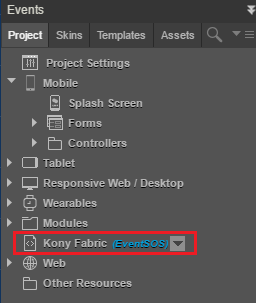
Setting up Kony Fabric Identity Service
- Select Kony Fabric from the Visualizer project explorer.
- The Kony Fabric Console screen appears with the Events App page. The Configure Services tab is selected by default.
- Click the Identity tab and select linkedIdentityLogin.
- In the page that appears, paste the Client ID and Client Secret that you generated by creating the LinkedIn app in LinkedIn developer portal.
Note: You also need to copy the Callback URL from the Kony Fabric page and paste in the appropriate field in the LinkedIn developer portal in your LinkedIn app.
After you set up an Identity Service in Kony Fabric, you need to set up the push notification service for your app. Follow the given steps to set up push notifications for your app:
Identity Service: customAccountLogin
- Navigate to the Identity tab and select the service customAccountLogin.
- Set the Custom Identity Service Endpoint as follows:
https://<your_cloud_host_name>.konycloud.com/services/accountlogin - In the Provider Settings section, enter the credentials of your Kony account in the User ID and Password fields.
Note: This URL is not valid if you are running the fabric console on premise. In that case, the URL is:https://<your_on_premise_host:port>/services/accountlogin
Integration Service: accountLogin
- Navigate to Integration tab and select the service accountLogin.
- In the Service Definition tab, set the Base URL value as:
https://accounts.auth.konycloud.com
Note: If you are running an on-premise instance of Kony Fabric, the URL is:https://<your_on_premise_host:port>/authService/accounts
Engagement Service: Android
- Navigate to theEngagement tab and expand Android.
- Select the network as GCM.
- In GCM Authorization Key, provide the Server Key or Legacy Server Key that you generated in the Firebase App.
Engagement Service: iOS
- Navigate to Engagement tab and expand iOS.
- Provide the iPhone Push Certificate and Certificate Password in the required fields.
The Visualizer project contains a sample data set. You can find this data set at the following path:<Your Download Location>/Event/EventData.zip
Uploading Sample Data
- Sign in to Kony Fabric.
- Select the Apps tab from the left pane.
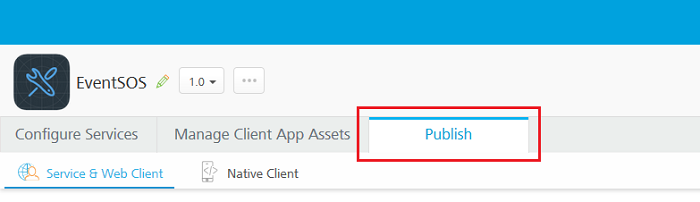
- Click the EventSOS app, which was created as a part of importing the application.
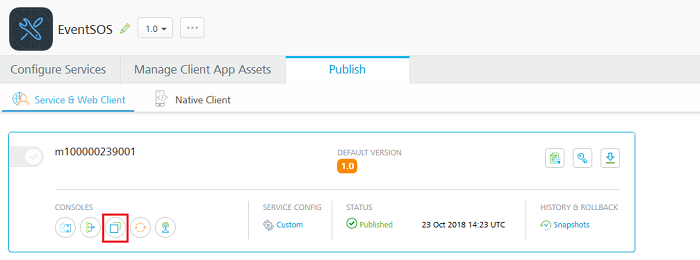
- On the Events App Console screen that appears, select the Publish tab.
- Click the Object console as shown in the following image.
- The Object Services screen, select Events SOS, and click Import.
- In the dialog box that appears, you can upload the data set that is bundled with the application zip.
Publish and Preview the App
Once you upload the sample data to the Object Services, you need to publish the Kony Fabric app to a run-time environment. The client app accesses the data from the run-time environment. After publishing you can preview the app in Kony Visualizer App Viewer.
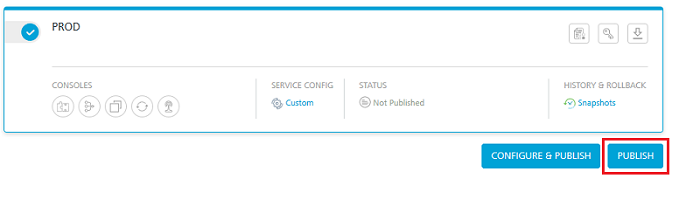
- On the File menu, select Publish to Kony Fabric.
- In the screen that appears, select Publish to publish the application.
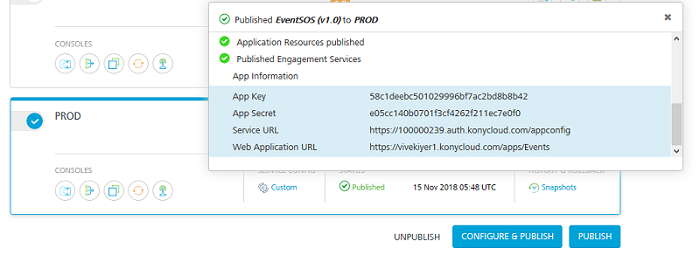
- The following screen appears when you publish the application.
Once you publish the Kony Fabric app, navigate back to Visualizer and make the client app ready for preview. Use the Kony Visualizer App Viewer mobile app to view the published client app.
You now need to publish the application to Kony Cloud to access and view it on App Viewer. This operation reduces the need to build the app multiple times.
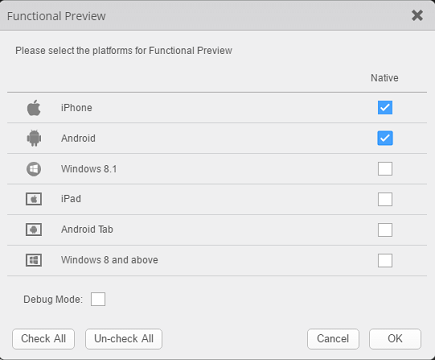
- On the Preview menu, select Publish
.png)
- On the Publish App dialog box, select the appropriate channels and click Continue.
- In the dialog box that appears, add the application name and description. If you need the application to be password protected, select Protected and provide the password for the app. Click Apply.
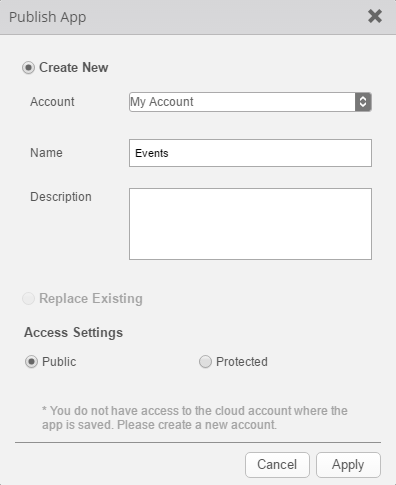
- Make a note of the five-digit preview code.
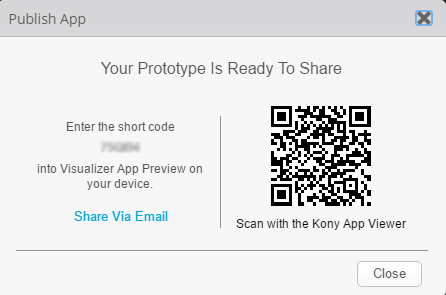
Apart from viewing the app, you can also use App Viewer to provide comments on the design and functionality of the app. Follow these steps to preview your app:
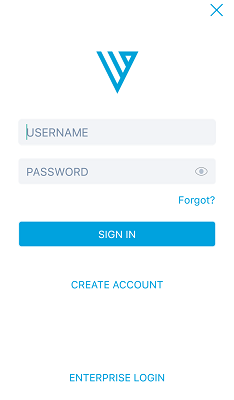
- Launch the Kony Visualizer App Viewer app on your mobile.
- Sign in by using your Kony account credentials.
- Once you login, select the Cloud tab and enter the five-digit preview code in the App Viewer Code field, which you noted down earlier.
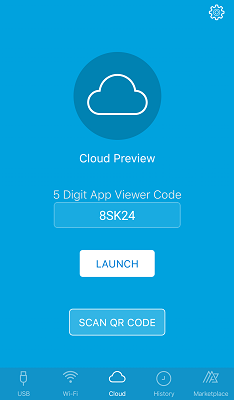
- Click Launch to launch the application on your mobile.
Run the Desktop Web App
To run the Desktop Web app, you need to set up the Kony Fabric app, configure Box account and Google account, and then provide the required details to the Kony Fabric app. You must now build and publish the Visualizer app to render the Desktop Web app on a browser.
Set up the Fabric App
You need to configure the user store for gaining access to the Admin Console, Box account for image gallery component and Google account for Google Map services.
- In the Visualizer project explorer, select Kony Fabric.
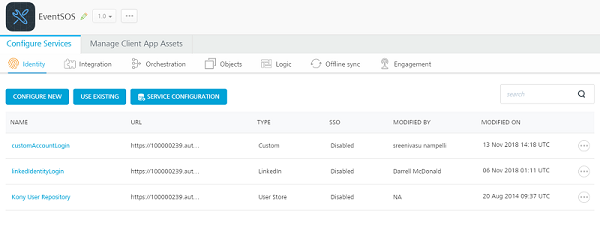
The Kony Fabric Console screen appears with the Events App page. The Configure Services tab is selected by default. - Click the Identity tab.
- Select Kony User Repository. For more information regarding Kony User Repository click here.
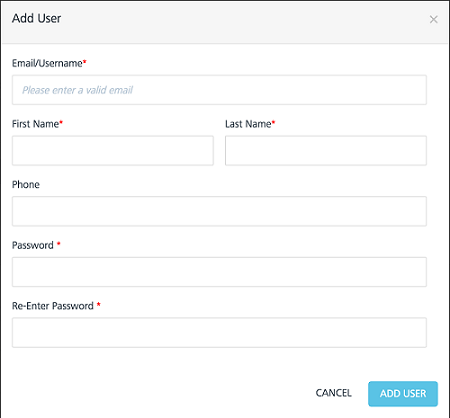
- Click ADD USER. Provide the user details in the Add User dialog that appears. You must use these user credentials for signing in to the client app.
The app requires LinkedIn credentials for logging in. For the LinkedIn log-in to work, you need to have an app in the LinkedIn developer portal. Follow the steps mentioned in Authenticating OAuth 2.0 to create and configure the LinkedIn app.
After you configure your LinkedIn app, you need to generate a Client ID and a Client Secret for the app. You need to configure the client details in Kony Fabric.
Note: If you have already performed the steps mentioned earlier in the Running the Mobile App section, do not repeat the steps in the LinkedIn Account Setup for the Desktop Web app.
Setting up Kony Fabric Identity Service
- Select Kony Fabric from the Visualizer project explorer.
- The Kony Fabric Console screen appears with the Events App page. The Configure Services tab is selected by default.
- Click the Identity tab and select linkedIdentityLogin.
- In the page that appears, paste the Client ID and Client Secret that you generated by creating the LinkedIn app in LinkedIn developer portal.
Note: You also need to copy the Callback URL from the Kony Fabric page and paste in the appropriate field in the LinkedIn developer portal in your LinkedIn app.
For using the Image Gallery component, you need to have a Box account (as mentioned in the Prerequisites). In your Box account, you need to create a JWT Application. This requires you to sign in to the Box developer console. Once the app is created, you need to configure the app and download the generated config.json file.
Please follow the steps mentioned in the Box Documentation to create and configure your JWT Application at Box.
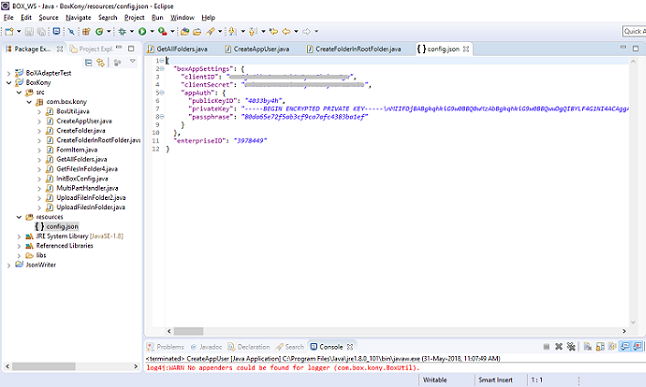
Once you download the config.json file, copy its content. You can use it later to create the appropriate JAR file for Box integration.
Download the java project from the Kony Dev GitHub. You can use this java program and the config.json file to configure the Box Account.
Open the program in Eclipse and follow the given steps:
- In the java project that you downloaded from Kony Dev GitHub, locate the config.json file. Replace the content of this file with the content of the that you downloaded from Box account.
- Open CreateAppUser.java file and provide a preferable user name against the variable appUserName and execute the main method (Right-click on the editor pad and go to Run as → Java Application).
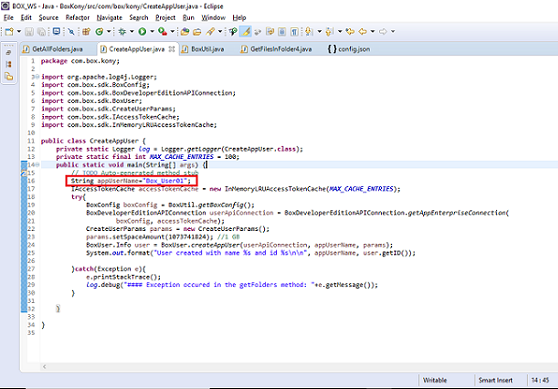
- The created app user is assigned to the user variable and the user ID can be accessed by the
user.getID()method.
- Open CreateAppUser.java file and provide the app User Name created in the previous step against the variable app User ID.
- Provide the parent folder ID (this defaults to 0, which means it is the root folder in this case).
- Provide a preferable folder name to the variable folder Name and execute the main method (Right-click on the editor pad and go to Run as → Java Application).
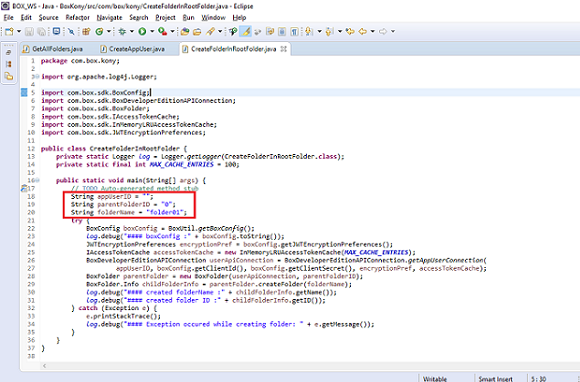
- The newly created folder info will be available in the childFolderInfo variable and you can access the child folder ID using the
getID()method.
Once you complete the configuration steps, you can create a JAR file from the java program. You need to upload this JAR file in the Kony Fabric app, to link the Box account methods
- In the project explorer in Eclipse, right-click BoxKony and select Export.
- In the export wizard, select JAR file from the Java drop-down and click Next.
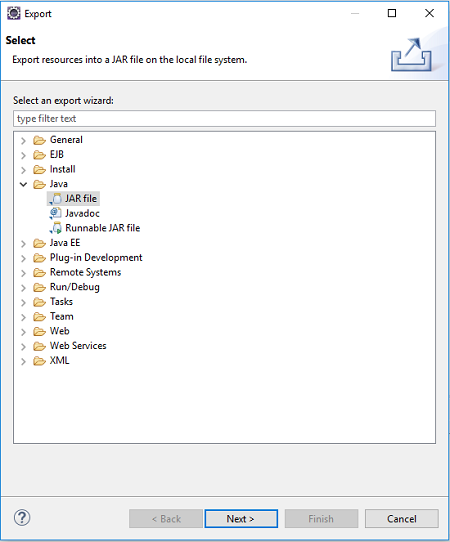
- In the next screen, deselect the parameters as shown in the following image.

- Provide a location on your machine to save the JAR file and click Finish.
Now that you have downloaded the refreshed JAR file, let us move back to Visualizer and upload the JAR file to Kony Fabric.
- In the Visualizer project explorer, select Kony Fabric.
- Move to Integration tab and select the service named BoxService.
- In the next screen that appears, delete the existing JAR and upload the one you created in the previous steps.
- Save the service by clicking on the Save button at the bottom right corner.
The Events app makes use of Google’s Map API to provide the location of the event on a map widget. The map widget requires a map key to be set up in the visualizer settings in order to view the map in an app. Follow these steps to setup a Google account:
Google Developer Account Creation and Key Generation
If you have already setup the API Key details for the mobile app, you can skip this step and directly move to Setting up the Key in the Project.
You must create a Google developer account at Google Developer Console to use the map services for the app.
- Create a project in your developer account and give it a name.
- Once the app is created, move to the APIs tab and enable Geocoding API and Maps Embed API for your project.
- Click on any of the APIs.
- Click the credentials tab.
- Create an API Key for your project. You can use this API key in the following steps.
Setting up the Key in the project
Once the key is generated from the Google developer portal, it has to be set in the appropriate service in Kony Fabric.
- In the Visualizer project explorer, select Kony Fabric.
- On the Kony Fabric console page, click Integration.
- Select the service getLatLang and then move to the getBounds operation in the service.
- Now paste the API Key generated from the Google account against the Default Value under googlePlaceAPIKey.
Build the Visualizer App
Once you complete all the set up, you need to build the app to render the desktop web app on a browser.
- Click Product->Build. The following screen appears.
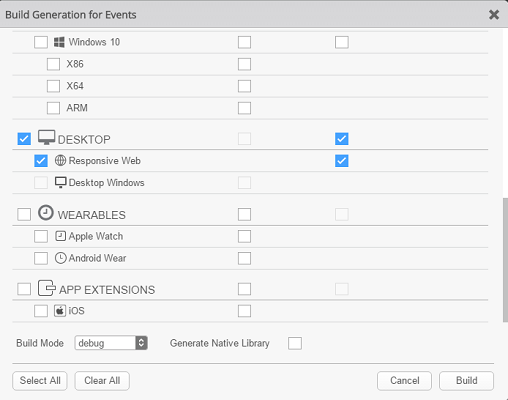
- Select the Desktop Web channel and click Build.
- Once the build is done, the Information dialog appears as shown in the image. Also, a page with the layout of the desktop web app is shown in a browser, but will not have any functionality (only UI).
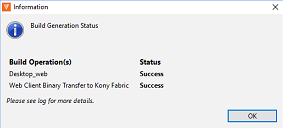
- Click OK to dismiss the dialog.
Build the Events Progressive Web App (PWA)
A Progressive Web App (PWA) is an application that feels like a native app, but is available over Web browsers. Users can access a Progressive Web App via any Web browser on a mobile device. The app is responsive and works even when the device is offline or when the device has limited network speed.
Following up closely on the Responsive Web design as part of Kony Visualizer V8 release, Kony Visualizer SP3 GA release provides you with the ability to create a Progressive Web App.
The Events app contains pre-configured PWA settings.
For more information regarding Progressive Web App refer Progressive Web App documentation.
Note: Progressive Web App feature is only available for Events app 1.1.1 and later.
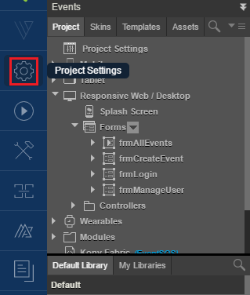
- In your Visualizer Project, click Project Settings.
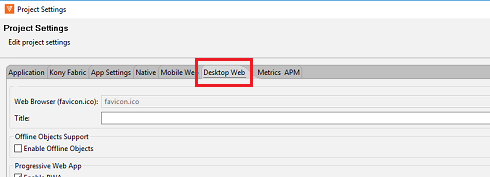
The Project Settings page opens. - Click the Desktop Web tab.
The Desktop Web contents appear. - Select Enable PWA.
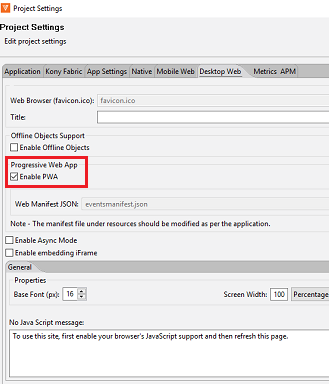
The Web Manifest JSON option is enabled. - Select Browse to add any details about the Progressive Web app with a manifest file. The file explorer opens.
- Navigate to the folder where you have stored the JSON file and select your Desktop Web manifest file. The Web Manifest JSON file contains information on the resources that are required for the Progressive Web App. The information can be the name of the app, app icons, and more.
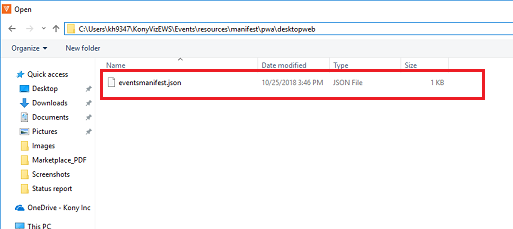
The manifest file is present in<workspace>\<projectname>\resources\manifest\pwa\desktopweb
In Events app (1.1.1), PWA is already enabled along with the respective web manifest file. - Click Finish.
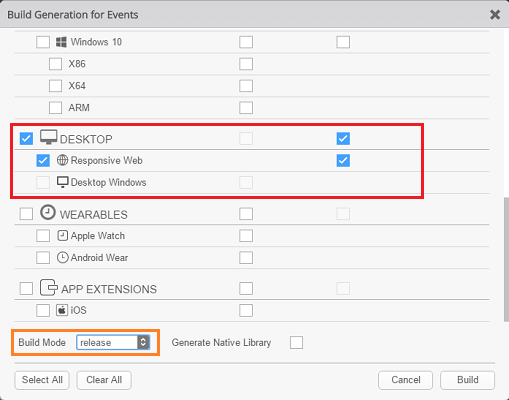
- From the Visualizer File menu, go to Product → Build.
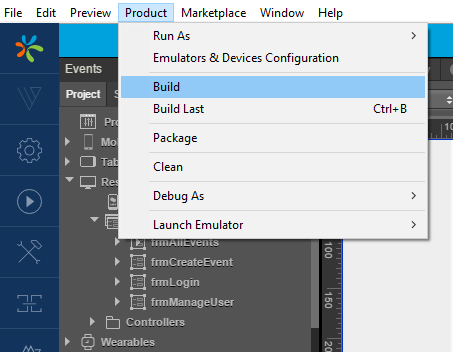
The Build page appears. - In the Desktop section, select Responsive Web and then click Build. Make sure that you set the Build mode as release.
The build process begins.
Note: Once the build is completed in the release mode, you must publish the app to your Fabric environment with HTTPS. Once you publish the app, that URL can be used to open the Progressive Web App in your browser.
You can enable Progressive Web Apps from the Responsive Web channel in Kony Visualizer. Follow these guidelines to optimize your Progressive Web Apps to achieve a better score on Google Lighthouse:
- Make sure that the first screen of the app uses the least number of resources while providing complete functionality. Try to keep the first screen as simple as possible. Remove any images or service calls that are not essential from the first screen.
- Add a Splash Screen for the Web application.
- Build the application in release mode.
- In the Web manifest file, make sure you use an image for the app icon.
-
In the Web manifest file, add a background color and a theme color to the manifest file.
- Use a Web install prompt to pin the app on the home screen of your mobile device or desktop.
- For mobile devices, add to Home screen (Web app install prompt) is displayed by the device browser if the manifest contains the app icons.
- For desktop browsers, use the beforeinstallprompt event for Chrome to display notification to the users. For more information on beforeinstallprompt and similar functionality on other browsers, click here.
- Push notifications: Web Push notifications can be enabled by using third-party Push services. For more information, refer Web Push Notifications documentation.
- Service workers: When Progressive Web is enabled, you need not register or enable the Service workers. The Web framework in Kony Visualizer helps your application in creating and registering a service worker by using the default caching mechanism.
Publishing the Visualizer App
Once the app is built, you need to publish the app to Kony Fabric.
- On the File menu, select the Publish to Kony Fabric.
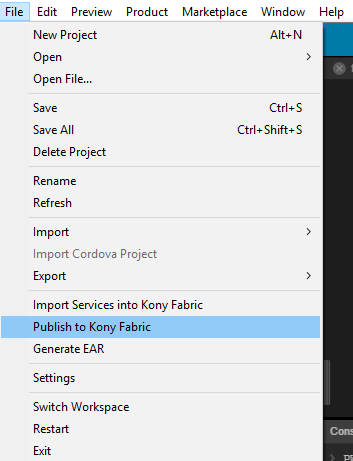
- Kony Fabric console will opens inside the context of Visualizer tool as shown in the image:
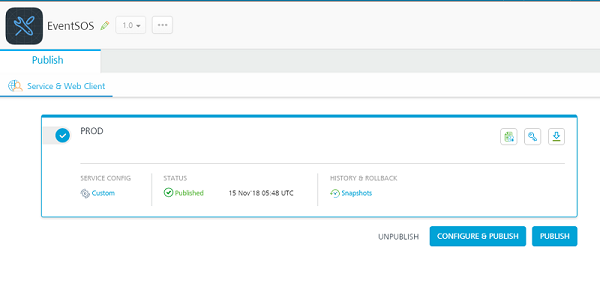
- Select an environment and click Publish button at the bottom right corner. Once you click on the same, you can see the publish in progress. The publish process may take some time.
- Once the publish is done, the following screen appears. You can use the Web Application URL shown in the following image to run your application on a browser.

Note: We will now walk you through Kony App platform capabilities and Events app feature coverage using few scenarios.