Build an iOS Application
Once you have created and configured an app’s assets, resources, and services, you compile and link them by building your app.
Prerequisites
-
This topic covers the following topics:
-
Automatically Add Required System Frameworks to the XCode Project
About App Transport Security (ATS)
As of January 2017, Apple Corp. requires that all iOS apps make use of App Transport Security (ATS), which implements the https protocol when communicating with internet resources. Introduced in iOS 9, ATS enforces secure connections between internet resources (such as the backend server) and an iOS app, ensuring that internet communications via the iOS platform conform secure connection best practices. Doing so lessens the likelihood of accidentally disclosing sensitive information either directly through an app or through a library consuming data.
Quantum Visualizer supports ATS and assumes that 1) your iOS applications make use of https, and 2) your communication through higher-level APIs is encrypted using TLS version 1.2 with forward secrecy. As a workaround to this requirement, if your app needs to make a request to an insecure domain, you have to specify this domain in your app's info.plist file.
For more information, see the Apple Developer site.
Automatically Modify info.plist with Custom Key Value Pairs
When you build an app for the iOS platform in Quantum Visualizer, Xcode generates a build properties file called info.plist. By modifying this file, you can customize the properties of the build, which are reflected in the app the next time you build it. Modifications to info.plist take priority over whatever properties are set by Quantum Visualizer.
If your app requires that the info.plist file be configured with sets of key value pairs of native SDK or custom-defined entries, you can automate this customization using a json file. The json file contains the key value pairs that you want added to info.plist, and during the building of the app, this json file is incorporated into the kar file. When the kar file is extracted, iOS incorporates the key value pairs in the json fie into info.plist.
To automatically modify info.plist with custom key value pairs, do the following:
- Create a json file with the following file name:
infoplist_configuration.json - Place the json file in the following Quantum Visualizer project folder:
<WorkspaceName>\<ProjectName>\resources\common - Edit the json file, adding the key value pairs that you want automatically incorporated into the
info.plistfile. Save the file and close it. - In Quantum Visualizer, build the app.
The json file is incorporated into the kar file. When the kar file is extracted, iOS incorporates the key value pairs in the json fie into info.plist.
Automatically Add Required System Frameworks to the XCode Project
When you use FFIs with Quantum Visualizer, if the FFI has dependencies on any system frameworks, you can add those system frameworks to your XCode project. You can do so by configuring a kony_frameworks.json file.
To add system frameworks to the XCode project, do the following:
- Navigate to the common folder in your Quantum Visualizer project. For example, <Workspace Name>/<Project Name>/resources/common
- In the folder, create a JSON file and name it kony_frameworks.json.
- Open the JSON file in any text editor.
- Add a JSON object with the key as systemframeworks and value as an array containing all the system frameworks that are dependencies for FFI’s. For example,
{
"systemframeworks" : ["AVFoundation", ”Security”, ”LocalAuthentication”]
} - In Quantum Visualizer, build the app.
The JSON file is incorporated into the KAR file. When the KAR file is extracted, system frameworks provided in the JSON is added to the XCode project.
Package Custom Perl Scripts during the Build Process
From the 202307 release, Quantum Visualizer has added support to execute custom Perl Scripts to add files to an Xcode project as part of the build process. You can add files with the following file extensions into the Xcode project:
- .h
- .m
- .swift
- .pl
- .pm (perl module files)
Follow these steps to add files to your Quantum Visualizer project through Perl Scripts:
- Navigate to the Workspace location of your project.
- Navigate to the resources > mobile > native > iPhone > raw folder.
For example, the..\Workspace\<AppName>\resources\mobile\native\iphone\rawpath.NOTE:- For the Tablet platform, navigate to the resources > tablet > native > iPad > raw folder.
- For Universal Apps, navigate to the resources > mobile/tablet > common > raw folder.
- In the raw folder, create a new folder with the name CustomBuild.
- In the CustomBuild folder, create a Perl Script file with the name CustomScripts.pl.
NOTE: Ensure that you do not change the name of the CustomBuild folder or the CustomScripts.pl file.
During the extraction of the kar file, theextract.plcommand parses the CustomScripts.pl file present in the CustomBuild folder to add files in the Xcode project. - Open the CustomScripts.pl file, and type the code to include the files that are present in the CustomBuild folder into the app binary.
NOTE: Ensure that you add the path to your Xcode project in the specified argument (
$projectFilePath_) in the CustomScripts.pl file. - Open Quantum Visualizer, and build the app by using the Build Native Local option.
NOTE: In the Build Native Local dialog box, ensure that you select the iOS option under the Mobile (or Tablet) section, and the Generate Native App option from the Post Build Action drop-down.
Quantum Visualizer generates the app binary as a .kar file.
- Navigate to the location of the kar file.
- Right-click the VMAppWithKonylib folder, and open the Terminal.
- Execute the cd gen command.
- Execute the perl extract.pl <KAR file location> command to extract the kar file.
- After the perl extraction is complete, open the project in Xcode.
Build an App
To build an app with new or different settings, do the following:
- On the Build menu, click Build and Publish Native.
- In the Build Generation dialog box, select the channels and platforms for which you want to build your app. For example, you may want to build a native type of app for Mobile (phone) devices and Tablet devices for the iOS and Android platforms. For more information about native apps, see Types of Applications.
- Select the build mode.
- Debug mode - To help you identify and fix errors, Quantum Visualizer emits the complete symbolic debug information . To lessen the amount of time necessary to complete the build, the build is not optimized for code execution, so it may tend to execute slower than a build optimized for release. Also, the inclusion of the symbolic debug information causes the final executable to be larger than a release build.
- Release mode - Quantum Visualizer optimizes the build for execution, requiring more time to generate the build. It also does not emit the complete symbolic debug information, making the final executable smaller than a debug build.
- Protected Mode - Applications built in Quantum Visualizer can use the additional security enhancements by building the application in the Protected Mode. Quantum VisualizerPlatform code for iOS and Android is equipped with mechanisms that can protect your application by detecting attacks like tampering, swizzling, debugging, jail breaking (iOS), rooting (Android), and information disclosure. Additional security mechanisms are provided through the use of White Box Cryptography to protect application business logic and source code. Application reacts to the attack by exiting upon detecting attacks to prevent further attempts.
If you choose to build an application in Protected mode, then setting the public and private keys is mandatory. To do so, go to Project Settings > Protected Mode. For more details on how to generate public and private keys, click here. - Test Mode - To help you identify and fix errors, Quantum Visualizer provides the ability to Test the application on the device or an emulator. When you build an app using the Test Mode, you can leverage the Jasmine testing framework of Quantum Visualizer to thoroughly test your app and ensure your application is errors free. You can run jasmine test cases, test suites and test plans by building an app using the Test mode.
- Click Build.
IMPORTANT: If you want to build your iOS app with multiple workspaces, you must select the Support Multiple iOS Workspaces from the Build section (Edit > Preferences > Build). If this option is not checked, the workspace is replaced for every build. When this option is checked, a separate workspace is created for each application. It will reduce the time and effort required for building applications every time you switch from one application to another.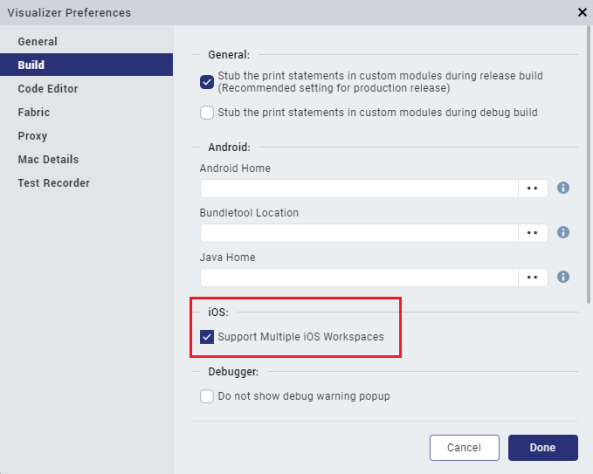
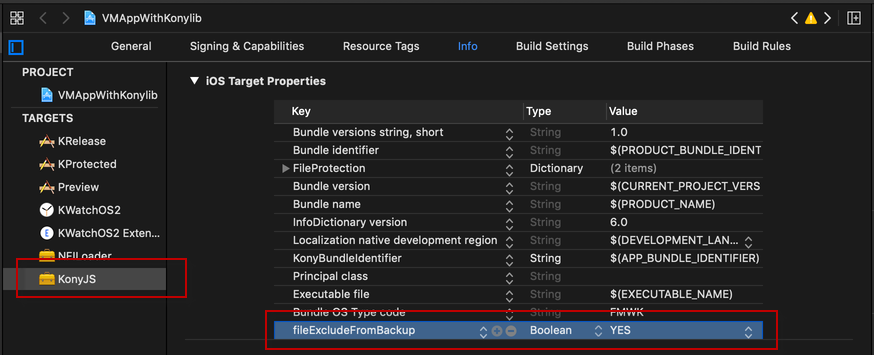
Exclude an app from iCloud backup
If you want to exclude your application from the iCloud backup, you can configure the fileExcludeFromBackup Boolean value in the info.plist file.
To exclude the app from the backup, do the following:
- In Xcode, open the project you want to exclude from backup.
- From the KonyJS folder, open info.plist.
- Add a new key fileExcludeFromBackup
- Set the type of the key to Boolean
The default value for this property is No. - Configure the value to Yes.
The application will be excluded from iCloud backups.