Policy Types
This section details about EMM supported policy types, settings for each of the policies.
Introduction
For Android, EMM policies are defined in two categories as follows:
The following table provides information on policies applicable on different platforms.
| MDM Policies | iOS | Android | Windows Phone 8.x | Windows Phone 8 | Windows 8.1 |
|---|---|---|---|---|---|
| Passcode Policy | Yes | Yes | Yes | Yes | Yes |
| Device Restrictions | Yes | Yes | Yes | Yes | Yes |
| Email and Calendar | Yes | Yes | Yes | Yes | No |
| Network | Yes | Yes | Yes | No | No |
| Certificate Distribution | Yes | Yes | Yes | No | No |
| Web Clips | Yes | No | No | No | No |
| Compliance Actions | Yes | Yes | No (Not required) | No | No |
| Public Apps | Yes | Yes | Yes | No | No |
| Others | Yes | No | No | No | No |
Stock Android Policies
Stock Android policies are available by default in EMM. The Stock Android policies can be created for all device sets, and can be applied to Android devices.
SAFE Policies
Samsung For Enterprise (SAFE) is an inbuilt software feature provided by Samsung for devices it manufactures. Samsung devices enabled with SAFE are targeted to meet specific enterprise level management and security benchmarks.
Users can access these features on SAFE devices:
- Enhanced support for Microsoft Exchange ActiveSync
- VPN connectivity
- On-device encryption using the 256-bit Advanced Encryption Standard
- Mobile Device Management (MDM) component
SAFE is an extension of the device capabilities that are handled the same way as in Kony EMM.
In case of SAFE even if control is removed, SAFE licenses and polices remain active on the device. The user must also delete enterprise store to remove SAFE license on the device. Even after the Enterprise Store is deleted, some settings will remain on the device, such as:
- SAFE exchange email policy
- APN Settings
- VPN settings
- Certificates
Once a SAFE license is accepted on a device, the license cannot be revoked from the server:
- To remove a SAFE larcenist user must delete enterprise store.
- To remove SAFE policies, a device must be enterprise wiped.
- For any residual actions that were performed on a device through Device Details, enterprise store needs to be removed.
SAFE Compliant Devices
EMM supports SAFE devices from Android OS V 4.2+ (SAFE Version 4.0 and later)
The following devices are supported with SAFE:
- Galaxy Note 3
- Galaxy Note 4
- Galaxy S4
- Galaxy Note 10.1 2014 Edition
- Galaxy Note 8
- Galaxy Tab 3 10.1
- Galaxy Note 2
- Galaxy S3
- Galaxy Note 10.1
For an updated list of devices supported with SAFE, refer to the Samsung site.
SAFE License
A license activates SAFE on a device. SAFE license activation occurs when a SAFE device with MDM Version >=4.0 or later is enrolled.
In order to implement SAFE (for Samsung Android 4.2) in EMM, the following necessary configurations need to be done in the EMM console. You can specify details for the following policy types:
- Passcode Policy
- Device Restrictions Policy
- Email and Calendar Policy
- Network Policy
- Certificate Distribution Policy
- Webclips Policy
- Public App Policy
- Compliance Actions Policy
- Others Policy
Passcode Policy
The primary purpose of the Passcode policy is to authenticate users and ensure data safety. Based on business rules, the Passcode policy is defined for all the supporting platforms.
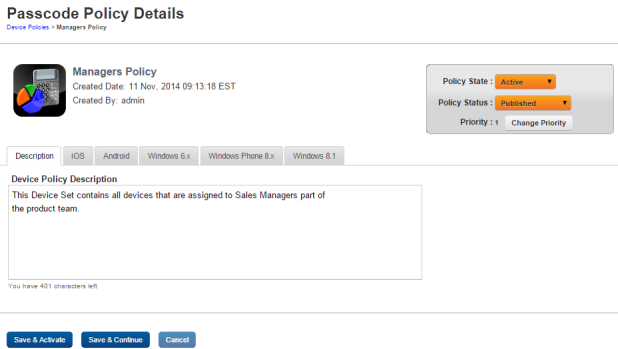
You can set passcode priorities for the following operating systems.
- Set Passcode Policy for iOS
- Set Passcode Policy for Android
- Set Passcode Policy for Windows 6.x
- Set Passcode Policy for Windows Phone 8.x
- Set Passcode Policy for Windows 8.1
Set Passcode Policy for iOS
-
To set passcode policy for iOS, fill the following fields:
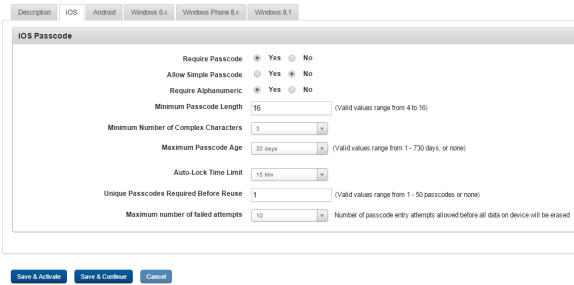
- Require Passcode: By default, this option is set to No. You can modify it to Yes. If this option is set to No, then no device passcode is required.
If you select Yes, the remaining fields become active. You can enter details and select the options for the following fields.
- Allow Simple Passcode: By default, this option is set to Yes. You can modify it to No. If you select No, then Minimum Number of Complex Characters field is activated.
Select the required number of complex characters from the drop-down list.
- Require Alphanumeric: By default, this option is set to No. You can modify it to Yes.
This setting requires that a password contain numeric and non-numeric characters.
- Minimum Passcode Length: Set the passcode length. The passcode length can be between four to 16 characters.
- Minimum Number of Complex Characters: Set the minimum number of complex characters limit. You can set the limit upto 3.
- Maximum Passcode Age: Select the maximum passcode age from the drop-down list. The default value is 30 days, which you can modify up to 730 days.
- Auto-lock Time Limit: Select the appropriate auto-lock time limit from the drop-down list.
This field specifies the period (in minutes) for which an auto-lock time limit is enforced.
- Unique Passcodes Required before Reuse: This security setting defines the number of times a passcode can be reused. Select the required value from the drop-down list.
- Maximum number of failed attempts: Select the limit for invalid password attempts from the drop-down list.
If the limit is crossed, the OS automatically does a factory reset of the device. As this is not communicated to the EMM server, the status remains as enrolled. The device cannot be enrolled with any other user unless the status is changed manually by issuing a wipe command to the device. The same user can re-enroll the device.
- Require Passcode: By default, this option is set to No. You can modify it to Yes. If this option is set to No, then no device passcode is required.
- Click the Save and Continue button to save the data and stay on the same page to update other details immediately.
-
Click the Save and Activate button to save the data and exit the window. The updated policy details appear in the list view.
Click the Cancel button to close the window.
Important: For iOS devices, the passcode policy is in sync with the carrier time. If the device is not synced with NTP, someone could tamper with the device's date and time. This would affect the passcode enforcement as there could be a difference between device time and carrier time.
Set Passcode Policy for Android
- To set passcode policy for Android, complete these fields:
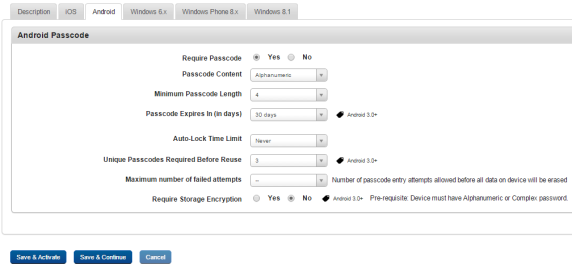
- Require Passcode: By default, this option is set to Yes. You can modify it to No.
- Passcode Content: Based on the selected option from the dropdown list, required entry fields are displayed. If you select the option as numeric, alphanumeric, or alphabetic then Minimum Passcode length field is displayed. Select the required minimum passcode length from the drop-down list.
If you select the option as Complex from the dropdown list, following fields supporting complex passcode appears. Select appropriate options:
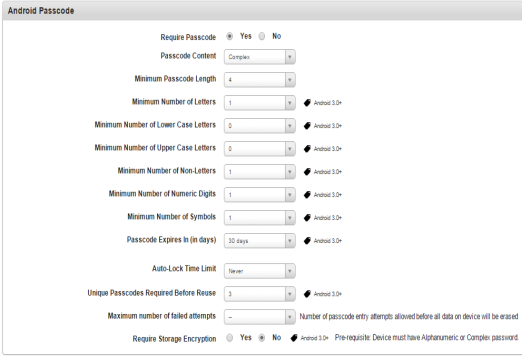
- Minimum Passcode Length: Select the minimum passcode length to define a complex passcode from the drop-down list.
- Minimum Number of Letters: Select the minimum number of letters to define a complex passcode from the drop-down list.
- Minimum Number of Lowercase Letters: Select the minimum number of lowercase letters to define a complex passcode from the drop-down list.
- Minimum Number of Uppercase Letters: Select the minimum number of uppercase letters to define a complex passcode from the drop-down list.
- Minimum Number of Non-Letters: Select the minimum number of non- letters to define a complex passcode from the drop-down list.
- Minimum Number of Numeric Digits: Select the minimum number of numeric digits to define a complex passcode from the drop-down list.
- Minimum Number of Symbols: Select the minimum number of symbols to define a complex passcode from the drop-down list.
- Passcode Expires In (in Days): Select the number of days to define maximum passcode age from the drop-down list.
- Auto-lock Time Limit: Select the time limit (in minutes) to define maximum passcode age from the dropdown list. This field specifies the period (in minutes) for which an auto-lock time limit is enforced.
- Unique Passcode required Before Reuse: This security setting defines the number of times a password can be reused. Select the required value from the drop-down list.
- Maximum number of failed attempts: Select the limit for invalid password attempts from the drop-down list.
- Require Storage Encryption: By default, this option is set to No. You can modify it to Yes. Storage encryption is the conversion of data into a coded form to secure data.
- Click the Save and Activate button to save the data and exit the window. The updated policy details appear in the list view.
- Click the Save and Continue button to stay on the same page and perform other updates on policy.
Important: The Sony Ericsson ST15i AOS 4.0.4 and the HTC Sense (Android 4.0.3 Platform only) cannot handle complex passcode settings.
If a user tries to set a complex passcode policy on the Sony Ericsson ST15i AOS 4.0.4, a "Settings has stopped" message will be displayed.
If a user tries to set a complex passcode policy on the HTC Sense, the device will only display a numeric keypad.
Set Passcode Policy for Windows 6.x
- To set passcode policy for Windows 6.x, follow these steps:
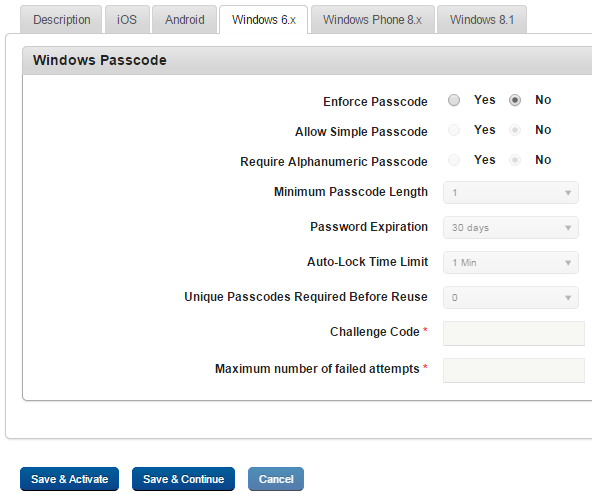
- Enforce Passcode: By default, this option is set to No. You can modify it to Yes. If you select the option as Yes, all the remaining fields become active, and you can enter details and select the options.
- Allow Simple Passcode: By default, this option is set to No. You can modify it to Yes.
- Require Alphanumeric Passcode: By default, this option is set to No. You can modify it to Yes.
- Minimum Passcode Length: Select the minimum number from the drop-down list. By default, it is set to six.
- Password Expiration: Select the number of days for passcode life time from the drop-down menu. By default, it is set to 30 days.
- Auto Lock Time Limit: Select the auto-lock time limit from the drop-down menu. By default, it is set to 1 minute.
After the time passes, the account becomes locked.
- Unique Passcode Required Before Reuse: Select the limit for Passcode reuse from the drop-down menu.
- Challenge Code: Enter the unique Challenge Code to access the application after failed log in attempts in the text field. This security setting ensures that after a certain number of failed flocking attempts, system prompts the user to enter the Challenge code to access the application. If the user fails to enter the challenge code, then application is locked.
- Maximum Number of Failed Attempts: Enter the limit for password attempts. If the limit is crossed, the OS automatically does a factory reset of the device. As this is not communicated to the EMM server, the status remains as enrolled. The device cannot be enrolled with any other user unless the status is changed manually by issuing a wipe command to the device. The same user can re-enroll the device.
- Click the Save and Activate button to save the data and exit the window. The updated policy details appear in the list view.
- Click the Save and Continue button to stay on the same page and perform other updates on policy.
Click the Cancel button to close the window.
Set Passcode Policy for Windows Phone 8.x
- To set passcode policy for Windows 8, follow these steps:
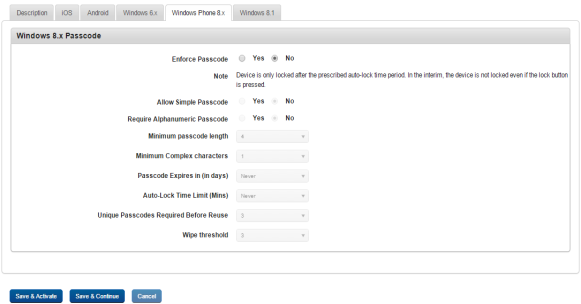
- Enforce Passcode: By default, this option is set to No. You can modify it to Yes. If you select the option as Yes, all the remaining fields become active, and you can enter details and select the options.
- Allow Simple Passcode: By default, this option is set to No. You can modify it to Yes.
- Require Alphanumeric Passcode: By default, this option is set to No. You can modify it to Yes.
- Minimum Passcode Length: Select the minimum passcode length from the drop-down list.
- Password Expiration in Days: Enter the number of days after that passcode expires.
- Maximum Auto Lock Time Limit (mins): Enter the maximum auto-lock time limit in the text field.
- Unique Passcode Required Before Reuse: Enter the number of times a passcode can be reused.
- Wipe Threshold: Enter the limit for invalid password attempts in the text field.
If the limit is crossed, the OS automatically does a factory reset of the device. As this is not communicated to the EMM server, the status remains as enrolled. The device cannot be enrolled with any other user unless the status is changed manually by issuing a wipe command to the device. The same user can re-enroll the device.
- Click the Save and Activate button to save the data and exit the window. The updated policy details appear in the list view.
- Click the Save and Continue button to stay on the same page and perform other updates on policy.
Click the Cancel button to close the window.
Set Passcode Policy for Windows 8.1
- To set the passcode policy for Windows 8.1, follow these steps:
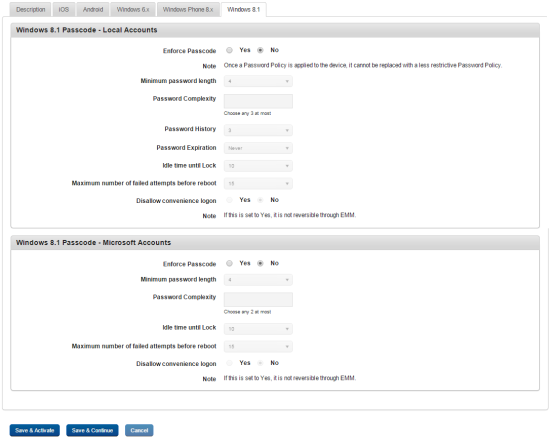
Windows 8.1 Passcode - Local Accounts
- Enforce Passcode: By default, this option is set to No. You can modify it to Yes. If you select the option as Yes, all remaining fields become active. You can enter details and select the options.
- Minimum password length: Set the minimum length of the password from the drop-down list.
- Password History: Select the password history from the drop-down list.
- Password Expiration: Enter the number of days until the passcode expires.
- Idle time until Lock: Enter the number of days until the passcode expires.
- Maximum number of failed attempts before reboot: Set the maximum number of attempts a user can make before rebooting the device.
Windows 8.1 Passcode - Microsoft Accounts
- Enforce Passcode: By default, this option is set to No. You can modify it to Yes. If you select the option as Yes, all remaining fields become active. You can enter details and select the options.
- Minimum Passcode Length: Select the minimum passcode length from the drop-down list.
- Idle time until Lock: Enter the number of days after that passcode expires.
- Maximum number of failed attempts before reboot: Set the maximum number of attempts a user can make before rebooting the device.
- Click the Save and Activate button to save the data and exit the window. The updated policy details appear in the list view.
- Click the Save and Continue button to stay on the same page and perform other updates on policy.
Click the Cancel button to close the window.
Device Restrictions Policy
The primary purpose of the Device Restriction policy is to control approved devices to protect the device data and restrict unapproved features and applications.
You can set device restrictions policies for the following operating systems.
- Set Device Restriction Policy for iOS
- Set Device Restriction Policy for Android
- Device Restriction Policy for Windows 6.x
- Device Restriction Policy for Windows Phone 8.x
- Device Restriction Policy for Windows 8.1
Set Device Restriction Policy for iOS
- To set device restrictions policy for iOS, complete the following fields:
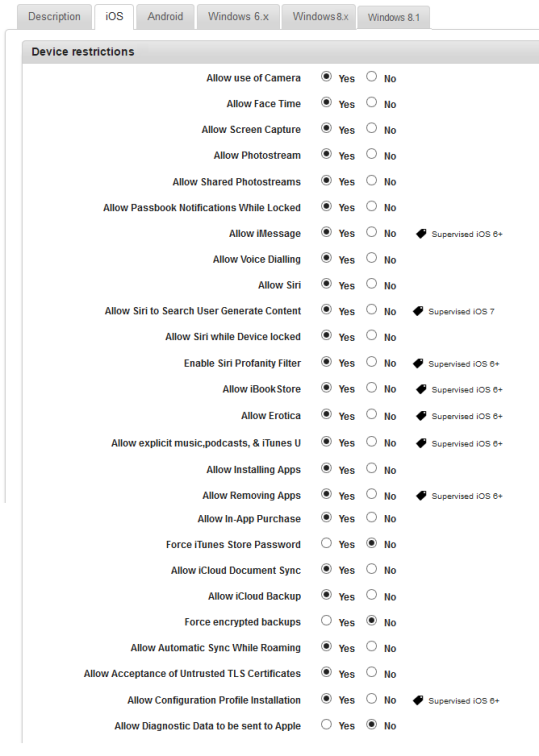
- Allow use of Camera: By default, this option is set to Yes to enable you to use the camera. You can modify it to No.
This functionality enables you to use camera.
- Allow FaceTime: By default, this option is set to Yes. You can modify it to No.
FaceTime is a video chat application for supported mobile devices. Camera use must be enabled.
- Allow Screen Capture: By default, this option is set to Yes. You can modify it to No.
Configures the screen capture feature. Setting this to no will disable the screen capture feature.
- Allow Photostream: By default, this option is set to Yes. You can modify it to No.
Controls the Photo stream feature. Configuring this to no will disable the Photo stream feature.
- Allow Shared Photostreams: By default, this option is set to Yes. You can modify it to No.
Controls the Shared Photo stream feature. Configuring this to no will disable the Shared Photo stream feature.
- Allow Passbook Notifications While Locked: By default, this option is set to Yes. You can modify it to No.
Controls the Passbook notifications. Configuring this to no will disable displaying Passbook notifications while the device is locked.
- Allow iMessage: By default, this option is set to Yes. You can modify it to No.
Controls the iMessage feature. Configuring this to no will disable the iMessage feature.
- Allow Voice Dialing: By default, this option is set to Yes. You can modify it to No.
Controls the Voice Dialing feature. Configuring this to no will disable dialing a phone number through voice commands.
- Allow Siri: By default, this option is set to Yes. You can modify to No.
Controls the Siri feature. Configuring this to no will disable the Siri feature.
- Allow Siri to Search User Generate Content: By default, this option is set to Yes. You can modify to No.
Controls the Siri feature. Configuring this to yes will allow Siri to search the user generated content and include those in the search results. You need the Allow Siri feature enabled for this feature to work.
- Allow Siri While Device Locked: By default, this option is set to Yes. You can modify it to No.
Controls the Siri feature. Configuring this to yes will allow Siri to activate even when the phone is locked. You need the Allow Siri feature enabled for this feature to work.
- Enable Siri Profanity Filter: By default, this option is set to Yes. You can modify to No.
Controls the Siri feature. Configuring this to yes will allow Siri to filter any cuss words used in the voice commands. You need the Allow Siri feature enabled for this feature to work.
- Allow iBooks Store: By default, this option is set to Yes. You can modify to No.
This feature allows access to iBooks app. This app enables you to access online books library and download them.
- Allow Erotica: By default, this option is set to Yes. You can modify it to No.
This feature controls the adult literature and art on the device. If configured to No, all songs, videos, and images that contain adult material are not displayed on the device through Safari browsing and AppStore results.
- Allow Explicit Music, Podcasts & iTunes U: By default, this option is set to Yes. You can modify it to No.
This feature controls the adult literature and art on the device. If configured to No, all adult content in Podcasts, iBooks, and iTunes Store is hidden from the search results.
- Allow Installing Apps: By default, this option is set to Yes. You can modify it to No.
Controls user’s ability to install apps on the device. If configured to No, users cannot install apps on the device. Further, you will not be able to upgrade the installed Enterprise store.
- Allow Removing Apps: By default, this option is set to Yes. You can modify it to No.
Controls user’s ability to remove apps on the device. If configured to No, users cannot remove apps on the device.
- Allow in-App Purchase: By default, this option is set to Yes. You can modify it to No.
Controls user’s ability to make In-App purchases for apps on the device. If configured to No, users cannot make any purchases within apps on the device.
- Force iTunes Store Password: By default, this option is set to Yes. You can modify it to No.
This feature restricts the access to iTunes Store and a user needs to provide credentials before accessing the store.
- Allow iCloud Document Sync:By default, this option is set to Yes. You can modify it to No.
This feature restricts synching documents on iCloud. If configured to Yes, all documents are synched with the user’s iCloud account.
- Allow iCloud Backup: By default, this option is set to Yes. You can modify it to No.
This feature controls the iCloud Backup. If configured to Yes, all the data will be backed up on iCloud. The default storage capacity on iCloud is 5GB. If your data exceeds 5 GB, you may have to buy additional storage space.
- Force Encrypted Backups: By default, this option is set to No. You can modify it to Yes.
This feature controls forced backups on devices. Under Force Encrypted Backups, all backups for an iOS device enrolled in MDM be encrypted.
- Allow Automatic Sync While Roaming: By default, this option is set to Yes. You can modify it to No.
This feature enables a cellular device’s automatic sync of apps (like mail, calendar or contacts) while device is in roaming. If turned off, user might need to manually sync the apps.
- Allow Acceptance of Untrusted TLS Certificates By default, this option is set to Yes. You can modify it to No.
This feature controls accepting untrusted TLS certificates. If configured to Yes, the device will accept untrusted TLS certificates. Transport Layer Security (TLS) is a cryptographic protocol that provides communication security over the Internet.
- Allow Configuration Profile Installation: By default, this option is set to Yes. You can modify it to No.
This feature controls installing profiles on the device. If configured to Yes, configuration profiles can be installed on the device.
- Allow Diagnostic Data to be sent to Apple: By default, this option is set to Yes. You can modify it to No.
This feature controls data to be sent to Apple. If configured to No, diagnostic data will not be shared with Apple.
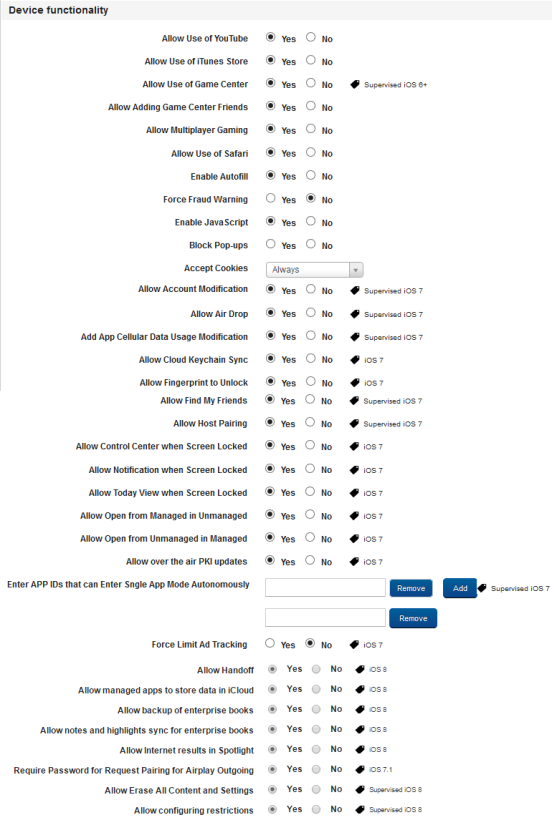
- Allow Use of You Tube: By default, this option is set to Yes. You can modify it to No.
This feature controls the YouTube application on the device. If configured to No, the YouTube app will not work on the device.
- Allow Use of iTunes Store: By default, this option is set to Yes. You can modify to No.
This feature controls the iTunes Store application on the device. If configured to No, the iTunes Store app will not work on the device
- Allow Use of Games Center: By default, this option is set to Yes. You can modify it to No.
This feature controls the Game Centre application on the device. If configured to No, the Game Centre app will not work on the device. Game Center is an app that allows creating an online persona, playing online games, and interacting with other players anonymously through their alias.
- Allow Adding Game Center Friends: By default, this option is set to Yes. You can modify it to No.
This feature controls the Game Center application on the device. If configured to No, the Game Centre app will not allow you to add friends in it.
- Allow Multiplayer Gaming: By default, this option is set to Yes. You can modify it to No.
This feature controls the Game Center application on the device. If configured to No, the Game Centre app will not allow Multiplayer gaming work on the device.
- Allow Use of Safari: By default, this option is set to Yes. You can modify it to No.
This feature controls the Safari application on the device. If configured to No, the Safari app will not work on the device.
- Enable Autofill: By default, this option is set to Yes. You can modify to No.
This feature controls the Autofill feature on the device. If configured to Yes, the Autofill feature will store your details to fill forms and will offer to provide that data automatically when you visit the login page of saved details again.
- Force Fraud Warning: By default, this option is set to No. You can modify to Yes.
This feature controls the Fraud waring feature in the Safari application on the device. If configured to Yes, Safari app will warn you about a fraud site if the site is a malicious site. The fraud warning feature adds a small level of protection against a possible phishing attacks.
- Enable JavaScript: By default, this option is set to Yes. You can modify to No.
This feature controls the JavaScript feature on the device. If configured to Yes, the Safari app will allow JavaScripts to run on websites.
- Block Pop-ups: By default, this option is set to No. You can modify it to Yes.
This feature controls the Pop-ups feature in the Safari App. If configured to Yes, the Safari app will block all pop-ups from any website.
- Accept Cookies: By default, this option is set to Yes. You can modify it to No.
This feature controls the cookies feature in the Safari App. If configured to Yes, the Safari app will accept cookies from the websites it visits.
Allow Account Modification: By default, this option is set to Yes. You can modify it to No.
Applies to a Supervised Device. If Allowed, lets users to modify the device account.
Allow Air Drop: By default, this option is set to Yes. You can modify it to No.
This feature controls the Air Drop feature. Air Drop enables the transfer of files among supported Macintosh computers and iOS devices over Wi-Fi and Bluetooth, without using mail or a mass storage device.
Add App Cellular Data Usage Modification: By default, this option is set to Yes. You can modify it to No.
Applies to a Supervised Device. If permitted, let users manage which app could use cellular data.
Allow Cloud Keychain Sync: By default, this option is set to Yes. You can modify it to No.
This feature controls the Keychain feature. If configured to Yes, the device will sync Keychain data with your cloud account.
Allow Fingerprint to Unlock: By default, this option is set to Yes. You can modify it to No.
This feature controls unlocking the device. If configured to Yes, the fingerprint reader will be allowed to read your fingerprint to unlock the device.
Allow Find My Friends: By default, this option is set to Yes. You can modify it to No.
This feature controls the Find My Friends app on the device. If configured to No, the Find My Friends app will not work on the device.
Allow Host Pairing: By default, this option is set to Yes. You can modify it to No.
Applies to Supervised Device. If Allowed, a Device can pair to any Host Computer. If Disallowed, Device can pair only with the supervising Host.
Allow Control Center when Screen Locked: By default, this option is set to Yes. You can modify it to No.
This feature controls the Control Center on the device. I configured to No, the control center will not be accessible when the screen is locked.
Allow Notification when Screen Locked: By default, this option is set to Yes. You can modify it to No.
This feature controls notifications on the device. If configured to No, notifications will not be pushed when the screen is locked.
Allow Today View when Screen Locked: By default, this option is set to Yes. You can modify it to No.
If allowed, enables the Today View in Notification Center on the Lock Screen.
Allow Open from Managed to Unmanaged: By default, this option is set to No. You can modify it to Yes.
If allowed, Documents from Managed Apps and accounts can be opened in Unmanaged apps and accounts. If not allowed, documents from managed apps and accounts can be opened only in other managed apps and accounts.
- Allow Open from Unmanaged to Managed: By default, this option is set to No. You can modify it to Yes.
If allowed, Documents from Unmanaged Apps and Accounts can be opened in Managed Apps and Accounts. If not allowed, documents from unmanaged apps and accounts can be opened only in other unmanaged apps and accounts
Allow over the air PKI updates: By default, this option is set to Yes. You can modify it to No.
If Allowed, allows over the Air PKI updates (primarily for root certificates). Useful in case of having certificates for mobile environments.
- Enter APP IDs that can Enter Single App Mode Autonomously: By default, this option is set to Yes. You can modify it to No.
App Bundle IDs which are permitted to enter Single App Mode Autonomously. Apps configured here can enter into Single App Mode as per the coded trigger / behavior.
Force Limit Ad Tracking: By default, this option is set to No. You can modify it to Yes.
If forced, enables Limit Ad Tracking (Advertisement) setting.
- Allow Handoff: By default, this option is set to Yes. You can modify it to No.
If Yes, Allows Handoff feature. If No, user handoff will be disabled on the device
- Allow managed apps to store data in iCloud: By default, this option is set to Yes. You can modify it to No.
This feature controls data storage on iCloud. If configured to Yes, data from managed apps will be allowed to store data on iCloud.
Allow backup of enterprise books: By default, this option is set to Yes. You can modify it to No.
This feature controls enterprise books backup on iCloud. If configured to Yes, enterprise books will be allowed to store data on iCloud.
Allow notes and highlights sync for enterprise books: By default, this option is set to Yes. You can modify it to No.
This feature controls synching notes and highlights of enterprise books in iCloud. If configured to Yes, enterprise books will be allowed to store notes and highlights on iCloud.
Allow Internet results in Spotlight: By default, this option is set to Yes. You can modify it to No.
This feature controls the internet results in the Spotlight search feature on the device. If configured to Yes, when you search in the spotlight, internet results will also display in the results.
Require Password for Request Pairing for Airplay Outgoing: By default, this option is set to Yes. You can modify it to No.
This feature controls Airplay settings. If configured to Yes, all outgoing Airplay pairing requests will require password.
Allow Erase All Content and Settings: By default, this option is set to Yes. You can modify it to No.
This feature controls erasing content and settings. If configured to No, the user will not be able to use the Erase All Content and Settings feature on the device.
Allow configuring restrictions: By default, this option is set to Yes. You can modify it to No.
Applies to Supervised Device. If Allowed, user can set a password (different password than device password) to restrict the device. Primarily for parental controls.
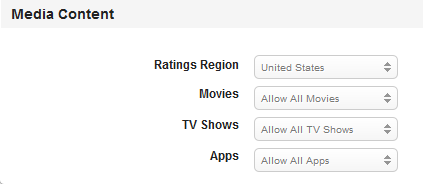
- Ratings Region: Select the required region from the drop-down menu. By default, it is set to United States.
This feature controls the region for media content rating.
- Movies: Select the desired movie from the drop-down menu. By default, it is set to Allow All Movies.
This feature controls the movies that are allowed on the device based on their rating.
- TV Shows: Select the desired TV shows from the drop-down menu. By default, it is set to Allow All TV Shows.
This feature controls the TV shows that are allowed on the device based on their rating.
- Apps: Select the desired apps from the drop-down menu. By default, it is set to Allow All Apps.
This feature controls the Apps that are allowed on the device based on their rating.
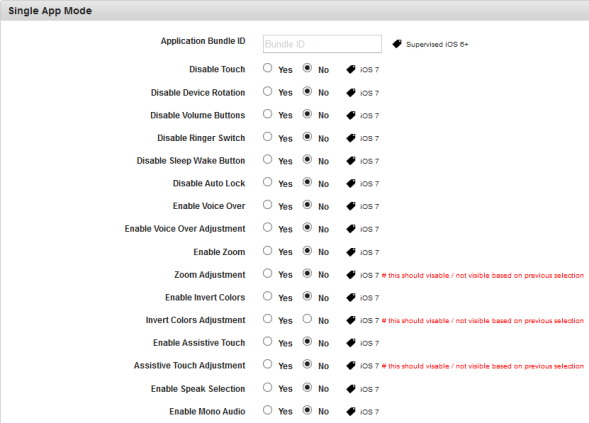
- Application Bundle ID: Enter the application bundle ID.
Enter the application bundle ID for which you want to configure the features further below.
Disable Touch: By default, this option is set to No. You can modify it to Yes.
This feature controls the touch feature. If configured to Yes, the touch feature will be disabled on the device.
Disable Device Rotation: By default, this option is set to No. You can modify it to Yes.
This feature controls the device rotation feature. If configured to Yes, the device rotation feature will be disabled on the device.
Disable Volume Buttons: By default, this option is set to No. You can modify it to Yes.
This feature controls the volume buttons feature. If configured to Yes, volume buttons feature will be disabled on the device.
Disable Ringer Switch: By default, this option is set to No. You can modify it to Yes.
This feature controls the ringer switch feature. If configured to Yes, the ringer switch feature will be disabled on the device.
Disable Sleep Wake Button: By default, this option is set to No. You can modify it to Yes.
This feature controls the sleep wake button feature. If configured to Yes, the sleep wake button feature will be disabled on the device.
Disable Auto Lock: By default, this option is set to No. You can modify it to Yes.
This feature controls the auto lock feature. If configured to Yes, the auto lock feature will be disabled on the device.
Enable Voice Over: By default, this option is set to No. You can modify it to Yes.
This feature controls the voice over feature. If configured to Yes, the voice over feature will be disabled on the device.
Enable Voice Over Adjustment: By default, this option is set to No. You can modify it to Yes.
Enable Zoom: By default, this option is set to No. You can modify it to Yes.
This feature controls the zoom feature. If configured to No, the zoom feature will be disabled on the device.
Zoom Adjustment: By default, this option is set to No. You can modify it to Yes.
Enable Invert Colors: By default, this option is set to No. You can modify it to Yes.
This feature controls the invert colors feature. If configured to Yes, the colors will be inverted in the screen on the device.
Invert Colors Adjustment: By default, this option is set to No. You can modify it to Yes.
Enable Assistive Touch: By default, this option is set to No. You can modify it to Yes.
This feature controls the assistive touch feature. If configured to Yes, the assistive touch feature will be disabled on the device.
Assistive Touch Adjustment: By default, this option is set to No. You can modify it to Yes.
Enable Speak Selection: By default, this option is set to No. You can modify it to Yes.
This feature controls the speak selection feature. If configured to Yes, the speak selection feature will be disabled on the device.
Enable Mono Audio: By default, this option is set to No. You can modify it to Yes.
This feature controls the mono audio feature. If configured to Yes, the mono audio feature will be enabled on the on the device.
- Allow use of Camera: By default, this option is set to Yes to enable you to use the camera. You can modify it to No.
- Click the Save and Activate button to save the data and exit the window. The updated policy details appear in the list view.
- Click the Save and Continue button to stay on the same page and perform other updates on policy.
To Remove Single App Mode from a Device (For supervised iOS 6 only)
To remove the app lock, the Administrator should modify the device restriction policy and remove the name of the assigned app. Then, Admin should send a blank field to remove the Single App Mode.
Set Device Restriction Policy for Android
-
To set device restrictions policy for Android, follow these steps:
The Android tab has the following sections:
- Device Functionality
- Browser Policy
- Restrictions Policy
- Roaming
- Phone Restrictions
- Date Time
- Location
- App Restrictions
- Stats Capture
- Security
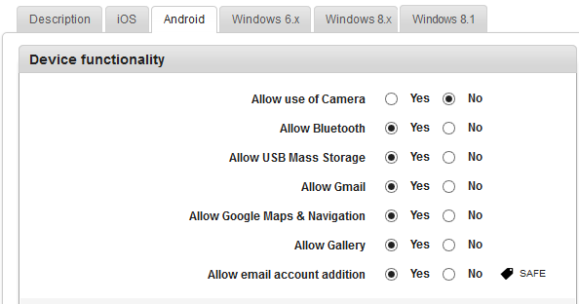
- Allow Use of Camera: By default, this option is set to Yes. You can modify it to No.
This feature controls the usage of camera on the device. If configured to No, the camera will not function on the device.
-
Allow Bluetooth: By default, this option is set to Yes. You can modify it to No.
This feature controls the usage of Bluetooth on the device. If configured to No, the Bluetooth will not function on the device.
- Allow USB Mass Storage: By default, this option is set to Yes. You can modify it to No.
- Allow Gmail: By default, this option is set to Yes. You can modify it to No.
This feature controls the usage of the Gmail app on the device. If configured to No, the Gmail app will not function on the device.
- Allow Google Maps and Navigation: By default, this option is set to Yes. You can modify it to No.
This feature controls the usage of Google Maps and navigation on the device. If configured to No, Google Maps will not function on the device.
- Allow Gallery: By default, this option is set to Yes. You can modify it to No.
This feature controls the usage of the Gallery on the device. If configured to No, the Gallery will not function on the device
-
Allow email account addition: By default, this option is set to Yes. You can modify it to No.
This feature controls adding a new email account on the device. If configured to No, the user cannot add a new email account on the device.
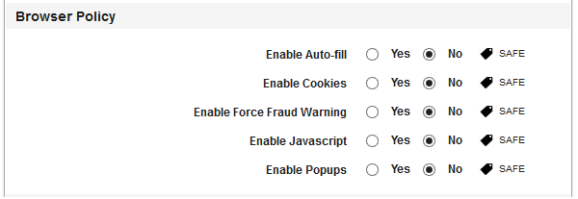
- Enable Auto-fill: By default, this option is set to No. You can modify it to Yes.
This feature controls the Autofill feature on the device. If configured to Yes, the Autofill feature will store your details to fill forms and will offer to provide that data automatically when you visit the login page of saved details again.
- Enable Cookies: By default, this option is set to No. You can modify it to Yes.
This feature controls the cookies feature in the Chrome App. If configured to Yes, the Chrome app will accept cookies from the websites it visits.
- Enable Force Fraud Warning: By default, this option is set to No. You can modify it to Yes.
This feature controls the Fraud waring feature in the Chrome app on the device. If configured to Yes, the Chrome app will warn you about a fraud site if the site is a malicious site. The fraud warning feature adds a small level of protection against a possible phishing attacks.
- Enable JavaScript: By default, this option is set to No. You can modify it to Yes.
This feature controls the JavaScript feature on the device. If configured to Yes, the Chrome app will allow JavaScripts to run on websites.
- Enable Popups: By default, this option is set to No. You can modify it to Yes.
This feature controls the Pop-ups feature in the Safari App. If configured to No, the Chrome app will block all pop-ups from any website.
- Allow Admin Control Removal: If allowed, User can Deactivate an App a Device Administrator.In EMM Mode, if user Deactivates Launchpad as Device Administrator, enrolment will be void. Also, based on compliance policy (if configured), this action might trigger a compliance violation.
- Allow Factory Reset:This feature controls the factory reset feature on the device. If configured to No, the user will not be able to reset the device to factory defaults..
- Allow Power Off: By default, this option is set to No. You can modify it to Yes.
- Allow SD Card Access: By default, this option is set to No. You can modify it to Yes.
- Allow SD Card Write: By default, this option is set to No. You can modify it to Yes.
- Allow Settings Changes: By default, this option is set to No. You can modify it to Yes.
- Allow VPN: By default, this option is set to No. You can modify it to Yes.
- Allow Wallpaper Change: By default, this option is set to No. You can modify it to Yes.
- Allow Wi-Fi: By default, this option is set to No. You can modify it to Yes.
- Allow Non-market Apps: By default, this option is set to No. You can modify it to Yes.
- Allow Background Data: By default, this option is set to No. You can modify it to Yes.
- Allow backup: By default, this option is set to No. You can modify it to Yes.
- Allow Bluetooth Tethering: By default, this option is set to No. You can modify it to Yes.
- Allow Mock Locations: By default, this option is set to No. You can modify it to Yes.
- Allow USB Debugging: By default, this option is set to No. You can modify it to Yes.
- Allow USB Tethering: By default, this option is set to No. You can modify it to Yes.
- Allow USB Media Player: By default, this option is set to No. You can modify it to Yes.
- Allow Wi-Fi Tethering: By default, this option is set to No. You can modify it to Yes.
- Allow All Tethering Interfaces: By default, this option is set to No. You can modify it to Yes.
Note: If the allow all tethering interfaces is set to No, all other tethering will not work. Wi-fi, USB, and Bluetooth tethering can be enabled only if this option is Yes.
- Allow Screen Capture: By default, this option is set to No. You can modify it to Yes.
- Allow Microphone: By default, this option is set to No. You can modify it to Yes.
- Allow Home Key: By default, this option is set to No. You can modify it to Yes.
- Allow clipboard: By default, this option is set to No. You can modify it to Yes.
- Allow Cellular Data: By default, this option is set to No. You can modify it to Yes.
- Allow NFC: By default, this option is set to No. You can modify it to Yes.
- Automatically Send Google Crash Report: By default, this option is set to No. You can modify it to Yes.
- Allow Status Bar Expansion: By default, this option is set to No. You can modify it to Yes.
- Allow Audio Recording: By default, this option is set to No. You can modify it to Yes.
- Allow Video Recording: By default, this option is set to No. You can modify it to Yes.
Note: Video Recording is blocked when Allow Audio Recording is set to No.
- Allow Killing Activities on Leave: By default, this option is set to No. You can modify it to Yes.
- Allow Android Beam: By default, this option is set to No. You can modify it to Yes.
An administrator can set this policy to block the use of Android Beam on the device. When Android Beam is disabled, the user cannot send information (for example, contacts, e-mails, and Web addresses) using Android Beam. S Beam is also disabled when Android Beam is disabled.
- Allow S Beam: By default, this option is set to No. You can modify it to Yes.
An administrator can set this policy to block the use of S Beam on the device. S Beam allows users to share content using near field communication (NFC) and Wi-Fi Direct. When S Beam is disabled, the user cannot send or receive files using S Beam.
- Allow S Voice: By default, this option is set to No. You can modify it to Yes.
An administrator can use this API to allow or disallow launching the S Voice application (Samsung personal assistant). When S Voice is disabled, the user can neither set a new wake-up command nor unlock the device by using a wake-up command set prior to disallowing S Voice. In addition, once disallowed, the administrator can no longer set a new face and voice lock screen. However, the device can still be unlocked if the lock screen had already been set prior to disallowing S Voice.
- Show Share Via List: By default, this option is set to No. You can modify it to Yes.
The Share Via List is displayed in certain applications that share data with other applications.
- Allow Stopping System Apps: By default, this option is set to No. You can modify it to Yes.
Note: An administrator can use this API to disable:
- the Force Stop button for system-signed applications on the App Info UI in Settings.
- the Stop button for the system application process on the Running App UI in Settings. - Allow Wi-Fi Direct: By default, this option is set to No. You can modify it to Yes.
An administrator can enable or disable Wi-Fi Direct without user interaction. When Wi-Fi Direct is disabled, any ongoing Wi-Fi Direct connection is interrupted, and the user cannot turn on Wi-Fi Direct.
- Allow User to Set Data Limit: By default, this option is set to No. You can modify it to Yes.
An administrator can allow or disallow a user to set the mobile data limit. When disabled, the background process limit is set to the maximum value.
- Block Installation of Non-Trusted Apps: By default, this option is set to No. You can modify it to Yes to prevent users from installing non CAcert apps.
- Allow Roaming data: By default, this option is set to No. You can modify it to Yes.
- Allow Auto-Sync While Roaming: By default, this option is set to No. You can modify it to Yes.
- Allow Roaming Voice Calls: By default, this option is set to No. You can modify it to Yes.
- Allow Push Messages While Roaming: By default, this option is set to No. You can modify it to Yes.
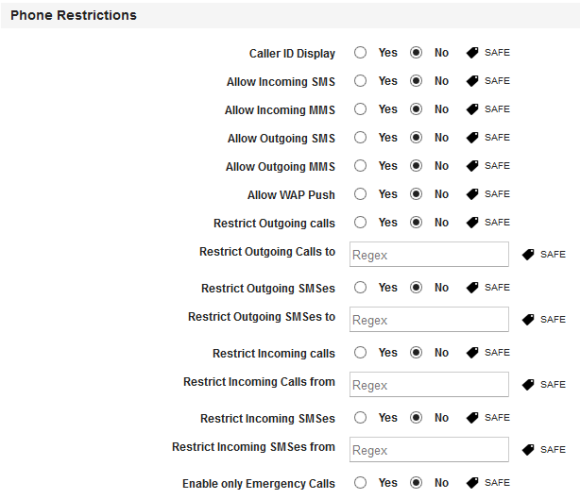
- Caller ID Display: : By default, this option is set to No. You can modify it to Yes.
- Allow Incoming SMS: By default, this option is set to No. You can modify it to Yes.
- Allow Incoming MMS: By default, this option is set to No. You can modify it to Yes.
- Allow Outgoing SMS: By default, this option is set to No. You can modify it to Yes.
- Allow Outgoing MMS: By default, this option is set to No. You can modify it to Yes.
- Allow WAP Push: By default, this option is set to No. You can modify it to Yes.
- Restrict Outgoing calls: By default, this option is set to No. You can modify it to Yes.
- Restrict Outgoing Calls to: By default, this option is set to No. You can modify it to Yes. This option is shown only if you set Yes in Restrict Outgoing calls. This field even takes the regular expression for list of all numbers to be blocked. For more information, see tool tips.
- Restrict Outgoing SMSs: By default, this option is set to No. You can modify it to Yes.
- Restrict Outgoing SMSs to: By default, this option is set to No. You can modify it to Yes.
This option is shown only if you set Yes in Restrict Outgoing SMSs. This field even takes the regular expression for a list of all numbers to be blocked. - Restrict Incoming calls: By default, this option is set to No. You can modify it to Yes.
- Restrict Incoming Calls from: By default, this option is set to No. You can modify it to Yes.
This option is shown only if you set Yes in Restrict Incoming calls. This field even takes the regular expression for a list of all numbers to be blocked. For more information, see tool tips. - Restrict Incoming SMSs: By default, this option is set to No. You can modify it to Yes.
- Restrict Incoming SMSs from: By default, this option is set to No. You can modify it to Yes.
This option is shown only if you set Yes in Restrict Incoming SMSs. This field even takes the regular expression for a list of all numbers to be blocked. - Enable only Emergency Calls: By default, this option is set to No. You can modify it to Yes.
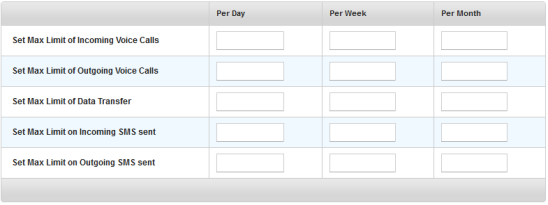
- Set Max Limit of Incoming Voice Calls: You can set three numbers for per day, per week, and per month. When no number is set, the default value “0” which means unlimited.
- Set Max Limit of Outgoing Voice Calls: You can set three numbers for per day, per week and per month. When no number is set, this is set to default value “0” that means unlimited.
- Set Max Limit of Data Transfer: You can set three numbers for per day, per week and per month. When no number is set, this is set to default value “0” that means unlimited.
- Set Max Limit on Incoming SMS sent: You can set three numbers for per day, per week and per month. When no number is set, this is set to default value “0” that means unlimited.
- Set Max Limit on Outgoing SMS sent: You can set three numbers for per day, per week and per month. When no number is set, this is set to default value “0” that means unlimited.
- Use Network Provided Date & Time: By default, this option is set to Yes. You can modify it to No.
- Allow Date Time Change: By default, this option is set to No. You can modify it to Yes.
- Require Location Always On: By default, this option is set to Yes. You can modify it to No.
- Allow GPS State Change: By default, this option is set to Yes. You can modify it to No.
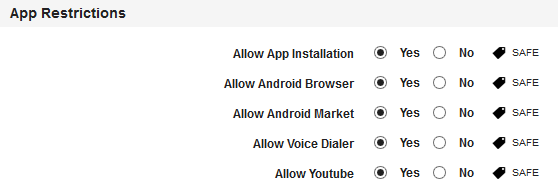
- Allow App Installation: By default, this option is set to Yes. You can modify it to No.
- Allow Android Browser: By default, this option is set to Yes. You can modify it to No.
- Allow Android Market: By default, this option is set to Yes. You can modify it to No.
- Allow Voice Dialer: By default, this option is set to Yes. You can modify it to No.
- Allow Youtube: By default, this option is set to Yes. You can modify it to No.
- Enable SMS Capture: By default, this option is set to Yes. You can modify it to No.
- Enable Call Capture: By default, this option is set to Yes. You can modify it to No.
- Encrypt External Storage: By default, this option is set to Yes. You can modify it to No.
- Click the Save and Activate button to save the data and exit the window. The updated policy details appear in the list view.
- Click the Save and Continue button to stay on the same page and perform other updates on policy.
Click the Cancel button to close the window.
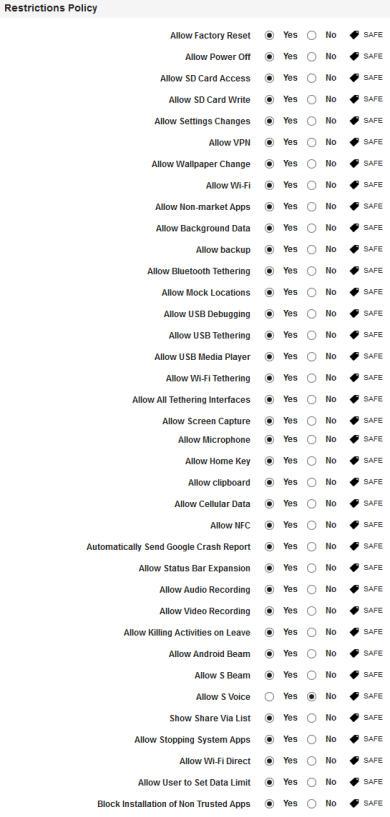





Note: If you disable Settings such as Allow Settings Changes, Allow Wi-Fi, Factory Reset, Block Installation of Non Trusted Apps, and Allow Cellular Data, the device can not communicate later on with the server (due to no network as you have disabled all the mentioned above). To avoid blocking the device from communicating with the server, ensure that you enable atleast one of the above settings.
Call restrictions Code Examples
The following section provides information on examples for call restrictions.
To restrict outgoing calls, use the following:
- To block all calls: .*
- To block phone numbers starting with +11 or 11: ^\+{0,1}11.*$
- To block phone numbers ending with 789: .*789$
- To block phone numbers not ending with 789: ^(?!.*789$).*
- To block phone numbers not containing 789: ^(?!.*789.*).*
- To block phone numbers containing 789: ^(.*789.*)
- To block all phone numbers other than 911: ^(?!911$).*
- To block all numbers except numbers like 1-123-XXX-XXXX or 1123XXXXXXX or 123-XXX-XXX or 123XXXXXX (?![1]?[\-]?123[\-]?[0-9]{3}[\-]?[0-9]{4}$).*
To restrict incoming calls, use the following:
- To block all calls: .*
- To block phone numbers starting with +11 or 11: ^\+{0,1}11.*$
- To block phone numbers ending with 789: .*789$
- To block phone numbers not ending with 789: ^(?!.*789$).*
- To block phone numbers not containing 789: ^(?!.*789.*).*
- To block phone numbers containing 789: ^(.*789.*)
- To block all numbers except numbers like 1-123-XXX-XXXX or 1123XXXXXXX or 123-XXX-XXX or 123XXXXXX (?![1]?[\-]?123[\-]?[0-9]{3}[\-]?[0-9]{4}$).*
Device Restriction Policy for Windows 6.x
- To set device restrictions policy for Windows 6.x, follow these steps:
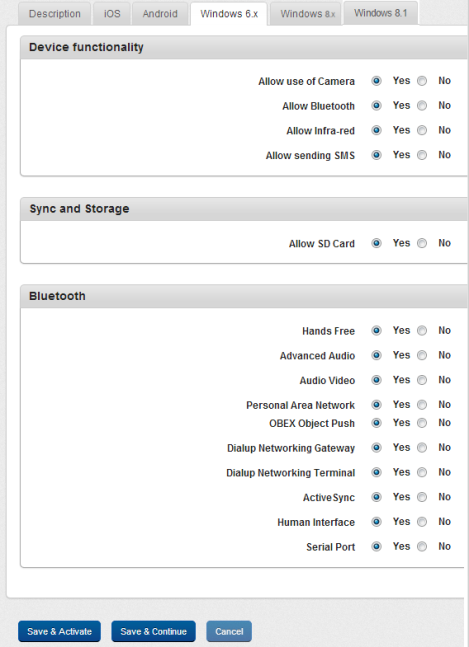
- Allow Use of Camera: By default, this option is set to Yes. You can modify it to No.
- Allow Bluetooth: By default, this option is set to Yes. You can modify it to No.
- Allow Infra-red: By default, this option is set to Yes. You can modify it to No.
- Allow Sending SMS: By default, this option is set to Yes. You can modify it to No.
- Allow SD Card: By default, this option is set to Yes. You can modify it to No.
- Hands Free: By default, this option is set to Yes. You can modify it to No.
- Advanced Audio: By default, this option is set to Yes. You can modify it to No.
- Audio Video: By default, this option is set to Yes. You can modify it to No.
- Personal Area Network: By default, this option is set to Yes. You can modify to No.
- OBEX Object Push: By default, this option is set to Yes. You can modify it to No.
OBEX Object Push is a communications protocol that facilitates the exchange of binary objects between devices.
- Dialup Networking Gateway: By default, this option is set to Yes. You can modify it to No.
- Dialup Networking Terminal: By default, this option is set to Yes. You can modify it to No.
- Active Sync: By default, this option is set to Yes. You can modify it to No.
- Human Interface: By default, this option is set to Yes. You can modify it to No.
- Serial Port: By default, this option is set to Yes. You can modify it to No.
- Click the Save and Activate button to save the data and exit the window. The updated policy details appear in the list view.
- Click the Save and Continue button to stay on the same page and perform other updates on policy.
Click the Cancel button to close the window.
Device Restriction Policy for Windows 8.x
- To set device restrictions policy for Windows 8, follow these steps:

- Disable SD Card: By default, this option is set to Yes. You can modify it to No.
- Require Encryption: By default, this option is set to Yes. You can modify it to No.
-
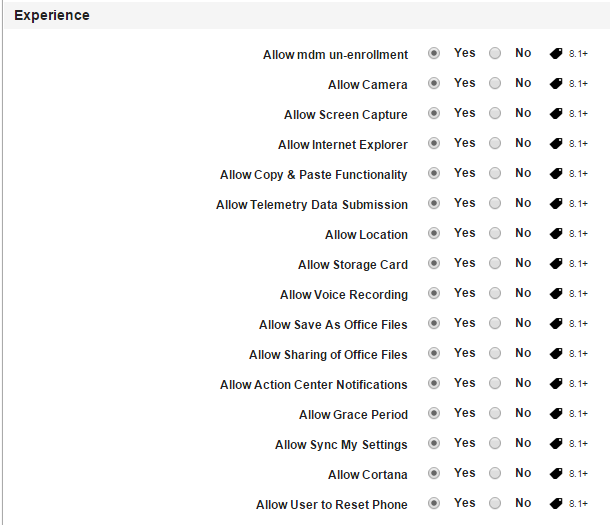
Allow mdm un-enrollment: By default, this option is set to Yes. You can modify it to No.
-
Allow Camera: By default, this option is set to Yes. You can modify it to No.
-
Allow Screen Capture: By default, this option is set to Yes. You can modify it to No.
-
Allow Internet Explorer: By default, this option is set to Yes. You can modify it to No.
-
Allow Copy & Paste Functionality: By default, this option is set to Yes. You can modify it to No.
-
Allow Telemetry Data Submission: By default, this option is set to Yes. You can modify it to No.
-
Allow Location: By default, this option is set to Yes. You can modify it to No.
-
Allow Storage Card: By default, this option is set to Yes. You can modify it to No.
-
Allow Voice Recording: By default, this option is set to Yes. You can modify it to No.
-
Allow Save As Office Files: By default, this option is set to Yes. You can modify it to No.
-
Allow Sharing of Office Files: By default, this option is set to Yes. You can modify it to No.
-
Allow Action Center Notifications: By default, this option is set to Yes. You can modify it to No.
-
Allow Grace Period: By default, this option is set to Yes. You can modify it to No.
-
Allow Sync My Settings: By default, this option is set to Yes. You can modify it to No.
-
Allow Cortana: By default, this option is set to Yes. You can modify it to No.
-
Allow User to Reset Phone: By default, this option is set to Yes. You can modify it to No.

-
Allow Microsoft Store: By default, this option is set to Yes. You can modify it to No.
-
Allow Developer Unlock (Side Loading): By default, this option is set to Yes. You can modify it to No.
-
Allow Share and Save As: By default, this option is set to Yes. You can modify it to No.
-
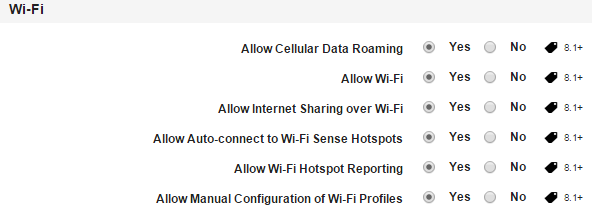
Allow Cellular Data Roaming: By default, this option is set to Yes. You can modify it to No.
-
Allow Wi-Fi: By default, this option is set to Yes. You can modify it to No.
-
Allow Internet Sharing over Wi-Fi: By default, this option is set to Yes. You can modify it to No.
-
Allow Auto-connect to Wi-Fi Sense Hotspots: By default, this option is set to Yes. You can modify it to No.
-
Allow Wi-Fi Hotspot Reporting: By default, this option is set to Yes. You can modify it to No.
-
Allow Manual Configuration of Wi-Fi Profiles: By default, this option is set to Yes. You can modify it to No.

-
Allow NFC: By default, this option is set to Yes. You can modify it to No.
-
Allow VPN When Roaming Over Cellular: By default, this option is set to Yes. You can modify it to No.
-
Allow VPN Over Cellular: By default, this option is set to Yes. You can modify it to No.
-
Allow Sync via USB: By default, this option is set to Yes. You can modify it to No.
-
Allow Bluetooth: By default, this option is set to Yes. You can modify it to No.
-
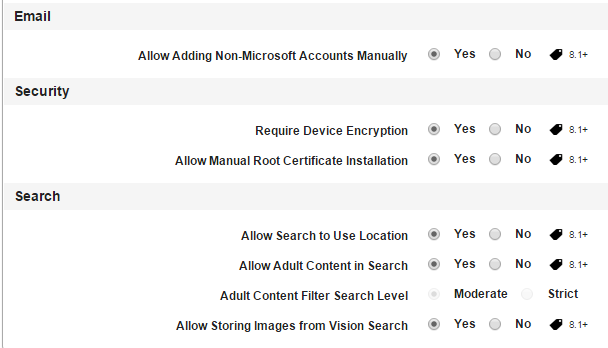
Allow Adding Non-Microsoft Accounts Manually: By default, this option is set to Yes. You can modify it to No.
-
Require Device Encryption: By default, this option is set to Yes. You can modify it to No.
-
Allow Manual Root Certificate Installation: By default, this option is set to Yes. You can modify it to No.
-
Allow Search to Use Location: By default, this option is set to Yes. You can modify it to No.
-
Allow Adult Content in Search: By default, this option is set to Yes. You can modify it to No.
-
Adult Content Filter Search Level: By default, this option is set to Yes. You can modify it to No.
-
Allow Storing Images from Vision Search: By default, this option is set to Yes. You can modify it to No.
- Click the Save and Activate button to save the data and exit the window. The updated policy details appear in the list view.
- Click the Save and Continue button to stay on the same page and perform other updates on policy.
Device Restriction Policy for Windows 8.1
To set device restrictions policy for Windows 8.1, follow these steps:
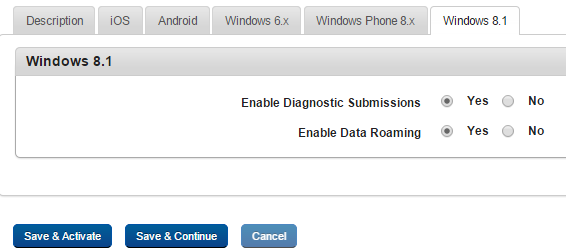
- Enable Diagnostic Submissions: By default, this option is set to No. You can modify it to Yes.
- Enable Data Roaming: By default, this option is set to No. You can modify it to Yes.
- Click the Save and Activate button to save the data and exit the window. The updated policy details appear in the list view.
- Click the Save and Continue button to stay on the same page and perform other updates on policy.
Email and Calendar Policy
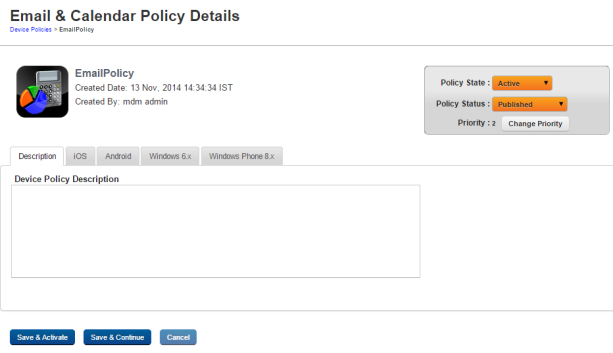
The primary purpose of the email and calendar policy is to configure email and calendar settings for a user based on existing business rules. This policy ensures that email settings are configured, and a device user can access an email account.
You can set email and calendar policy for the following operating systems:
- Set Email and Calendar Policy for iOS
- Set Email and Calendar Policy for Android
- Set Email and Calendar for Windows 6.x
- Set Email and Calendar Policy for Windows Phone 8.x
Set Email and Calendar Policy for iOS
The email policy for an iOS page includes following sections:
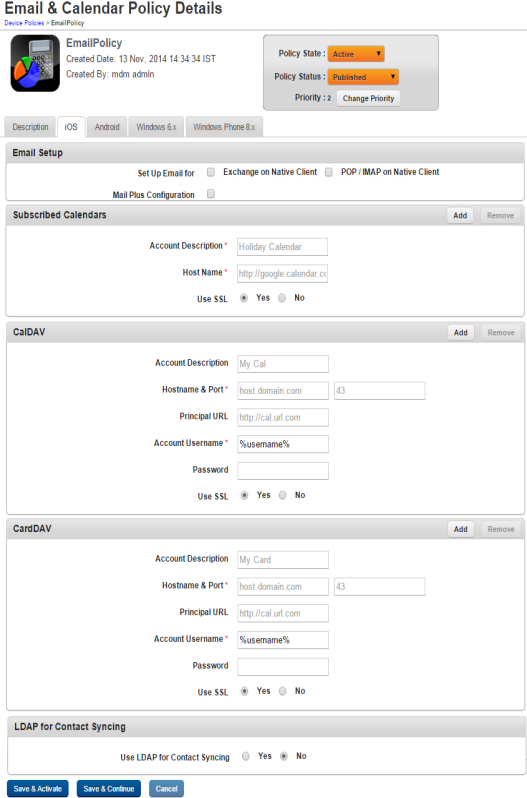
Email Setup
Email Setup section includes two options. 
You can configure these options.
Select the check box to display Exchange on Native Client window.
To set up Exchange on Native Client functionality, follow these steps:
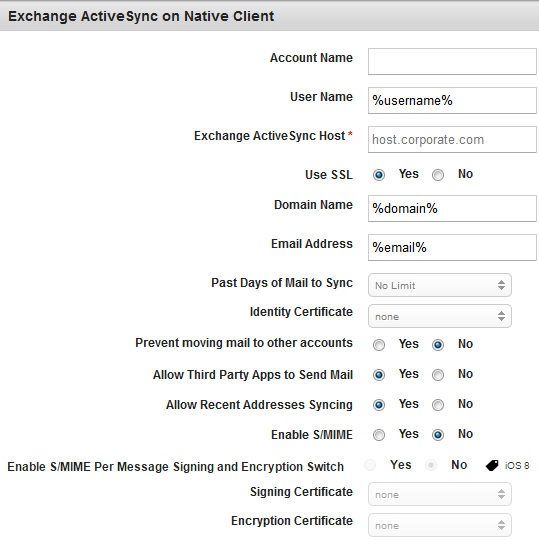
- Account Name: Enter the Account name.
- User Name: Enter the User name.
- Exchange Active Sync Host: Enter the host URL address.
- Use SSL: By default, this option is set to Yes. You can modify it to No.
- Domain Name: Enter the domain details.
- Email Address: Enter the email address of the Administrator.
- Past Days of Mail to Sync: Select the required option from the drop-down list. By default, it is set to No-Limit.
- Identity Certificate: Select the required option from the drop-down list. By default, it is set to None.
- Prevent Moving Mail to Other Accounts: By default, this option is set to No. You can modify it to Yes.
- Allow Third Party Apps to Send Mail: By default, this option is set to Yes. You can modify it to No.
- Allow Recent Addresses Syncing: By default, this option is set to Yes. You can modify it to No.
- Enable S/MME: By default, this option is set to No. If you select the option as Yes, then Signing Certificate and Encryption Certificate fields become active.
- Enable S/MME Per Message Signing and Encryption Switch: By default, this option is set to No. If you select the option as Yes, then you can choose to sign and encrypt each message before you send it out. This feature is available only on iOS 8.
- Signing Certificate: Select the required signing certificate from the drop-down list. By default, it is set to None.
- Encryption Certificate: Select the required signing certificate from the drop-down menu. By default, it is set to None.
Select the check box to display POP/MAP on Native Client window
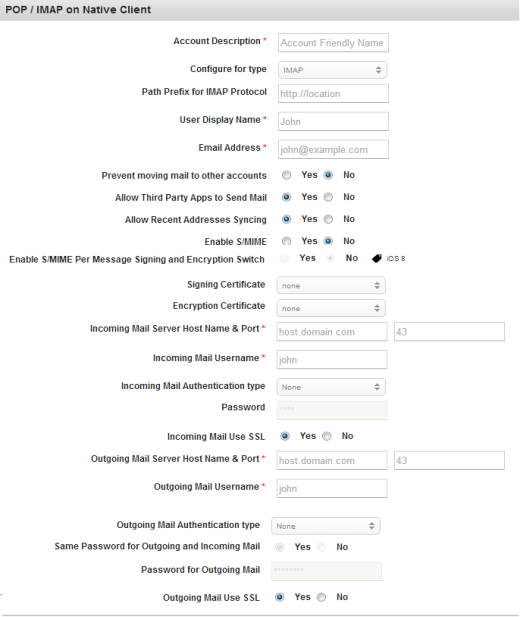
To setup Exchange on POP/MAP Native Client functionality, follow these steps:
- Account Description: Enter the Account name.
- Configure for Type: Select the required option from the drop-down list.
- Path Prefix for IMAP Protocol: Enter the address for IMAP protocol.
- User Display Name: Enter the user name for display.
- Email Address: Enter email address of the user.
- Prevent moving mail to other Accounts: By default, this option is set to No. You can modify it to Yes.
- Allow Third Party Apps to Send Mail: By default, this option is set to Yes. You can modify it to No.
- Allow Recent Addresses Syncing: By default, this option is set to Yes. You can modify it to No
- Enable S/MIME: By default, this option is set to No. You can modify it to Yes.
- Enable S/MMEPer Message Signing and Encryption Switch: By default, this option is set to No. If you select the option as Yes, then you can choose to sign and encrypt each message before you send it out. This feature is available only on iOS8.
- Signing Certificate: Select the required certificate from the drop-down list. By default,this option is set to None.
- Encryption Certificate: Select the required certificate from the drop-down list. By default this option is set to None.
- Incoming Mail server Host Name & Port: Enter the host name and the port number.
- Incoming Mail Username: Enter the user name for all the incoming mails.
- Incoming Mail Authentication type: Select the required incoming mail authentication type from the drop-down list. By default it is set to None. if you select the option as Password, then Password field becomes active.
- Password: Enter the password.
- Incoming Mail Use SSL: By default this option is set to Yes. You can modify it to No.
- Outgoing Mail server Host Name and Port: Enter the host name and the port number for the out going mail.
- Outgoing Mail User Name: Enter the user name for the out going mail.
- Outgoing Mail Authentication type: Select the required outgoing mail authentication type from the drop-down list. If you select the option as Yes, then Same Password for Outgoing and Incoming Mail, Password for Outgoing Mail, and Outgoing Mail Use SSL fields becomes active.
- Same Password for Outgoing and Incoming Mail: By default, this option is set to Yes. You can modify it to No. If you select the option as Yes, then Password for Outgoing Mail field become disabled.
- Password for Outgoing Mail: Enter the password for the outgoing mail.
- Outgoing Mail Use SSL: By default, this option is set to Yes. You can modify to No.
Select the check box to display Mail Plus for the Enterprise window.
To set up Mail Plus for Enterprise, follow these steps:
- User Name: The default value is %username%.
Note: If you have a single domain, retain default value macro %username%. If you have multiple domains, provide %email% OR %username% in the User Name field.
- Exchange Host Name: Enter your exchange host name.
- Email Address: The default value is %email%.
- Allow iTunes Backup: The default value is No. Select Yes to enable iTunes backup of the Mail Plus Enterprise App.
- Allow Passcode: The default value is No. Select Yes to enable a passcode on the Mail Plus Enterprise App.
- Enable S/MIME:The default value is No. Select Yes to enable Secure/Multipurpose Internet Mail Extensions (SMIME). When you select Yes, Allow Same Certificate for Signing and Encryption feature appears.

- Allow Same Certificate for Signing and Encryption: The default value is Yes, which allows you to use one certificate for S/MIME signing and encryption. Select the S/MIME certificate from the list.
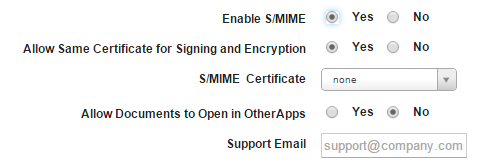
If you select No, the Encryption and Signing certificate fields appear.
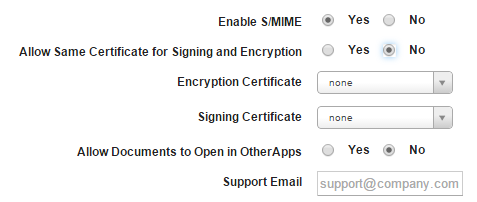
- Encryption Certificate: Select an encryption certificate from the list.
- Signing Certificate: Select a signing certificate from the list.
- Allow Documents to Open in Other Apps: By default, the setting is configured to No. Configure to Yes if you want to allow documents in the Mail Plus Enterprise app to open in other apps.
- Support Email: Enter the email ID of Mail Plus configuration support.
Subscribed Calendars
- Enter details for the following fields:

- Account Description: Enter the description of the account, such as Holiday Calendar.
- Host Name: Enter the Host URL.
- USE SSL: By default, this option is set to No. You you can modify to Yes.
CalDAV
This option is used to set Dates, Times and Events to sync between the Calendar and the Device.
To set CalDAV properties, follow these steps:

- Account Description: Enter the Account description.
- Hostname and Port: Enter the Host name and Host Port number of the CalDAV account.
- Principal URL: Enter the URL address of CalDAV account.
- Account User Name: Enter the user name.
- Password: The the user password.
- Use SSL: By default, this option is set to Yes. No can modify it to No.
CardDAV
The device user must have his Contact List in sync in order to communicate with contacts across multiple media.
To set CardDAV properties, follow these steps:
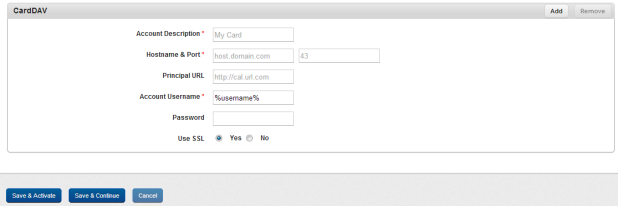
- Account Description: Enter the user account details. This is the display name for the CardDAV account.
- Hostname and Port: Enter the host URL and the Port number.
- Principal URL: Enter the principal URL.
- Account User Name: Enter the account user name for CardDAV.
- Password: Enter the user password.
- Use SSL: By default, this option is set to No. You can modify it to Yes.
Note: SSL is used to communicate with CardDAV.
LDAP for Contact Syncing
This option is used to import and sync contacts from LDAP.
To set LDAP for Contact Syncing properties, follow these steps:
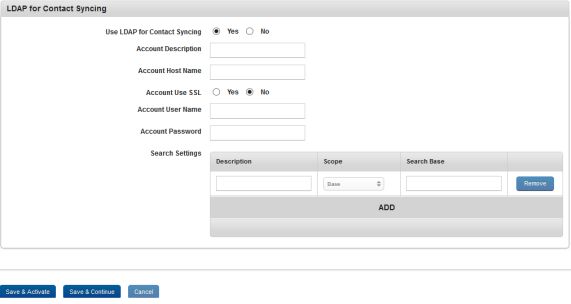
- Use LDAP for Contact Syncing: By default this option is set to No. You can modify it to Yes. If this is set to Yes, only then the below fields will be active.
- Account Description: Enter the description of the LDAP Account.
- Account Host Name: Enter LDAP account Host name you wish to connect with
- Account Use SSL: By default this option is set to No. You can modify it to Yes.
- Account User Name: Enter the user name of the LDAP Account.
- Account Password: Enter the password of the LDAP Account.
- Search Settings: Click the ADD button to add search settings shown below:
- Description: Enter description for search settings.
- Scope: Select the scope from the list.
- Search Base: Enter search base for search settings.
You can remove multiple search settings by clicking the Remove button.
Set Email and Calendar Policy for Android
To set Email and Calendar policy for Android, follow these steps:
- Under Email Setup, select one of the check boxes:

Email for Android For Work (supported Devices only) Exchange
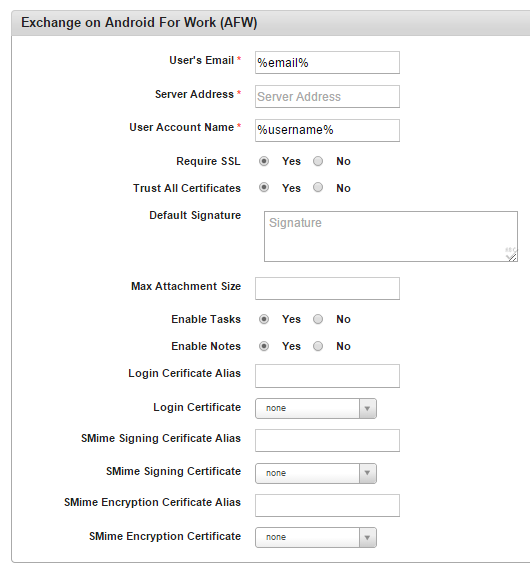
- User's Email: Enter the email of the exchange account.
- Server Address: Enter the email server address.
- User Account Name: Enter the user account name.
- Require SSL: By default, Require SSL is configured to Yes. If the email server does not require Secure Sockets Layer (SSL), configure to No.
- Trust ALL Certificates: By default, Trust All Certificates is configured to Yes. If you do not want to trust all certificates, configure this to No.
- Default Signature: Enter your email signature details that can be used as the default signature for the email being configured.
- Max Attachment Size: Enter the maximum size of the attachments that are allowed for the email.
- Enable Tasks: By default, Enable Tasks is configured to Yes. If you do not want to enable tasks associated with the email account to sync with the device tasks feature, configure to No.
- Enable Notes: By default, Enable Notes is configured to Yes. If you do not want to enable notes associated with the email account to sync with the device notes feature, configure to No.
- Login Certificate Alias: Enter an alias for the log-in certificate.
- Login Certificate: Select a certificate from the list.
- SMIME Signing Certificate Alias: Enter an alias for the SMIME signing certificate.
- SMIE Signing Certificate: Select a certificate from the list.
- SMIME Encryption Certificate Alias: Enter an alias for the SMIME encryption certificate.
- SMIME Encryption Certificate: Select a certificate from the list.
Exchange on Native Client (Samsung only)
Important: When the enterprise store is uninstalled on a SAFE device, all SAFE emails are removed from the device.
- Display Name *: Enter the name to be displayed for exchange account.
- User's Email: Enter the email of the exchange account.
- Exchange User Account Name *: Enter user name of the exchange account.
- Exchange Domain Name *: Domain name of the exchange account
- Sync Email for: Select one of the numbers of previous days of Email to sync.
- Peak Email Synchronization Frequency: Select one of the options of frequency to sync email during peak time.
- Make this the Default Account: By default this option is set to No. You can modify it to Yes.
- Protocol Version *: Enter EAS server protocol version. For example, V 12.0
- Signature *: Enter your signature details.
- Always Vibrate on Email Notification: By default this option is set to No. You can modify it to Yes.
- Vibrate on Email Notification When Silent: By default this option is set to No. You can modify it to Yes.
- Server Address *: Enter the address of the exchange server. For example, "mail.xyz.com"
- Use SSL: By default, this option is set to No. You can modify it to Yes.
- Use TLS: By default, this option is set to No. You can modify it to Yes.
- Accept All Certificates: By default, this option is set to No. You can modify it to Yes.
- Server Password *: Enter the password of the exchange account.
- Server Path Prefix: Enter the prefix to be added to server path (optional can be null)
- Peak Start Time *:
- Click in Peak Start Time field.
- Choose Time dialog appears.
- Drag the cursor to select Hour and Minute. Click Done to continue.
- The selected time appears in Peak Start Time field.
- Peak End Time: Follow the similar process to select peak end time.
- Peak Days *: Select checkboxes for peak days for sync schedule.
- Off Peak Schedule: Select one of the options for frequency to sync email during off peak time.
- Roaming Sync Schedule: By default, this option is set to Use Sync settings. You can modify it to Manual.
- Manual
- Use Sync settings
- Max Size to be Retrieved: Select the option from the drop-down list.
- Notify on Every Email Receipt: By default, this option is set to No. You can modify it to Yes.
- Synchronize Contacts: By default, this option is set to No. You can modify it to Yes.
- Synchronize Calendar: By default, this option is set to No. You can modify it to Yes.
- Calendar Synchronization Period: Select the option from the drop-down list.
- Certificate: Select the certificate from the drop-down list.
- Synchronize Tasks: By default, this option is set to No. You can modify it to Yes to synchronize tasks.
- Synchronize Notes: By default, this option is set to No. You can modify it to Yes to synchronize notes.
POP / IMAP on Native Client (Samsung Only)
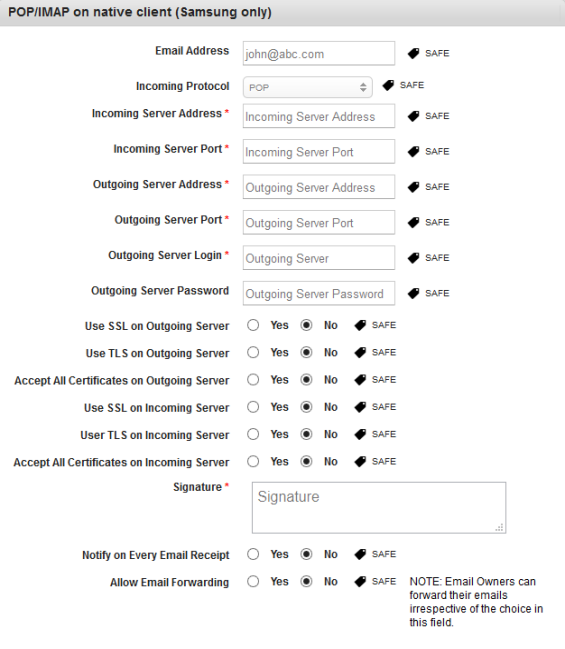
Important: Currently, outgoing server details are not honored by SAFE (a defect in SAFE). SAFE presumes that outgoing server details are the same as incoming server details. This issue might get fixed in updated versions of the SAFE API.
Important: When the enterprise store is uninstalled on a SAFE device, all SAFE emails are removed from the device.
- Email Address: This field populates the email address of the enrolled user when a policy a is applied.
- Incoming Protocol: Select the Incoming server protocol from the list.
- Incoming Server Address *: Enter the incoming server address.
- Incoming Server Port *: Enter the incoming server port number.
- Outgoing Server Address *: Enter the OutGoing server address.
- Outgoing Server Port *: Enter the OutGoing server port number.
- Outgoing Server Login *: Enter Outgoing Server Login address.
- Outgoing Server Password: Enter Outgoing Server Login password.
- Use SSL on Outgoing Server: By default this option is set to No. You can modify it to Yes.
- Use TLS on Outgoing Server: By default this option is set to No. You can modify it to Yes.
- Accept All Certificates on Outgoing Server: By default this option is set to No. You can modify it to Yes.
- Use SSL on Incoming Server: By default this option is set to No. You can modify it to Yes.
- User TLS on Incoming Server: By default this option is set to No. You can modify it to Yes.
- Accept All Certificates on Incoming Server: By default this option is set to No. You can modify it to Yes.
- Signature *: Enter the signature text.
- Notify on Every Email Receipt: By default this option is set to No. You can modify it to Yes.
- Allow Email Forwarding: By default this option is set to No. You can modify it to Yes.
Set Email and Calendar for Windows 6.x
Windows 6.x support following subset of Email and Calendar policy settings.
To set Email and Calendar policy for Windows 6.x, follow these steps:
Email: Rules

- Disable Desktop Email and PM Sync: Select the required option from the drop-down list. By default, it is set to None.
This setting specifies whether the mobile phone can synchronize with a computer through a cable or Bluetooth connection. You can set the value as True or False.
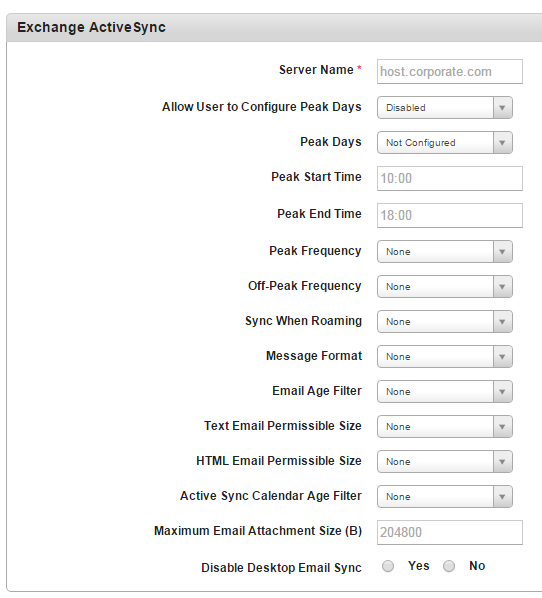
Exchange ActiveSync
- Server Name: Enter the Server Name.
- Allow User to Select Peak Days: Select the required option from the drop-down menu.
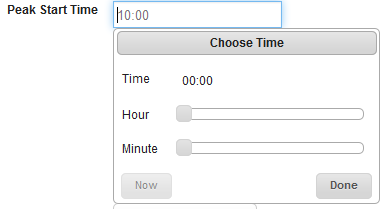
- Peak Start Time: Click in Peak Start Time field.
Choose Time dialog box appears.
- Drag the cursor to select Hour and Minute. Click Done to continue.
The selected time appears in Peak Start Time field.
- Peak End Time: Follow the similar process to select peak end time.
- Peak Frequency: Select the required option from the drop-down list. By default, it is set to None.
- Off-Peak Frequency: Select the required option from the drop-down list. By default, it is set to None.
- Sync when roaming: Select the required option from the drop-down list. By default, it is set to None.
This setting specifies whether the mobile phone must synchronize manually while roaming.
- Message Format: Select the required option from the drop-down list. By default, it is set to None.
This setting allows you to define rules to receive email as Plain Text or HTML format.
- Email Age Filter: Select the required option from the drop-down list. By default, it is set to None.
- Text Email Permission Size: Select the required option from the drop-down list. By default, it is set to None.
This setting specifies the permissible size for Text-formatted e-mail messages when they are synchronized to the mobile phone.
- HTML Email Permission Size: Select the required option from the drop-down list. By default, it is set to None.
This setting specifies the permissible size for HTML-formatted e-mail messages when they are synchronized to the mobile phone. The value is specified in kilobytes (KB).
- Active Sync Calendar Age Filter: Select the required option from the drop-down list. By default, it is set to None.
This setting specifies the maximum range of calendar days that can be synchronized to the mobile phone. The value is specified in days.
- Maximum Email Attachment Size: Enter the email attachment size.
This setting specifies the size beyond which HTML-formatted e-mail messages are truncated when they are synchronized to the mobile phone.
- Disable Desktop Email Sync. By default, this option is set to Yes, which you can modify to No.
- Click the Save and Activate button to save the data and exit the window. The updated policy details appear in the list view.
- Click the Save and Continue button to stay on the same page and perform other updates on policy.
Click the Cancel button to close the window.
Set Email and Calendar Policy for Windows Phone 8.x
To set Email and Calendar policy for Windows Phone 8.x, follow these steps:
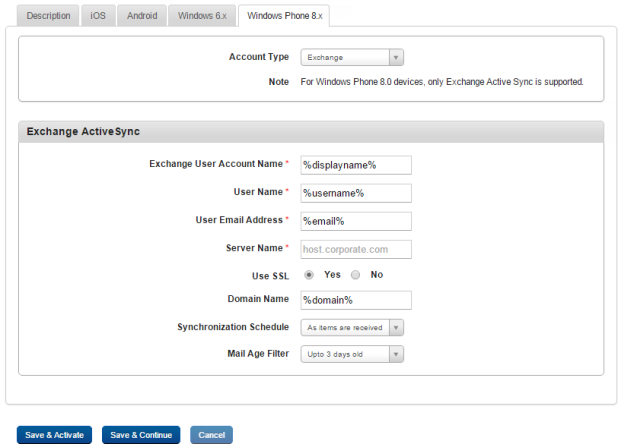
- Account Type: Select the account type. Exchange or Pop/IMAP.
- If you select Exchange, the following appear,
- Exchange User Account Name: Enter exchange user account name.
User Name: Enter user name.
User Email Address: Enter user email address.
- Server Name: Enter the host URL in the text field.
- Use SSL: By default, this option is set to Yes. You can modify it to No.
- Domain Name: Enter the corporate domain URL in the text field.
- Synchronized Schedule: Select the required synchronized schedule from the drop-down list. By default, it is set to As items are received.
- Mail Age Filter: Select the required mail age filter from the drop-down list. By default, it is set to 3 days old.
- If you select POP/IMAP, the following appear,
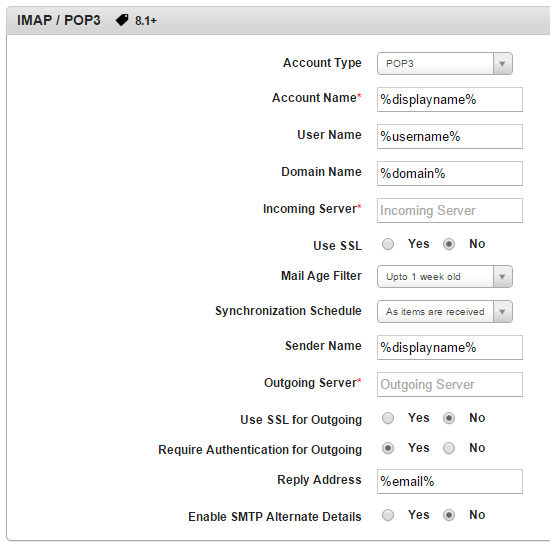
- Enter details for the following,
Account Type: Select POP3 or IMAP4 from the list.
- Account Name: Enter account name.
User Name: Enter user name.
Domain Name: Enter domain name.
Incoming Server: Enter incoming server details.
Use SSL: By default this is set to No. You can chose Yes.
Mail Age Filter: Select mail age filter time period from the list.
Synchronization Schedule: Select synchronization schedule interval from the list.
Sender Name: Enter sender name.
Outgoing Server: Enter outgoing server details.
Use SSL for Outgoing: By default this is set to No. You can chose Yes.
Require Authentication for Outgoing: By default this is set to Yes. You can chose No.
Reply Address: Enter reply email address.
Enable SMTP Alternate Details: By default this is set to No. You can chose Yes.
Choosing Yes will enable the following fields.
- Alternate Username: Enter alternate username.
- Alternate User's Password: Enter alternate user's password.
- Alternate Domain: Enter alternate user's domain name.
- Click the Save and Activate button to save the data and exit the window. The updated policy details appear in the list view.
- Click the Save and Continue button to stay on the same page and perform other updates on policy.
Click the Cancel button to close the window.
Network Policy
The primary purpose of the network policy is to ensure settings of the different network connections such as Wi-Fi and VPN, to authorize network connectivity on devices.
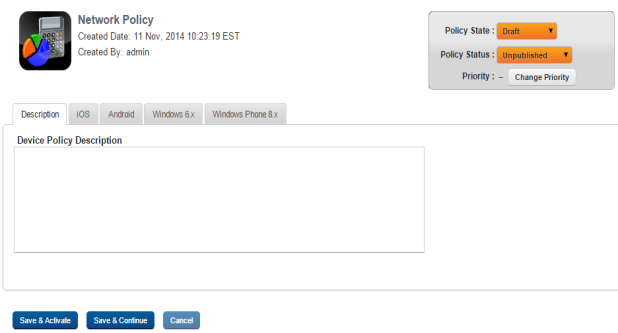
Important: Network Policy on server side browsers like Opera Mini cannot be enforced. It is recommended to use other browsers. If you need high security, you may need to blacklist the Opera Mini browser.
You can set Network Policy for the following operating systems.
- Set Network Policy for iOS
- Set Network Policy for Android
- Set Network Policy for Windows 6.x
- Set Network Policy for Windows Phone 8.x
To specify Network policy for the iOS platform, follow these steps:
- Wi- Fi: Select one of the Wi-Fis from the list.
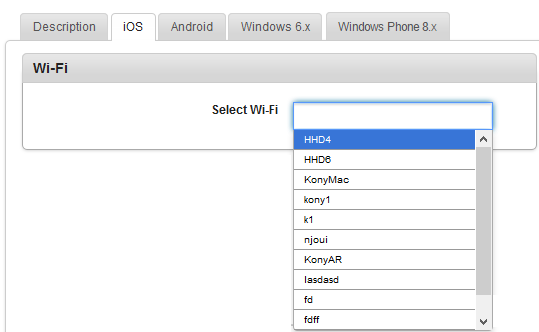
-
In the VPN, select one of the VPNs from the list.

- Enter details for the following fields to set Global HTTP Proxy.
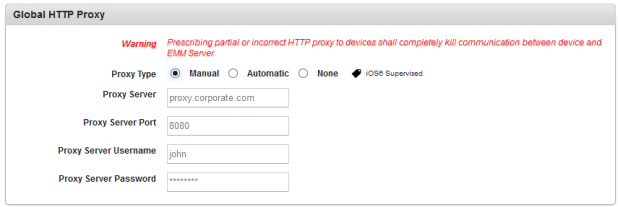
- Proxy Type:Select the required Proxy Type from the drop-down menu. By default, proxy type is set to None. You can modify your selection to Manual or Automatic.
- If you select the Proxy Type as Manual, then you need to enter details for the following fields:
- Proxy Server: Enter details of the Proxy Server in the text field.
- Proxy Server Port: Enter Proxy Server Port number in the text field.
- Proxy Server Username: Enter Server Username in the text field.
- Proxy Server Password: Enter Proxy Server Password. in the text field.
- If you select Proxy Type as Automatic, then you need to enter details for the following fields:

- Proxy PAC URL: Enter address of the proxy server.
- Enter whitelisted airplay devices details in the Whitelisted Devices field. (Supervised iOS7+)
Based on the configuration done in Enterprise Resources > AirPlay Settings, you can search and select the device IDs for AirPlay.

-
Enter selected AirPrint devices details in the AirPrint Settings field (Supervised iOS7+)
Select the printers to support AirPrint functionality (iOS7+)
Based on the configuration done in Enterprise Resources > AirPrint Settings, you can search and select the IP for AirPrint.
- Enter details for the following fields to set Access Point Network (APN) Configuration:
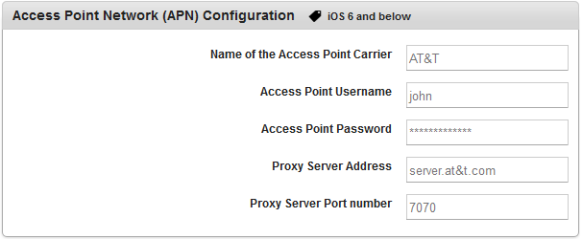
- Name of the Access Point Carrier Enter the name of the access point carrier in the text field. Access Point Carriers ensures network connectivity.
- Access Point Username: Enter the name of the access point username in the text field.
- Access Point Password: Enter the access point password in the text field.
- Proxy Server Address: Enter the proxy server address in the text field.
- Proxy Server Port Number: Enter the proxy server port number in the text field.
- For iO7+, admin can create a single sign-on account for different web portals and apps as well. Enter details for the following fields to set Single Sign-On Account Payload.
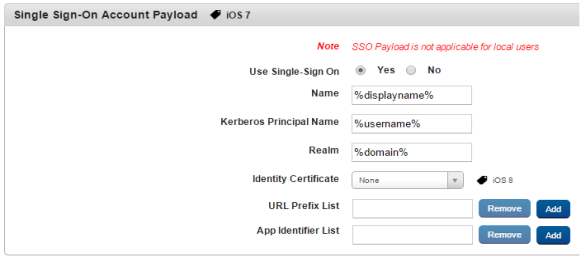
- Use Single-Sign On: By default this option is set to No. You can modify it to Yes. If this is set to Yes, only then the below fields will be active.
- Name: Enter the name for the account
- Kerberos Principal Name: Enter the Kerberos Principal Name.
- Realm: Enter the Kerberos Realm name.
- Identity Certificate: Select the identity certificate.
- URL Prefix List:
Click Add to add additional fields. You can remove fields by clicking on the Remove button.
- App Identifier List:
Click Add to add additional fields. You can remove fields by clicking on the Remove button.
- Enter details for the following fields to set Web Content Filter Payloads.
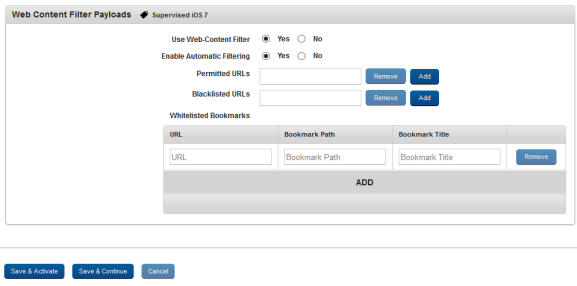
- Use Web-Content Filter: By default this option is set to No. You can modify it to Yes. When the Use Web-Content Filter is set to Yes, the following fields will be active.
- Enable Automatic Filtering: By default, this option is set to No. You can modify it to Yes.
- Permitted URLs: Enter the permitted URLs. The permitted URLs can only be accessed on the device. You can add more URLs by clicking the Add button. You can remove URLs by clicking the Remove button.
- Blacklisted URLs: Enter the Blacklisted URLs. The blacklisted URLs can not be accessed on the device. You can add more URLs by clicking the Add button. You can remove URLs by clicking the Remove button.
- Whitelisted Bookmark: You can configure only whitelisted URLs as bookmarks on the device. To add whitelisted URLs, click the ADD button and follow these steps:
- URL: Enter the URL of a website.
- Bookmark Path: Enter name for the bookmark folder. All your bookmarks will be stored under this folder.
- Bookmark Title: Enter the title for the bookmark URL.
You can add more URLs by clicking the Add button. You can remove URLs by clicking the Remove button.
- Enter details for Managed Domains. This feature is available only for devices with iOS8.
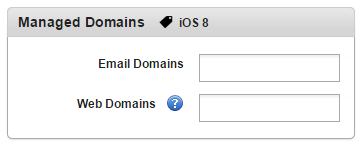
- Email Domains: Enter allowed email domain names.
- Web Domains: Enter allowed web domain names.
- Click the Save and Activate button to save the data and exit the window. The updated policy details appear in the list view.
- Click the Save and Continue button to stay on the same page and perform other updates on policy.
Click the Cancel button to close the window.
Set Network Policy for Android
To specify network policy for the Android platform, follow these steps:
- In Wi-Fi, enter the name of the Wi-Fi you want to use. Ensure that this is one of the Wi-Fis configured in Enterprise Resources > Wi-Fi.

- In Wi-Fi with SAFE, complete the following fields:
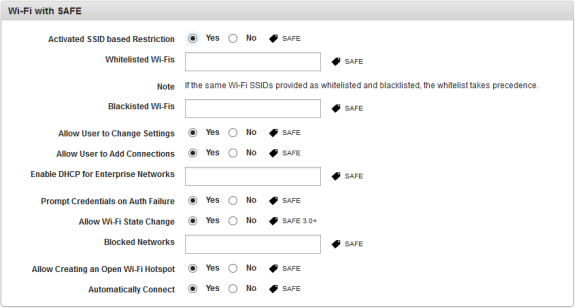
- Activated SSID based Restriction: By default this option is set to Yes. You can modify it to No.
Only when the Activated SSID based Restriction is set to Yes are the following options active:- Whitelisted Wi-Fis: Select one of the whitelisted Wi-Fis.
- Blacklisted Wi-Fis: Select one of the blacklisted Wi-Fis.
- Allow User to Change Settings: By default this option is set to No. You can modify it to Yes.
- Allow User to Add Connections: By default this option is set to No. You can modify it to Yes.
- Enable DHCP for Enterprise Networks: Select the DHCP for enterprise networks.
- Prompt Credentials on Auth Failure: By default this option is set to Yes. You can modify it to No.
- Allow Wi-Fi State Change: By default this option is set to Yes. You can modify it to No.
- Blocked Networks: Select the desired SSIDs to be blocked, which prevents the user from connecting to the SSID. The blocked network still appears in the Access Point list but is disabled. A network is considered blocked if any administrator has it in a blacklist.
- Allow Creating an Open Wi-Fi Hotspot: By default this option is set to Yes. You can modify it to No.
Automatically Connect: By default this option is set to Yes. You can modify it to No.
If it is No, a user must manually connect to the designated Wi-Fi
Important: The Hidden Network functionality is not supported for Android.
- Activated SSID based Restriction: By default this option is set to Yes. You can modify it to No.
- In the VPN, select one of the VPNs that are configured in the Enterprise Resources > VPN section.

- In Access Point Network (APN) Configuration, follow these steps:
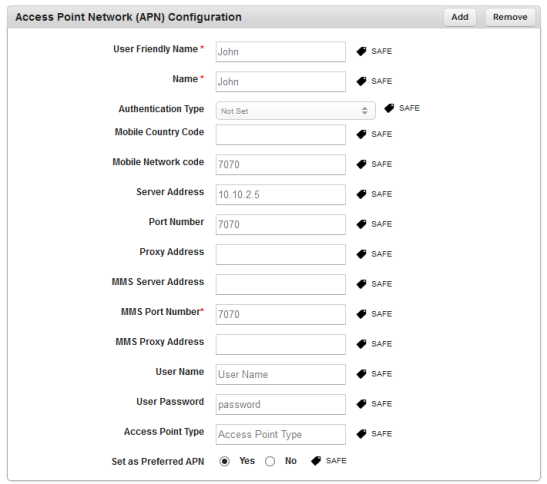
- User Friendly Name *: Enter a name for your APN.
- Name *: Enter the APN name that received from your network provider.
- Authentication Type: Select one of the options from the drop-down list.
- Mobile Country Code: Enter your mobile country code, such as 1 for the United States or 91 for India.
- Mobile Network Code: Enter your mobile network code. If you do not have it, please provide your network provider for the same.
- Server Address: Enter the server address of the APN.
- Port Number: Enter the port number.
- Proxy Address: Enter the proxy server address.
- MMS Server Address: Enter the MMS server address.
- MMS Port Number *: Enter the MMS port number.
- MMS Proxy Address: Enter the MMS proxy.
- User Name: Enter the user authentication name.
- User Password: Enter the password.
- Access Point Type: Enter the type of access point. For example, default, mms, or supl. If you do not enter any value, this field is populated with these values "default,mms,supl" on the user device.
- Set as Preferred APN: By default this option is set to Yes. You can modify it to No. If you set this as Yes, all your APN communications pass through this APN settings.
- For thee Bluetooth Policy, complete the following fields:
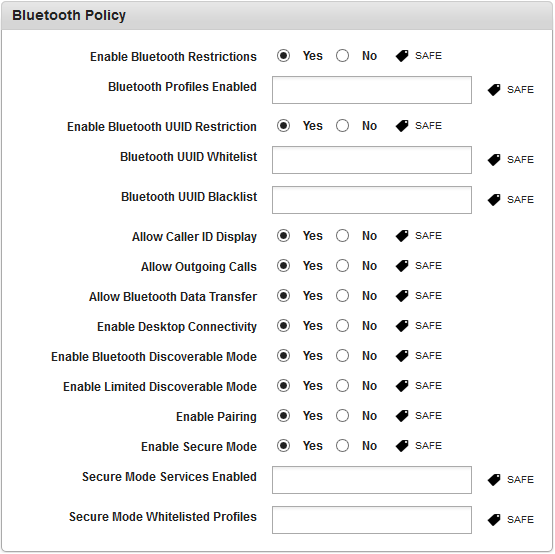
- Enable Bluetooth Restrictions: By default this option is set to No. You can modify it to Yes. If it is Yes, only then the below options are displayed.
- Bluetooth Profiles Enabled: Select the profiles from the list.
- Enable Bluetooth UUID Restriction: By default this option is set to No. If you modify it to Yes, the following fields are active:
Bluetooth UUID Whitelist: Select the UUIDs from the list.
Bluetooth UUID Blacklist: Select the UUIDs from the list.
- Allow Caller ID Display: By default, this option is set to Yes. You can modify it to No.
- Allow Outgoing Calls: By default, this option is set to Yes. You can modify it to No.
- Allow Bluetooth Data Transfer: By default, this option is set to Yes. You can modify it to No.
- Enable Desktop Connectivity: By default, this option is set to Yes. You can modify it to No.
- Enable Bluetooth Discoverable Mode: By default, this option is set to Yes. You can modify it to No.
- Enable Limited Discoverable Mode: By default, this option is set to Yes. You can modify it to No.
- Enable Pairing: By default, this option is set to Yes. You can modify it to No.
- Enable Secure Mode: By default, this option is set to No. If you modify it to Yes, the following fields are active:
- Secure Mode Services Enabled: Select the services from the list.
- Secure Mode Whitelisted Profiles: Select the profiles from the list.
- Enable Bluetooth Restrictions: By default this option is set to No. You can modify it to Yes. If it is Yes, only then the below options are displayed.
- Click Save and Activate button to save the data and exit the window. The updated policy details appear in the list view.
- Click Save and Continue button to stay on the same page and perform other updates on policy.
Click Cancel button to close the window.
Set Network Policy for Windows 6.x
-
To specify Network policy for Windows 6.x platform, follow these steps:

- Allow Wifi Only: By default, this option is set to No. You can modify it to Yes.
- Click the Save and Activate button to save the data and exit the window. The updated policy details appear in the list view.
- Click the Save and Continue button to stay on the same page and perform other updates on policy.
Click the Cancel button to close the window.
Note: To apply Network Policy, Passcode policy must be there and device should have a passcode.
Set Network Policy for Windows Phone 8X
To specify network policy for Windows 8.X platform, follow these steps:
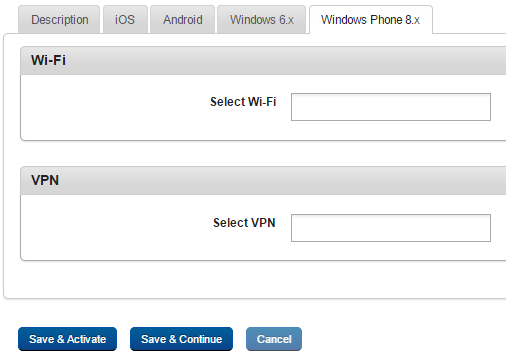
- Wi- Fi: Select one Wi-Fi from the enterprise resources list.
- VPN: Select one VPN from the enterprise resources list.
- Click Save and Continue to stay on the same page and perform other policy updates. Or Click Save and Activate.
Certificate Distribution Policy
The primary purpose of the Certificate Distribution policy is to ensure that appropriate certificates are uploaded so the users can access the required data securely.
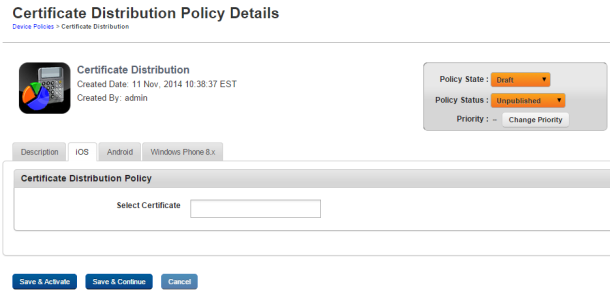
To set Certificate Distribution policy for iOS, follow these steps:
- Description: By default, this tab is set to Active. Enter the appropriate description for the Certificate Distribution policy.
- Click the iOS tab to open Certificate Distribution Policy section. You can add more certificates at Enterprise Resources > Certificates.
- Select the required certificate from the Select Certificate list.
- Click the Save and Activate button to save the data and exit the window. The updated policy details appear in the list view.
- Click the Save and Continue button to stay on the same page and perform other updates on policy.
Click the Cancel button to close the window.
To set Certificate Distribution policy for Android, follow these steps:
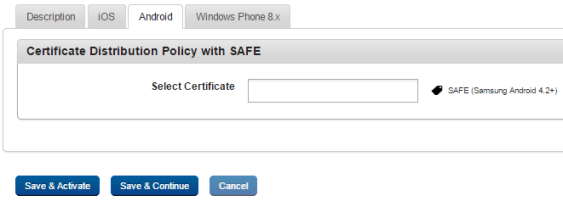
- Click the Android tab to open Certificate Distribution Policy section.
- Select the required certificate from the Selected Certificate list. You can add more certificates at Enterprise Resources > Certificates.
- Click the Save and Activate button to save the data and exit the window. The updated policy details appear in the list view.
- Click the Save and Continue button to stay on the same page and perform other updates on policy.
Click the Cancel button to close the window.
To set Certificate Distribution policy for Windows Phone 8.x, follow these steps:
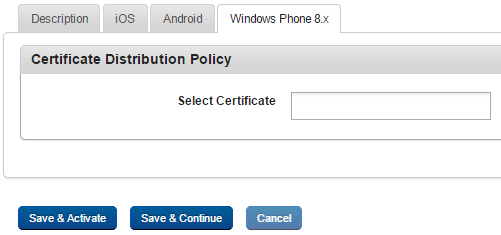
- Click Windows Phone 8.x tab to open Certificate Distribution Policy section.
- Select the required certificate from the Selected Certificate list. You can add more certificates at Enterprise Resources > Certificates.
- Click the Save and Activate button to save the data and exit the window. The updated policy details appear in the list view.
- Click the Save and Continue button to stay on the same page and perform other updates on policy.
Click the Cancel button to close the window.
Webclips Policy
The primary purpose of the Webclips policy is to specify an icon that conveys the essence of your web application.
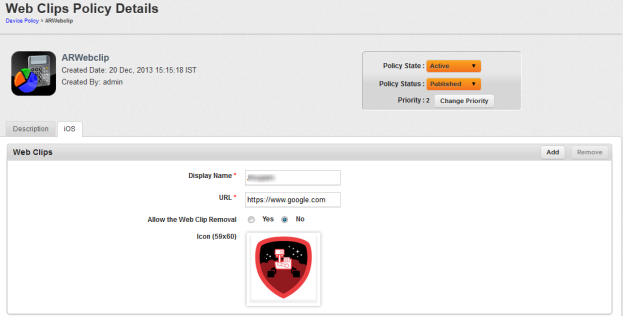
To specify an icon to represent your web application or webpage on iOS, follow these steps:
- Device Policy Description: Enter a brief description of the Webclips policy, which explains its objective.
By default, Description tab is set to active.
Click the iOS tab. Web Clips pane appears. Enter details into following fields.
- Display Name: Enter an appropriate name for the webclip which signifies its utility. This name is displayed on a device
- URL: Enter the Web application address that is accessed by the webclip icon.
- Allow the Web Clip Removal: By default, this option is set to Yes. You can modify it to No.
- Icon(59x60): Click the Browse button to select the icon from its location to upload.
- Click the Save and Activate button to save the data and exit the window. The updated policy details appear in the list view.
- Click the Save and Continue button to stay on the same page and perform other updates on policy.
Click the Cancel button to close the window.
Note: (For iOS) The webclip icon pushed from the server is replaced by the icon of the website once the website loads completely on the browser.
If you face any issues with Internet Explorer 9, refer to Annexure.
Public App Policy
The primary purpose of the Public App policy is to have complete control over devices and ensure data security based on existing business rules.
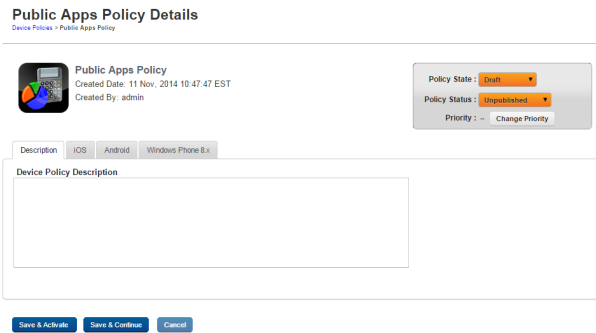
You can set public app policies for the following operating systems.
Important: For a public app policy to work for iOS and Android devices, you must have the Enforce App policy feature of the Compliance policy to be set to Yes. For more information, see Compliance policy.
- Set Public App Policy for iOS
- Set Public App Policy for Android
- Set Public App Policy for Windows Phone 8.x
Set Public App Policy for iOS
To set the App Policy for iOS, follow these steps:
- Click iOS tab to open.
- In the Manage App Lists, do the following:

- Required Apps: By default, this option is set to Yes. You can modify it to No.
If this option is set to Yes, the Add to Required Apps button is active in the Search Apps section.
- App Restrictions: By default, this option is set to None. You can modify it to Whitelist Apps or Blacklist Apps.
Based on the option selected, one of the following buttons will be active in the Search Apps section:- Add to Whitelist Apps
- Add to Blacklist Apps
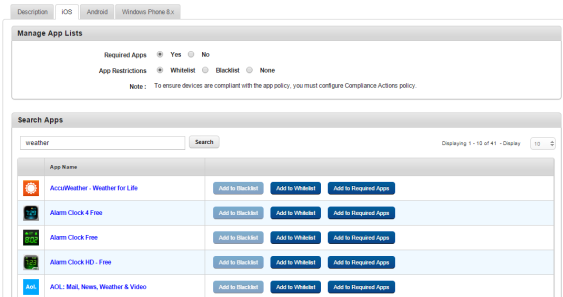
- Required Apps: By default, this option is set to Yes. You can modify it to No.
- In the Search text box under the Search Apps section, enter your text for the app, and click the Search button. The system displays apps from Apple App Store and Google Play. The selected apps appear in the list view with App Name, Source and manage app options. When you search for an app, unrelated apps are displayed as a result in list view. You can create either Blacklist apps or Whitelist apps but not both.
Based on the options selected in the Manage App Lists section, you can add the apps to Blacklist, Whitelist, or Required list. - Click the buttons to add apps into the requited category as follows:
- Add to Required Apps
Required apps must be installed on devices. For iOS, these apps are installed automatically. - Add to Whitelist
A Whitelist is a list of apps that you choose whether to install it. - Add to Blacklist
A Blacklist is a list of apps that are not allowed to be installed on devices.
According to the selected category, the system displays apps in various sections with details. For example, the Required Apps section has the App Name, Sourceand Assign VPN columns.
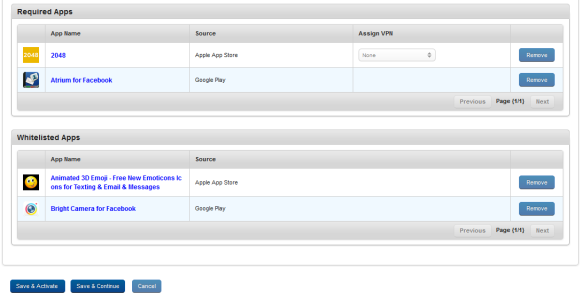
Whitelisted apps are installed by a user from the Apple App Store. They are considered as Personal apps as they are not pushed by the EMM Server.
Note: When app policy alone is pushed along with compliance policy (no other policies are pushed apart from app policy and compliance policy), the view policy pop-up does not display applied policies under server resolved and device acknowledged policy columns. You can check the status of policy delivery in event log.
- Add to Required Apps
-
Select one of the VPNs from the Per App VPN drop-down list, and assign it for the desired app.
Only VPNs enabled to be Per App VPN are displayed in the Per App VPN drop-down list. For more details, refer Assigning Per App VPN for iOS.
You can remove any app from the Required or Whitelisted or Blacklisted Apps list by clicking the Remove button.
- Click the Save and Activate button to save the data and exit the window. The updated policy details appear in the list view.
- Click the Save and Continue button to stay on the same page and perform other updates on policy.
Click the Cancel button to close the window.
Note: On iOS 7.0, whenever a mandatory app is upgraded, the app is installed on device silently.
Public App Policy for Android
To set the App Policy for Android, follow these steps:
- Click Android tab.
- In the Manage App Lists, do the following:

- Required Apps: By default this option is set to Yes. You can modify it to No.
If this option is set to Yes, the Add to Required Apps button is active in the Search Apps section.
- App Restrictions: By default this option is set to None. You can modify it to Whitelist or Blacklist.
Note: To ensure devices are compliant with the app policy, you must configure Compliance Actions policy.
System applications cannot be managed using App Policy.
Some Carriers /OEMs /Vendors might pre-install Public applications as System Applications. Such applications will not be managed with App Policy.Based on the option selected, one of the following buttons will be active in the Search Apps section.
- Add to Whitelist Apps
- Add to Blacklist Apps
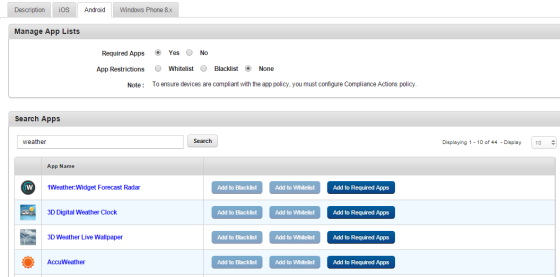
- Required Apps: By default this option is set to Yes. You can modify it to No.
- Under Search Apps section, enter your text for the app in the text field, and click the Search button. The system displays apps from Apple App Store and Google Play. The selected apps appear in the list view with App Name, Source and manage app options. When you search for an app, unrelated apps are displayed as a result in list view. You can create either Blacklist or Whitelist apps but not both.
Based on the options selected in the Manage App Lists section, you can add the apps to Blacklist, Whitelist, or Required list.
- Click the buttons to add apps into the requited category as follows:
- Add to Required Apps
Required apps are must be installed on devices. For iOS these apps are installed automatically. - Add to Whitelist
A Whitelist is a list of apps that are allowed for you to choose whether to install it. - Add to Blacklist
A Blacklist is the list of apps that are not allowed to install on devices.
As per the selected category, the system displays apps in various sections with details. For example, Required Apps section has the App Name, Status Bar Notifications, Force Stop, Widget on Home Page, Clearing Cache, and Delete App Data columns.
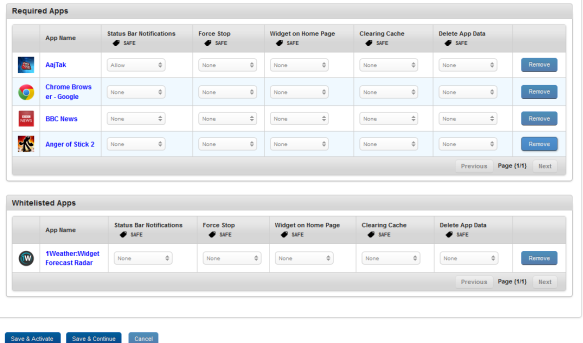
Whitelisted apps are installed by a User from the Google Play Store. They are considered as Personal apps as they are not pushed by the EMM Server.
Note: When App policy alone is pushed along with Compliance policy (no other policies are pushed apart from app policy and compliance policy), the View Policy pop-up does not display applied policies under Server resolved and Device acknowledged policy columns. You can check the status of policy delivery in event log.
- Add to Required Apps
-
Configure SAFE for Required or Whitelisted or Blacklisted Apps if required:
- Status Bar Notifications: By default, this option is set to None You can modify it to Allow or Block.
The Admin can specify whether messages received by the app can be shown in the status bar or not by selecting Allow.
If Block is selected, any messages received by the app are not shown in the status bar. -
Force Stop: By default, this option is set to None You can modify it to Allow or Block.
The Admin can specify whether the User has the ability to Force Stop an app by selecting Allow.
If Blocked is selected, the user cannot Force Stop the app. - Widget on Home Page: By default, this option is set to None. You can modify it to Allow or Block.
The Admin can specify whether the widgets of an app are allowed to become a widget on the device home page by selecting Allow.
If Block is selected, the user cannot add widgets of that app to the home page. - Clearing Cache: By default, this option is set to None You can modify it to Allow or Block.
- Delete App Data: By default, this option is set to None You can modify it to Allow or Block.
You can remove any app from the Required or Whitelisted or Blacklisted Apps list by clicking the Remove button.
- Status Bar Notifications: By default, this option is set to None You can modify it to Allow or Block.
- Click the Save and Activate button to save the data and exit the window. The updated policy details appear in the list view.
- Click the Save and Continue button to stay on the same page and perform other updates on policy.
Click the Cancel button to close the window.
Public App Policy for Windows Phone 8.X
To set the App Policy for Windows Phone 8X,
- Click Windows Phone 8.x tab.
- Navigate to Manage App Lists. By default, the App Restrictions option is set to None. You can modify it to Whitelist or Blacklist.

- Add to Whitelist
- Add to Blacklist
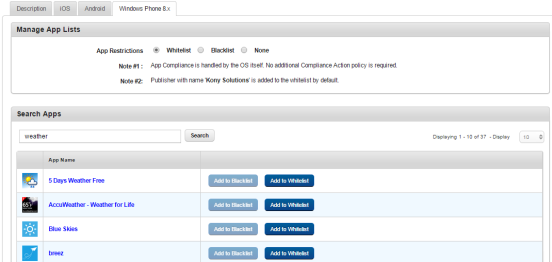
- Under Search Apps section, enter your text for the app in the text field, and click the Search button. The system displays apps from the Windows App Store. The selected apps appear in the list view with App Name, and Add to Black List and Add to Whitelist options. You can create either Blacklist or Whitelist apps but not both.
- Based on selections in Manage App Lists, click Add to Whitelist or Add to Blacklist to add apps to the required category.
-
You can remove any app from the Whitelisted or Blacklisted Apps list by clicking the Remove button.
- You can add a publisher to the Whitelist or a Blacklist.
- To add a publisher, from the Whitelisted Publishers section, enter the publisher name in the Publisher text box and click Add to Whitelist. You can search and download apps from a whitelisted publisher.

- To add a publisher, from the Blacklisted Publishers section, enter the publisher name in Publisher text box and click Add to Blacklist. The publisher is added to Blacklist. You cannot search and download apps from a Blacklisted publisher.
- Remove a publisher from the Whitelisted or Blacklisted Apps list by clicking the Remove button.

- Click the Save and Activate button to save the data and exit the window. The updated policy details appear in the list view.
- Click the Save and Continue button to stay on the same page and perform other updates on policy. To close the window. click Cancel.
Compliance Actions Policy
The primary purpose of the Compliance Actions policy is to restrict the device usage if they do not adhere to the policy and trigger appropriate action depending upon the business rules.
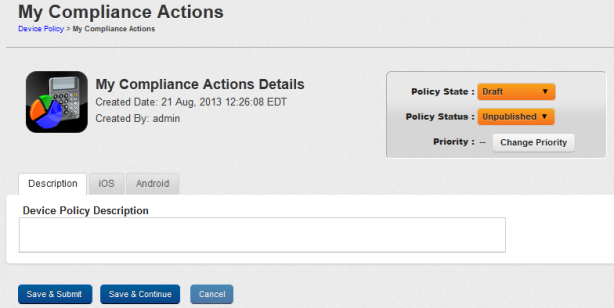
Enforcement Actions
Enforcement actions allow the Admin to define a bunch of compliance actions against devices that violate the Policy applicable. When a device performs a compliance violation act, an enforcement action is triggered within a specified time frame with respect to the event occurrence.
The Admin can perform the following Enforcement Actions:
| Enforcement Actions | Description |
|---|---|
| Alert Administrator | In case of non-compliance of the policies alert the Admin immediately. |
| Alert User and Administrator | In case of non-compliance of the policies alert the Admin and User immediately. |
| Reset Passcode and Lock | This action is only available for Android devices. The device’s passcode can be changed automatically and locked. This locks users out of their own non-compliant devices. The User must contact Admin to gain access to the device again. |
| Block Email | Block Email blocks access to the Exchange ActiveSync. The user shall not be able to view emails from Exchange server again. |
| Enterprise Wipe | Enterprise wipe selectively erases only those device settings, user data, applications and application data that were previously installed by Kony EMM. |
| Complete Wipe |
When a device is Completely Wiped, the future enrollment rule is by default set to Never Enroll. Complete Wipe erases complete data including Enterprise settings and user-installed public applications, data or device settings configured by the user. |
| Remove App Data | This action removes app data from the device. Remove App Data is only applicable to Enterprise Apps pushed through EMM and not side-loaded apps. |
If a device is non-compliant, with every heartbeat, the chosen compliance action is executed on it until the device comes back into compliance. Automatically mails are also triggered intimating the users and the Administrators about the action. If a device changes compliance state after a policy acknowledgment, you need to wait until next heart beat for corresponding violation actions.
When a device is Completely Wiped, the future enrollment rule is by default set to Never Enroll.
Important:
(For Employee owned Devices only)
If you select Complete Wipe as Enforcement Action, then Enterprise Wipe with deactivated state is sent to the device.
(For Corporate and Shared Devices)
If you select Complete Wipe as Enforcement Action, then Complete Wipe occurs but future enrollment of the device is not possible.
Compliance actions can be defined in one of the following two modes, or both:
An administrator can define both kinds of compliance actions for each platform and both set of rules must be applied to devices.
Simple Compliance
In the case of simple compliance, the current method is applied. There is no change in the simple compliance section.
Conditional Compliance Actions
An administrator can also define composite compliance rules. This includes conditions for several compliance parameters and rules for a combined compliance conditions. Enforcement actions can be assigned for each rule definition. The same set of actions as in Simple compliance can be performed here.
The following is an example of a compliance rule: If a device is out of Wi-Fi compliance and app compliance, then block email.
You can set Compliance Actions Policy for the following operating systems:
Set Compliance Action Policy for iOS
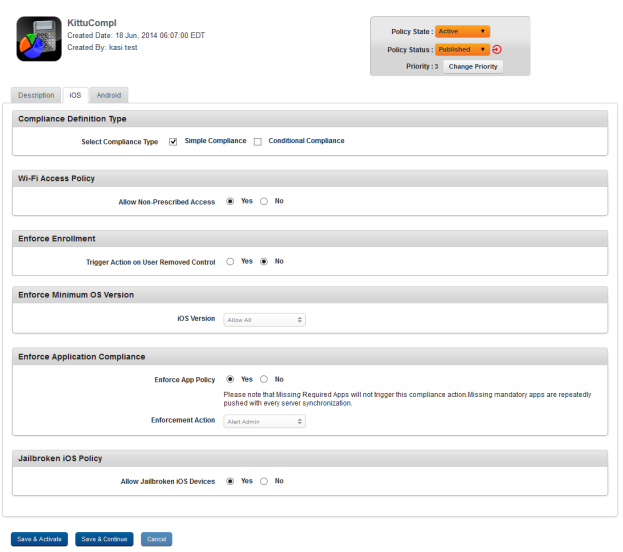
To set Compliance Action settings for iOS, follow these steps:
- Enter a brief and appropriate description of the policy in the Device Policy Description text box.
- Click the iOS tab. The system displays the iOS tab with the Compliance Definition Type section by default. The Compliance Definition Type section has two checkboxes:

- Select Compliance Type as Simple Compliance
- Select Compliance Type as Conditional Compliance
Important: If the check box is cleared without saving details, the system displays the following message "Simple Compliance will not be saved." or "Conditional Compliance will not be saved." Click OK to confirm.

To prevent data loss, ensure that you save the details if required.
-
In the Compliance Definition Type section, select the Simple Compliance checkbox to configure simple compliance actions.
- Enter details for the simple compliance actions:
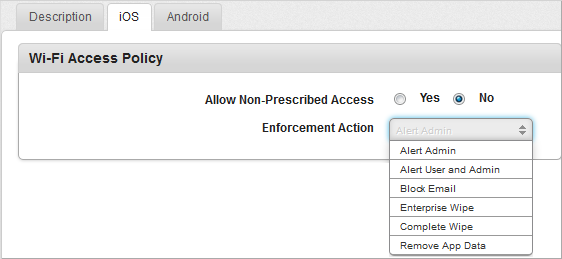
- Wifi Access Policy: This setting allows the Admin to create an alert for using or creating Wi-Fi connections not prescribed as part of the Policy. By default, Allow Non-Prescribed Access option is set to Yes. If you select this option as No, Enforcement Action drop-down menu appears. If required, select the required action from the dropdown list.

- Enforce Enrollment:
This setting allows the Admin to enforce enrollment of the device. By default, the Trigger Action on User Removed Control option is set to No. If you select this option as Yes, the Send Enrollment Request in Email option appears.
By default, Send Enrollment Request in Email option is set to No. You can select this option as Yes. If required, select the Enforcement Action - Alert Admin or Alert User and Admin from the drop-down list.
- Enforce Minimum OS Version
This setting allows the administrator to set iOS version. By default, the iOS Version option is set to Allow All. You can select the desired iOS version from the above drop-down list.
- Enforce Application Compliance
By default, Enforce App Policy option is set to Yes. If you select this option as No, the Enforcement Action drop-down list is removed from the screen. If required, select the required action from the dropdown list.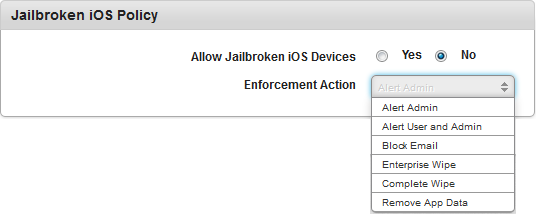
- Jailbroken iOS Policy
This setting defines if Jailbroken devices are allowed or not allowed. If Jailbroken devices are allowed, then no enforcement actions are defined. By default, Allow Jailbroken iOS Devices option is set to No. If you select the option as Yes, Enforcement Action drop-down list is removed from the screen. - Click the Save and Activate button to save the data and exit the window. The updated policy details appear in the list view.
- Click the Save and Continue button to stay on the same page and perform other updates on policy.
Click the Cancel button to close the window. - In the Compliance Definition Type section, select the Composite Compliance check box to configure composite compliance actions.
- Enter details for composite compliance actions:
By default, the Condition Definition section has the first row added with the Condition Number.Note: The Condition Number is the reference to entire row of the added compliance parameter in the grid that helps you use them to define different combined conditions in the Define Rules Using Above Conditions area.
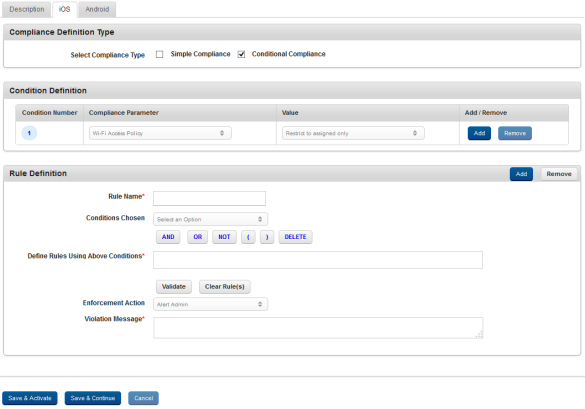
Under the Compliance Parameter column, select the parameter from the drop-down list.
Based on the compliance parameter selected, the Value column is updated with options as required.
- Select the value from the Value column drop-down list.
You can add a new row in the Condition Definition section. To add a new row, click the ADD button under Add/Remove column.
At least one condition must be exist. You can delete added rows. To delete a row, click the Remove button.Once you are done with defining conditions, do the following in the Rule Definition section:
- In Rule Name, enter the name for the rule definition.
You can add new rule definitions. To add a rule definition, click the ADD button in the Rule Definition section.
At least one rule definition must be exist. You can delete added rule definitions. To delete a rule definition, click the Remove button. Select a condition from the Conditions Chosen drop-down list. The drop-down list is loaded with the conditions that you defined.
Note: The system validates whether the rule definition follows BODMAS, a rule which specifies the order of operations in a mathematical expression. BODMAS stands for brackets, orders, division and multiplication, and addition and subtraction.
- Click the logic button to apply the conditional logic. The system inserts the logic button next to the condition number in the Define Rules Using Above Conditions area. You can click any one of the six logic buttons as required, required - and, or, not, left parenthesis, right parenthesis, or delete.
Repeat the step d through step e to complete your rule definition if required. Click the Validate button. The system validates whether the rule definition follows the BODMAS (Brackets Of Division Multiplication Addition Subtraction) rule of selection. If the created rule syntax is correct, the system displays a message "Syntax of the Rule is valid.", else displays "Syntax of the Rule is invalid. Please fix the same."
Click the Clear Rule button if you want to clear all the rule definition details.
- Select one of the actions from the Enforcement Action drop-down list for the above rule. Scroll down to the Violation Message text box, and enter a message. The message is displayed to users when an action in a rule definition is triggered.
Enter a message in the Violation Message text box. The message is displayed to users when an action in a Rule Definition is triggered.
- Click the Save and Activate button to save the data and exit the window. The updated policy details appear in the list view.
- Click the Save and Continue button to stay on the same page and perform other updates on policy.
Click the Cancel button to close the window.
Set Compliance Action Policy for Android
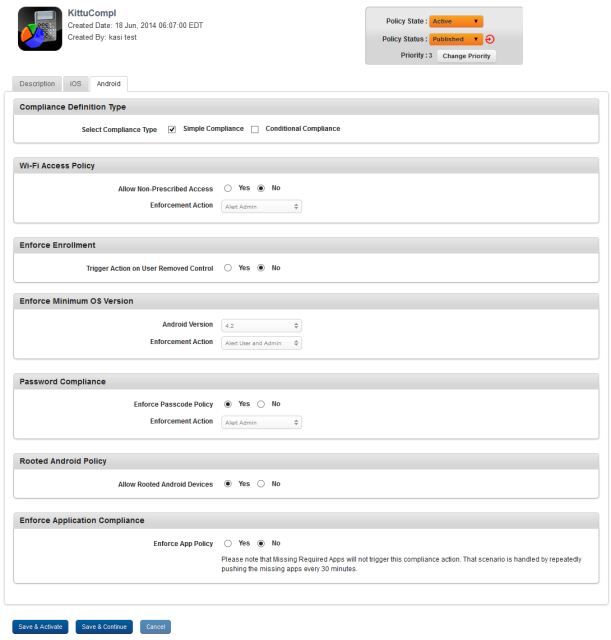
To set Compliance Action settings for Android, follow these steps:
- Enter a brief description of the policy in Device Policy Description text box.
- Click the Android tab. The system displays the Android tab with the Compliance Definition Type section by default. The Compliance Definition Type section has two check boxes:
- Select Compliance Type as Simple Compliance
- Select Compliance Type as Conditional Compliance
-
In the Compliance Definition Type section, select the Simple Compliance check box to configure simple compliance actions. The system displays the following:
-
Enter details for the simple compliance actions:
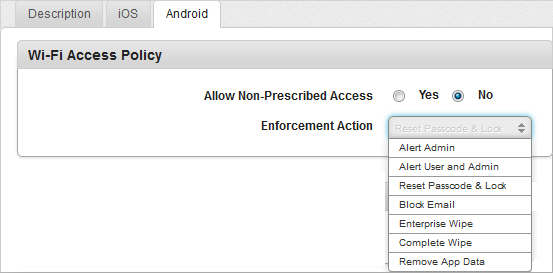
- Wi-Fi Access Policy:
This setting allows the administrator to create an alert for using or creating Wi-Fi connections not prescribed as part of the policy. By default, the Allow Non-Prescribed Access option is set to Yes. If you select this option as No, Enforcement Action drop-down list appears. If required, select the required action from the drop-down list.

- Enforce Enrollment:
This setting allows the Admin to enforce enrollment of the device. By default the Trigger Action on User Removed Control option is set to No. If you select this option as Yes, the Send Enrollment Request in Email option appears.
By default, the Send Enrollment Request in Email option is set to No. If you select this option as Yes, the Enforcement Action drop-down list appears, as shown above. If required, select the required action from the dropdown list.
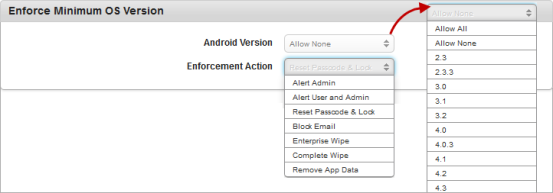
- Enforce Minimum OS Version
This setting allows the administrator to set Android version. By default, the Android Version option is set to Allow All. You can select the desired Android version from the drop-down list. If required, select the required action from the drop-down list.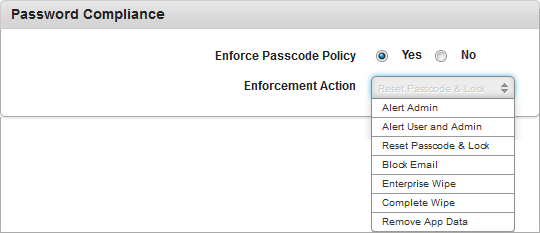
- Password Compliance:
This setting allows the administrator to set Passcode policy on device. By default, the Password Compliance option is set to No. If you select this option as Yes, then the Enforcement Action drop-down list appears. If required, select the required action from the drop-down list.
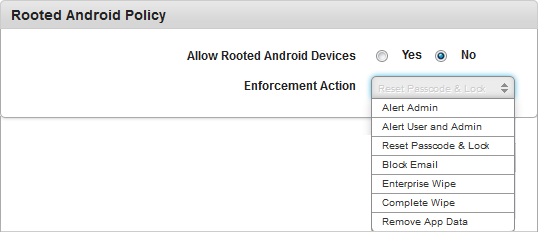
- Rooted Android:
By default, the Allow Rooted Android Devices option is set to Yes. If you select this option as No, the Enforcement Action dropdown list appears. If required, select the required action from the dropdown list.

- Enforce Application Compliance
By default, Enforce App Policy option is set to Yes. If you select this option as No, Enforcement Action dropdown list is removed from the screen. If required, select the required action from the drop-down list.
- Click the Save and Activate button to save the data and exit the window. The updated policy details appear in the list view.
- Click the Save and Continue button to stay on the same page and perform other updates on policy.
Click the Cancel button to close the window.
- In the Compliance Definition Type section, select the Composite Compliance check box to configure composite compliance actions.
- Enter details for Composite compliance actions:
By default, the Condition Definition section has first row added with the Condition Number.Note: The Condition Number is the reference to entire row of the added compliance parameter in the grid that helps you use them to define different combined conditions in the Define Rules Using Above Conditions area.
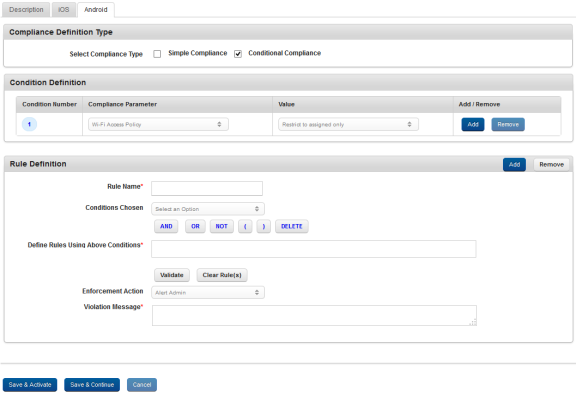
Under the Compliance Parameter column, select the parameter from drop-down list.
Based on the compliance parameter selected, the Value column is updated with options as required.
- Select the value from the Value column drop-down list.
You can add a new row in the Condition Definition section. To add a new row, click the ADD button under Add/Remove column.
At least one condition must be exist.When finished defining conditions, scroll to the Rule Definition section.
- In Rule Name field, enter the name for the rule definition. To delete a rule definition, click the Remove button.
You can add new rule definitions. To add a rule definition, click the ADD button in the Rule Definition section.
At least one rule definition must exist. Select a condition from the Conditions Chosen drop-down list. The drop-down list is loaded with the number of conditions that you defined.
- Click the logic button to apply the conditional logic. The system inserts the logic button next to the condition number in the Define Rules Using Above Conditions area. You can click any one of the six logic buttons as required - and, or, not, left parenthesis, right parenthesis, and delete.
Repeat the step d through step e to complete your rule definition if required.
Click the Validate button. If the created rule syntax is correct, the system displays a message "Syntax of the Rule is valid.", else displays "Syntax of the Rule is invalid. Please fix the same."
Click the Clear Rule button to clear all the rule definition details.
- Select one of the actions from the Enforcement Action drop-down list for the above rule.
Scroll down to the Violation Message textbox, and enter a message. The message is displayed to users when an action in a Rule Definition is triggered.
- Click the Save and Activate button to save the data and exit the window. The updated policy details appear in the list view.
- Click the Save and Continue button to stay on the same page and perform other updates on policy.
Click the Cancel button to close the window.
Others Policy
The administrator can push fonts (.TTF or .OTF) files to iOS device. Once these fonts are configure on the device, the OS recognizes the fonts properly and supplies them to the app on the device.
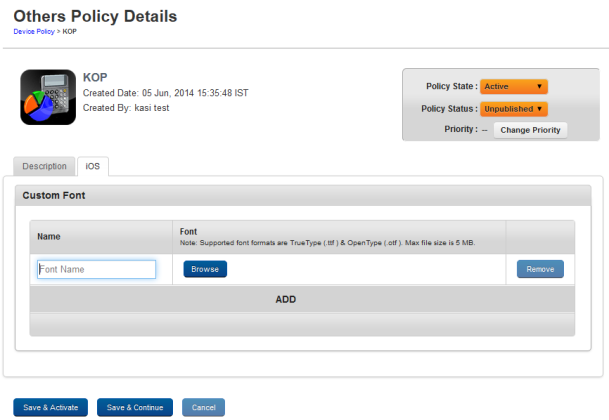
- Click the ADD button to add new rows. You can remove added rows by clicking the Remove button.
- In Name, enter a font name .
- In Font, click the Browse button to navigate to your local folder and select the font file.
-
Click the Save and Activate button to save the data and exit the window. The updated policy details appear in the list view.
- Click the Save and Continue button to stay on the same page and perform other updates on policy.
Click the Cancel button to close the window.
| Copyright © 2018 Kony, Inc. All rights reserved. |
