Custom Pipelines in App Factory
An App Factory project contains different services representing app components, such as client-side apps, back-end Fabric apps, and databases. Every service is built or triggered from the respective main job; the builds are called pipelines, which perform specific steps to build the apps. A Custom Pipeline provides a way to combine different pipelines from different App Factory projects and services and run them as a single flow.
In earlier versions of App Factory, running multiple jobs required manual intervention and monitoring. Users would have to take steps based on the result of previous pipelines and trigger the next build after a successful result.
Custom Pipelines will help organizations to completely automate the CI/CD flow, which requires building different apps and components, performing database operations, updating Fabric Apps, and other jobs. This feature helps put these operations in a sequential pipeline and trigger them from a single point.
- Custom pipelines support projects that were created in version V9 SP3 or later. Make sure that you upgrade older projects before adding them to a custom pipeline.
- Custom Pipelines only support services from Quantum Projects. For more information about the types of projects in App Factory, refer to Creating an App Factory project.
- A Custom Pipeline does not propagate the build status to consecutive builds or pipelines. Therefore, consecutive jobs will run regardless of the build status of earlier jobs.
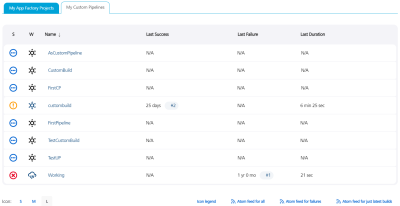
The Custom Pipelines are visible on the My Custom Pipelines tab of the App Factory dashboard.
Create and Configure a Custom Pipeline
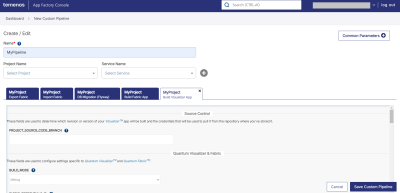
To create a custom pipeline, sign in to your App Factory console and from the left menu, click Custom Pipeline. The Create/Edit page opens.
To add a project and service to your pipeline, follow these steps:
- In the Name box, type a name for your custom pipeline.
IMPORTANT: The name must not start with a number, must not contain any special characters, and the number of characters must be between 4 and 16.
- From the Project Name list, select the project that you want to add to the pipeline.
IMPORTANT: App Factory only displays projects for which you are a primary or secondary owner.
- From the Service Name list, select the service that you want to add to the pipeline.
- Click the add button.
A new tab with the Project Name and Service appears.
Every tab displays the applicable parameters for the respective main job of the service. For more information, refer to the following sections.
- Running Flyway Jobs
- Building a Visualizer App
- Building a Fabric App
- Import a Fabric App (or Configurable Parameters)
- Export a Fabric App
NOTE: Support for the Import a Fabric App and Export a Fabric App options is added in the Temenos App Factory 202410 release.
- When you run the custom pipeline, the services are executed in order from left to right.
- You can drag the tabs to rearrange the order of execution.
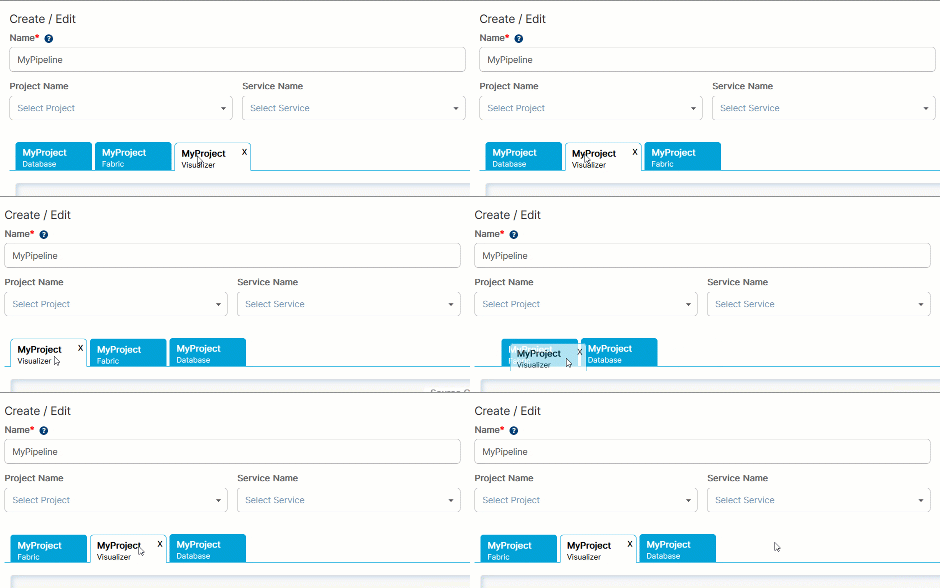
After adding and configuring the required services, on the lower-right corner, click Save Custom Pipeline. The pipeline is created and can be viewed on the My Custom Pipelines dashboard.
Run a Custom Pipeline
To run a custom pipeline, follow these steps:
- On the My Custom Pipelines dashboard, select the pipeline that you want to run.
- On the left menu of the pipeline page, click Build Now.
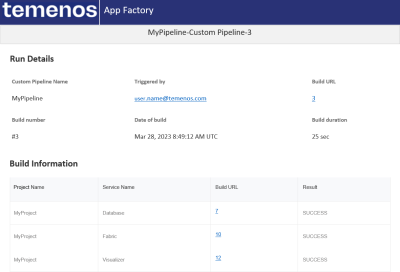
After the custom pipeline execution is complete, App Factory sends an email with the details of the builds.
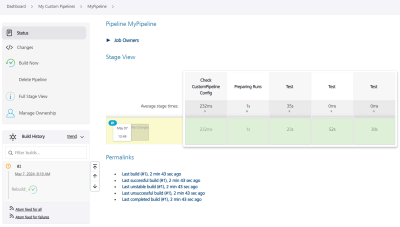
You can also view the details in the stage view of the pipeline.
Manage a Custom Pipeline
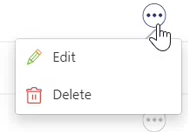
On the My Custom Pipelines dashboard, you can use the following options in the context menu:
- Edit: This option opens the Create/Edit page. You can add, remove, or modify services in the pipeline.
NOTE: The name of the pipeline cannot be changed in the edit mode.
- Delete: This option deletes the custom pipeline.
Configure Common Parameters for Custom Pipelines
From the 202410 release, App Factory has introduced support to configure Common Parameters to streamline the configuration process of Custom Pipelines.
Configuring common parameters enables users to perform deployments for multiple project services from a single point by updating the Fabric Credentials, Fabric Environment Name, and Fabric Host Environment.
Prior to the 202410 release, when a user configured custom pipelines that included multiple project services, they had to enter the build parameters for each project service individually, even when the parameters were common across all the services. In addition, while deploying a custom pipeline to multiple environments, users had to update the same build parameters to suit each environment.
Configuring common parameters reduces redundancy and simplifies the management of build parameters across different project services in a custom pipeline.
NOTE: The values that you provide in the Common Parameters are given a lower precedence than the build parameters that you configure for each project service. Therefore, for the common parameters to be applied across the pipeline, ensure that you do not provide values in the build parameters.
To configure Common Parameters for Custom Pipelines, follow these steps:
- Follow the steps to Create a Custom Pipeline.
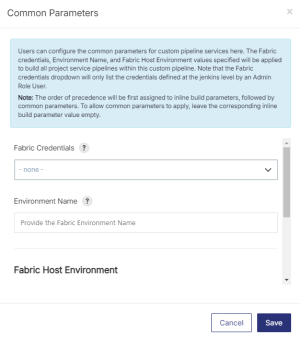
- In the Create/Edit page, click Common Parameters.
- In the Fabric Credentials field, select the Quantum credentials that App Factory must use to import, export and publish the app to the Fabric cloud.
NOTE: The Fabric Credentials drop-down displays a list of all the credentials (of the type Username with Password) that are created in your AppFactory instance at the Root-Level (in the Jenkins scope). The credentials created at the Jenkins scope can be shared across projects and used by all the AppFactory users.
Credentials created at the Project or Project Sub-Level scopes are not available in the drop-down list, and can only be configured in the project-specific parameters in their respective tabs. - In the Environment Name field, provide the name of the Quantum Fabric Cloud Environment on which the app is published.
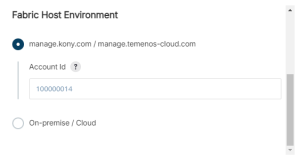
- In the Fabric Host Environment section, select the type of Quantum Fabric Environment that you are using, and provide the details based on your selection:
- Select the manage.kony.com / manage.temenos-cloud.com option to use the Quantum Fabric Cloud account associated with your App Factory Cloud account.
In the Account ID field, provide the nine-digit identifier of your Quantum Fabric Cloud account that has the environment linked.
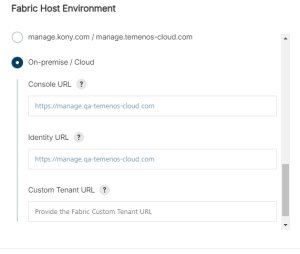
- Select the On-premise / Cloud option to use a Quantum Fabric On-Premise Environment (excluding the context path in the URLs) or a non-AWS Quantum Fabric Cloud account (such as a Fabric on Azure, Fabric on OpenShift, or others) that is accessible through your App Factory Cloud account (over the internet on the specified URL).
NOTE: If the target Quantum Fabric Environment is the same as the one in which your AppFactory account exists, you must use the Account ID field in the manage.kony.com/manage.temenos-cloud.com option.
Provide the following details under the On-premise / Cloud option:
- Console URL: The IP or DNS Address and port number of the server where you have hosted the Quantum Fabric Console.
- Identity URL: The IP or DNS Address and port number of the server where you have hosted the Quantum Fabric Identity Services.
- Custom Tenant URL: The Custom Tenant URL used to generate the Service Document for the Quantum Fabric App Services.
NOTE: If you do not provide the Custom Tenant URL, App Factory generates the Service Document by using the Identity URL of the Quantum Fabric installation environment.
NOTE: Ensure that the App Factory Environment has access to the Quantum Fabric Environment that you are using.
- Select the manage.kony.com / manage.temenos-cloud.com option to use the Quantum Fabric Cloud account associated with your App Factory Cloud account.
-
Click Save.
The Common Parameters configurations are saved in the Custom Pipeline, and will be used during the execution of the pipeline.


