
Set Native App Properties
Native app properties are divided into two categories: those that are common to all platforms, and those that are platform-specific. These properties range from the logo image your app displays to the types of screens and SDKs the app supports, and how certificates are handled.
From Kony Visualizer V8 SP4, you can also enable certain Android features by manually adding the corresponding properties to the androidbuild.properties file.
To set Native app properties, follow these steps:
- In Kony Visualizer, from the Project Explorer, click Project Settings. The Project Settings window appears.
- Click the Native tab. A list of sub-tabs appears.
- Click the Common sub-tab, and set the following properties:
- Enter a Name for the Native channel version of the application. If no name is specified, the Application ID specified under Application Properties is used.
Note: For iOS applications, if the Name of the app has non-English characters, you must add the
unicodeAppNameFlag: truekey in theinfoplist_configuration.jsonfile. - Browse and select an image file for the logo.
- Important:
- The logo you specify here will be renamed to
icon.pngwhile building the application on the iPhone platform. - For Desktop/Kiosk, the icon dimension must be in multiples of 8. Minimum pixels can be 8 x 8 and maximum pixels can be 248 x 248.
- The logo you specify here will be renamed to
- Enter a Name for the Native channel version of the application. If no name is specified, the Application ID specified under Application Properties is used.
-
Click the Android sub-tab, and set the following properties:
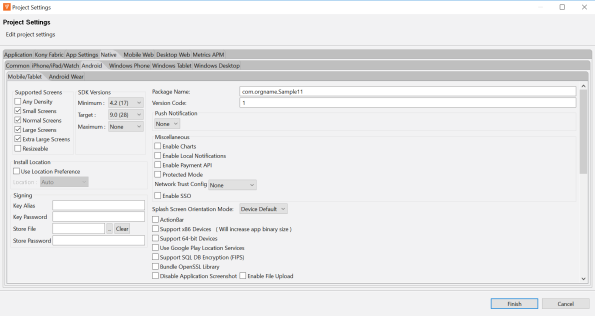
- In the Supported Screens section:
- Any Density - If this option is enabled, the application can accommodate any screen density for a resource. You do not have to use this option if your app directly manipulates bitmaps. Generally this option must always be set to true.
- Small Screens - If this option is enabled, the application supports smaller screen form-factors. A small screen is one with a smaller aspect ratio than the normal (traditional HVGA) screen. An application that does not support small screens is not available for small screen devices from external services (such as Google Play).
- Normal Screens - If this option is enabled, the application supports normal screen form-factors. Traditionally, this is an HVGA medium density screen, but WQVGA low density and WVGA high density are also considered to be normal.
Large Screens - If this option is enabled, the application supports larger screen form-factors. A large screen is defined as a screen that is significantly larger than a normal handset screen, and might require some special care on the application's part to make good use of it. The application may rely on resizing by the system to fill the screen.
If this option is unchecked, it enables screen compatibility mode.
- Extra Large Screens - If this option is enabled, the application supports extra large screen form-factors. An extra large screen is defined as a screen that is significantly larger than a large screen, for example, tablet (or something larger) and may require special care on the application's part to make good use of it. The application may rely on resizing by the system to fill the screen. If the option is unchecked, this will generally enable screen compatibility mode.
- Resizable - If this option is enabled, the application is resizable for different screen sizes. This property is deprecated by Android SDK and is supported only for customers on the 2.6 plug-in. This property enables you to run an application in the compatibility mode. For more information, see Support Screen Elements for the Android App Manifest.
- In the SDK Versions section:
- Select the Minimum SDK Version that needs to be supported for the application. The default minimum SDK value is 4.0.
- Kony Visualizer does not support SDK Versions less than 4.0.
- You must keep the minimum SDK value between 4.0 and 4.4.
- The SDK values of 5.0 and above results in a build error(technical limitation).
- The application must be built with a minimum version matching the device SDK version. For example, a device with 5.0 version of SDK cannot run an application built on 4.0.
- Notes:
- Select the Target SDK Version that needs to be supported for the application.
Note: The Target SDK Version must be greater than or equal to the Minimum SDK Version.
- Select the Maximum SDK Version that needs to be supported for the application.
- Package Name: Package name is a unique name to identify a specific application. It is generally in the format
domain.company.application.Note: The name you specify for Android Package must contain at least two segments.
A segment is a valid Java package name. The following are a few examples of valid Android Package names:
com.konylabs.<ApplicationName>com.kony.<ApplicationName>com.konysolutions.<ApplicationName>com.kony.<ApplicationName>_Android.
- Version Code. This is an internal version number. This number is used to determine whether the application is a recent version. This version number is not shown to users. The value must be an integer. You can increase each version by one to indicate a newer version.
- In Push Notification section:
- GCM - Select this option to enable Push Notifications for the application. This option copies the libraries required for push notification into the project during build time.
Important: GCM (Google Cloud Messaging) is supported only for Android SDK Versions 2.3 and above.
- Custom GCM Broadcast Receiver (Optional) - If your application requires to override the default GCM broadcast receiver behavior, you can provide your own custom broadcast receiver. To customize the GCM receiver, see Customizing GCM Broadcast Receiver.
- FCM Select this option to enable Push Notifications for the application. This option copies the libraries required for push notification into the project during build time.
- Custom FCM Service (Optional) - If your application requires to override the default FCM service, you can provide your own custom FCM service. To customize the FCM service, see Customizing FCM Service.
- GCM - Select this option to enable Push Notifications for the application. This option copies the libraries required for push notification into the project during build time.
- In the Miscellaneous section:
- Enable Charts - Select this option to enable charts in your application. Charts represent numeric data in graphical format.
- Protected Mode - Selecting this option ensures that your app is not run on a rooted/jail-broken device.
- Enable Local Notifications - Select this option to enable notifications scheduled by an app and delivered on the same device. They are suited for the apps with time-based behaviors, such as calendar events.
- Enable Payment API - Selecting this option enables online transactions in applications.
Note: Charts are not supported in arm64 and x86_64 architectures. If you enable both the Enable Charts and the Support 64-bit devices checkboxes, the project build fails. Kony has, however, developed several useful Chart components, which are pre-built and are ready to use. You can directly download and import these Chart components from Kony Marketplace to your Kony Visualizer project. Alternatively, you can use the kony.ui.browser function to render HTML-based JavaScript charts.
Note: This option works only if the application is built in Release mode. The Protected Mode option works only if the application is built in Release mode. To know more about protecting your application, see Applying Application Security.
- Network Trust Config - Using this option, you can control the certificates that are used.
- None - No certificates are allowed. This means that if the certificate is present in the Android Trust store, it will allow the N/W call to proceed; otherwise, it throws an exception. With this option, servers having non-trusted or self-signed certificates are not accessible via the app on the device.
- All - All types of certificates are allowed regardless of whether they are bundled. This option is useful during the development phase of an app, but not for publication. With this option, all servers are accessible regardless of the kind of certificate they hold (i.e. self-signed, non-trusted, trusted). Due to the lack of security inherent in this option, the Google Play store rejects such apps when they are submitted for publication.
- Allow Bundled - Only the certificates that are bundled along with the app are allowed. With this option, the app can communicate only with servers that have the certificate(s) that are bundled with the app.
- To bundle the certificate in the application, copy the certificate under the following folder:
For mobile,
<workspace>/<app>/resources/mobile/native/android/assets/certsFor tablet,
<workspace>/<app>/resources/tablet/native/androidtab/assets/certsNote: If an assets folder does not exist, create an assets folder under respective locations as indicated above.
Create certs directory under the assets folder and add all the certificates into this folder.Important: Allow Bundled option will not work in Android 2.3.x OS versions due to certificate chaining issue (causes certificate exception). This is a known Android native issue. For more information, see Issue 25152 on the Android Open Source Project Issue Tracker. Among other topics, Issue 25152 documents that to make the bundled option work in Android 2.3.x devices, the root CA needs to be omitted from the server end.
- To bundle the certificate in the application, copy the certificate under the following folder:
- Allow Pinned - Only the certificates that are pinned or associated to the host. Pinning makes use of knowledge of the pre-existing relationship between the user and an organization or service to make the security-related decisions better.
- In the Install Location section:
- Use Location Preference. This property defines the location where the application is deployed.
- Auto - Indicates that the application is deployed on the device and can be moved to the SD Card later if required.
- Prefer SD Card - Implies that the application is deployed on the storage card and cannot later be moved to the device memory.
Note: This works only if the Minimum SDK is 2.3 or above.
- Use Location Preference. This property defines the location where the application is deployed.
- Signing - Use this option to sign the android binary automatically during the build process.
- Key Alias- Use this option to enter the alias of the key.
- Key Password - Use this option to enter the password for the key.
- Store File - Use this option to locate and configure the store file.
- Store Password - Use this option to enter the password for the store.
- Splash Screen Orientation Mode - When resource folders are created from IDE by Add resource folders option, then directories like drawable-port and drawable-land are created automatically inside the directory
<workspace>/<app>/resources/mobile/native/android.- Portrait - Use this option if splash screen support is required only for portrait mode, and copy it inside drawable-port folder.
- Landscape - Use this option if splash screen support is required only for landscape mode, and copy it inside drawable-land folder.
- Both - Use this option if splash screen support is required for both modes. If splash screen images are different images, then place the image in their respective directories. If you use same image for both modes, then copy the resources under
mobile > native > androidinstead of drawable-port or drawable-land folder.
- ActionBar - Enabled only if target SDK is 3.0 or above. Use this option to enable Action Bar feature.
- Support x86 Devices - Select this option to support any Android-x86 devices.
- Support 64-bit Devices - Select this option to build an Android APK with 64-bit support. Once you select this option, only 64-bit
.sofiles (arm64-v8a and x86_64 ) are packed and the application leaves out 32-bit.sofiles (armeabi-v7a and x86). If you do not select the Support 64-bit devices option, 32-bit libraries/.sofiles (armeabi-v7a and x86) are packed by default.Note: From August 1st 2019 onwards, all apps published on Google Play must support 64-bit architectures.
To support both 64-bit and 32-bit architectures in Google Play store, you must make sure that you perform the following actions:
- Build the 32-bit and 64-bit APKs with two different version codes, which are separated by at least 1000.
For example,64-bit version code = 32-bit version code + 1000. - Ensure that the third-party libraries (
AARfiles) contain the respective.sofiles in all supported architectures: lib/armeabi-v7a, lib/arm64-v8a, and lib/x86 lib/x86_64 for 32-bit and 64-bit architectures, respectively.
Note: To enable your application to be built with bundled 32-bit native libraries and to make your app compatible with 32-bit devices, set the support32bit property as true in the androidbuild.properties file.
Note: Charts are not supported in arm64 and x86_64 architectures. If you enable both the Enable Charts and the Support 64-bit devices checkboxes, the project build fails. Kony has, however, developed several useful Chart components, which are pre-built and are ready to use. You can directly download and import these Chart components from Kony Marketplace to your Kony Visualizer project. Alternatively, you can use the kony.ui.browser function to render HTML-based JavaScript charts.
- Build the 32-bit and 64-bit APKs with two different version codes, which are separated by at least 1000.
- Support SQL DB Encryption (FIPS)- In Android, if you select this option, Kony Visualizer automatically
bundles Federal Information Processing Standard (FIPS) compliant SQL Cipher third-party library
with the application. After the application is complied with this option selected, the APIs in Web SQL support database encryption. For more info, see API Reference Guide > Offline Data Access APIs > Web SQL APIs.
Note: FIPS does not provide the mechanism to build the x86_64 architecture for Android. From V8 SP4 onwards, for the x86_64 architecture, Kony Visualizer automatically bundles libraries that are non-compliant to FIPS for the following items:
SQLCipher
OpenSSL - Bundle OpenSSL Library- In Android, if you select Bundle OpenSSL Library option, Kony Visualizer automatically bundles a third-party OpenSSL native library along with the application. The following APIs use this OpenSSL library to support additional hashing algorithms than the algorithms supported by Native Android SDK (Java Implementation). For information on supported algorithms in these APIs, see API Reference Guide > Cryptography APIs.
- kony.crypto.createPBKDF2Key
- kony.crypto.createHMacHash
Note: FIPS does not provide the mechanism to build the x86_64 architecture for Android. From V8 SP4 onwards, for the x86_64 architecture, Kony Visualizer automatically bundles libraries that are non-compliant to FIPS for the following items:
SQLCipher
OpenSSL - Disable Application Screenshot - This option specifies whether the user can take a screenshot of your application.
- Enable File Upload - Enables you to upload files to a remote sever by using the HttpRequest API.
- In Manifest Properties section:
Permissions tab: Set the permissions to true or false based on the application requirements. Set the appropriate permissions for Android Manifest file. For more information, see The Android Manifest File.
- To enable permissions, select the permissions from the left pane and click Add >.
- To disable permissions, select the permissions from the right pane and click < Remove.
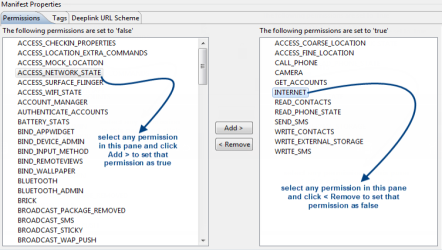
Important: Add the
WRITE_EXTERNAL_STORAGEsetting if you need to save images in an external storage like SD Card.
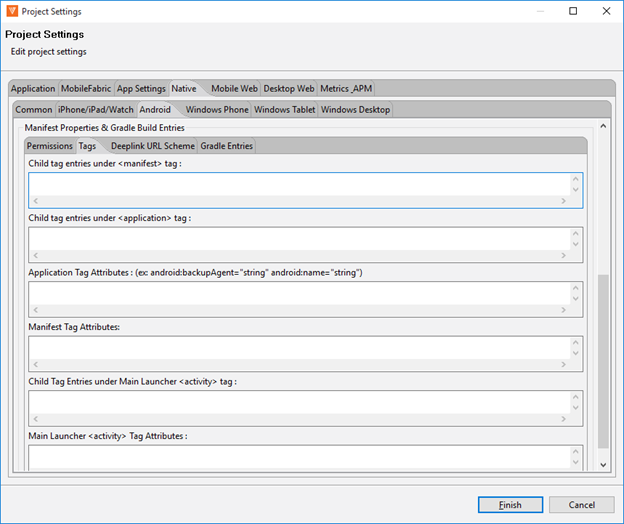
- Tags tab: You can add tags to the Android manifest file directly from Kony Visualizer by specifying tag entries and attributes on the Tags tab. You can specify child tag entries and attributes for <manifest> and <application> tags, and the Main Launcher <activity> tag. For more information on the tags you can add with the manifest or application tags, see http://developer.android.com/guide/topics/manifest/manifest-intro.html.
- Deeplink URL Scheme tab: You can use the URL Scheme tab for Deeplinking. The values for Scheme/ port/ path/host/pathprefix/path pattern specified under this tab can be used to deep-link to a particular URL directly. For instance, if you set the masterdata for a browser widget to be a URL to deep-link, use the following format,
scheme://host:port/pathorpathPrefixorpathPattern. For more information on each of the values available under the URL Scheme tab, see http://developer.android.com/guide/topics/manifest/data-element.html#path.Important: For a URL scheme in Android, please note that the scheme name should be in lowercase; otherwise the scheme name will not work in higher versions (Android 4.0 and above) or Android devices.
- Gradle Entries tab: You can use the Gradle Entries tab to import additional gradle packages, apply external plugins, or specify build-related configuration information, build dependencies, or the location of any external repositories or modules used by your Android application.
- Prefix entries are added just below any existing import statements in the build.gradle build script file. Use prefix entries to import additional gradle packages, or to specify external plugins to use in the build.
- Suffix entries are appended to the end of the generated build.gradle file. Use suffix entries to customize build logic; for example, to add compilation dependencies such as Google and Android support repositories, local library modules, or local and remote repository paths. For more information, see Organizing Build Logic.
For more information on the tags you can add, see http://developer.android.com/guide/topics/manifest/manifest-intro.html.
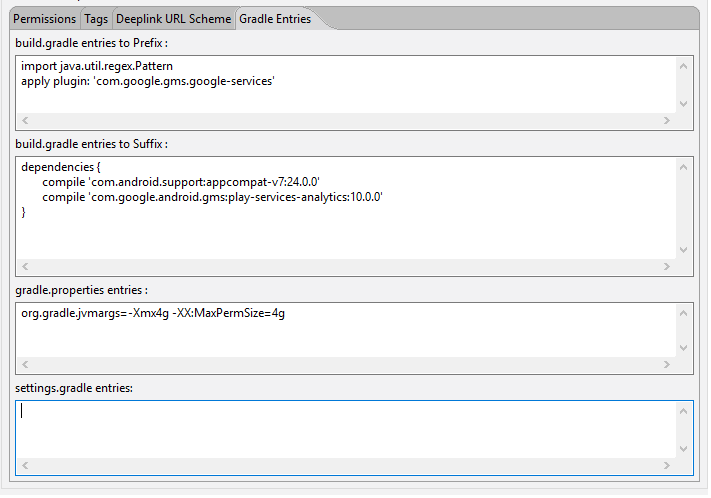
You can specify build.gradle entries as a prefix or suffix entries:
Use the gradle.properties entry to configure project-wide Gradle settings, such as the Gradle daemon's maximum heap size or proxy settings. For more information, see The Build Environment.
Use the settings.gradle entry to specify external modules (Gradle-based third-party Android libraries) to include when building your application. For more information, see Configure Your Build.
- In the Supported Screens section:
- Under iPhone/iPad/Watch tab, set the following properties:
- Bundle Identifier - Provide an unique name that identifies the application bundle. This is usually in three parts and follows the convention of
com.kony.<appname>. - Bundle Version - a number that identifies the version of the application bundle.
- Apply Glossy Effect to App Icon - specifies if the glossy effect must be applied to the app icon. The default value is false.
-
Enable Charts - Select this option to enable charts in your application.Charts represent numeric data in graphical format.
- Enable Watch - Select this option to enable wearable functionality in your application. If you select this option, wearable binaries are bundled with your application.
-
Protected Mode - Selecting this option ensures that your app is not run on a rooted/jail broken device. To use this option, you have to patch Xcode with the Finalizer utility. For information on patching Xcode with Finalizer, see the Install Finalizer Package. This option works only if the application is built in Release mode. The Debug mode will generate unprotected binaries.To know more about protecting your application, refer Protect your app topic.
Note: From the Kony Visualizer V8 Service Pack 3 release, it is not mandatory to install the Finalizer tool to build iOS applications in protected mode.
- Push Certificate - Choose the required option from the list to either enable push notifications in different types of environments. You can also disable receiving push notifications for any environment. This field contains the following options:
- development: Select this option to receive push notifications when in the developer environment.
- production: Select this option to receive push notifications when in the production environment.
- None: Select this option to disable push notifications in any environment.
Note: This feature is available from Kony Visualizer V8 SP4 FP19 onwards, and is available in both Kony Visualizer Classic and Kony Visualizer.
- Application Launch Mode for iPad - specifies the default mode of launching the application on iPad. Portrait is the default value.
- Supported Orientations for iPad - specifies the supported orientations for the iPad. This depends on the launch mode. The different orientations for a form and at application level are listed at
- Deeplink URL Scheme: specifies a url to which the application will deep-link to. If the application name is southwest then the url scheme that the other applications can use to launch the southwest application is southwest://. For more information about deep-linking, see Appendix E: the App Service Event.
- Platform Settings: Using the Platform Settings Area, you can set certain default properties for an application for iPhone.
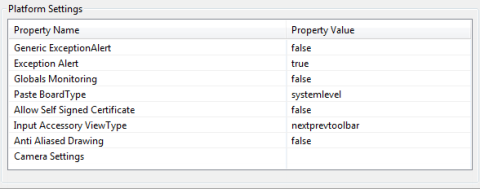
- Generic exception alert: When true, generic exception alerts like "system error" are fired and when false detailed exception message is shown as alert. Best practice is to be use true for release mode and false for debug mode.
- Exception alert: When true, system throughs the exception alerts otherwise (with false) app would crash in case of exception instead of alert. Best practice is to be use true for release mode and true for debug mode.
- Globals monitoring: If set to true, the information like number of variables of the given type used in the app. Possible types are Strings, tables, numbers, closures, forms, other objects is printed in the logs.
- Paste Board Type: It will allow the user to copy paste content from the app to external writable area like message etc. system level - it will allow to copy paste into other applications. Applevelpersistent - it will allow to copy paste within the app and the messages are persistent will be available across the app restarts. Applevelnonpersistent - it will allow to copy paste within the app and the messages are Not persistent and will not be available across the app restarts. Nopasteboard - it will not allow paste anywhere.
Allow Self Signed Certificate: By default it is false, if true, it allows self signed certificate for development.
Note: Self Signed Certificate option is only applicable if you use Network APIs in your application.
- Input Accessory View Type: The input accessory view type for widgets like text box, calendar, grouped widgets etc where you have next previous cancel buttons. This can be overridden by form level Input Accessory View Type.
- Anti Aliased Drawing: If set to true, allows smoother widgets and layout without any jagged edges.
- Camera Settings: Allows to set images to the icons which appear on the camera such as cancel icon, settings icon, tapanywhere.
- Backward_compatibility_mode: By default it is false, if true it will allow the application feature to behave as it would have behaved on earlier version (if there is any behavioral change in the latest version)
- Platform Settings: Using the Platform Settings Area, you can set certain default properties for an application for iPhone.
- Click the Windows Phone sub-tab, and set the following properties:
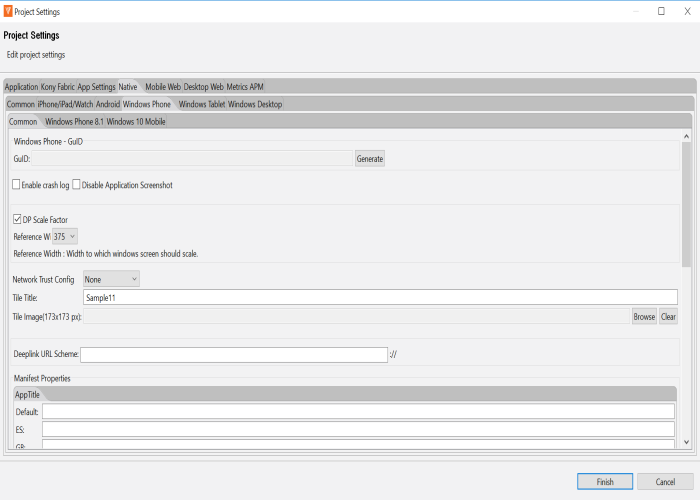
- Under the Common sub-tab:
- Click Generate to generate a GuID for the Windows Mobile. This GuID enables you to view the application on Windows 7 emulator. You need to perform this step only once after you install the Windows 7 SDK.
Network Trust Config - Using this option, you can control the certificates that are used.
- None - No certificates are allowed. This means that if the certificate is present in the Windows Certificate Trust Root, it will allow the N/W call to proceed; otherwise, it throws an exception. With this option, servers having non-trusted or self-signed certificates are not accessible via the app on the device.
- All - All types of certificates are allowed regardless of whether they are bundled. This option is useful during the development phase of an app, but not for publication. With this option, all servers are accessible regardless of the kind of certificate they hold (i.e. self-signed, non-trusted, trusted). Due to the lack of security inherent in this option, the Windows Store rejects such apps when they are submitted for publication.
- Allow Bundled - Only the certificates that are bundled along with the app are allowed. With this option, the app can communicate only with servers that have the certificate(s) that are bundled with the app.
- Allow Pinned- Only the certificates that are pinned or associated to the server. Pinning makes use of knowledge of the pre-existing relationship between the user and an organization or service to make the security-related decisions better.
Note: All the allowable exceptions are bypassed. For exceptions that cannot be bypassed, corresponding action should be taken by the app developer.
To bundle the certificate in the application, copy the certificate under the following folder.
Mobile:
<workspace>/<app>/resources/mobile/native/winphone8/assets/certs <workspace>/<app>/resources/mobile/native/winphone10/assets/certs
Tablet:
<workspace>/<app>/resources/tablet/native/windows8/assets/certs <workspace>/<app>/resources/tablet/native/windows10/assets/certs
Note: The Network Trust Config field is also available under the Windows Tablet and Windows Desktop sub-tabs.
SSL Pinning - Windows Limitation
For Windows devices, when SSL pinning is implemented, and the HTTPRequest initiates, if a Man in the Middle (MitM) attack accesses the HttpRequest (for example, fiddler), the HttpRequest goes to the server through the MitM and comes with a response. However, the client does not receive the response as the MitM attack corrupts the certificate of the response during the communication process. This applies to all windows channels (Windows Phone8.1, Windows 8.1, Windows 10, Windows 10 mobile & Windows Desktop).
In case of Android and iOS platforms, if there is a MitM attack, the HttpRequest aborts.
- Tile Title - Specifies the Title Headers for the application which is displayed as a tile.
- Tile Image - Browse and select a Tile Image for Windows platform. This image must be of the size 173x173 pixels and is used as the image for the tile (application icon).
- Manifest Properties - set the appropriate permissions to true using the manifest properties area. For more information refer, Windows Manifest.
- Under the Windows Phone 8.1 sub-tab:
- In the Application UI sub-tab, set the following:
- Display name: Specifies display name of the application visible in the applications list.
- Description: Specifies the description to be displayed on the tile. For example a tile on finance can contain a generic description about stocks.
- In the Application UI sub-tab, set the following:
- In the Capabilities tab, set the permissions to true or false based on the application's requirements. For more information about each of the permissions refer Capabilities and requirements.
- To enable permissions, select the permissions that are currently false and click Add >.
- To disable permissions, select the permissions that are currently true and click < Remove.
- In the Packaging tab, set the following properties:
Package name: A unique name to identify a specific application. It is generally in the format
domain.company.application.- Package display name: The name with which the application is submitted to Google play. This name is used to search the application in Google play.
- Publisher name: The publisher of the app. This default value is the name of the project. This attribute is required for certain types of apps, such as push-enabled apps.
- Publisher display name: Display name of the publisher.
- Version: Internal version number of the package.
- Publisher ID: Kony is the default Publisher ID of the project.
Note: You must have the Windows 7 SDK installed to generate the Windows Mobile GuID. For more information about installing Windows 7 SDK, see the Kony Visualizer Installation Guide.
- Click the Windows Tablet and Windows Desktop sub-tabs to set their respective properties.
In Windows Desktop, if you select Disable Application Minimize feature, the application will not be allowed to minimize.
- Click Finish.

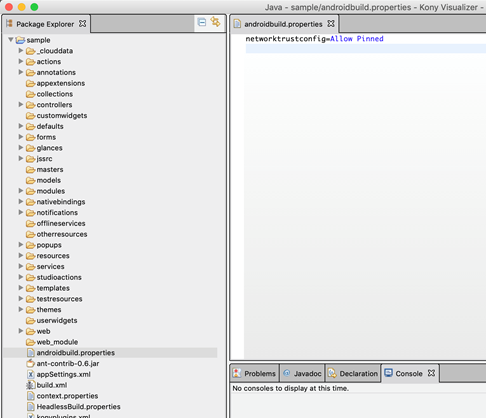
Add Android Properties to androidbuild.properties File
From V8 SP4 onwards, you can enable or disable certain Android features by adding the corresponding properties to the androidbuild.properties file. You must first create the androidbuild.properties file in your Kony Visualizer project workspace (workspaceLocation\\project) as shown in the image.
Note: If the same property is passed from Kony Visualizer in future plugins, the Kony Visualizer property takes precedence.
Enable Android Features
You can enable the following Android features by adding these properties in the androidbuild.properties file:
Public Key Pinning
You can enable the Public Key Pinning feature by specifying the following property in the androidbuild.properties file as shown.
This feature is enabled only if the networktrustconfig property is set as Allow Pinned in the androidbuild.properties file.
networktrustconfig = Allow Pinned
React Native
You must set both the following properties in the androidbuild.properties file as shown, to enable React Native feature support:
enableReactNative = true
Add the enableReactNative flag to enable ReactNative support.
reactNativeAppsList = "<reactNativeApp1>,<reactNativeApp2>..."
Specify the list of ReactNative apps (root folder name of ReactNative apps that are placed in the ReactNativeProjects folder) to be embedded into your Kony app.
APK Tamper Protection
The APK Tamper Protection feature helps you to verify if an APK has been tampered with (modified from its original version). If a tamper is detected, the application safely exits during the bootup process. This is an optional feature that is supported only in Release and Protected modes. APK Tamper Protection is available from V8 SP4 onwards. From V8 SP4 Fixpack 20 onwards, support for Google Play App Signing has been added. Google Play App Signing is a mandatory signup for Android App Bundle support.
This feature is enabled only if the addAPKTamperProtection property is set as true in the androidbuild.properties file.
addAPKTamperProtection = true
For this feature to work, you must provide either of the information as follows:
- Add KeyStore entries from the Signing section in Visualizer: Project Settings > Native > Android > Mobile/Tablet > Signing.
- Alternatively, you can add the developerSigningKeyHash key in the androidbuild.properties file.
An example of a typical developerSigningKeyHash is shown here.
developerSigningKeyHash:2otpMeAC68KCm7Q+F48tzTFtzmU=
The developerSigningKeyHash key helps you to utilize the APK Tamper Protection feature in the following scenarios:
- Google Play App Signing, where the key used to sign the APK that is being uploaded is different from the final APK delivered to customers from Google Play. For more information on how the Google Play App Signing process works, click here.
- CI/Cloud build environment, without actually revealing the original developer signing KeyStore information.
Generate the developerSigningKeyHash Key for Google Play App Signing
- When customers enroll into the Google Play App Signing process , the SHA-256 or SHA-1 hash of the public key can be obtained. They can obtain the hash by signing in to Google Play Store Console, navigating to Release Management > App Signing, and then copying the SHA-256/SHA-1 certificate fingerprint.
-
Go to
<WorkSpace>\temp\<AppID>\build\luaandroid\extres. - Locate and open the
PrintApkSignatureHash.jarfile. - Run the following command to generate the developerSigningKeyHash:
java -jar PrintApkSignatureHash.jar --fingerprint "<Hash-Algorithm>: <certificate fingerprint in Hexadecimal>"
Here,Hash-Algorithmcan either beSHA-1orSHA-256.
For example:
java - jar PrintApkSignatureHash.jar--fingerprint“ SHA256: EB: 71: 4E: 90: 3D: 2A: 7E: 14: 4B: D1: 73: 47: 3A: EA: 3D: 06: C5: F2: 69: B5: DC: BB: 28: 44: A0: 8D: AC: 17: E7: F2: 7F: 8F”
- Here is a sample output that is generated.
developerSigningKeyHash : xxxxxxxxxxxxxxxxxx
- Copy and paste the output value in the
androidbuild.propertiesfile.
Important Points
- If you specify KeyStore entries through Kony Visualizer, the KeyStore entries will take precedence over the developerSigningKeyHash key until Kony Visualizer V8 SP4 Fixpack 19.
- From Kony Visualizer V8 SP4 Fixpack 20 onwards, if you specify Visualizer KeyStore entries and developerSigningKeyHash, both items are respected simultaneously and the app is launched if any one of these items matches. This enhancement helps you to test the APK locally before uploading it to Google Play.
- If you do not want to upload the Upload Signing key to the CI cloud, use the
uploadSigningKeyHashproperty in the additionalbuild.properties file as an alternative to specifying KeyStore entries. - You must provide either the KeyStore or uploadSigningKeyHash to test Google Play App Signing locally for the enrolled APK, which is tamper-protected. If you do not provide any of those values, the test APK that is generated will be signed by the debug key and the APK will not boot as the hash validation process fails at run time.
Generate the developerSigningKeyHash Key by using the KeyStore File
To manually sign the application by using your own keystore file, follow these steps:
-
Go to
<WorkSpace>\temp\<AppID>\build\luaandroid\extres. - Locate and open the
PrintApkSignatureHash.jarfile. - Run either of the following commands to generate the developerSigningKeyHash:
- For apps built in Kony Visualizer V8 SP4 Fixpack 19 or earlier, use the following command. This command generates the hash with SHA-1 algorithm.
java -jar PrintApkSignatureHash.jar keyStorePath keyStorePassword keyAlias - For apps built in Kony Visualizer V8 SP4 Fixpack 20 or later, use the following command. This command generates the hash with either SHA-1 or SHA-256 algorithm, depending on the
-- algorithminput parameter.java -jar PrintApkSignatureHash.jar –-storepath keyStorePath –-storepass keyStorePassword –-alias keyAlias --algorithm hash-logo
Here, the items are as follows:
keyStorePath: Path to your actual developer signing key, which is used to upload your app's APK to the Google Play Store.
keyStorePassword: Password of your developer KeyStore.
keyAlias: Signing key alias of your developer KeyStore.
hash-algo: Hashing algorithm that is used to generate the signing key hash. It can either be
SHA-1orSHA-256.
- For apps built in Kony Visualizer V8 SP4 Fixpack 19 or earlier, use the following command. This command generates the hash with SHA-1 algorithm.
Note: If the hash is generated with SHA-256 algorithm, the hash will not work for apps built in Kony Visualizer V8 SP4 Fixpack 19 or earlier. However, if the hash is generated with SHA-1 or SHA-256 algorithm, the hash will work for apps built in Kony Visualizer V8 SP4 Fixpack 20 or later.
- Here is a sample output that is generated.
developerSigningKeyHash : xxxxxxxxxxxxxxxxxx
Note: If you are generating the hash of the upload signing key to support Google Play App Signing, use uploadSigningKeyHash as the key instead of developerSigningKeyHash.
- Copy and paste the output value in the
androidbuild.propertiesfile.
Support for 32-bit and 64-bit Architectures in a Single APK
The support32bit property enables your application to be built with bundled 32-bit native libraries and makes your app compatible with 32-bit devices.
This feature is enabled only if the support32bit property is set as true in the androidbuild.properties file.
support32bit = true
Earlier, when you selected or unselected the Support 64-bit Devices check box from Project Settings > Native > Android, either 64-bit support or 32-bit support was enabled for your application. It was not possible for you to generate an application binary that bundles both 32-bit and 64-bit native libraries.
From V8 SP4 Fixpack 12 GA onwards, when you enable the support32bit property in the androidbuild.properties file and select the Support 64-bit Devices check box from Project Settings > Native > Android, the Kony Android build generates a Fat application. This Fat application supports all architectures: armeabi-v7a, x86, arm64-v8a, and x86_64.
Note: Kony recommends that you use a Fat binary for testing purposes only, and Kony does not recommend you to upload a Fatbinary to Google Play. Use either the Split APK feature or the Android App Bundle feature to reduce the size of the binary that is downloaded to customers' devices.
Note: The Charts widget is supported only on 32-bit devices; so for an application that has 32-bit and 64-bit support, the Charts widget does not work for 64-bit devices. Kony has, however, developed several useful Chart components, which are pre-built and are ready to use. You can download and import these Chart components from Kony Marketplace. Alternatively, you can use the kony.ui.browser function to render HTML-based JavaScript charts.
Split APKs based on Supported Architecture
Bundling all architectures into a single fat APK increases the APK size of the app that is delivered to customers. This APK Splitting feature, which has been introduced from V8 SP4 Fixpack 12 GA onwards, helps you to decrease the APK size that is downloaded based on the target platform architecture. For more information on the splitting of APKs, click here.
You must enable the splitapks property as true in the androidbuild.properties file. This action generates the architecture-specific individual .apk files and universal .apk file that supports all the architectures. This approach reduces the size of the .apk file.
splitapks = true
Note: Based on the specified value of the support32bit property in the androidbuild.properties file as well as on the selection of the Support x86 Devices and Support 64-bit Devices check boxes in the Kony Visualizer Project Settings, the Kony Android build generates a set of APKs, each with a single supported architecture.
- Architecture-specific .apk files are generated with this naming convention:
<appid>-<architecture>-<buildtype>.apk
Consider an app with appid as KonySample, for which the 64-bit ARM APK names for Debug and Release modes are as follows:- Debug mode: KonySample-arm64-v8a-debug.apk
- Release Unsigned mode: KonySample-arm64-v8a-release-unsigned.apk
- Release Signed mode: KonySample-arm64-v8a-release-signed.apk
- Universal .apk files with all selected architectures are generated with this naming convention:
<appid>-universal-<buildtype>.apk
Consider an app with appid as KonySample, for which the APK names for Debug and Release modes are as follows:- Debug mode: KonySample-universal-debug.apk
- Release Unsigned mode: KonySample-universal-release-unsigned.apk
- Release Signed mode: KonySample-universal-release-signed.apk
The APKs are generated under the following paths:
- For Mobile: <workspace>\temp\<appid folder>\build\luaandroid\dist\<appid folder>\build\outputs\apk folder.
- For Tablet: <workspace>\temp\<appid folder>\build\luatabandroid\dist\<appid folder>\build\outputs\apk folder.
Note: For architecture-specific .apk files, the version code of the individual .apk file must be unique. This is because since both 32-bit and 64-bit APKs are supported in 64-bit devices, there will be a conflict while choosing the APK file. Specifying a higher version code for the 64-bit APK file results in a greater precedence, and thus the 64-bit APK file would be chosen for a 64-bit device. This process helps to leverage the higher performance of a 64-bit APK in a 64-bit device.
The Kony Android build.gradle file automatically handles the use cases related to APK versioning in the following manner:
- The Kony Android
build.gradlefile assigns architecture codes in the following order of priority:
'armeabi-v7a':1 < 'x86':2 < 'arm64-v8a':3 < 'x86_64':4 - The final Google Play version code of the individual .apk file is: {(architecture code) * 1000} + (version code from project settings)
For example, if the version code in the Kony Visualizer Project Settings is 3. Then, the Google Play version codes of each architecture APK is as follows:- armeabi-v7a: 1003 {(1 * 1000) +3 }
- x86 : 2003 {(2 * 1000) +3 }
- arm64-v8a : 3003 {(3 * 1000) +3 }
- x86_64 : 4003 {(4 * 1000) +3 }
Note: If you want to split APKs based on density along with architecture, customize the build by adding the appropriate build.gradle entries in the Gradle Entries tab > build.gradle entries to Suffix section.
Generate Android App Bundle
Google Play’s Dynamic Delivery feature uses your Android App Bundle to build and serve APKs that are optimized for each device configuration. This results in a smaller app download for customers by removing unused code and resources needed for other devices. The support for Android App Bundle generation has been added from V8 SP4 Fixpack 12 GA onwards. For more information about Android App Bundle, click here.
To enable this feature, you must set the generateAppBundle property as true in the androidbuild.properties file. The Kony Android build then generates the binary in App Bundle (aab) format. The AAB file is a Google Play upload format file, and is not an installable file.
Note: Kony Visualizer and CI builds in Kony Visualizer do not provide support for the generation of binaries in the Android App Bundle (aab) format. You must configure Kony Visualizer to support the generation of 32-bit and 64-bit architectures in a single APK for generating the Android App Bundle.
generateAppBundle = true
The AAB file is generated in the following paths after the build:
- For Mobile : <workspace>\temp\<appid folder>\build\luaandroid\dist\<appid folder>\build\outputs\bundle folder.
- For Tablet : <workspace>\temp\<appid folder>\build\luatabandroid\dist\<appid folder>\build\outputs\bundle folder.
Note: The Kony Android build generates an AAB file with all the selected architectures. The selected architectures are based on the specified value of the support32bit property in the androidbuild.properties file as well as on the selection of the Support x86 Devices and Support 64-bit Devices checkboxes from the Kony Visualizer Project Settings.
To test how Google Play uses the AAB file to generate APKs and how those APKs behave when deployed to a device, follow these steps:
- Download bundletool.
Note: Android provides a tool, named bundletool, to extract APKs from the AAB file and test them. For more information on the usage of bundletool, click here.
- Extract the APKs set file from the aab file by using this command:
java -jar bundletool.jar build-apks --bundle=<app-id>.aab --output=<app-id>.apks --overwrite
Here, APKs set is an archive file with the extension as .apks. - The following command fetches the configuration details of the connected device and installs the device-compatible set of APKs:
java -jar bundletool.jar install-apks --apks=<app-id>.apks --device-id=serial-id
Here, --device-id: Optional parameter that helps to install the device-compatible set of APKs to a specific device (identified by serial-id), when multiple devices are connected.
serial-id: Device identifier that the adb devices command returns.
Note: If you want to estimate the download size of the APKs from Google Play, generate the device-specific set of APKs by following the procedure specified here.
As part of the V8 SP4 Fixpack 12 GA release, the Dynamic Delivery feature (on-demand delivery of modules when an app developer requests) is not supported for Kony Framework libraries. You can, however, implement the Dynamic Delivery feature for third-party libraries by using FFI code.
To sign the App Bundle file and ensure that the file is ready to be uploaded to Google Play, follow these steps
- It is mandatory that you enroll into the Google Play App Signing process for you to be able to upload your App Bundle to the Play Console. Otherwise, you cannot upload the App Bundle to Google Play. For more information on how the Google Play app signing process works, click here.
- The Release build generates a signed App Bundle with the Release Key value, which is specified in Kony Visualizer. This Release Key is usually either the Upload Key (if you have already enrolled for the Google Play App Signing process) or the actual Release Key (if you are opting for the Google Play App Signing process for the first time to submit an update in the form of an App Bundle to the existing app in Google Play). The signed App Bundle can then be uploaded to Google Play. While delivering optimized APKs to the device, Google Play signs the APKs with its own app signing key.
- If the Release Key value is not specified in Kony Visualizer, the Release build generates an unsigned App Bundle. The jarsigner command can be used to sign the aab file. For further information on jarsigner, click here.
jarsigner -verbose -sigalg SHA1withRSA -digestalg SHA1 -keystore <keystorefile>
<app bundle file> alias_name
Note: apksigner is not supported to sign the App Bundle.
- In Debug build, Gradle automatically signs the App Bundle with the Android SDK Debug Key.
Bundle a Customized Cordova-Generated Android Project
To bundle the manually customized version of your Cordova-generated Android project, you must set the cordovabuildmode property as incremental in the androidbuild.properties file. This feature is available from Kony Visualizer V8 SP4 Fixpack 47.
cordovabuildmode = incremental
For more information about how to manually customize the Cordova-generated Android project, click here.
| Rev | Author | Edits |
|---|---|---|
| V8 SP4 | NMK | SS |
| Copyright © 2013 Kony, Inc. All rights reserved. |