
Generating Certificate Signing Request (CSR) in Windows
To generate a CSR in Windows, follow these steps:
Make sure that you have OpenSSL enabled in your system.
- Open command prompt and enter the command in the below format.
openssl req -out <csrname.csr> -new -newkey rsa:2048 -nodes -keyout <keyname.key>For example,openssl req -out konypro.csr -new -newkey rsa:2048 -nodes -keyout konypro.key. - If required, enter details for extra attributes. For example, a challenge password, or Optional company name and others. A CSR is generated. Save it to you desktop.
- Upload the CSR for Kony signing in the EMM Management console Device Settings > Communication Configuration tab.
- After uploading the CSR, download the Kony Signed CSR to your desktop.
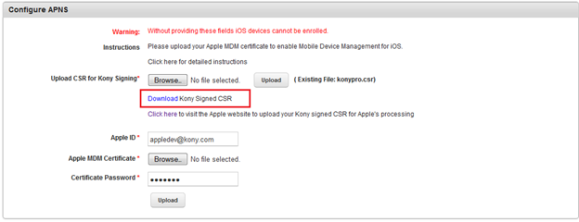
- Upload the signed CSR to your Apple Push Certificates portal using your Apple developer credentials.
- After the upload, download the pem file from Apple portal.
- Rename the file to your company identifiable name. For example, yourcompany.pem.
- Convert the downloaded .pem file to a.p12 file using the following command format.
openssl pkcs12 -export -inkey <yourcompany.key> -in <yourcompany.pem> -out <yourcompany.p12>For example,openssl pkcs12 -export -inkey konypro.key -in konypro.pem -out konypro.p12. - If prompted, provide a password while creating the .p12 file.
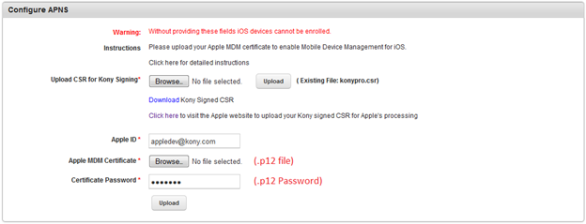
- Upload the .p12 file to the Kony Management Suite portal under Device Settings > Communication Configuration.
- Enter the password you created during .p12 file creation process.
Generating Certificate Signing Request (CSR) in Linux
To generate a CSR in Linux, follow these steps:
Make sure that you have OpenSSL enabled in your system.
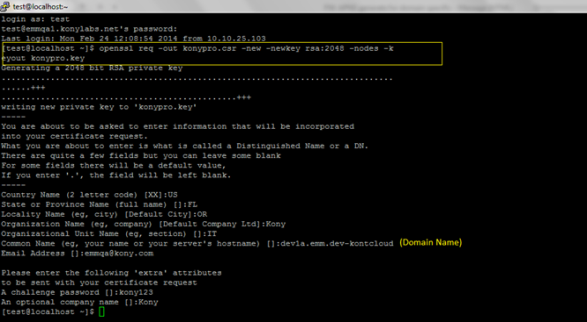
- Open command prompt and enter the command in the below format.
openssl req -out <csrname.csr> -new -newkey rsa:2048 -nodes -keyout <keyname.key>For example,openssl req -out konypro.csr -new -newkey rsa:2048 -nodes -keyout konypro.key. - If required, enter details for extra attributes. For example, a challenge password, or Optional company name and others. A CSR is generated. Save it to you desktop.
- Upload the CSR for Kony signing in the EMM Management console Device Settings > Communication Configuration tab.
- After uploading the CSR, download the Kony Signed CSR to your desktop.
- Upload the signed CSR to your Apple Push Certificates portal using your Apple developer credentials.
- After the upload, download the pem file from Apple portal.
- Rename the file to your company identifiable name. For example, yourcompany.pem.
- Convert the downloaded .pem file to a.p12 file using the following command format.
openssl pkcs12 -export -inkey <yourcompany.key> -in <yourcompany.pem> -out <yourcompany.p12>For example,openssl pkcs12 -export -inkey konypro.key -in konypro.pem -out konypro.p12. - If prompted, provide a password while creating the .p12 file.
- Upload the .p12 file to the Kony Management Suite portal under Device Settings > Communication Configuration.
- Enter the password you created during .p12 file creation process.
| Copyright © 2017 Kony, Inc. All rights reserved. |