
Creating Android Certificates and Keys
To create Android Certificates and Keys follow these steps:
Create an Android GCM Key
- In a browser, go to https://code.google.com/apis/console, and log in. If you do not have an account already, you need to create one. Note that this Google ID will be input into the Management Cloud configuration setup. You should not use a personal account.

- the Go Back option.

- Click the Create Project button.

- On the left side of the API’s Dashboard page, click the drop-down menu and select Create.

- Enter a name and choose Create project. Your browser will refresh and display a new URL.

- The number after #project (Ex: 214267376347) should be noted. This is your Sender ID, and will be needed in the Management Cloud console during initial configuration.

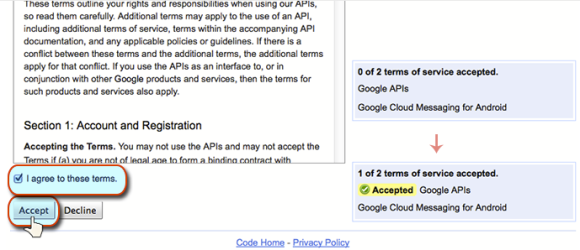
- Scroll down the page to Google Cloud Messaging for Android and set the ON/OFF widget to ON.

-
Agree to the terms and conditions and click Accept.
- At the bottom of the API’s home page, click the Create new Server key button.

- Choose the Server Key option and click Create.
- Two GCM Keys are now displayed. Record the top one labeled "for server apps".

- Store this key in a safe place to be used during your Management Cloud initial configuration. You will apply it with the Keystore created in the next steps below.
Google Maps API Key
To create your API key, follow these steps:
- Visit the APIs Console at https://code.google.com/apis/console and log in with your Google Account.
- Click the Services link from the left-hand menu.
- Activate the Google Maps API v3 service.
- Click the API Access link from the left-hand menu. Your API key is available from the API Access page, in the Simple API Access section. Maps API applications use the Key.

Creating an Android Key Store
- Verify that your local computer you will use to generate the Key Store has Keytool installed and available. Keytool is a component of the Java Development Kit (JDK).
- You will need to launch Keytool from the Java install bin directory (if Windows machine), or the root path (if Mac machine), as Keytool is included by default in Xcode on a Mac. You can also use Keytool from Java on a Mac if desired by using the
./keytoolcommand from the Java bin directory. - Enter this command: keytool –genkey –v –keystore my_release_key.keystore –alias alias_name –keyalg RSA –keysize 1024 –validity 10000
Note that ‘my_release_key’ and ‘alias_name’ can be customized to preference.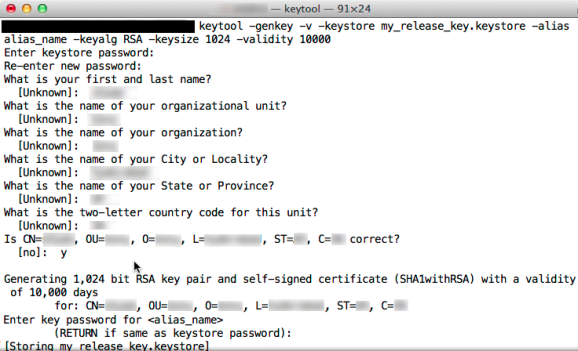
- Provide a password for the keystore and make note of this password.

- Provide desired details for each question.

- A certificate will be generated with the Alias chosen in the Keytool command. Provide a password for this certificate, or hit enter to reuse the password chosen for the keystore in Step 4 above. The Keystore is now stored with the name chosen in the Keytool command.

- Store this keystore and info in a safe place to be used during your Management Cloud initial configuration.
-
You can display a certificate's SHA-1 fingerprint using the keytool program with the
-vparameter.Command
keytool -list -v -keystore my_release_key.keystore -alias <alias name> -storepass <storepass name> -keypass <keypass name>
Response
Owner: CN=ll, OU=ll, O=ll, L=ll, S=ll, C=ll
    Issuer: CN=ll, OU=ll, O=ll, L=ll, S=ll, C=ll
    Serial Number: 59092b34
    Valid from: Thu Sep 25 18:01:13 PDT 1997 until: Wed Dec 24 17:01:13 PST 1997
    Certificate Fingerprints:
         MD5:  11:81:AD:92:C8:E5:0E:A2:01:2E:D4:7A:D7:5F:07:6F
         SHA1: 45:B5:E4:6F:36:AD:0A:98:94:B4:02:66:2B:12:17:F2:56:26:A0:E0
Use the command above and copy the SHA1 from the response to your clipboard. The SHA1 is used in the steps below.
-
In your Google account > API Access page, you need to tag every enterprise app with a unique bundle identifier with the fingerprint generated. This needs to be done for both Android and iOS. This ensures that apps can show Google Maps and use other Google resources. To configure fingerprint, do the following:
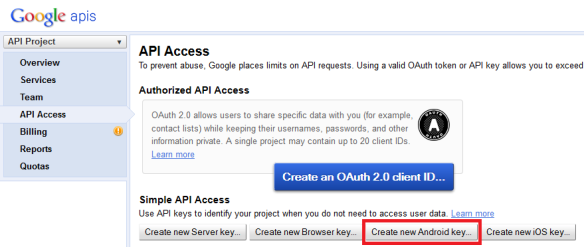
- Click the Create new Android key button. The Configure Android Key for API Project dialog appears.

- Enter the fingerprint details you copied from the previous Step 8 in the above text box and click Create.
One SHA1 certificate fingerprint and package name (separated by a semicolon) per line.
Example:
45:B5:E4:6F:36:AD:0A:98:94:B4:02:66:2B:12:17:F2:56:26:A0:E0;com.companyname.containerappThe API Key is generated as shown below:

The API Key must be copied and provided in the EMM Console.
- Click the Create new Android key button. The Configure Android Key for API Project dialog appears.
- Provide the Google Maps Android API Key generated from Step 9 along with other details in the EMM Console > Application Settings > Certificates > Android section.
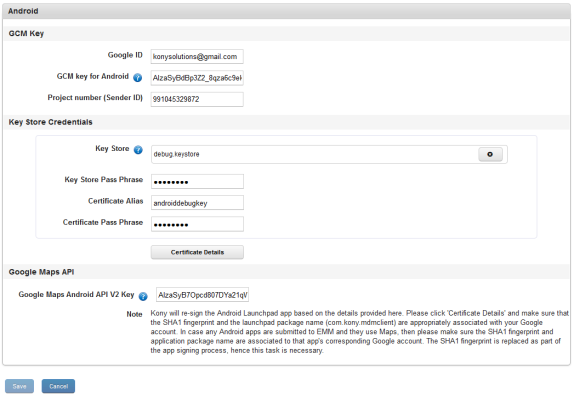
- Google IDGoogle ID: Enter your email account ID.
- GCM Key for Android: Enter the Google Cloud Messaging (GCM) Key.
- Project Number (Sender ID): Enter the Sender ID.
- Key Store: Click the +Add button to select the certificate from its location and click the Open button. The selected certificate with size in KB appears next to Key Store label.
Click the Close icon if you wish to close the selected certificate details.
 - Key Store Pass Phrase: Enter the password that you need to enter while accessing the Certificate.
- Certificate Alias: Enter a suitable called name for the Certificate.
The keystore protects each certificate with its individual password. For example, when you sign an Android application using the Key Store Pass Phrase, you are asked to select a keystore first, and then asked to select a single alias from that keystore. After providing the passwords for both the keystore and the chosen alias, the app is signed and the public key (the certificate) for that alias is embedded into the APK. - Certificate Pass Phrase: Enter the password that you need to enter while accessing the Certificate.

- Click the Certificate Details button to view the respective certificate details and associated error, if any.
- Click the Save button to save the entered details. In the confirmation message that appears, click OK to return to the main page.
For more information about How to create Google Maps key, see https://developers.google.com/maps/documentation/android/start
Re-creating Android Certificates and Keys
You can not renew Android certificates and keys. You can renew an expired certificate or key by re-create them with previous certificate/key details. To recreate Android Certificates and Keys, you must navigate to your Android developer member center in an internet browser. and generate the key or certificate all over again.
If you renew any Androd certificates or keys, the Launchpad and Child apps (if any) will be wrapped and signed with the new certificates and keys.
Important: Make sure that you are using the same google account you previously used to generate the certificates and keys.
Important: If you create any of the certificate or key with a new google account, you must re-enroll your Android devices into Kony Management Suite EMM console.
| Copyright © 2017 Kony, Inc. All rights reserved. |