
Users
A user is an individual person. Each user needs an account to access the EMM Console. Administrator creates a user account for each person who uses the EMM Console.
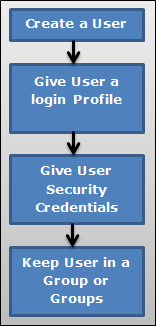
The process to create a new User is as follows:
- Create a new user.
- Provide details for the user settings so that the user can access the account.
- Save the configuration details.
- A new user is created at the end of this activity.
- A new user is assigned to a Group or Groups (Optional). By default, any new user is part of the All group.
From the Access Management tab, click User. The Users screen appears with the list of users. The list view displays a list of all the users along with other details. You can search the users based on each column.
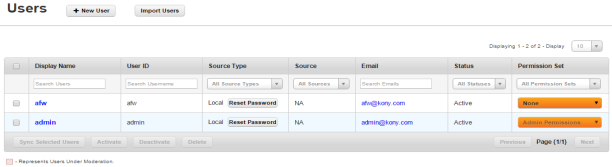
The Users list view displays the following columns:
You can navigate the list view through the Previous and the Next buttons.
You can perform the following activities from the User page:
- Creating a New User
- Importing Users from the Active Directory
- Automatic Creation of a New User Using Kony Fabric Data
- Searching for Users
- Updating a User
- Sync Selected Users
- Activating a User
- Deactivating a User
- Deleting a User
Creating a New User
Only an administrator can add a User to the EMM database.
By default, any new user is part of the All group.
To create a new User, follow these steps:
- To create a new user, click the + New User button next to the User label at the top of the page.

Add New User window appears.
- Enter details for the following fields:
- First Name: Enter the First Name of the user.
- Last Name: Enter the Last Name of the user.
- Display Name: Enter a user name. This is a unique name to identify a user.
- Email: Enter the email address of the user. It can include alphanumeric and special characters that follow standard email address representation.
- Phone: Enter phone number of the user. It should be numeric. You can also use + to as a prefix for the country code.
- User ID: Enter the User ID of the user. Its length can vary from 1-500 characters including alphanumeric and special characters. You cannot create user IDs with Special characters such as / \ [ ] : ; | = , + * ? < > @ "
- Password: Enter the password for the user. This is a string of characters that allows access to a system. It can be a combination of alphanumeric, numeric, and special characters.
- Confirm Password: Retype the password to acknowledge with definite assurance.
Important: While creating a User, in the Password and the Confirm Password fields all the leading and trailing space characters are removed.
- Active: By default, a newly created user is active. The newly created user appears as an active user in the list view under Status column. You can deselect the check box to create an inactive user.
- Enrollment Mode: Select an enrollment mode from the list. For more information on different enrollment modes and their impact on available features in the Kony Management Suite, refer Enrollment Mode.
- Click the Save button to save the details. In the confirmation message that appears, click OK to continue.
The newly added user appears in the list view.
Note: Fields with the red asterisk sign are mandatory.
Importing Users from the Active Directory
An Active Directory (AD) is a centralized and standardized system that automates network management of user data. You can also add users to the EMM database by importing them from the ADs by using Import Users window.
By default, any new user is part of the All group.
The users thus imported appears in the Users List page and apps can be targeted towards them.
Before initiating a new request to import Users, as an Admin you must meet the following conditions:
- Ensure that any of the sync jobs is not in progress. If no sync jobs in progress, then only you can request for importing Users.
- If sync is in progress, the Sync All and Sync Imported buttons are deactivated and are not available for Admin to do adhoc sync.
To import a user from Active Directory, follow these steps:
- To import a new user, click the Import Users next to the User label at the top of the page.
The Import Users window appears with Source Type drop-down list.
-
Select the source type from the Source Type list. Available source type details appear.
- Select Active Directory. Source list appears.
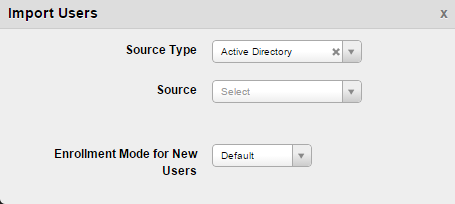
- Select the source from the Source list.
- Select an enrollment mode from Enrollment Mode for New Users list. For more information on different enrollment modes and their impact on available features in the Kony Management Suite, refer to the Enrollment Mode page.
- You can search for the users through the available search filters. Apply a single or a combination of search filters to define the search criteria and get the refined outcome.
- AD Username: Enter partial or complete name of the user in the Search Username field.
- First Name Last Name: Enter partial or complete display name of the user in the Search Display Name field.
- Email: Enter email address of the user in the Search Emails field.
- Phone Number: Enter phone number of the user in the Search Phone field.
Based on the search criteria, the list view is updated with respective user details. You can navigate the list view using the Previous and the Next buttons.
- Select the required user or users through the check box next to AD Username listing. You can select the complete user list by selecting the check box next to the AD Username column name.
Important: You can also import a user without an email ID.
- Click the Import button to import the users from the Active Directory. The System displays the Success Window with a list of the updated users.
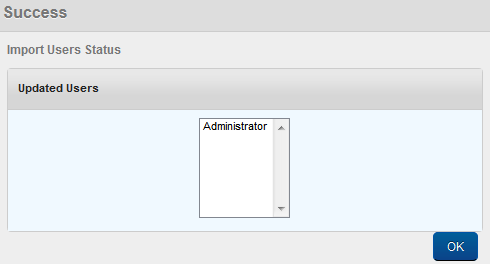
- Click the OK button to return to the main page.
Automatic Creation of a New User Using Kony Fabric Data
When the Kony Fabric identity Service is configured, if the Kony Fabric user does not exist in the Kony Management server, a new user is created (in Kony Management server) automatically using the data from Kony Fabric identity service. An administrator does not have any role in creating a user based on information from Kony Fabric.
- Information is gathered from the MFToken, and the user is created in the Kony Management server.
- If the MFToken does not have any user information, Kony Management server will throw an exception and the Enterprise Store will provide a login failed response.
- If a user is created using the MFToken, the Reset Password button will not display on the Enterprise Store and Kony Management Administrator console. This is because a user, who is created using MFToken information will not have a password in Kony Management Suite.
- A user created using an MFToken will not be able to log into the Kony Management self-service console.
- If a local user with the same name exists in Kony Management server as that of the MFToken user, MFUser is added to the user ID.
- If the Overwrite local user with imported user option is configured to Yes, and if users are imported from Active Directory group , Kony Fabric user is overridden by an Active Directory user . But on next login call, Kony Fabric user is created again.
Searching for Users
You can search for the users through the available search filters. Apply a single or a combination of search filters to define the search criteria and get the refined outcome.
- Enter or select details for the following search filters:
- Display Name: Enter partial or a complete display name in the Search Users field.
- User ID: Enter partial or a complete User ID in the Search Username field.
- Source Type: Select the desired option from the drop-down list
- Source : Select the desired option from the drop-down list.
- Email: Enter email address of the user in the Search Emails field.
- Status : Select the desired option from the drop-down list, for example, Active or Inactive.
- Permission Set: Select the desired option from the drop-down list.
- The list view is updated with respective user details, as per the search criteria.
By default, the list view displays ten users according to Display settings that you can modify through the Display drop-down list. You can also scroll the list view through Previous and the Next button.
Updating a User
Administrators need to update details of the local users
You may require to update details of the users from the following sources:
Local User
To update a local user details, follow these steps:
- Select the user source as Local from the list view.
A list of local users appears in the list view.
- Click the required user in the list view that you need to update.
The User Details page appears.
- The User Details page includes three sections
- User Details
- Groups
- Permissions
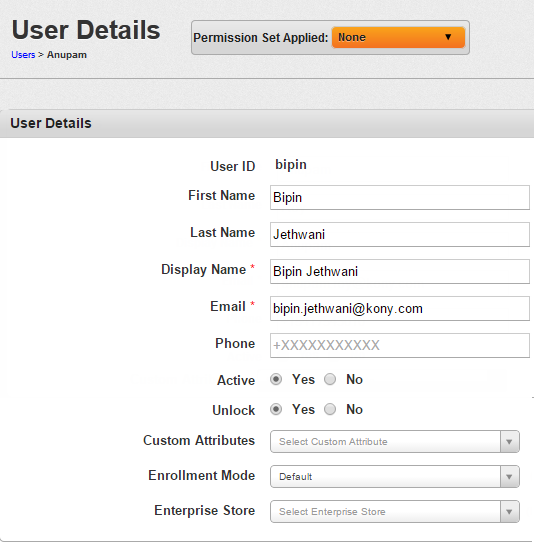
- User Details:The User Details section includes First Name, Last Name, Display Name, Email and Phone fields. The fields are populated by local user details. You can update these details.
By default, the user status is set to active. If required, you can change the user status to inactive.
The Unlock feature will control the user's access to the Enterprise Appstore. However, if the user is locked by the backend
Important: If your external authentication failed attempts count is configured to X, the Lock After feature in the Usage Settings (Application Settings page) should be less than or equal to X. When you are using an external authentication mechanism Kony Management only passes on the request for authentication.
You can add custom attributes to the user from the custom attributes list. Select an enrollment mode from Enrollment Mode list. For more information on different enrollment modes and their effect on features in Kony Management Suite, refer to the Enrollment Mode. Select an Enterprise Store from the Enterprise Store list.
- Groups: Enter the name of the group you want to assign the user.
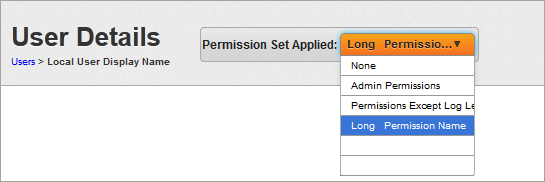
- Permission Set: Select the required permission set from the Permission Set Applied drop-down list.
The updated User details with applied permission set appear in the list view.
You can also apply a Permission set to a user from the main page.
-
To apply a Permission set to a user from the list view, follow these steps:
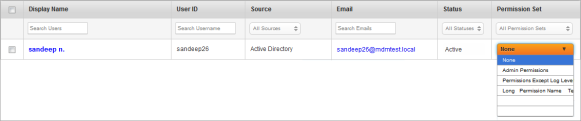
- Select the required Permission set from the list view and then click Save. A success message appears. Click OK to return to the main page.
- Click the Save button to save the details.
- In the confirmation message that appears, click OK to return to the main page.
Reset Password
Important: EMM Installation comes with default user ‘admin’. Please do not change its permission set to ‘None’. If you change the permission set, admin user can not log on to the EMM administration console.
- Select the user state as Local from the list view.
A list of local users appears in the list view.
- Click the Reset Password button for the user, you wish to reset the password.

Reset Password window appears.
- New Password: Enter the new password. The new password should be a combination of alphanumeric characters.
- Confirm Password: Retype the password to confirm it.
A confirmation message about password acceptance appears.
- Click the Save button to save the new password.
A confirmation message about password update appears.
Users imported from Active Directory
To update a user from Active Directory, follow these steps:

- Select the user source type as Active Directory from the list view.
A list of Active Directory users appears in the list view.
- Select the required user from the list.
User Details page appears.
The User Details page includes three sections - User Details, Groups and Permissions.
User Details section includes First Name, Last Name, Display Name, Email and Phone fields. These fields are populated by already existing active directory user details. You cannot update AD user details.
To assign AD user to a group and apply the required policy, follow these steps:
- Groups: You can assign an AD user to the required group. You can search the required Group by entering partial or complete Group name in the Search field.
- Permission Set: Select the required permission set from the Permission Set Applied drop-down list.
The updated User details with applied permission set appear in the list view.
- Click the Save button to save the details.
- In the confirmation message that appears, click OK to return to the main page.
- Groups: You can assign an AD user to the required group. You can search the required Group by entering partial or complete Group name in the Search field.
The following table provides additional information about Permission Set:
| Properties | Description |
|---|---|
| Permission Set |
|
Cloud
Admin can create users with admin privileges for cloud environment. The created user can login into EMM Management Console through cloud login credentials.
Sync Selected Users
This action synchronizes all the User details including any new or removed associations with any Group or Groups. The Admin can choose to synchronize an individual user or multiple users at a time by selecting check boxes on the left of each User and clicking Sync Selected Users. This action synchronizes all the details of the Users including any new or removed associations with any Groups. This action is applicable to AD Users.
Note: Synchronizing Users applies only to Users from multiple ADs. It does not apply to local Users.

To Sync the selected users, follow these steps:
- Select the required User or Users from the list view. The Sync Selected Users button becomes active.
- Click the Sync Selected Users button. The System displays the Success window with a list of the updated users.

- Click the OK button to return to the main page.
Activating/Deactivating a User
If a User is deleted
Important: When any of the users
If the User as an Admin created any entities, the user is still credited with the same entities - Applications, categories, and MAM policies. No other references of the User persist in the EMM system.
To change the status to Active or Deactive for a User, follow these steps:
- To activate or deactivate a user, select the user and click Active or Deactivate at the bottom of the User page.
The Activate or Deactivate Action dialog appears asking, if the user status be activated/deactivated.

-
Click OK to continue. A confirmation message about activated/deactivated user status appears.
The system changes the state of the User to Active/Inactive.
Deleting a User
To delete a user, follow these steps:
- To delete a user, select the user and click Delete at the bottom of the User page.
The Delete Action dialog appears asking, if the user can be deleted.

-
Click OK to continue. A confirmation message about deletion appears.
The system deletes the user from the grid.When you delete a user, if there is a device enrollment request for an associated device, the device enrollment status will change from Request Sent to Request Deleted.
Important: When any of the users
| Rev | Author | Edits |
| 4.1 | PK | PK |
| 4.2 | PK | PK |
| Copyright © 2018 Kony, Inc. All rights reserved. |