
Groups
Groups represent a collection of users created to provide security options for domains and other business services. Using the permission sets, you can grant or deny a group access to one or more domains, or set privileges for individual services. In all, a group represents multiple users with the same requirement and authority to access particular business services.
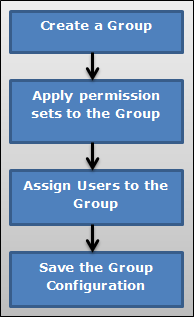
The process to create a new Group is as follows:
- Create a new Group.
- Apply Permission Set to the Group.
- Assign user/users to the Group.
- Save the configuration details.
- A new Group is created at the end of this activity.
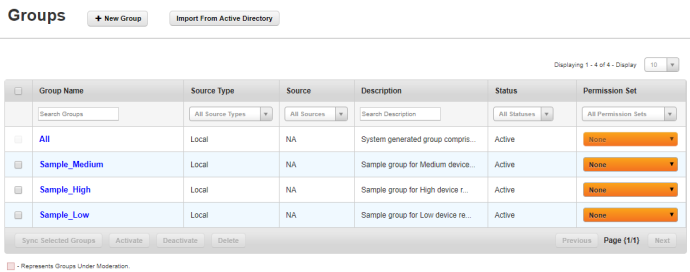
From the Access Management tab, click Groups. The Groups screen appears with the list of groups. The list view displays a list of all the groups along with other details. You can search the groups based on each column and also sort on each column.
By default, an All group is created when Kony Management suite is newly installed or upgraded from a previous version. The All group consists of all active users who exist in the Kony Management server. During an upgrade, if a group with name All exists at the time of the upgrade, All_SystemGenerated group is created. All active system users at the time of the upgrade will automatically be added to the All_SystemGenerated group.
Any new user created or imported in Kony Management server will automatically be added to the All group. The All group cannot be deleted by anyone. Even the administrators cannot delete or modify the all group. Using the all group, you can target any apps, MDM policies, and MCM content to all users.
You can navigate the list view through the Previous and the Next buttons.
The Groups list view displays the following columns:
You can perform the following activities from the Groups page:
- Creating a New Group
- Importing Groups from the Active Directory
- Searching for Groups
- Updating a Group
- Sync Selected Group
- Deactivating a Group
- Deleting a Group
Creating a New Group
Only an Admin can add a Group to the EMM database.
To create a new Group, follow these steps:

- To create a new Group, click the + New Group button next to the Groups label at the top of the page.
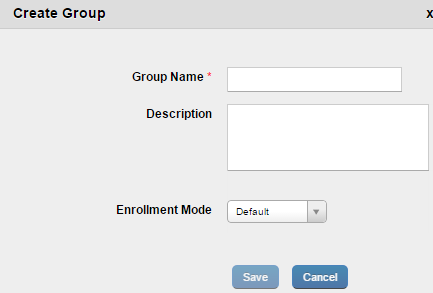
The Create Group window appears.
- Enter details for the following fields:
- Group Name: Enter an appropriate name for the Group.
- Description: Enter an appropriate description of the group that clearly indicates its objective.You cannot create group names with Special characters such as / \ [ ] : ; | = , + * ? < > @ ". You can use a hyphen in the name of the group.
- Select an enrollment mode from Enrollment Mode list. For more information on different enrollment modes and their impact on available features in the Kony Management Suite, refer to the Enrollment Mode page.
- Click the Save button to save the details. In the confirmation message that appears, click OK to continue. By default, the newly created Group appears as active with no permission set applied on it in list view.
Click the Cancel button to close the window.
Importing Groups from the Active Directory
You can also add groups to the EMM database by importing them from the Active Directory, using the Import Groups from Active Directory window.
Note: Users imported into Kony Management Suite with this method (Importing Groups from Active Directory) will also be part of the default All group.
Important: If you move users from one Active Directory group to another, this may result in app un-targetting and re-targetting users who are moved.
To import a group from the Active Directory, follow these steps:
- To import a new group, click the + Import From Active Directory button next to the New Group button at the top of the page.

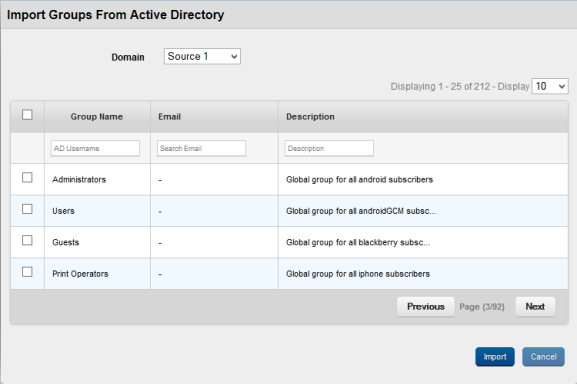
The Import Groups from Active Directory window appears with Domain drop-down list.
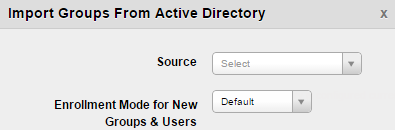
- Select the group from the Source drop-down list. The Group details from the selected source appears in the grid.
Note: In case of Forest, the root domain is always the default context, and the system displays sub-domains of each Group against the Group names. For more details, refer to AD Configuration.
- Select an enrollment mode from Enrollment Mode list. For more information on different enrollment modes and their impact on available features in the Kony Management Suite, refer Multi-license page.
You can search for the group through the available search filters. You can apply a single or a combination of search filters to define the search criteria and get the refined outcome.
- Group Name: Enter partial or complete name of the group in the Search Groups field.
- Description: Enter partial or complete description of the group in the Search Description field.
Based on the search criteria, the list view is updated with respective group details. You can navigate the list view using the Previous and the Next buttons.
- Select the required group or groups through check box next to Group Name. You can select the complete group list by selecting the check box next to the Group Name column.
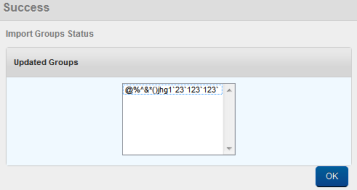
- When you select the Group or Groups, the Import button becomes active. Click the Import button to import the groups from the Active Directory. The System displays the Success Window with a list of the updated groups.
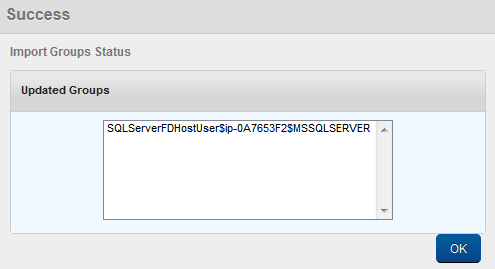
- Click the OK button to return to the main page. The Groups thus selected are copied to the EMM database and displayed in the Groups List page.
The following table provides additional information about Groups:
| Properties | Description |
|---|---|
| Group Name | Along with the Groups, all the Users that are part of the Group and part of any sub-groups are individually imported into the EMM system.
|
Searching for Groups
You can search a desired group through the available search filters. You can apply a single or a combination of search filters to define the search criteria and get the refined outcome.

- Enter or select details for following search filters:
- Group Name: Enter partial or complete name of the group in the Search Groups field.
- Sources: Select the desired option from the drop-down menu
- Description: Enter partial or complete description of the group in the Search Description field.
- The list view is updated with respective groups details, as per the search criteria. By default, the list view displays ten groups according to Display settings that you can modify through the Display drop-down list. You can also scroll the list view through Previous and the Next button.
Updating a Group
You may require updating group details for any reason such as applying permission sets. Admin can add Users to the Group by searching for them on the Users List. Groups can be created with the EMM created local Users
Local Group
To update a local group details, follow these steps:

- Select the group source as Active Directory from the list view.
A list of Active Directory groups appears in the list view.
- Click the required group in the list view that you need to update. The Group Details page appears. The Group Details page includes three sections - Group Details, Users and Permission Set Applied.
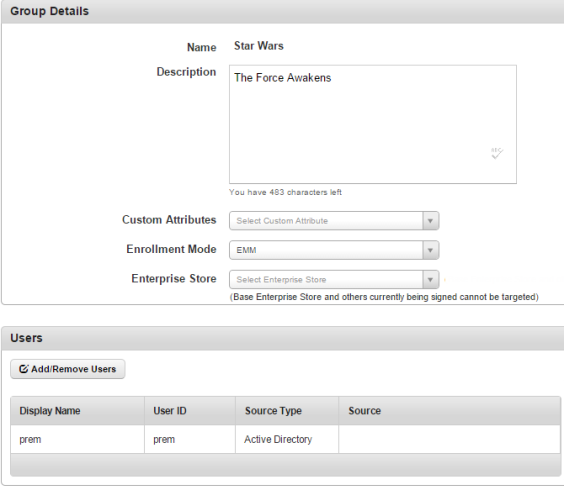
- Group Details: This section is repopulated with existing Group details for the following fields.
- Name: This field is pre-populated with the existing Group Name. You cannot modify the existing Group name.
- Description:Based on requirement, you can update the particulars.
- Custom Attributes: You can add Custom Attributes to the user from the Custom Attributes list.
- Enrollment Mode: Select an enrollment mode from Enrollment Mode list. For more information on different enrollment modes and their effect on available features in Kony Management Suite, refer to the Enrollment Mode page.
- Enterprise Store: Select an Enterprise Store from the Enterprise Store list.
- Custom Attributes: You can add Custom Attributes to the user from the Custom Attributes list.
- Users: Search the required user by entering the partial or complete user name in the Search field.
- To assign a user, use the left single-arrow icons to select the user.
- To assign the complete user list, use the left double arrow icon.
- To remove a user from the assigned list, select the right single arrow icon.
- To remove all the users from the assigned list, click the right double arrow icon.
- Assigned Users: You can enter the name of a user to whom you want to assign the group.
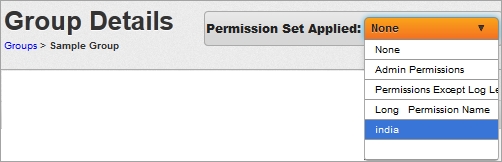
- Permission Set: Select the required permission set from the Permission Set Applied drop-down list. All the permissions granted in the permission set automatically is applied to all the users who are part of the Group.
You can also apply a permission set to a group from the main page. To apply a permission set to a group from the list view, follow these steps:
- Select the required permission set from the list view.
- The Change Group Permission Set window appears asking, if the user wants to change the existing permission set. Click OK to continue
- A confirmation message about changed permission set appears. Click OK to return to the main page.
- Click the Save button to save the details.
- In the message that appears, click OK to return to the main page. The updated Group details with applied permission set appear in the list view.
Group imported from Active Directory
To update an Active Directory group, follow these steps:
- Select the source as Active Directory from the list view.
A list of Active Directory groups appears in the list view.
- Click the required group in the list view that you need to update. The Group Details page appears. The Group Details page includes three sections - Group Details, Users and Permission Set Applied.
- Group Details: Name and the description fields are populated by already existing details. You cannot update group details.
- Custom Attributes: Add any custom attributes from the list as required.
- Users: Search the required user by entering partial or complete user name in the Search field.
- To assign a user, select the user and click left single arrow icon.
- To assign the complete user list, click the left double arrow icon.
- To remove a user from Assigned list, click the right single arrow icon.
- To remove all the users from Assigned list, click the right double arrow icon.
- Permission Set: Select the required permission set from the Permission Set Applied drop-down list. All the permissions granted in the Permission Set automatically gets applied to all the Users that are part of the Group.
- Click the Save button to save the details.In the message that appears, click OK to return to the main page. The updated Group details with applied permission set appear in the list view
Sync Selected Group
The Admin can choose to synchronize an individual AD group or multiple groups. This action synchronizes all details with regards to that Group. This includes importing any new User as part of the group who are currently not part of EMM. It also includes removing any User or Users from the Group or Groups. This action is limited to AD Groups.
To Sync selected groups, follow these steps:

- Select the required Group or Groups from the list view. The Sync Selected Groups button becomes active.
- Click the Sync Selected Groups button. The System displays the Success window with a list of the updated groups.
- Click the OK button to return to the main page.
Deactivating a Group
By default, a newly created Group appears as active in the list view under Status column. A User Group can be deactivated for various reasons.
Note: You cannot deactivate the All group.
To deactivate a group, follow these steps:

- Select the group you want to deactivate. The Deactivate button is enabled.
- Click Deactivate.
The Change Group Status window appears asking, if the group status be deactivated.
When the Group is made inactive manually through EMM
- Group not used in Targeting Apps
If the Group is not used in targeting any apps, a simple confirmation is required.
- Group used in Targeting Apps
If a Group is actively targeted for an app, the admin is informed of the same and a confirmation to delete the Group is required.
- Group not used in Targeting Apps
Click OK to continue.
A confirmation message about deactivated group status appears. Click OK to return to the main page.
The group status appears as Inactive under Status column in list view.
Deleting a Group
Admin can delete one Group or multiple groups. Before deleting a Group, the Status of the Group should be Inactive.
Note: You cannot delete the All group.
To delete a group,
When a Group is deleted, the Group is deleted from DB and is no longer shown in the Group list.
A group is inactivated in EMM when the a group is deactivated or deleted in Active Directory.
To delete a group, follow these steps:
Ensure that the status of group is inactive.
- Select the group you want to delete. The Delete button is enabled.
- Click Delete.
The Delete Group window appears asking, if the group should be deleted.
- Click OK.
| Rev | Author | Edits |
| 4.1 | PK | PK |
| 4.2 | PK | PK |
| Copyright © 2018 Kony, Inc. All rights reserved. |