
EMM Windows Components
This section explains how to install EMM Windows Components using Kony EMM Windows Components installer. Go to the next section if you manually installed EMM Windows components.
For Kony Management Suite to work on the Windows platform, you must install the following:
- Kony Exchange Service
- Windows Mobile 6.x Group Policy
- CA Role
- NDES (SCEP)
- Windows App Wrapping
The EMM Windows Components installer installs all the above components except the Windows App Wrapping.
Prerequisites
- Kony Exchange Service – Powershell 3.0 and above, .Net 3.5 and above.
- Group Policy Service – Windows 7 and above, .Net version 4.0
- CA Role and NDES – Windows Server 2012 (enterprise edition recommended).
- EMM Windows Components executable file.
Installing EMM Windows Components
To install the required components for the Windows Server for the Kony Management Suite, follow these steps:
- Click the downloaded EMMWindowsComponents.exe. The InstallAnywhere page appears.

- Click Next. The License Agreement appears.
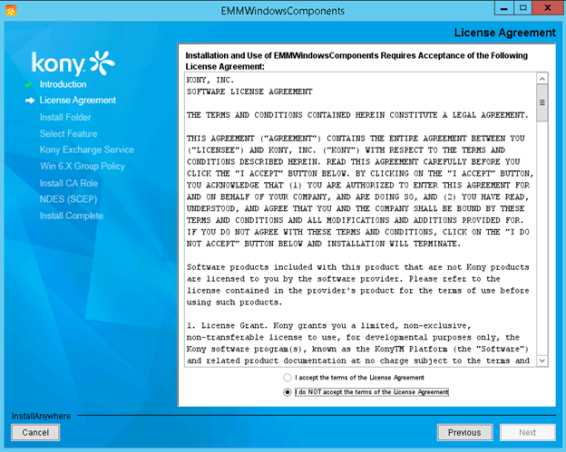
- Scroll down through the license agreement page. The I accept the terms of the License Agreement option is enabled.
- Select the I accept the terms of the License Agreement option, and then click Next. The Install Folder appears.
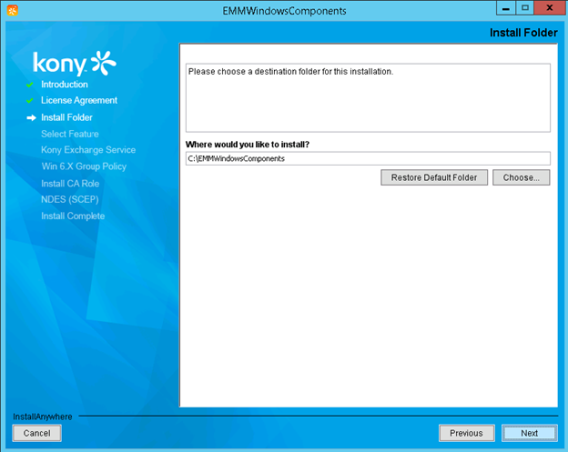
- If you want to install EMM components in any specific folder, click Choose, and select the folder. Otherwise, leave the default options, and click Next. The Select Feature page appears.
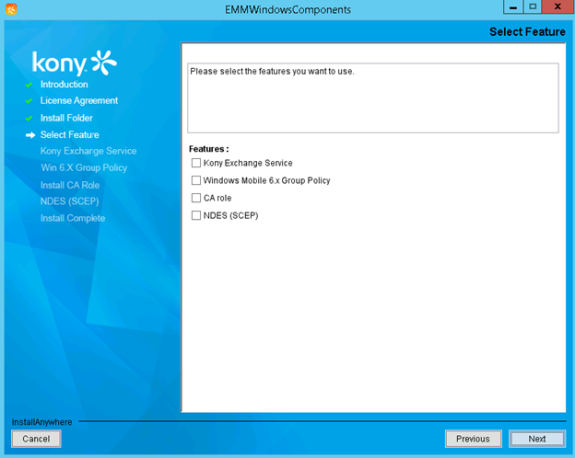
- Select all features, and then click Next. The Exchange Service Details page appears.
Note: To allow communication between the Windows Server 2008/2012 and your corporate email exchange server (to enable block and unblock email access on enrolled devices), Kony Exchange service should be configured. Using this service, you can also restrict email clients that can be used on enrolled devices.
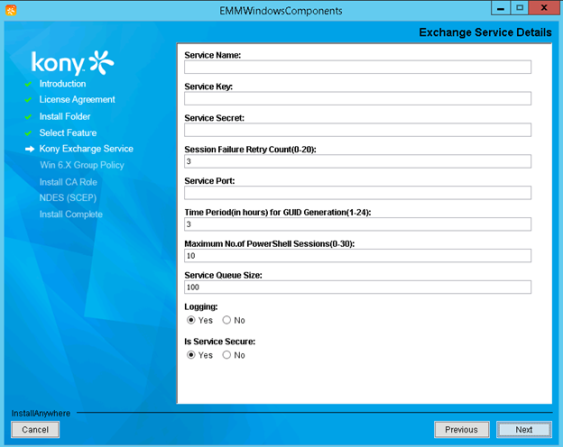
- Enter the following details:
Service Name: Enter the exchange service name.
- Service Key: Enter the exchange service key.
- Service Secret: Enter the exchange service secret.
- Session Failure Retry Count (0-20): Enter the number of times the session should retry after session failure.
- Service Port: Enter service port details.
Time Period (in hours) for GUID Generation (1-24): Enter the time period for the GUID generation.
Maximum No. of PowerShell Sessions (0-30): Enter the maximum number of poweshell sessions allowed.
Service Queue Size: Enter the size of allowed queue service.
Logging: Select Yes if logging is required.
Is Service Secure: Select Yes, if the service is secure.
- Click Next. The Group Policy Page appears.
Note: As mentioned in http://technet.microsoft.com/en-us/library/dd261866.aspx, a machine that supports GPMC must be in the domain in which SCMDM 2008 server is installed.
To support Windows Mobile 6.x devices on EMM, the Group Policy service must be installed on the machine that supports group policy management. This machine should be accessible to the SCMDM 2008 machine. It need not have a public IP and can remain within the corporate domain.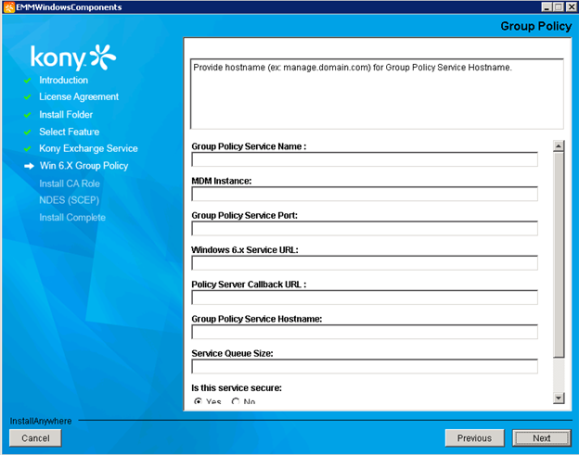
- Complete these fields:
Group Policy Service Name: Enter the group policy service name.
MDM Instance: Enter details of the MDM instance.
Group Policy Service Port: Enter the group policy service port details.
Windows 6.x Service URL: Enter the Windows 6.x service URL details.
Policy Server Callback URL: Enter the policy server callback URL details.
Group Policy Service Hostname: Enter the group policy service hostname details.
Service Queue Size: Enter the size of allowed queue service.
Is This Service Secure: Select Yes if the service is secure.
Note: If the service is secure (https), select Yes. Select No if the service is not secure (http).
Logging: Select Yes if logging is required.
- After entering all the details in the Group Policy page, click Next. The SCEP CA Role Details Page appears.
Note: To enable EMM to support iOS devices, certificate distribution through, Simple Certificate Enrollment Protocol (SCEP) Server is mandatory.This must be done before the EMM installation begins. A certificate authority (CA) must also be set to sign certificates distributed by the SCEP Server.
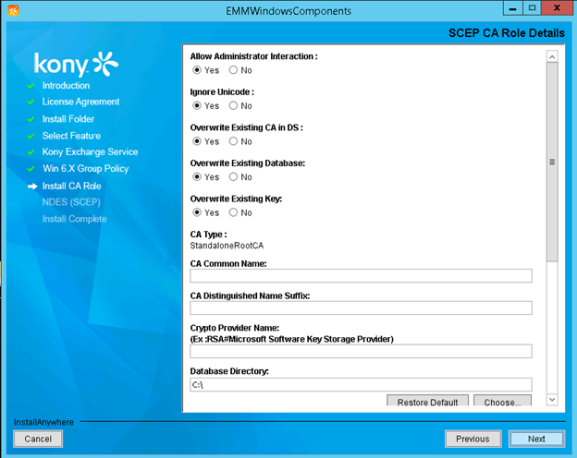
- Enter the following details:
Allow Administrator Interaction: Select Yes to allow administrator interaction.
Ignore Unicode: Select Yes to ignore unicode.
Overwrite Existing CA in DS: Select Yes to overwrite existing CA in DS.
Overwrite Existing Database: Select Yes to overwrite the existing database.
Overwrite Existing Key: Select Yes to overwrite the existing key.
CA Type: Details of the CA type appear.
CA Common Name: Enter the CA common name.
CA Distinguished Name Suffix: Enter the distinguished name suffix of the CA.
Crypto Provider Name: Enter the name of the crypto provider.
Database Directory: Select the database directory.
Ensure that the database directory you provide is not used by any other service. Once the CA role is installed, the directory will be locked by the Active Directory Certificate Services.Hash Algorithm Name: Enter the hash algorithm function name.
Key Length: Enter the length of the hash algorithm key.
Log Directory: Select the location for the log directory.
Ensure that the database log directory you provide is not used by any other service. Once the CA role is installed, the directory will be locked by the Active Directory Certificate Services.- Validity Period Units: Select the validity period unit of the CA. Options are Years, Months, Weeks, and Days.
Validity Period: Enter the validity period of the CA.
Username: Enter your username for your CA type provider account.
Password: Enter your password for your CA type provider account.
- Once you have entered all the details in the SCEP CA Role Details Page, click Next. The NDES Details page appears.
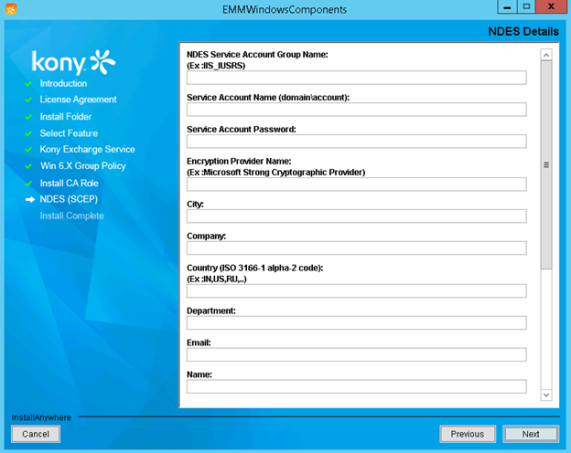
- Enter the following details:
NDES Service Account Group Name: Enter the NDES service account group name.
Service Account Name (domain/account): Enter the service account name.
Note: In case the server is a standalone computer, enter the computer name.
Service Account Password: Enter your NDES service account password.
Encryption Provider Name: Enter your NDES encryption provider name.
City: Enter your city.
Country (ISO 3166-1 alpha-2-code): Enter your country.
Department: Enter your department details.
Email: Enter your email address.
Name: Enter your name.
State: Enter the state name.
Signing Provider Name: Enter the signing provider name.
- Maximum Numbr of Passwords to Cache: Enter the maximum number of issued passwords to be stored in the password cache.
Log in Username: Enter your log in username.
Log in User Password: Enter your log in password.
Encryption Key Length: Enter the length of the encryption key.
Signing Key Length: Enter the length of the signing key.
- After entering all the details in the NDES Details page, click Next. The Pre-Installation Summary page appears.
- Click Install. The Install Complete page appears.
Note: All components are installed one by one. You might see several notifications before the final install complete page.
Note: If a Status confirmation page appears, click Yes to open the SCEP URL in a browser.
- Click Done.
Windows App Wrapping
Software Requirements
| Component | Version |
|---|---|
| Visual Studio | Visual studio 2013 express edition with update 3 (Prerequisite for Windows app wrapping) |
| Microsoft Silverlight Runtime | Microsoft Silverlight Runtime 5.0 (Prerequisite for Windows app wrapping) |
| Microsoft Silverlight | Microsoft Silverlight SDK 5.0 (Prerequisite for Windows app wrapping) |
| Cygwin | Latest Cygwin (32 bit) version. (Prerequisite for Windows app wrapping) |
How to Install Visual Studio
Windows Phone Enterprise apps must be signed for app management and app wrapping. You must install Visual Studio to manage Windows phone app wrapping.
See the Visual Studio website for more information on how to install and configure Visual Studio.
How to Install Microsoft Silverlight Runtime
To manage enterprise apps, you need the Windows phone app wrapping feature to function. You must install Microsoft Silverlight Runtime to manage Windows phone app wrapping.
See the Microsoft Silverlight Runtime website for more information on how to install Microsoft Silverlight Runtime.
How to Install Microsoft Silverlight SDK
To manage enterprise apps, you need Windows phone app wrapping feature to function. You must install Microsoft Silverlight SDK to manage Windows phone app wrapping.
See the Microsoft Silverlight SDK website for more information on how to install and configure Microsoft Silverlight SDK.
How to Install Cygwin
Cygwin is a large collection of GNU and Open Source tools that provide features similar to a Linux distribution on Windows. To manage Windows phone app wrapping, install Cygwin. With Cygwin, user binaries are copied to the Windows machine. To manage enterprise apps, you need Windows phone app wrapping feature to function.
Important: You should be familiar with Linux commands to work with Cygwin.
See the Cygwin website for more information on how to install and setup Cygwin.
Important: You must install Cygwin along with openSSH, openSSL, Dos2Unix, Winzip, Unzip, and Curl components.
How to Configure Cygwin Properties
To configure Cygwin for enterprise application wrapping based on your system settings, follow these steps:
- Right click on Computer, and select Properties. The system window appears.
- Select the Advanced System Settings link from the Control Panel Home pane. The System Properties window appears.
- Select Environment Variables.
- In the Environment Variables window, go to User Variables and select New.
- Enter CYGWIN_HOME in the Variable Name field.
- Enter
C:\cygwin64\binin the Variable Value field. - Click OK.
- Select Path from User Variables and click Edit.
- Add
C:\cygwin64\binin the Variable Value field. - Click OK.
Important: For Windows wrapping, directory path should be less than 260 characters. If the path is more than 260 characters, the signing process will fail during application wrapping
- Add
How to Configure SSH Server
To configure the SSH server, follow these steps:
-
Navigate to your Cygwin installation folder (for example, c/cygwin).
- Select Cygwin.bat, right click, and select Run as administrator. The Command prompt appears.
- In the command prompt, type
ssh-host-config,and press enter. An alertShould StrictModes be used? (yes/no)appears. - Type
Yesand press enter. An alertShould privilege separation be used? (yes/no)appears. - Type
Yesand press enter. An alertyou want to install sshd as a service. (yes/no)appears. - Type
Yesand press enter. The system promptEnter the value of CYGWIN for the daemon: []appears. - Type
ntsec ttyand press enter. An alertDo you want to use a different name? (yes/no)appears. - Type
Noand press enter. The system promptPlease enter the password for user <username>)appears. - Type the password and press enter.The
Reenter:prompt appears. - Type the password again and press enter. A confirmation message on SSHD configuration appears.
- Execute the following commands:
chmod +r /etc/passwd: Provides read permissions to password file.chmod u+w /etc/passwd: Provides write permissions to user.chmod +r /etc/group: Provides read permissions to a group file.chmod u+w /etc/group: Provides write permissions to user.chmod 755 /var: Provides all permissions to var folder.touch /var/log/sshd.log: Creates a new empty file sshd.log.chmod 644 /var/log/sshd.log: Owner can write and other users can only read the log file.chown system /etc/ssh*: Changes owner for ssh* files to system.chown system /var/empty: Changes owner for /car/empty folder to system.mkgroup -l > ..\etc\empty: This will print /etc/group file to /etc/empty file.mkpasswd -l > ..\etc\passwd: This will print /etc/passwd file to /etc/passwd.chmod a+x /etc/sshd_config: This will provide read and write permission to the sshd_config file.
Important: If the openssh you are using is version 6.7, perform the following steps:
Open /etc/sshd_config
Add the following line towards the end of the file:
KexAlgorithms diffie-hellman-group-exchange-sha1,diffie-hellman-group1-sha1 - To start SSHD, open command prompt and enter
net start sshd. The SSHD service will start successfully. - To change passwords, in the command prompt, enter
passwd <username>. - To verify test connection, open an ssh client tool, enter localhost in connection type text box, and click open. The SSH terminal opens, and a success message appears.
| Copyright © 2018 Kony, Inc. All rights reserved. |