The Integration tab is where you define services for your application.
A service is an application component that represents the application interaction with the external data source. A service definition comprises the meta-data or the configurations required to exchange data with the external data source. For example, the configurations can be service type, service ID, input parameters, output parameters, preprocessors and postprocessors, target URL, authentication credentials if required, and type (HTTP/HTTPS).
The service definition enables the application to exchange data with any external data source. The Kony Fabric provides back-end for connecting to a Web service and an XML service. Even if the external data source does not expose the services to these well-known interfaces, the developer can build a Java service.
Menu path for integration service designer:
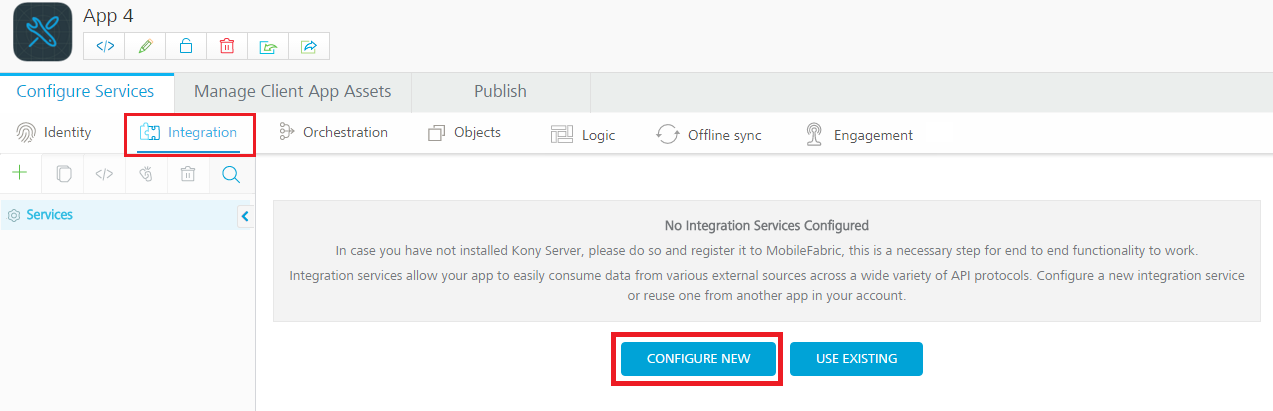
After you create an application, in the Configure Services tab, click the Integration service tab. The Integration page appears and lists the existing integration services (if any).
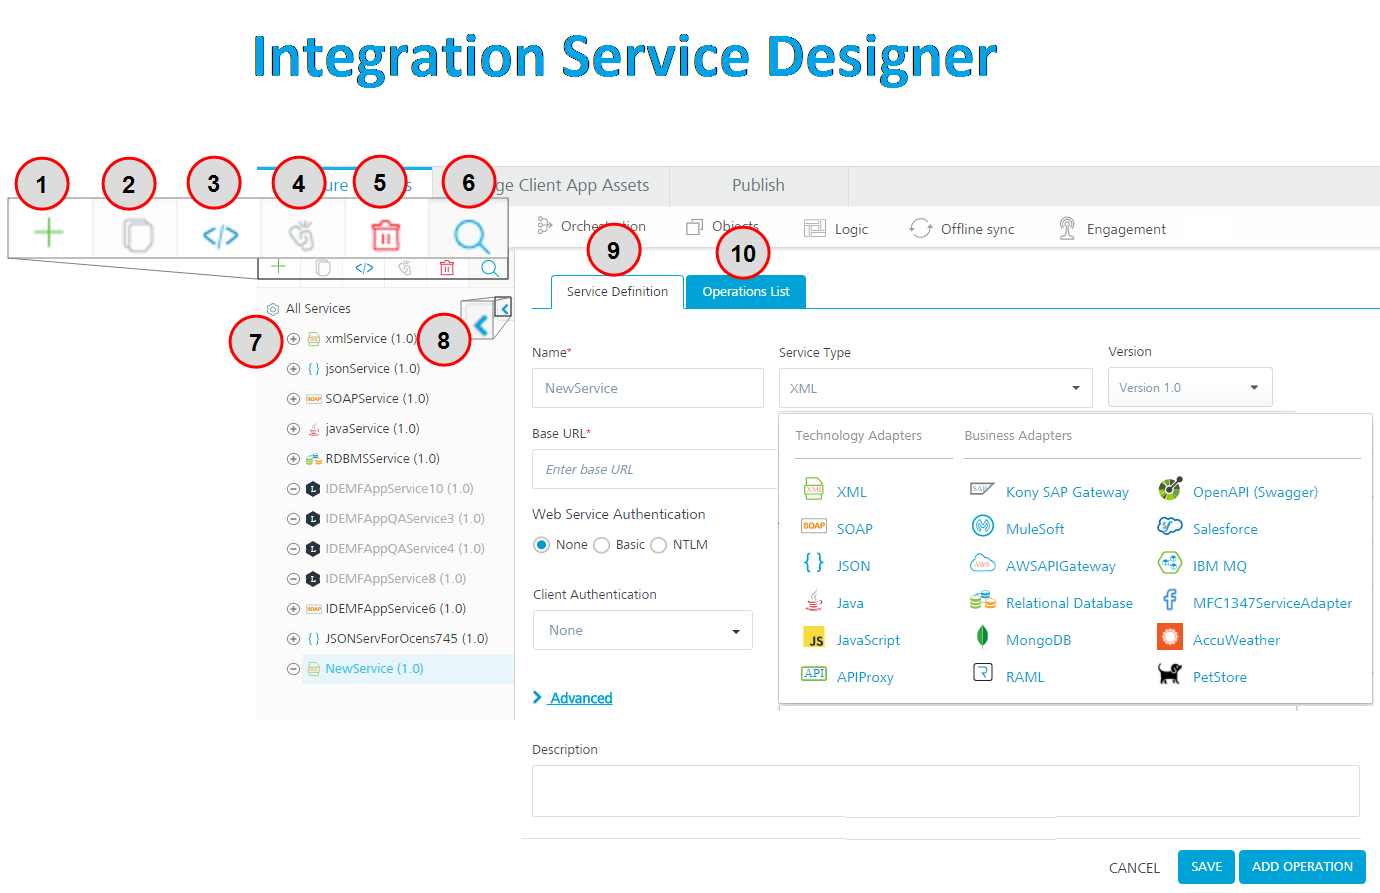
Click CONFIGURE NEW to create an integration service. The following details are displayed in the integration service designer.
The Integration page displays the following sections for an endpoint:
Number
Section
Description
1
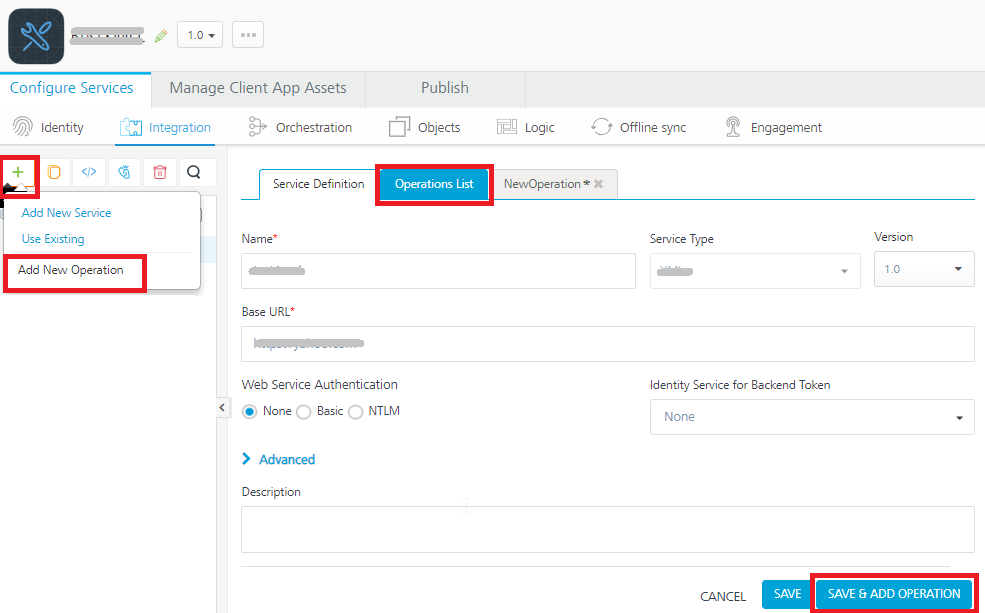
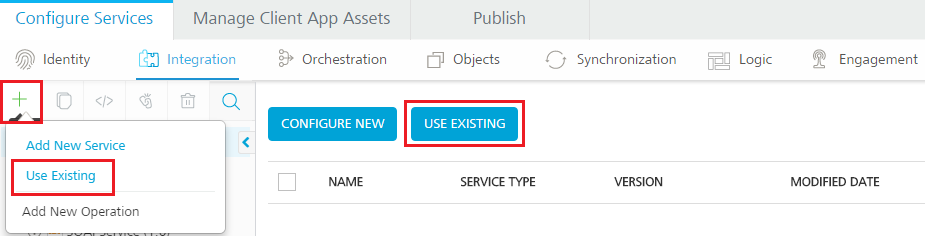
Add
Allows you to add the following:
Add New Service
Use Existing
Add New Operation
2
Clone
Allows you to duplicate an existing service. Changes made to a cloned service will not impact the original service.
3
Sample Code
A dynamic code is generated based on the configuration of a service. You can use this code in your SDK.
4
Unlink
Allows you remove the service from the Integration services section of an app. When a service is unlinked, it is disassociated from a particular app.
5
Delete button
Allows you to delete a service.
6
Search button
Allows you to search services and operations in the Services section.
7
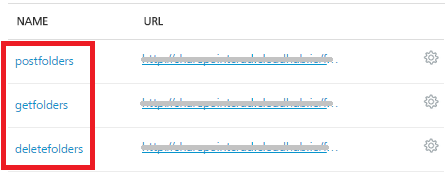
Services section
Configured services for an app.
You can click the expand or collapse button of a service to show or hide operations in the services.
8
Show / Hide button
Allows you the show or hide the tree. When you hide the tree section, the right pane is used for service definition or operations details.
9
Service Definition tab
Allows you to configure service defection for an integration service.
10
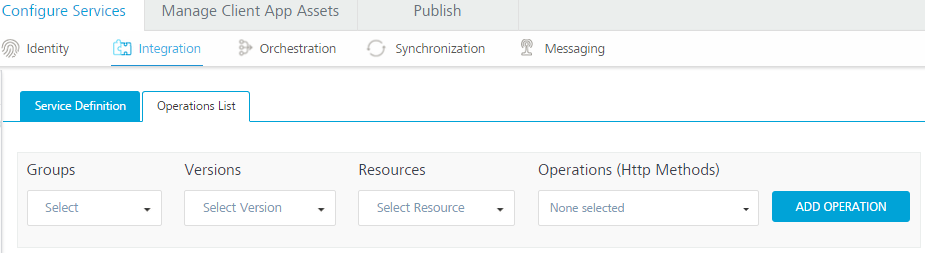
Operations List tab
Allows you to configure operations for an integration service.
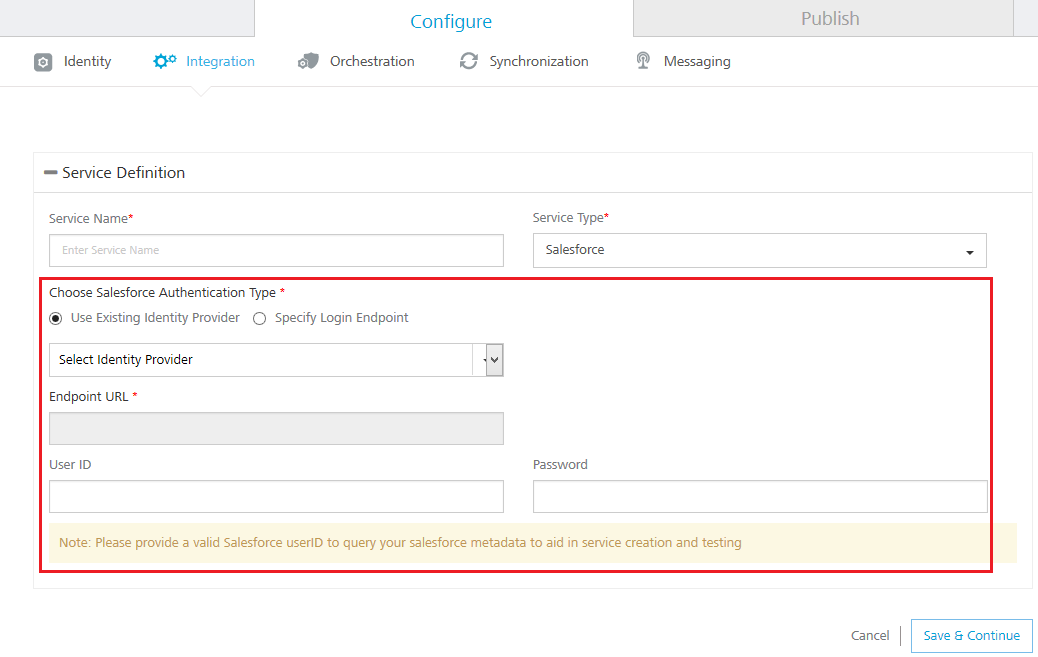
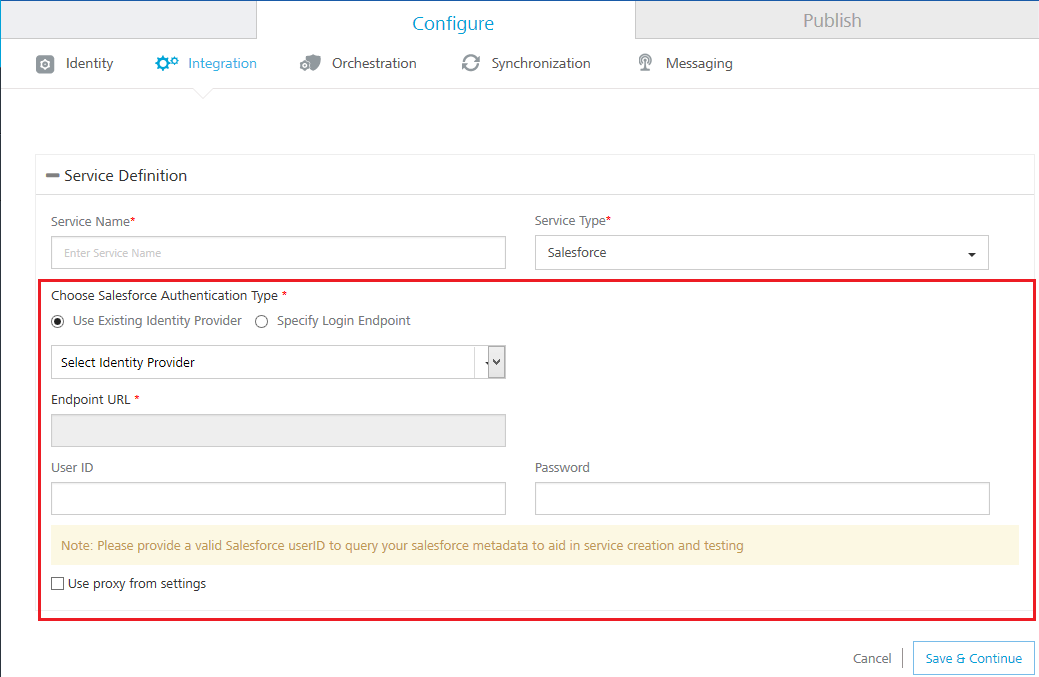
Salesforce is integrated with Kony Fabric portal, most of the details required for creating a service definition are automated. Whereas, for the remaining endpoints, you need to manually enter the details required for creating a service definition.
While configuring an integration service with basic auth mode, ensure that some reserved IDs are not used as input/header IDs. Key words such as userid, pwd and password are reserved by middleware when a user selects basic auth mode.
How to Configure an XML Service
A service that communicates with an external data source using an XML endpoint over the HTTP protocol is known as an XML Service.
Use Case
This section explains creation of an XML service for the following example:
The user enters the latitude and longitude values on a form in the mobile application.
The application invokes the designated XML service and hits the URL defined in the service with the longitude and latitude values as input parameters.
The service fetches the response and the response is sent back to the application.
The response received is displayed on a form to the user.
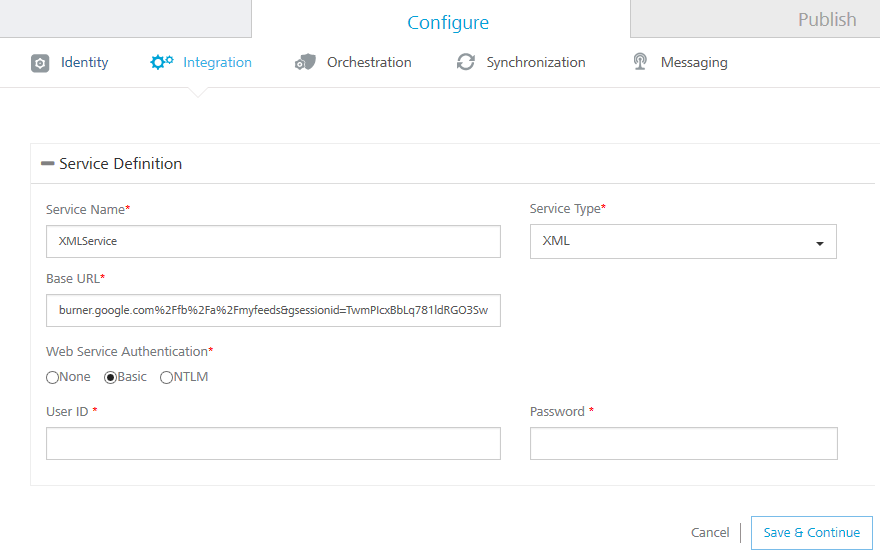
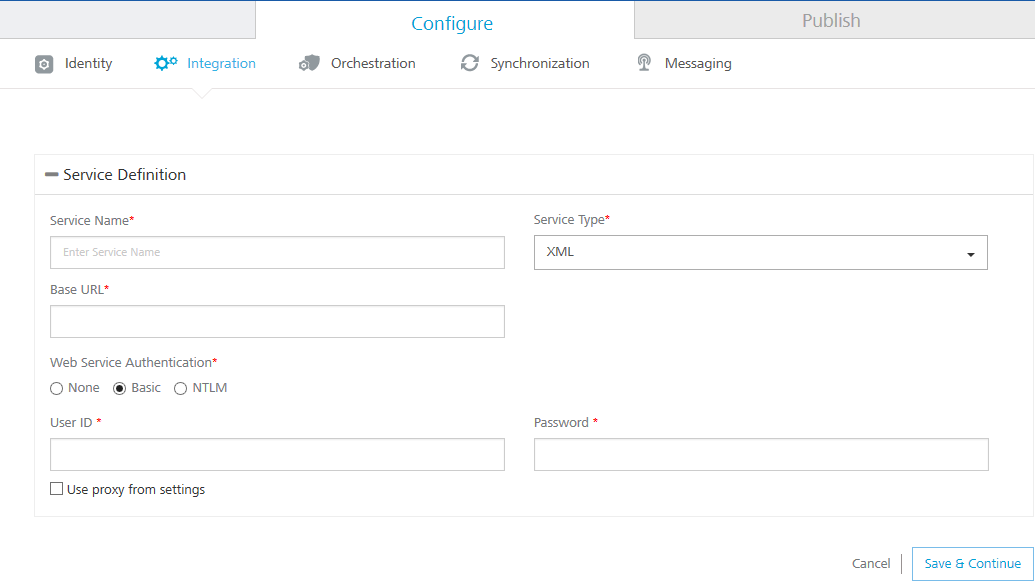
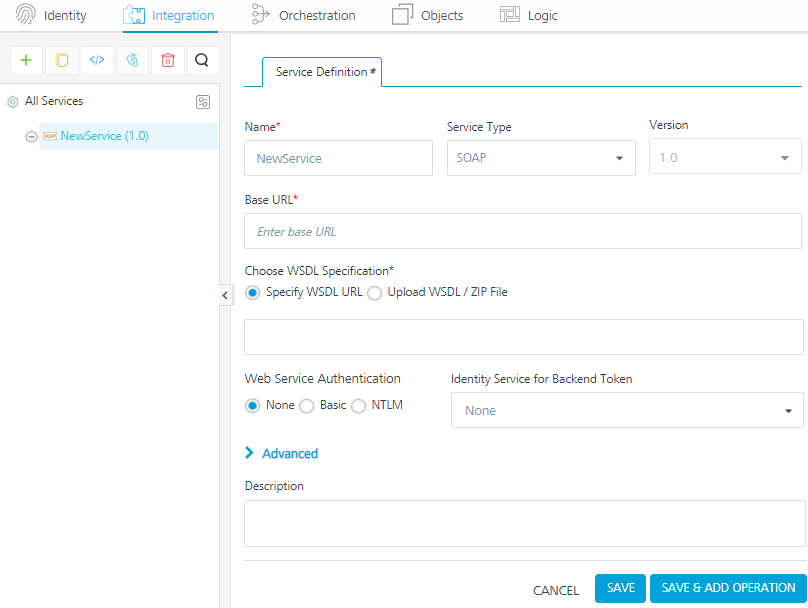
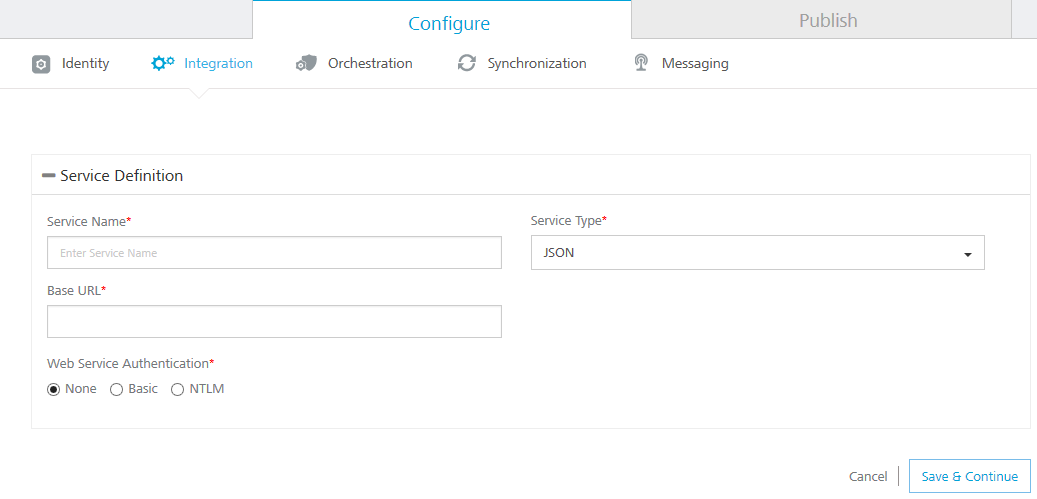
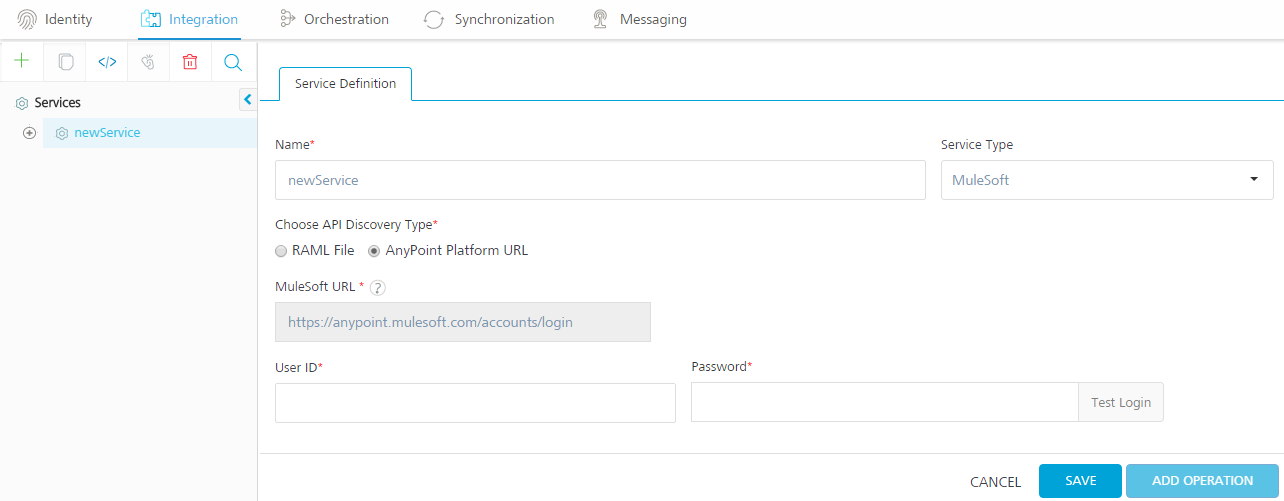
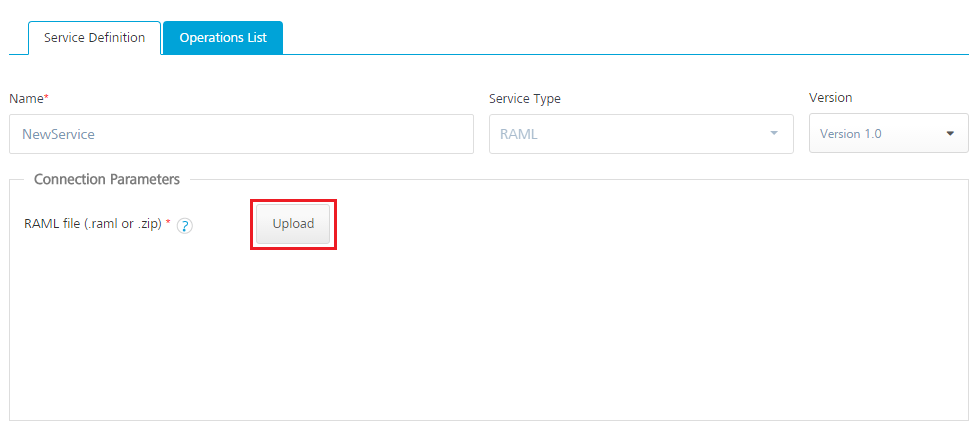
In the Name field, provide a unique name for your service.
From the Service Type list, select XML.
By default, XML is selected and the following section is displayed.
In the Base URL, type the URL.
In the Client Authentication field, select an identity provider from the drop-down list. This drop-down list shows identity providers only if you have created identity providers for OAuth 2.0 in the Identity page.
Click the Advanced tab to specify dependent JAR and API throttling. All options in the Advanced section are optional.
To specify dependent JAR, follow these steps:
Select the JAR containing preprocessor or postprocessor libraries from the drop-down list, or click Upload New to browse the JAR file from your local system. The step allows you to further filter the data sent to the back end:
Make sure that you upload a custom JAR file that is built on the same JDK version used for installing Kony Fabric Integration.
For example, if the JDK version on the machine where Kony Fabric Integration is installed is 1.6, you must use the same JDK version to build your custom jar files. If the JDK version is different, an unsupported class version error will appear when a service is used from a device.
API throttling enables you to limit the number of request calls within a minute. If an API exceeds the throttling limit, the API will not return the service response. To specify throttling, follow these steps:
In the Total Rate Limit text box, enter a required value. With this value, you can limit the number of requests configured in your Kony Fabric console in terms of Total Rate Limit.
In the Per IP Rate Limit text box, enter a required value. With this value, you can limit the number of IP address requests configured in your Kony Fabric console in terms of Per IP Rate Limit.
Enable API throttling in a clustered environment by configuring the KONY_SERVER_NUMBER_OF_NODES property in the server_configuration table available in Admin database. This property indicates the number of nodes configured in the cluster. The default value is 1.
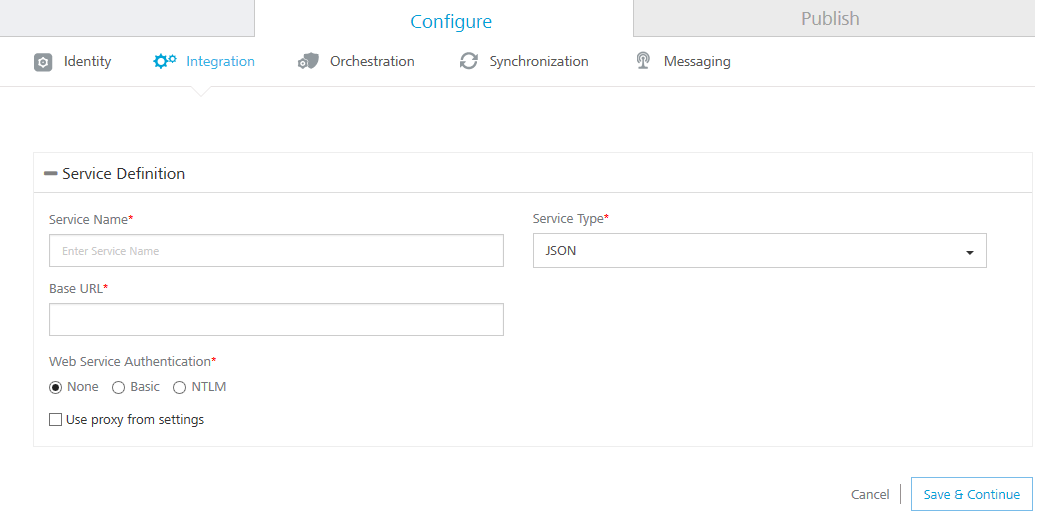
Under the Web Service Authentication, select one of the following modes:
None: Select the option if you do not want to provide any authentication for the service.
Basic: Provide User ID and Password if the external Web service requires form or basic authentication.
NTLM: Your service follows the NT LAN Manager authentication process. You are required to provide the User ID, Password, NTLM Host, and NTLM Domain.
To enable the proxy, select the Use proxy from settings check box. By default, the check box is cleared. The Use proxy from settings check box dims when no proxy is configured under the Settings > Proxy.
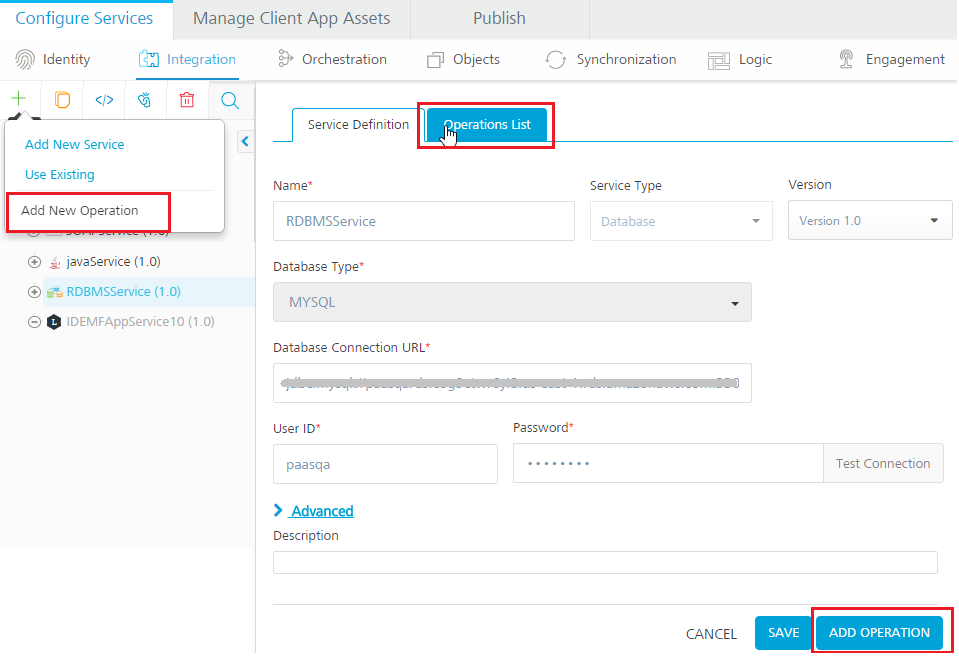
Click SAVE to save your service definition. The system displays the success message: Service Saved Successfully. The Operations List tab appears only after the Service Definition is saved. The ADD OPERATION button in the Service Definition page is active only after you click the SAVE button.
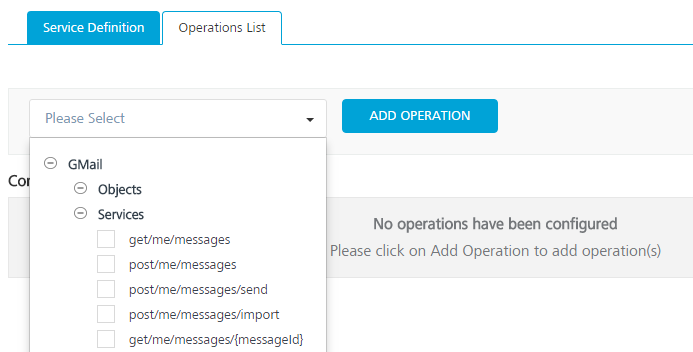
Click ADD OPERATION to display the NewOperation page.
You can also display the NewOperation page. Follow these steps:
- Click the Operations List tab > CONFIGURE OPERATION. - From the tree in the left pane, click Add > Add New Operation, shown below:
Type a new name for the operation in the Operation Name box.
While configuring an integration service with basic auth mode, ensure that some reserved IDs are not used as input/header IDs. Key words such as userid, pwd and password are reserved by middleware when a user selects basic auth mode.
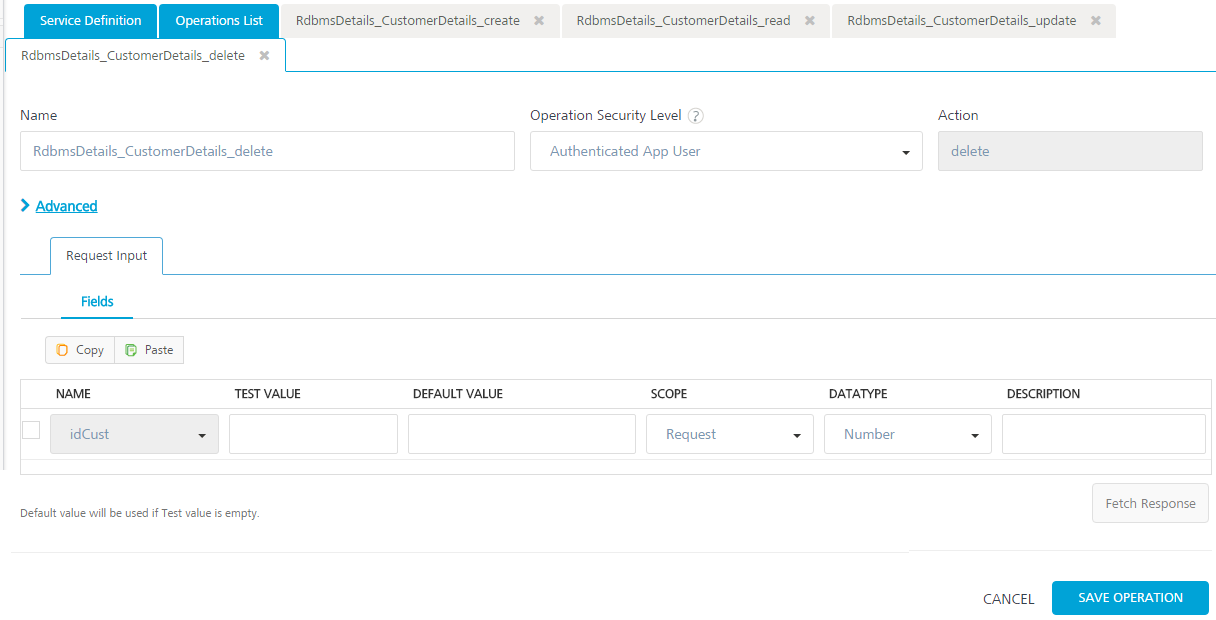
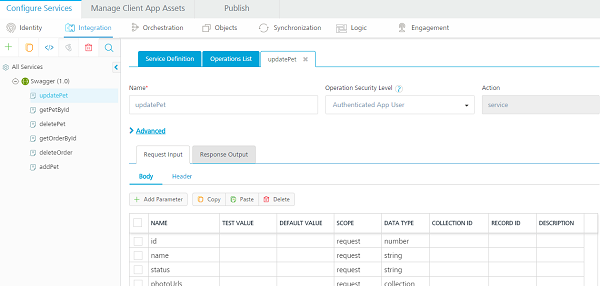
Select one of the following security operations in the Operation Security Level field. By default, the field is set to Authenticated App User:
Authenticated App User – indicates that the operation is secured. To use the operation, an app user must be authenticated by an associated identity service.
Anonymous App User – indicates that a user must have the app key and app secret to access the operation.
Public – indicates that the operation requires no special security.
Select the required method for the operation from the HTTP Methods field.
The Target URL field is prepopulated with the URL. You can add the suffix, if required.
For example, to the base URL, you can add suffix such as /latest or /sports to get latest news or sports news:
http://feeds.foxnews.com/foxnews/latest
http://feeds.foxnews.com/foxnews/sports
Click the Advanced tab to configure the preprocessor and postprocessor for Java and JavaScript. All options in the Advanced section are optional. For more details, refer to Preprocessor and Postprocessor.Click here
Configure the parameters for the preprocessor and postprocessor to filter the request and response objects for your business requirements. You can specify the Java class name or custom JavaScript code for preprocessor and postprocessor. Java class names contain the preprocessor and postprocessor.
Java Preprocessor and Postprocessor - The preprocessor and postprocessor are Java classes that implement DataPreProcessor / DataPreProcessor2 and DataPostProcessor / DataPostProcessor2 interfaces. A developer can write custom code in the execute method of the preprocessor or postprocessor class.
The step allows you to further filter the data received from a service call.
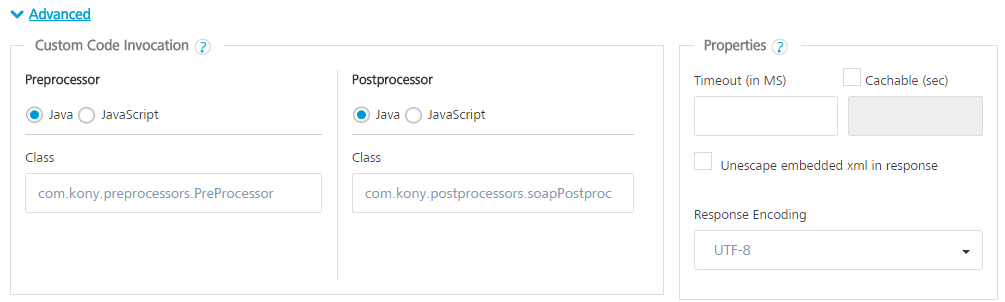
Under the Custom Code Invocation, follow these steps:
Under Preprocessor, configure one of the following:
Select Java, and in the Class text box, enter the preprocessor class. This step enables a developer to include any business logic on the data before forwarding the request to the external data source.
Select JavaScript to open a text box. You can write custom JavaScript code for the preprocessor.
Under Postprocessor, configure one of the following:
Select Java, and in the Class text box, enter the postprocessor class. This step enables a developer to include any business logic on the data before sending the response to a mobile device.
Select JavaScript to open a text box. You can write custom JavaScript code for the postprocessor.
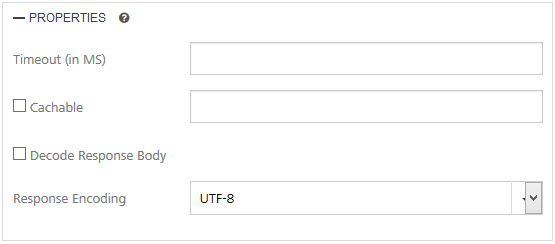
Under the Properties section, provide details for the following advanced service properties:
Timeout (in ms) - the duration in milliseconds after which the service call times out. Provide the details in the text box.
Cache Response - the duration in seconds within which the service response is fetched from the cache. Select the Cache Response check box, and provide the details in the text box.
Unescape embedded xml in response - To ignore the MuleSoft response received in the XML value field, select the Unescape embedded xml in response check box.
Response Encoding - Select the appropriate response encoding. The default value is UTF-8. For more information about different encoding schemes, refer to Response Encoding Schemes.
Under the Pass-through Cookies, specify a comma separated list of cookie names. When cookies names are present in the incoming client request, these cookies are send to the backend target along with preprocessor request. A sample value looks like - cookie1, cookie2.
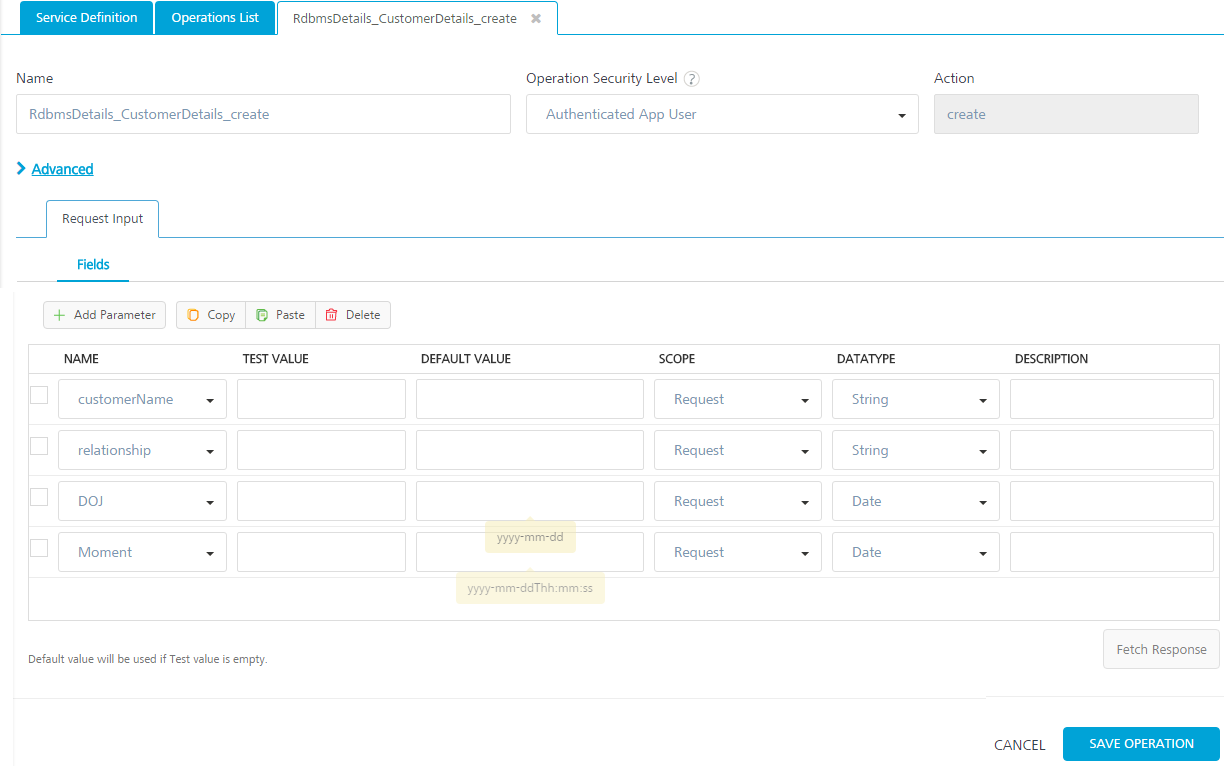
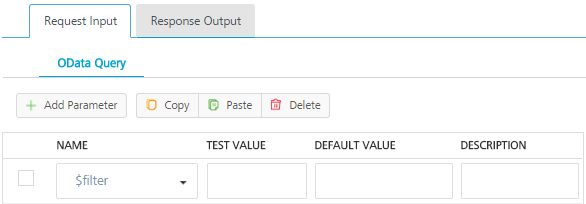
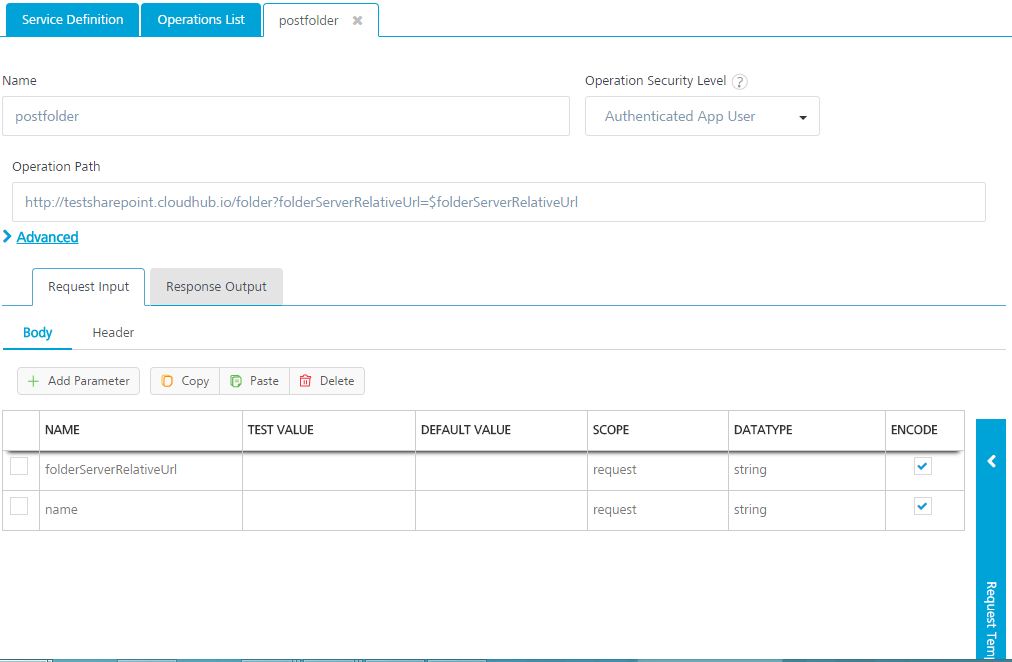
In the Request Input tab, do the following:
Integration services accept only form-url-encoded inputs for all input parameters provided in service input parameters (request input).
You can add an entry by clicking the Add Parameter button if entries for the input and the output tabs do not exist.
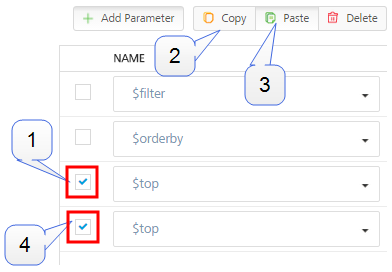
- To make duplicate entries, select the check box for the entry, click Copy, and then click Paste.
- To delete an entry, select the check box for an entry, and then click the Delete button.
ID
Path
CollectionID
channel
//channel
Title
//item/title
channel
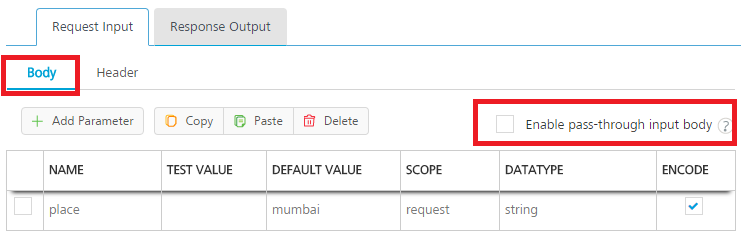
Under the Body tab, do the following:
To forward the body of the client's request to backend as it is, select the Enable pass-through input body check box. For more details on API Proxy service, refer to How to Enable Pass-through Proxy for Operations.
To configure parameters in the clients body, do the following:
In the NAME field, enter the name for the request input parameter.
VALUE: select request or session. By default, this field is set to Request. Three different options are available in Kony Fabric under Request Input > Body > VALUE during configuration of any operation. These options primarily determine the source of the value of the header.
Request: If this option is selected, the Integration Server picks the value pairs from the client's request during run time and forwards the same to the back-end.
User has the option to configure the default value. This default value is taken if the request does not have the header.
Session: If this option is selected, the value of header is picked from session context based on the user configuration.
Identity: If this is selected, you can filter the request parameters based on the response from the identity provider. For more details to configure identity filters, refer to Enhanced Identity Filters - Integration Services.
TEST VALUE: Enter a value. A test value is used for testing the service.
DEFAULT VALUE: enter the value if required. The default value will be used if the test value is empty.
SCOPE: select request or session. By default, this field is set to Request.
Request - Indicates that the value must be retrieved from the HTTP request received from a mobile device.
Session - Indicates that the value must be retrieved from the HTTP session stored on Kony Fabric. The default data type for the selected column is loaded under the DATATYPE field.
Select the Encode check box to enable an input parameter to be encoded. For example, the name New York Times would be encoded as New%20York%20Times when the encoding is set to True. The encoding must also adhere to the HTML URL encoding standards.
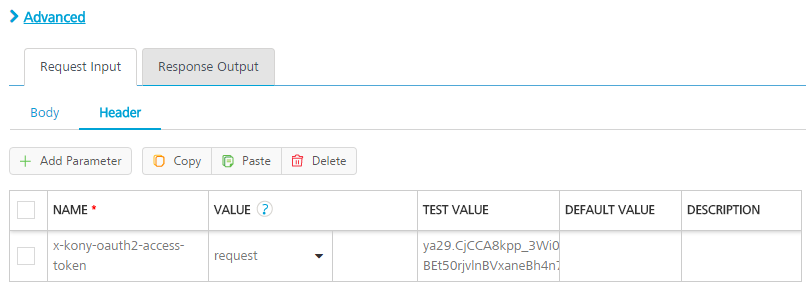
Click the Header tab to provide the following customer headers:
Based on the operation - for example, post or get -, provide custom HTTP headers.
To forward headers of the client's request to backend as it is, select the Enable pass-through input header check box. For more details on API Proxy service, refer to How to Enable Pass-through Proxy for Operations.
To configure parameters in the client's header, do the following.
In the NAME field, provide custom HTTP headers required by the external source.
VALUE: select request or session. By default, this field is set to Request. Five different options are available in Kony Fabric under Request Input > Headers > VALUE during configuration of any operation. These options primarily determine the source of the value of the header.
Request: If this option is selected, the Integration Server picks the value pairs from the client's request during run time and forwards the same to the back-end.
User has the option to configure the default value. This default value is taken if the request does not have the header.
Session: If this option is selected, the value of header is picked from session context based on the user configuration.
Constant: Constant is used to configure the value that is picked and sent to back-end by the Integration Server during the run-time.
Expression: Select this option to configure the velocity template expressions for the header values.
You cannot edit the default value for expression.
Identity: If this is selected, you can filter the request parameters based on the response from the identity provider. For more details to configure identity filters, refer to Enhanced Identity Filters - Integration Services.
TEST VALUE: Enter a value. A test value is used for testing the service.
DEFAULT VALUE: change the syntax if required.
DESCRIPTION: Enter a proper description.
To validate the details, click Fetch Response. The result of the operation appears.
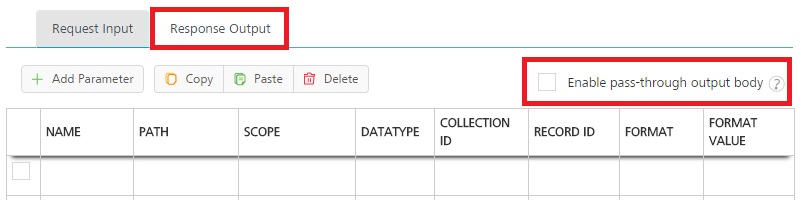
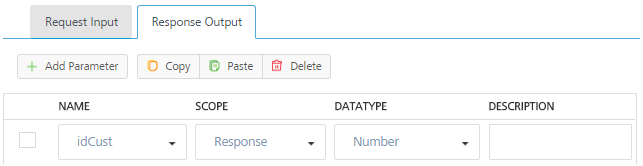
Click the Response Output tab to configure the fields of the table for displaying the data:
To forward the response from the backend to the client as it is, select the Enable pass-through output body check box. For more details on API Proxy service, refer to How to Enable Pass-through Proxy for Operations.
To configure parameters in the response, enter the values for required fields such as name, path, scope, data type, collection ID, record ID, format and format value.
To validate the details, click Test. The result of the operation appears.
When you enable Pass-through proxy flags, you will notice that you cannot configure request input, headers, and response out parameters for this operation.
You can use a mobile device to find a city's weather reports based on a ZIP code. The device initiates the service request.
Kony Application Server runs the back-end processes.
The response is fetched from the SOAP service and is sent to the application.
The response is displayed to the user.
To create the service definitions for an external data source providing SOAP interface, use the SOAP Service. You need to have a WSDL URL or file to create the service definition. For this example, we will use a WSDL URL of a weather application that has a GetCityWeatherByZip service and will provide appropriate configurations for the Service Definition.
In the Name field, provide a unique name for your service.
From the Service Type list, select SOAP.
By default, XML is selected. If you select SOAP, the following section is displayed.
In the Base URL, type the URL
In the Choose WSDL URL, select the option to specify the WSDL URL or upload the WSDL file.
If you click Specify WSDL URL, the system displays URL text box. Enter the WSDL URL.
In case, if you are unable to read metadata from an integration service (for example, SOAP) that is protected by an SSL certificate, enable the integration service by following one of the ways:
- Download the WSDL file from the https WSDL URL and upload the WSDL file on Kony Fabric console.
- Importing the SSL into your cacerts in your Kony Fabric install location. For more details, refer to FAQs
In case, if you are unable to read metadata from an integration service (for example, SOAP) that is protected by an SSL certificate, enable the integration service by following:
- Download the WSDL file from the https WSDL URL and upload the WSDL file on Kony Fabric console.
If you click Upload WSDL File, the system allows you to upload the WSDL file. Click the Upload WSDL File button to navigate to the WSDL file from your local system, and then click Open. The system uploads your WSDL file.
In the Client Authentication field, select an identity provider from the drop-down list. This drop-down list shows identity providers only if you have created identity providers for OAuth 2.0 in the Identity page.
Click the Advanced tab to specify dependent JAR and API throttling. All options in the Advanced section are optional.
To specify dependent JAR, follow these steps:
Select the JAR containing preprocessor or postprocessor libraries from the drop-down list, or click Upload New to browse the JAR file from your local system. The step allows you to further filter the data sent to the back end:
Make sure that you upload a custom JAR file that is built on the same JDK version used for installing Kony Fabric Integration.
For example, if the JDK version on the machine where Kony Fabric Integration is installed is 1.6, you must use the same JDK version to build your custom jar files. If the JDK version is different, an unsupported class version error will appear when a service is used from a device.
API throttling enables you to limit the number of request calls within a minute. If an API exceeds the throttling limit, the API will not return the service response. To specify throttling, follow these steps:
In the Total Rate Limit text box, enter a required value. With this value, you can limit the number of requests configured in your Kony Fabric console in terms of Total Rate Limit.
In the Per IP Rate Limit text box, enter a required value. With this value, you can limit the number of IP address requests configured in your Kony Fabric console in terms of Per IP Rate Limit.
Enable API throttling in a clustered environment by configuring the KONY_SERVER_NUMBER_OF_NODES property in the server_configuration table available in Admin database. This property indicates the number of nodes configured in the cluster. The default value is 1.
Under the Web Service Authentication, select one of the following modes:
None: Select the option if you do not want to provide any authentication for the service.
Basic: Provide User ID and Password if the external Web service requires form or basic authentication.
NTLM: Your service follows the NT LAN Manager authentication process. You are required to provide the User ID, Password, NTLM Host, and NTLM Domain.
To enable the proxy, select the Use proxy from settings check box. By default, the check box is cleared. The Use proxy from settings check box dims when no proxy is configured under the Settings > Proxy.
Click SAVE to save your service definition. The system displays the success message: Service Saved Successfully. The Operations List tab appears only after the Service Definition is saved. The ADD OPERATION button in the Service Definition page is active only after you click the SAVE button.
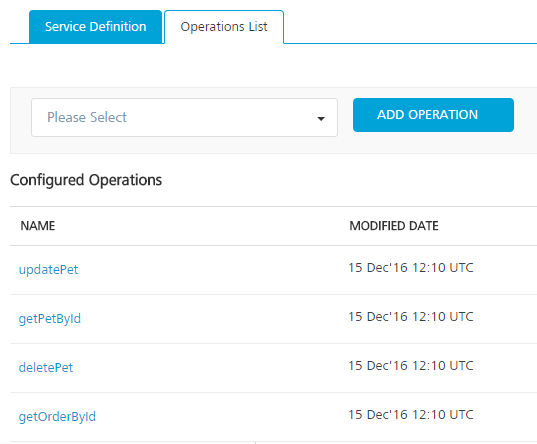
Click ADD OPERATION to display the Operations List tab for adding operations.
You can also add operations by following these steps:
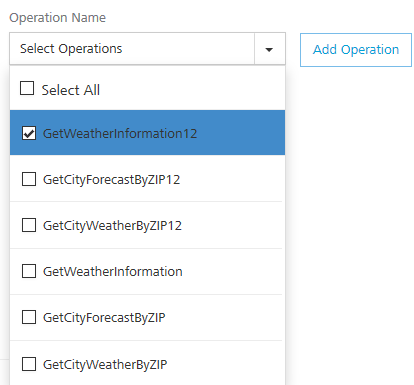
- Click the Operations List tab. - From the tree in the left pane, click Add > Add New Operation, shown below:
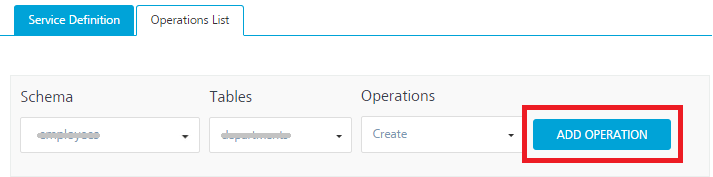
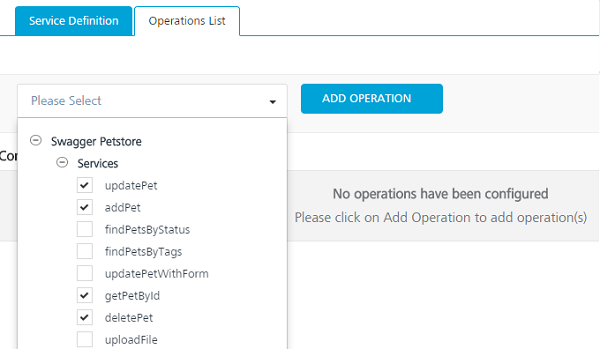
Under Operations List tab, from the Operations list box, select one or more check boxes.
Click ADD OPERATION.
While configuring an integration service with basic auth mode, ensure that some reserved IDs are not used as input/header IDs. Key words such as userid, pwd and password are reserved by middleware when a user selects basic auth mode.
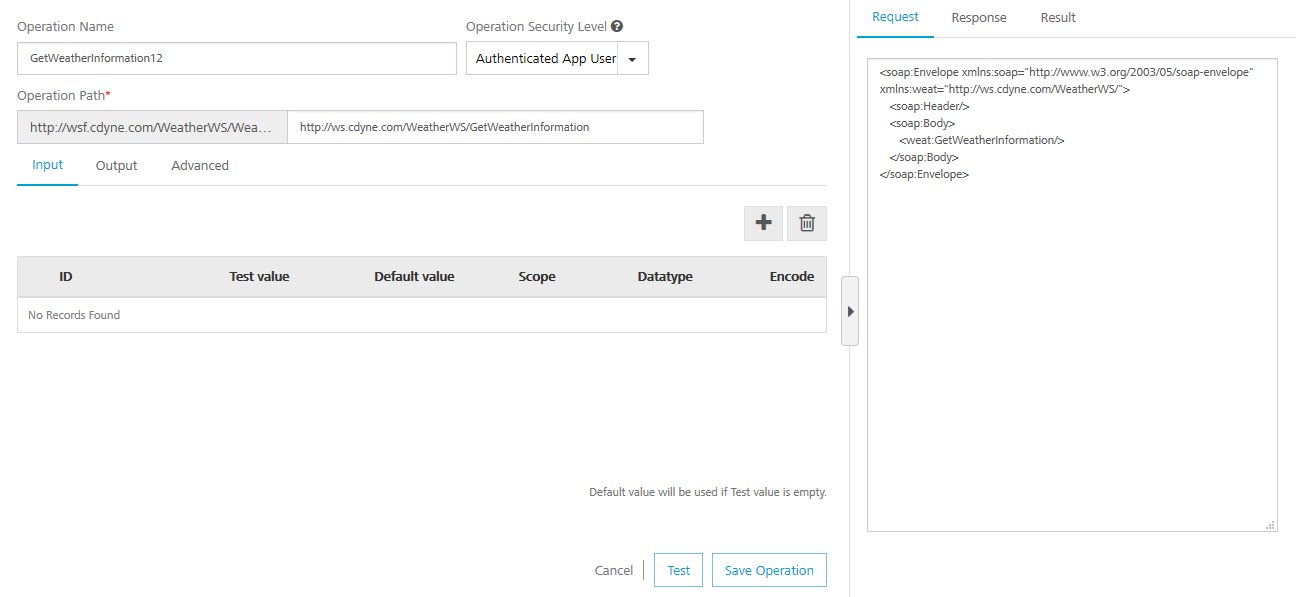
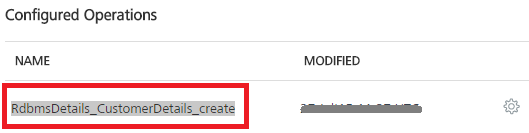
Click the operation that you created. The selected operation page appears.
In the Name field, modify the name if required.
Select one of the following security operations in the Operation Security Level field. By default, the field is set to Authenticated App User:
Authenticated App User – indicates that the operation is secured. To use this operation, an app user must be authenticated by an associated identity service.
Anonymous App User – indicates that a user must have the app key and app secret to access this operation.
Public – indicates that the operation requires no special security.
In the Target URL text box, modify the path if required.
For example, to the base URL, you can add suffix such as /latest or /sports to get latest news or sports news:
http://feeds.foxnews.com/foxnews/latest
http://feeds.foxnews.com/foxnews/sports
Click the Advanced tab to configure the preprocessor and postprocessor for Java and JavaScript. All options in the Advanced section are optional. For more details, refer to Preprocessor and Postprocessor.Click here
Configure the parameters for the preprocessor and postprocessor to filter the request and response objects for your business requirements. You can specify the Java class name or custom JavaScript code for preprocessor and postprocessor. Java class names contain the preprocessor and postprocessor.
Java Preprocessor and Postprocessor - The preprocessor and postprocessor are Java classes that implement DataPreProcessor / DataPreProcessor2 and DataPostProcessor/ DataPostProcessor2 interfaces. A developer can write custom code in the execute method of the preprocessor or postprocessor class.
The step allows you to further filter the data received from a service call.
Under the Custom Code Invocation, follow these steps:
Under Preprocessor, configure one of the following:
Select Java, and in the Class text box, enter the preprocessor class. This step enables a developer to include any business logic on the data before forwarding the request to the external data source.
Select JavaScript to open a text box. You can write custom JavaScript code for the preprocessor.
Under Postprocessor, configure one of the following:
Select Java, and in the Class text box, enter the postprocessor class. This step enables a developer to include any business logic on the data before sending the response to a mobile device.
Select JavaScript to open a text box. You can write custom JavaScript code for the postprocessor.
Under the Properties section, provide details for the following advanced service properties:
Timeout (in ms) - the duration in milliseconds after which the service call times out. Provide the details in the text box.
Cache Response - the duration in seconds within which the service response is fetched from the cache. Select the Cache Response check box, and provide the details in the text box.
Unescape embedded xml in response - To ignore the MuleSoft response received in the XML value field, select the Unescape embedded xml in response check box.
Response Encoding - Select the appropriate response encoding. The default value is UTF-8. For more information about different encoding schemes, refer to Response Encoding Schemes.
Under the Pass-through Cookies, specify a comma separated list of cookie names. When cookies names are present in the incoming client request, these cookies are send to the backend target along with preprocessor request. A sample value looks like - cookie1, cookie2.
Click Request Input and do the following.
Integration services accept only form-url-encoded inputs for all input parameters provided in service input parameters (request input).
You can add an entry by clicking the Add Parameter button if entries for the input and the output tabs do not exist.
- To make duplicate entries, select the check box for the entry, click Copy, and then click Paste.
- To delete an entry, select the check box for an entry, and then click the Delete button.
Under the Body tab, do the following:
To forward the body of the client's request to backend as it is, select the Enable pass-through input body check box. For more details on API Proxy service, refer to How to Enable Pass-through Proxy for Operations.
To configure parameters in the client's body, do the following.
In the NAME field, enter the name for the request input parameter.
VALUE: select request or session. By default, this field is set to Request. three different options are available in Kony Fabric under Request Input > Body > VALUE during configuration of any operation. These options primarily determine the source of the value of the header.
Request: If this option is selected, the Integration Server picks the value pairs from the client's request during run time and forwards the same to the back-end.
User has the option to configure the default value. This default value is taken if the request does not have the header.
Session: If this option is selected, the value of header is picked from session context based on the user configuration.
Identity: If this is selected, you can filter the request parameters based on the response from the identity provider. For more details to configure identity filters, refer to Enhanced Identity Filters - Integration Services.
TEST VALUE: Enter a value. A test value is used for testing the service.
DEFAULT VALUE: enter the value if required. The default value will be used if the test value is empty.
Select the ENCODE check box to enable an input parameter to be encoded. For example, the name New York Times would be encoded as New%20York%20Times when the encoding is set to True. The encoding must also adhere to the HTML URL encoding standards.
Click the Header tab to provide the following customer headers:
Based on the operation - for example, post or get -, provide custom HTTP headers. To provide customer headers, click Header.
To forward the header of the client's request to backend as it is, select the Enable pass-through input header check box. For more details on API Proxy service, refer to How to Enable Pass-through Proxy for Operations.
To configure parameters in the client's header, do the following.
In the NAME field, enter the name for the request input parameter.
VALUE: select request or session. By default, this field is set to Request. Five different options are available in Kony Fabric under Request Input > Headers > VALUE during configuration of any operation. These options primarily determine the source of the value of the header.
Request: If this option is selected, the Integration Server picks the value pairs from the client's request during run time and forwards the same to the back-end.
User has the option to configure the default value. This default value is taken if the request does not have the header.
Session: If this option is selected, the value of header is picked from session context based on the user configuration.
Constant: Constant is used to configure the value that is picked and sent to back-end by the Integration Server during the run-time.
Expression: Select this option to configure the velocity template expressions for the header values.
You cannot edit the default value for expression.
Identity: If this is selected, you can filter the request parameters based on the response from the identity provider. For more details to configure identity filters, refer to Enhanced Identity Filters - Integration Services.
TEST VALUE: Enter a value. A test value is used for testing the service.
DEFAULT VALUE: enter the value if required. The default value will be used if the test value is empty.
DESCRIPTION: Enter a proper description.
To validate the details, click Fetch Response. The result of the operation appears.
Click the Response Output tab to configure the fields of the table for displaying the data:
To forward the response from the backend to the client as it is, select the Enable pass-through output body check box. For more details on API Proxy service, refer to How to Enable Pass-through Proxy for Operations
To configure parameters in the response, enter the values for required fields such as name, path, scope, data type, collection ID, record ID, format and format value.
To validate the details, click Test. The result of the operation appears.
When you enable Pass-through proxy flags, you will notice that you cannot configure request input, headers, and response out parameters for this operation.
A service that communicates with an external data source using JSON over the HTTP protocol, and returns a response in JSON format is known as a JSON Service. You can use the JSON services in any case where you would use an XML service. But, the response of a JSON service is in a JSON format.
Concepts about JSON Connector
Notations
JSON Object - {}
JSON Array - []
Important Considerations
JSON Array will consist of an array of JSON Objects or a blank array.
JSON Object is a key value pair. The key is a String and value can be a String, number(int, float,double), JSON Object or JSON Array.
JSON string will not contain attributes.
JSON path does not provide Axes like Xpath.
Selecting Elements
Element
Description
elementname
Selects all child elements of the named Element.
//
Selects elements in the document from the current element that match the selection no matter where they are.
Example
Path Expression
Result
bookstore (or) /bookstore
Selects all the child elements of the bookstore element
bookstore/book
Selects all book elements that are children of bookstore
//book
Selects all book elements no matter where they are in the JSON string
bookstore//book
Selects all book elements that are descendant of the bookstore element, no matter where they are under the bookstore element
Predicates
Predicates are used to find a specific element or an element that contains a specific value. Predicates are always embedded in square brackets.
Path Expression
Result
bookstore/book[1]
Selects the first book element that is the child of the bookstore element
bookstore/book[last()]
Selects the last book element that is the child of the bookstore element
bookstore/book[last()-1]
Selects the last but one book element that is the child of the bookstore element
bookstore/book[position()<3]
Selects the first two book elements that are children of the bookstore element
bookstore/book[price>35.00]
Selects all the book elements of the bookstore element that have a price element with a value greater than 35.00
bookstore/book[price>35.00]/title
Selects all the title elements of the book elements of the bookstore element that have a price element with a value greater than 35.00
In the Name field, provide a unique name for your service.
From the Service Type list, select JSON. By default, XML is selected. If you select JSON, the following details are displayed.
In the Base URL, type the URL.
In the Client Authentication field, select an identity provider from the drop-down list. This drop-down list shows identity providers only if you have created identity providers for OAuth 2.0 in the Identity page.
Click the Advanced tab to specify dependent JAR and API throttling. All options in the Advanced section are optional.
To specify dependent JAR, follow these steps:
Select the JAR containing preprocessor or postprocessor libraries from the drop-down list, or click Upload New to browse the JAR file from your local system. The step allows you to further filter the data sent to the back end:
Make sure that you upload a custom JAR file that is built on the same JDK version used for installing Kony Fabric Integration.
For example, if the JDK version on the machine where Kony Fabric Integration is installed is 1.6, you must use the same JDK version to build your custom jar files. If the JDK version is different, an unsupported class version error will appear when a service is used from a device.
API throttling enables you to limit the number of request calls within a minute. If an API exceeds the throttling limit, the API will not return the service response. To specify throttling, follow these steps:
In the Total Rate Limit text box, enter a required value. With this value, you can limit the number of requests configured in your Kony Fabric console in terms of Total Rate Limit.
In the Per IP Rate Limit text box, enter a required value. With this value, you can limit the number of IP address requests configured in your Kony Fabric console in terms of Per IP Rate Limit.
Under the Web Service Authentication, select one of the following modes:
None: Select the option if you do not want to provide any authentication for the service.
Basic: Provide User ID and Password if the external Web service requires form or basic authentication.
NTLM: Your service follows the NT LAN Manager authentication process. You are required to provide the User ID, Password, NTLM Host and NTLM Domain.
To enable the proxy, select the Use proxy from settings check box. By default, the check box is cleared. The Use proxy from settings check box dims when no proxy is configured under the Settings > Proxy.
Click SAVE to save your service definition. The system displays the success message: Service Saved Successfully. The Operations List tab appears only after the Service Definition is saved. The ADD OPERATION button in the Service Definition page is active only after you click the SAVE button.
Click ADD OPERATION to display the NewOperation page.
You can also display the NewOperation page. Follow these steps:
- Click the Operations List tab > CONFIGURE OPERATION. - From the tree in the left pane, click Add > Add New Operation, shown below:
Type a new name for the operation in the Operation Name box.
While configuring an integration service with basic auth mode, ensure that some reserved IDs are not used as input/header IDs. Key words such as userid, pwd and password are reserved by middleware when a user selects basic auth mode.
Select one of the following security operations in the Operation Security Level field. By default, the field is set to Authenticated App User:
Authenticated App User – indicates that the operation is secured. To use the operation, an app user must be authenticated by an associated identity service.
Anonymous App User – indicates that a user must have the app key and app secret to access this operation.
Public – indicates that the operation requires no special security.
Select the required method for the operation from the HTTP Methods field.
The Target URL field is prepopulated with the URL. You can add the suffix, if required.
For example, to the base URL, you can add suffix such as /latest or /sports to get latest news or sports news:
http://feeds.foxnews.com/foxnews/latest
http://feeds.foxnews.com/foxnews/sports
Click the Advanced tab to configure the preprocessor and postprocessor for Java and JavaScript. All options in the Advanced section are optional. For more details, refer to Preprocessor and Postprocessor.Click here
Configure the parameters for the preprocessor and postprocessor to filter the request and response objects for your business requirements. You can specify the Java class name or custom JavaScript code for preprocessor and postprocessor. Java class names contain the preprocessor and postprocessor.
Java Preprocessor and Postprocessor - The preprocessor and postprocessor are Java classes that implement DataPreProcessor / DataPreProcessor2 and DataPostProcessor/ DataPostProcessor2 interfaces. A developer can write custom code in the execute method of the preprocessor or postprocessor class.
The step allows you to further filter the data received from a service call.
Under the Custom Code Invocation, follow these steps:
Under Preprocessor, configure one of the following:
Select Java, and in the Class text box, enter the preprocessor class. This step enables a developer to include any business logic on the data before forwarding the request to the external data source.
Select JavaScript to open a text box. You can write custom JavaScript code for the preprocessor.
Under Postprocessor, configure one of the following:
Select Java, and in the Class text box, enter the postprocessor class. This step enables a developer to include any business logic on the data before sending the response to a mobile device.
Select JavaScript to open a text box. You can write custom JavaScript code for the postprocessor.
Under the Properties section, provide details for the following advanced service properties:
Timeout (in ms) - the duration in milliseconds after which the service call times out. Provide the details in the text box.
Cache Response - the duration in seconds within which the service response is fetched from the cache. Select the Cache Response check box, and provide the details in the text box.
Unescape embedded xml in response - To ignore the MuleSoft response received in the XML value field, select the Unescape embedded xml in response check box.
Response Encoding - Select the appropriate response encoding. The default value is UTF-8. For more information about different encoding schemes, refer to Response Encoding Schemes.
Under the Pass-through Cookies, specify a comma separated list of cookie names. When cookies names are present in the incoming client request, these cookies are send to the backend target along with preprocessor request. A sample value looks like - cookie1, cookie2.
In the Request Input tab, do the following:
Integration services accept only form-url-encoded inputs for all input parameters provided in service input parameters (request input).
You can add an entry by clicking the Add Parameter button if entries for the input and the output tabs do not exist.
- To make duplicate entries, select the check box for the entry, click Copy, and then click Paste.
- To delete an entry, select the check box for an entry, and then click the Delete button.
Under the Body tab, do the following:
To forward the body of the client's request to backend as it is, select the Enable pass-through input body check box. For more details on API Proxy service, refer to How to Enable Pass-through Proxy for Operations.
To configure parameters in the client's body, do the following:
In the NAME field, enter the name for the request input parameter.
VALUE: select request or session. By default, this field is set to Request. three different options are available in Kony Fabric under Request Input > Body > VALUE during configuration of any operation. These options primarily determine the source of the value of the header.
Request: If this option is selected, the Integration Server picks the value pairs from the client's request during run time and forwards the same to the back-end.
User has the option to configure the default value. This default value is taken if the request does not have the header.
Session: If this option is selected, the value of header is picked from session context based on the user configuration.
Identity: If this is selected, you can filter the request parameters based on the response from the identity provider. For more details to configure identity filters, refer to Enhanced Identity Filters - Integration Services.
In the TEST VALUE filed, enter the user input for the selected column.
In the DEFAULT VALUE, enter the value if required. The default value will be used if the test value is empty.
Select the Encode check box to enable an input parameter to be encoded. For example, the name New York Times would be encoded as New%20York%20Times when the encoding is set to True. The encoding must also adhere to the HTML URL encoding standards.
Click the Header tab to provide the following customer headers: Based on the operation - for example, post or get -, provide custom HTTP headers.
To forward the header of the client's request to backend as it is, select the Enable pass-through input header check box. For more details on API Proxy service, refer to How to Enable Pass-through Proxy for Operations.
To configure parameters in the client's header, do the following.
In the NAME field, provide custom HTTP headers required by the external source.
VALUE: select request or session. By default, this field is set to Request. Five different options are available in Kony Fabric under Request Input > Headers > VALUE during configuration of any operation. These options primarily determine the source of the value of the header.
Request: If this option is selected, the Integration Server picks the value pairs from the client's request during run time and forwards the same to the back-end.
User has the option to configure the default value. This default value is taken if the request does not have the header.
Session: If this option is selected, the value of header is picked from session context based on the user configuration.
Constant: Constant is used to configure the value that is picked and sent to back-end by the Integration Server during the run-time.
Expression: Select this option to configure the velocity template expressions for the header values.
You cannot edit the default value for expression.
Identity: If this is selected, you can filter the request parameters based on the response from the identity provider. For more details to configure identity filters, refer to Enhanced Identity Filters - Integration Services.
TEST VALUE: Enter a value. A test value is used for testing the service.
DEFAULT VALUE: change the syntax if required.
DESCRIPTION: Enter a proper description.
To validate the details, click Fetch Response. The result of the operation appears.
Click the Response Output tab to configure the fields of the table for displaying the data:
To forward the response from the backend to the client as it is, select the Enable pass-through output body check box. For more details on API Proxy service, refer to How to Enable Pass-through Proxy for Operations.
To configure parameters in the response, enter the values for required fields such as name, path, scope, data type, collection ID, record ID, format and format value.
Enter the values for required fields such as name, path, scope, data type, collection ID, record ID, format and format value.
ID
Path
city
//current_observation/display_location/city
latitude
//current_observation/display_location/latitude
longitude
//current_observation/display_location/longitude
temperature
//current_observation/temp_c
relative_humidity
//current_observation/relative_humidity
windspeed
//current_observation/wind_string
icon
//current_observation/icon
icon_url
//current_observation/icon_url
forecast_url
//current_observation/forecast_url
To validate the details, click Test. The result of the operation appears.
When you enable Pass-through proxy flags, you will notice that you cannot configure request input, headers, and response out parameters for this operation.
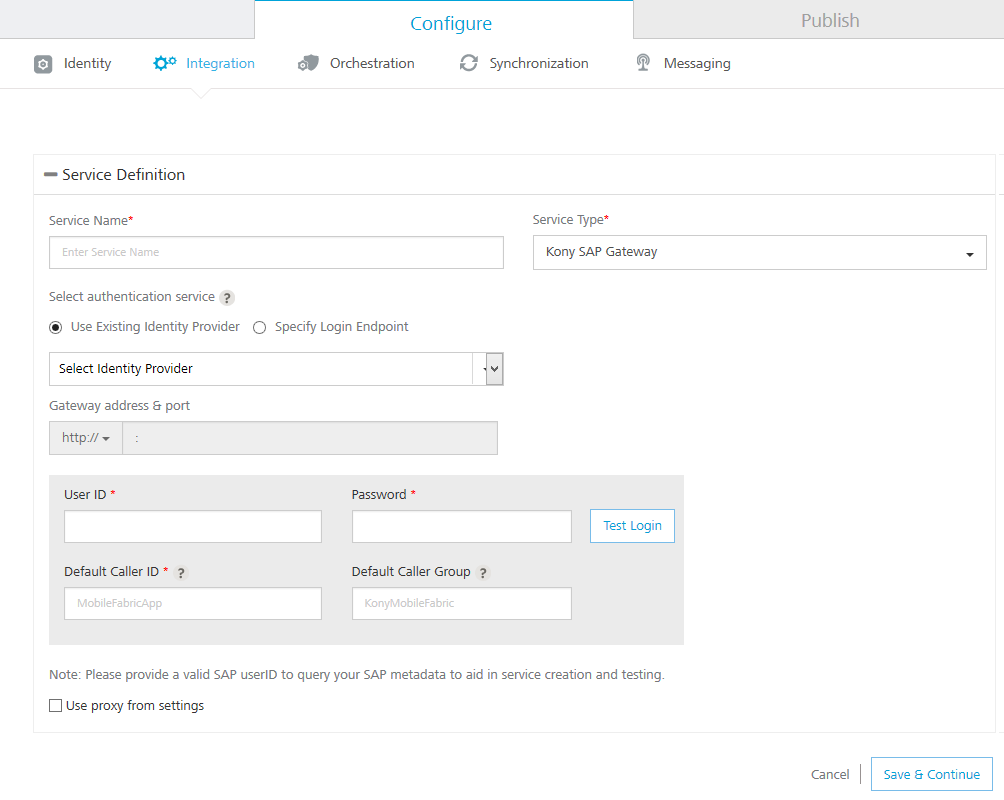
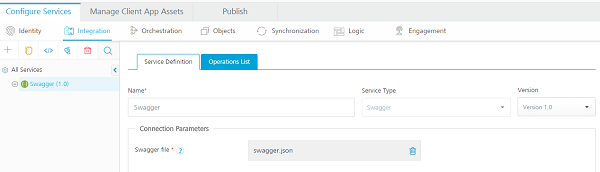
Adding a Service Definition for non-Salesforce endpoints
To add a service definition, follow these steps:
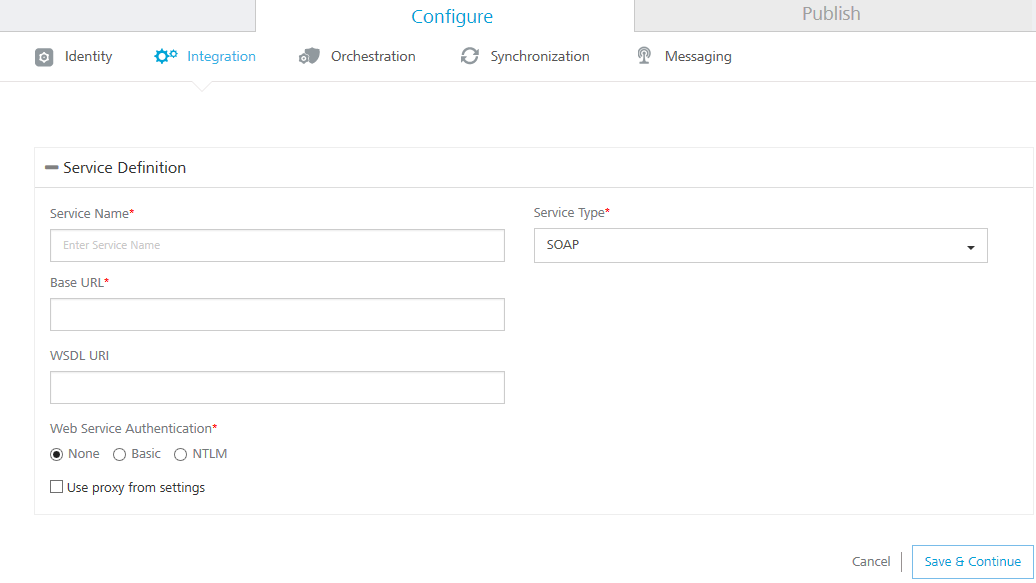
In the Integration tab, click Add New Integration, and then click Configure New.
Provide unique name for your service.
Under the Endpoint, provide the following details:
Select an EndPoint Type.
Type the Base URL address.
WSDL URL (for SOAP endpoint only): Type the WSDL URL that contains the wsdl file.
Applicable to SOAP endpoint only.
Expand Advanced and select the authentication mode.
None: Select the option if your services does not require authentication for your application.
Basic: Provide User ID and Password if the external Web service requires form or basic authentication.
NTLM: Your service follows the NT LAN Manager authentication process. You are required to provide the User ID, Password, NTLM Host and NTLM Domain.
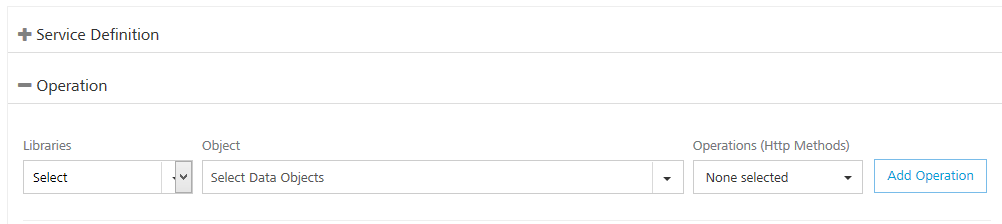
Click Continue to display Operations page.
Type a new name for the operation.
Select an HTTP method from the list.
For a successful service call, you have to provide the following operations details:
Input: On this tab, you can provide details of the call. You can also validate the call by clicking Test. On the Result tab, you can see the response received from the Endpoint URL.
Output: On this tab, you can refine the data being received from the service call.
Advanced: On this tab,
From the Custom Code Invocation, if you want to further filter the data Received from the service call, you can upload the JAR file containing the Preprocessor Class Name and Postprocessor Class name.
HTTP Headers: You can provide the HTTP Headers for the call.
Properties: You can configure various advanced service properties.
Click Save.
How to Configure a Java Connector
With Java service, you can interact with your software application that does not support restful APIs. A service that uses a custom Java connector is a Java service. The Java connector is a custom Java class and you can create a Java connector either by implementing com.konylabs.middleware.common.JavaService interface or com.konylabs.middleware.common.JavaService2 interface. Kony recommends to use JavaService2 as you can get an access to DataControllerRequest and DataControllerResponse objects.
You must load the required JAR files to define a Java service. The JAR files contain the Java classes. The Java classes contain the Java methods. These methods have the logic defined that is required for a service. Java services are mostly used with Webconnector Services.
The middleware-system.jar helps you to develop a Java connector. You can download the middleware-system.jar from Admin Console's download page.
Data Conversion of a Java Service
Click here for more details
The data structure of the Kony Result object (com.konylabs.middleware.datamapping.Result) shows that all the data is converted, but the complete data in the Kony Result object in not exposed as expected. You get a part of the data in Kony Fabric because only a few unnamed records are converted into an object instead of an array.
The use of JSON Arrays is particularly important for the mapping of data in user interface segments that require arrays as data input.
The following code details sample original JSON data, data converted to Kony Object, and in the result - data converted only limited unnamed records into an object in Kony Fabric (loss of data).
                            //Sample: Original JSON Data:


{"booking":[
{"amount":-254.6,"description":"Paiement carte BIM STORES PALMIER  le 21/02/2016 à 18:54","doc_id":17150820,"value_date":"2016-02-19","temporary":false,"date":"2016-02-21"},{"amount":-44.26,"description":"Paiement internet LYDEC ECOM  le 19/02/2016 à 13:04","doc_id":17146660,"value_date":"2016-02-18","temporary":false,"date":"2016-02-19"},{"amount":-37.26,"description":"Paiement internet LYDEC ECOM  le 19/02/2016 à 13:19","doc_id":17146835,"value_date":"2016-02-18","temporary":false,"date":"2016-02-19"},{"amount":-14.34,"description":"Paiement internet LYDEC ECOM  le 19/02/2016 à 13:11","doc_id":17146744,"value_date":"2016-02-18","temporary":false,"date":"2016-02-19"}
]}

Sample: Data converted to KONY Object:
Dataset [id=booking, index=-1,
	records=[
		Record [index=-1, order=0, id=,
			params=[
				Param [name=amount, value=-254.6],
				Param [name=description, value=Paiement carte BIM STORES PALMIER  le 21/02/2016 à 18:54],
				Param [name=doc_id, value=17150820],
				Param [name=value_date, value=2016-02-19],
				Param [name=temporary, value=false],
				Param [name=date, value=2016-02-21]
			], datasets=[], records=[]
			], Record [index=-1, order=0, id=,
			params=[
				Param [name=amount, value=-44.26],
				Param [name=description, value=Paiement internet LYDEC ECOM  le 19/02/2016 à 13:04],
				Param [name=doc_id, value=17146660],
				Param [name=value_date, value=2016-02-18],
				Param [name=temporary, value=false],
				Param [name=date, value=2016-02-19]
			], datasets=[], records=[]
			],


//Sample: Data converted only limited unnamed records into an object in Kony Fabric:

"booking": {
            "": {
                "date": "2016-02-21",
                "temporary": "false",
                "amount": "-254.6",
                "description": "Paiement carte BIM STORES PALMIER  le 21/02/2016 à 18:54",
                "doc_id": "17150820",
                "value_date": "2016-02-19"
            }
		}
Writing a Java Class
To write a Java class for a Java connector, follow these steps:
Create a Java connector either by implementing the com.konylabs.middleware.common.JavaService interface or com.konylabs.middleware.common.JavaService2 interface.
When you implement com.konylabs.middleware.common.JavaService, you have to implement the following invoke() method with the signature:
public Object invoke(String paramString, Object[] paramArrayOfObject) throws Exception;
When you implement com.konylabs.middleware.common.JavaService2, you have to implement the following invoke() method with the signature:
In the Name field, enter a name – for example, Java_operation.
From the Service Type drop-down list, select JAVA.
From the Specify Java Connector Jar list, select a JAR file, or click UploadNew to select the JARs from your local machine. The system adds your main JAR file to the console. The system displays the added JAR file's name under the Specify Java Connector Jar field.
The system allows you to select and upload only one JAR file at Specify Java Connector Jar. The main JAR file contains Kony middleware java services.
You can delete an uploaded JAR file by clicking the Delete button.
To upload an updated JAR file, upload the new file, which must have the same name as the old JAR file. The new JAR file overrides the existing file.
Under the Specify Dependent Jar list, select one or more JAR files if the main JAR depends only on external JARs. You can also click Upload New to select the JARs from your local machine. The system adds JAR files to the console.
You can remove an existing dependent JAR file from the console. Click the Unlink button. The system displays the Unlink JAR confirmation message window. Click confirm. The JAR file is removed from the Specify Dependent Jar section.
Click the Advanced tab to specify dependent JAR and API throttling. All options in the Advanced section are optional.
To specify dependent JAR, follow these steps:
Select the JAR containing preprocessor or postprocessor libraries from the drop-down list, or click Upload New to browse the JAR file from your local system. The step allows you to further filter the data sent to the back end:
Make sure that you upload a custom JAR file that is built on the same JDK version used for installing Kony Fabric Integration.
For example, if the JDK version on the machine where Kony Fabric Integration is installed is 1.6, you must use the same JDK version to build your custom jar files. If the JDK version is different, an unsupported class version error will appear when a service is used from a device.
API throttling enables you to limit the number of request calls within a minute. If an API exceeds the throttling limit, the API will not return the service response. To specify throttling, follow these steps:
In the Total Rate Limit text box, enter a required value. With this value, you can limit the number of requests configured in your Kony Fabric console in terms of Total Rate Limit.
In the Per IP Rate Limit text box, enter a required value. With this value, you can limit the number of IP address requests configured in your Kony Fabric console in terms of Per IP Rate Limit.
Click SAVE to save your service definition. The system displays the success message: Service Saved Successfully. The Operations List tab appears only after the Service Definition is saved. The ADD OPERATION button in the Service Definition page is active only after you click the SAVE button.
Click ADD OPERATION to display Operations List tab for adding operations.
You can also add operations by following these steps:
- Click the Operations List tab. - From the tree in the left pane, click Add > Add New Operation, shown below:
Under Operations List tab, in the Operation name text box, enter a name – for example, Java_operation.
From the Class Name drop-down list, select the Java class that has the method defined.
Click ADD OPERATION to display the Operation Modal tab.
In the Operation Modal tab, follow these steps:
This tab contains the request input, response output, and advanced sections. The input values are data types, scope, and format types. By default, the system will display the Request Input tab.
You can add an entry by clicking the Add button if entries for the input and the output tabs do not exist.
You can also delete an entry. Select the check box for an entry, and then click the Delete button.
In the Name field, modify the name if required.
Select one of the following security operations in the Operation Security Level field. By default, the field is set to Authenticated App User:
Authenticated App User – indicates that the operation is secured. To use the operation, an app user must be authenticated by an associated identity service.
Anonymous App User – indicates that a user must have the app key and app secret to access this operation.
Public – indicates that the operation requires no special security.
Click the Advanced tab to configure the preprocessor and postprocessor for Java and JavaScript. All options in the Advanced section are optional. For more details, refer to Preprocessor and Postprocessor.Click here
Configure the parameters for the preprocessor and postprocessor to filter the request and response objects for your business requirements. You can specify the Java class name or custom JavaScript code for preprocessor and postprocessor. Java class names contain the preprocessor and postprocessor.
Java Preprocessor and Postprocessor - The preprocessor and postprocessor are Java classes that implement DataPreProcessor / DataPreProcessor2 and DataPostProcessor/ DataPostProcessor2 interfaces. A developer can write custom code in the execute method of the preprocessor or postprocessor class.
The step allows you to further filter the data received from a service call.
Under the Custom Code Invocation, follow these steps:
Under Preprocessor, configure one of the following:
Select Java, and in the Class text box, enter the preprocessor class. This step enables a developer to include any business logic on the data before forwarding the request to the external data source.
Select JavaScript to open a text box. You can write custom JavaScript code for the preprocessor.
Under Postprocessor, configure one of the following:
Select Java, and in the Class text box, enter the postprocessor class. This step enables a developer to include any business logic on the data before sending the response to a mobile device.
Select JavaScript to open a text box. You can write custom JavaScript code for the postprocessor.
Under the Properties section, provide details for the following advanced service properties:
Timeout (in ms) - the duration in milliseconds after which the service call times out. Provide the details in the text box.
Cache Response - the duration in seconds within which the service response is fetched from the cache. Select the Cache Response check box, and provide the details in the text box.
Unescape embedded xml in response - To ignore the MuleSoft response received in the XML value field, select the Unescape embedded xml in response check box.
Response Encoding - Select the appropriate response encoding. The default value is UTF-8. For more information about different encoding schemes, refer to Response Encoding Schemes.
In the Request Input > Body tab, provide the following details:
Integration services accept only form-url-encoded inputs for all input parameters provided in service input parameters (request input).
You can add an entry by clicking the Add Parameter button if entries for the input and the output tabs do not exist.
- To make duplicate entries, select the check box for the entry, click Copy, and then click Paste.
- To delete an entry, select the check box for an entry, and then click the Delete button.
The NAME field contains a unique identifier for a parameter. Change the identifier if required.
In the Default value field, change the syntax if required.
Select a data type in the Data Type field:
String - A combination of alphanumeric and special characters. String supports all formats including UTF-8 and UTF-16 with no maximum size limit.
Boolean - A value that is true or false.
Number - An integer or a floating number.
Collection - A group of data or data set.
Select request or session in the Scope field. By default, this field is set to Request.
Request - Indicates that the value must be retrieved from the HTTP request received from a mobile device.
Session - Indicates that the value must be retrieved from the HTTP session stored on Kony Fabric.
In the Description, provide the description.
Click the Response Output tab, and enter the values for required fields such as name, scope, data type, collection ID, record ID, format and format value.
In Java service, the response (output) from a backend is not parsed based on the response values. The complete response from the backend is sent to the client device.
By default, the opStatus and httpStatusCode values for Java and JavaScript services are added as 0 and 200.
Click the Response Output tab, and follow these steps:
The Name field contains a unique identifier for a parameter. Change the identifier if required.
Select request or session in the Scope field. By default, this field is set to Request.
Request - Indicates that the value must be retrieved from the HTTP request received from a mobile device.
Session - Indicates that the value must be retrieved from the HTTP session stored on Kony Fabric.
Select a data type in the Data Type field:
String - A combination of alphanumeric and special characters. String supports all formats including UTF-8 and UTF-16 with no maximum size limit.
Boolean - A value that is true or false.
Number - An integer or a floating number.
Record - A group data elements under the specified parameter. A record can also be part of a collection. Typically, a record provides metadata to a segment. For more details, refer to How to Create a Collection Data Type.
Collection - A group of data, also referred to as data set. A collection contains only records, and a record contains string, boolean, or number values. For more details, refer to How to Create a Collection Data Type.
Select a format type in the Format Type list.
None - No format.
Currency - Currency format.
Number - Number format.
Date - Date format.
If datatype is string, then the options in the Format Type are Currency, Number and Date.
If the datatype is number, then the options in the Format Type are Currency and Date.
If the datatype is boolean, then the options in the Format Type and Format Value text box are disabled.
In the Format Value field, provide the standard for converting the specified format. For example, enter a date format as MMDDYY to display the date in Month/Date/Year.
How to Create a Collection Data Type for Java Service
To create a collection data type, follow these steps:
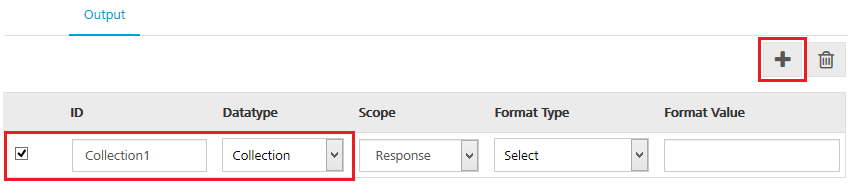
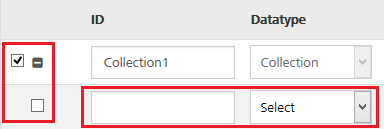
In the Operation Modal tab > the Output tab, click the Add Parameter button. A new row is added.
In the NAME field, enter the name - for example Collection1, and select the datatype as Collection. Complete the other fields as required. Select the check box, and click the Add button, shown below:
A row appears under Collection1.
If you select the check box for Collection, you can add more records under a collection.
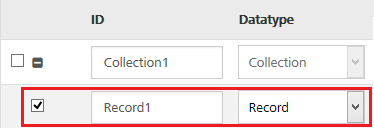
Clear the check box that you selected. In the new row's ID text box, enter the name (for example, Record1), and select the datatype as Record. Fill the other fields as required. Select only the check box for this row, and click the Add button, shown below:
Ensure that you have selected the check box for a Collection or Record before adding a row under it.
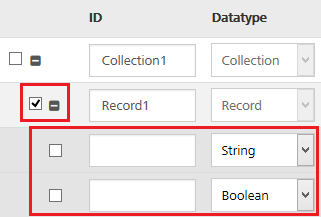
A row appears under Record1.
If you select the check box for Record, you can add parameters under a record.
How to Edit an Existing Java Connector Integration Service
If you want to edit an existing Java service, you can edit details such as service name, JAR files, operation modal details. While editing a Java service, you can change the Java service type. A Java service must be available in the Integration home screen. To add an existing Integration service, refer to Use an Existing Service.
To edit an existing Java service, follow these steps:
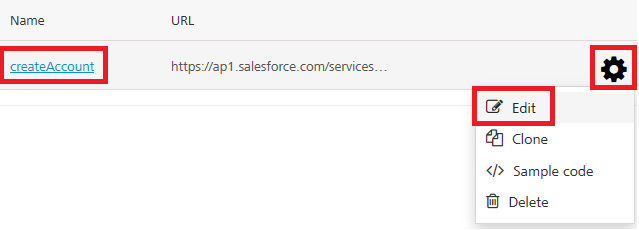
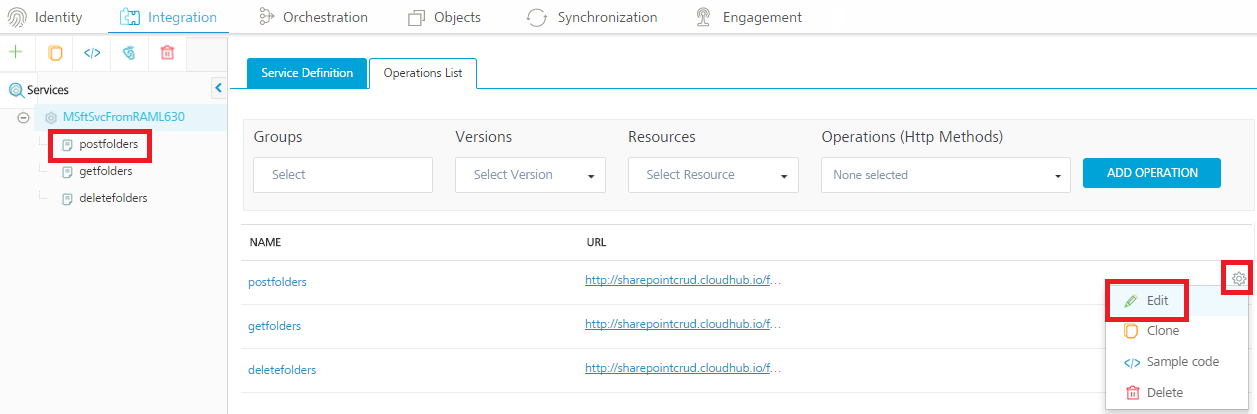
In the Integration page, click one of your Java services.
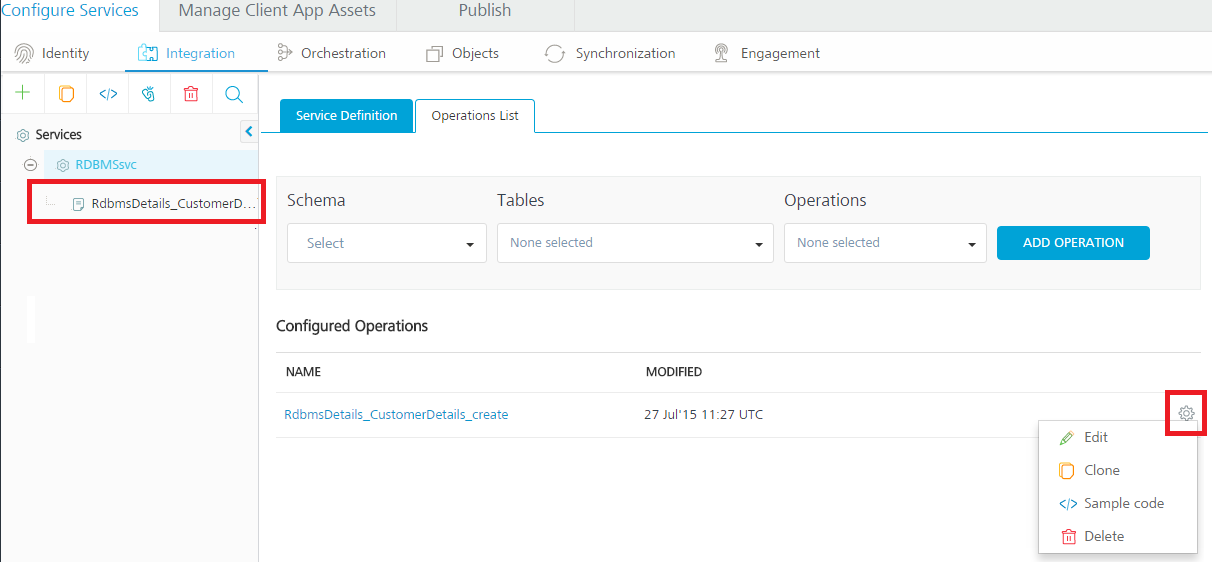
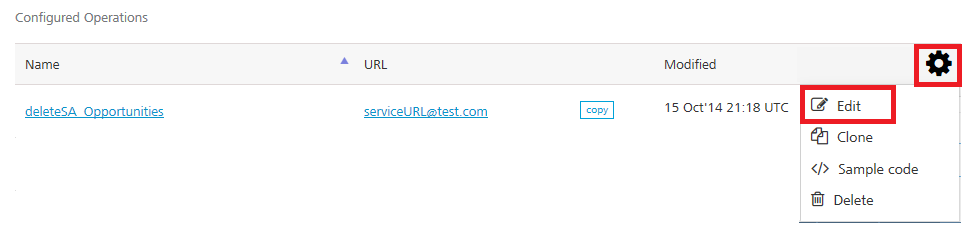
Under Operations > Configured Operations, hover your cursor over the required service, click the Settings button, and then click Edit.
The operation details are displayed in the Edit Service Parameters dialog.
Under the Operation section, hover your cursor over the required service, click the Settings button, and then click Edit to display the Operation Modal tab. To modify Java operations, refer to How to Configure and Edit Operation Modal.
Click Done to update your Java service. The Integration page is displayed.
How to Configure a JavaScript Connector Service
With the JavaScript Connector service, you can integrate plain JavaScript services to applications in Kony Fabric.
You can upload custom JavaScript files to Kony Fabric. Using JavaScript connectors, you can easily create server-side code and make it available as operations. The JavaScript file must contain functions that a user wants to be made available as operations, along with other supporting functions. You can also add preprocessor and postprocessor to the operations defined. For more details on the structure for JavaScript function definitions, refer to the Limitations section.
In the Name field, enter a name – for example, JavaScript_Service.
From the Service Type drop-down list, select JavaScript.
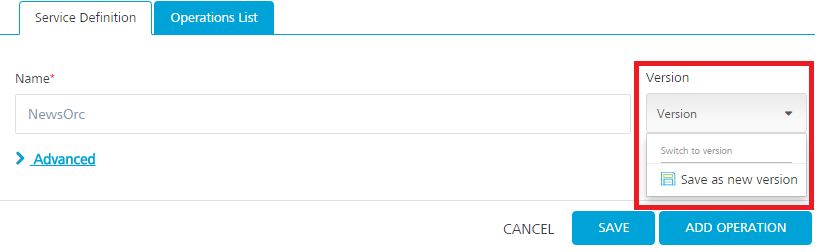
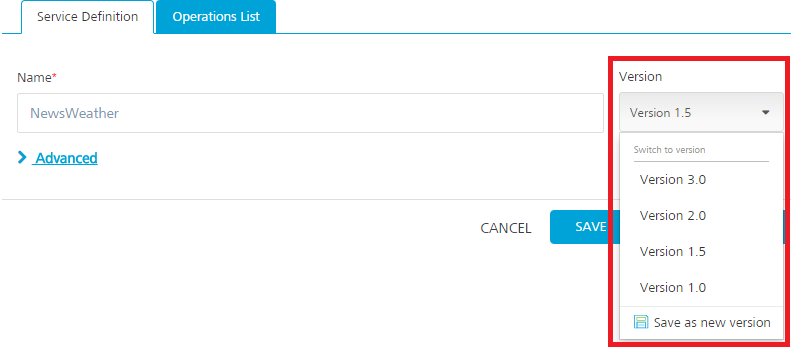
From the Versions drop-down list, select the required version. You can select only one version of the service.
From the Specify the Javascript libraries section, select a .JS file, or click Upload to select the .JS file from your local machine. The console adds your JS file to the console. The system displays the added JS file's name under the Specify the Javascript libraries section.
The system allows you to upload more than one JS file at Specify the Javascript libraries.
Once uploaded, JavaScript files are available across Kony Fabric console. They cannot be deleted, only unlinked. You can unlink uploaded .JS files by clicking the Unlink button.
Click the Advanced tab to specify API throttling. All options in the Advanced section are optional.
API throttling enables you to limit the number of request calls within a minute. If an API exceeds the throttling limit, the API will not return the service response. To specify throttling, follow these steps:
In the Total Rate Limit text box, enter a required value. With this value, you can limit the number of requests configured in your Kony Fabric console in terms of Total Rate Limit.
In the Per IP Rate Limit text box, enter a required value. With this value, you can limit the number of IP address requests configured in your Kony Fabric console in terms of Per IP Rate Limit.
Enable API throttling in a clustered environment by configuring the KONY_SERVER_NUMBER_OF_NODES property in the server_configuration table available in Admin database. This property indicates the number of nodes configured in the cluster. The default value is 1.
Click SAVE to save your service definition. The system displays the success message: Service Saved Successfully. The Operations List tab appears only after the Service Definition is saved. The ADD OPERATION button in the Service Definition page is active only after you click the SAVE button.
Click ADD OPERATION to display Operations List tab for adding operations to the service.
You can also add operations by following these steps:
- Click the Operations List tab. - From the tree in the left pane, click Add > Add New Operation, shown below:
Under Operations List tab, in the JS Library drop-down list, select the required .JS file – for example, Sample.js. This will populate the Function drop-down list.
From the Function drop-down list, select the required functions. Each function equates to an operation.
Click ADD OPERATION to create operations with the selected functions. The new operations are created and listed under the Configured Operations.
Operations name are auto-generated in the format : <Name-of-the-JS-file>_<function-name>. For example, sample_addTwoNumbers
Click the operation. In the Operation Modal tab, follow these steps:
The tab contains the request input, response output, and advanced sections. The input values are data types, scope, and format types. By default, the system will display the Request Input tab.
You can add an entry by clicking the Add button if entries for the input and the output tabs do not exist.
You can also delete an entry. Select the check box for an entry, and then click the Delete button.
In the Name field, modify the operation name if required.
Select one of the following security operations in the Operation Security Level field. By default, the field is set to Authenticated App User:
Authenticated App User – indicates that the operation is secured. To use the operation, an app user must be authenticated by an associated identity service.
Anonymous App User – indicates that a user must have the app key and app secret to access this operation.
Public – indicates that the operation requires no special security.
Click the Advanced tab to configure the preprocessor and postprocessor for JavaScript. All options in the Advanced section are optional
.refer to Preprocessor and Postprocessor.Click here For more details
Configure the parameters for the preprocessor and postprocessor to filter the request and response objects for your business requirements. You can only specify custom JavaScript code for preprocessor and postprocessor.
JavaScript Preprocessor and Postprocessor - Based on the interface, the preprocessors and postprocessors implement the following objects:
<serviceInputParams>, <request>, <response> and <result>.
The step allows you to further filter the data received from a service call.
Under the Custom Code Invocation, follow these steps:
Under Preprocessor, configure one of the following:
Select JavaScript to open a text box. Here you can write custom JavaScript code for the preprocessor.
Under Postprocessor, configure one of the following:
Select JavaScript to open a text box. Here you can write custom JavaScript code for the postprocessor.
Under the Properties section, provide details for the following advanced service properties:
Cache Response - the duration in seconds within which the service response is fetched from the cache. Select the Cache Response check box, and provide the details in the text box.
In the Request Input > Body tab, provide the following details:
Integration services accept only form-url-encoded inputs for all input parameters provided in service input parameters (request input).
You can add an entry by clicking the Add Parameter button if entries for the input and the output tabs do not exist.
- To make duplicate entries, select the check box for the entry, click Copy, and then click Paste.
- To delete an entry, select the check box for an entry, and then click the Delete button.
The NAME field contains a unique identifier for a parameter. Change the identifier if required.
In the Test Value: Enter a value. A test value is used for testing the service.
In the Default value field, change the value if required.
Select request or session in the Scope field. By default, the field is set to Request.
Request - Indicates that the value must be retrieved from the HTTP request received from a mobile device.
Session - Indicates that the value must be retrieved from the HTTP session stored on Kony Kony Fabric.
Select a data type in the Data Type field:
String - A combination of alphanumeric and special characters. String supports all formats including UTF-8 and UTF-16 with no maximum size limit.
Date - A value that is defined as date values.
Boolean - A value that is true or false.
Number - An integer or a floating number.
Collection - A group of data or data set.
Select the Encode check box to enable an input parameter to be encoded. For example, the name New York Times would be encoded as New%20York%20Times when the encoding is set to True. The encoding must also adhere to the HTML URL encoding standards.
Click the Response Output tab, and enter the values for required fields such as name, scope, data type, collection ID, record ID, format and format value.
In JavaScript service, the response (output) from a back end is not parsed based on the response values. The complete response from the back end is sent to the client device.
By default, the opStatus and httpStatusCode values for Java and JavaScript services are added as 0 and 200.
Click the Response Output tab, and follow these steps:
The Response Output tab is not honored in JavaScript Connector.
To configure parameters in the response, enter the values for required fields such as name, scope, path, data type, collection ID, record ID, format and format value.
The Name field contains a unique identifier for a parameter. Change the identifier if required. Here, you must provide the output parameters returned from the operations code.
Select request or session in the Scope field. By default, this field is set to Request.
Select a data type in the Data Type field:
String - A combination of alphanumeric and special characters. String supports all formats including UTF-8 and UTF-16 with no maximum size limit.
Boolean - A value that is true or false.
Number - An integer or a floating number.
Record - A group data elements under the specified parameter. A record can also be part of a collection. Typically, a record provides metadata to a segment. For more details, refer to How to Create a Collection Data Type.
Collection - A group of data, also referred to as data set. A collection contains only records, and a record contains string, boolean, or number values. For more details, refer to How to Create a Collection Data Type.
Select a format type in the Format list.
None - No format.
Currency - Currency format.
Number - Number format.
Date - Date format.
In the Format Value field, provide the standard for converting the specified format. For example, enter a date format as MMDDYY to display the date in Month/Date/Year.
Limitations for JavaScript Engine - JavaScript Connector
The JavaScript Engine does not support some common JavaScript libraries and global JavaScript functions such as jQuery, setTimeout, setInterval or XMLHttpRequest. However, it provides an alternate mechanism to perform the same operation. You can invoke the required functionality using Java for such cases. For example, consider the XMLHttpRequest API. Since Nashorn does not support this API, you will need to use Java to perform the required operations. You can use URLConnection java class or HttpClient API to achieve the same goal.
The JavaScript Engine only supports ECMAScript-262 Edition 5.1. It does not support any features of Edition 6 or any nonstandard features provided by other JavaScript implementations.
The JavaScript Engine does not include a browser plug-in API.
The JavaScript Engine does not include support for DOM/CSS or any related libraries (such as jQuery, Prototype, or Dojo)
The JavaScript Engine does not include direct debugging support.
The JavaScript Engine does not support event loop or a task queue.
Limitations for Supported Function Formats - JavaScript Connector
Supported formats of the JavaScript function definition as follows:
function abc() { … }
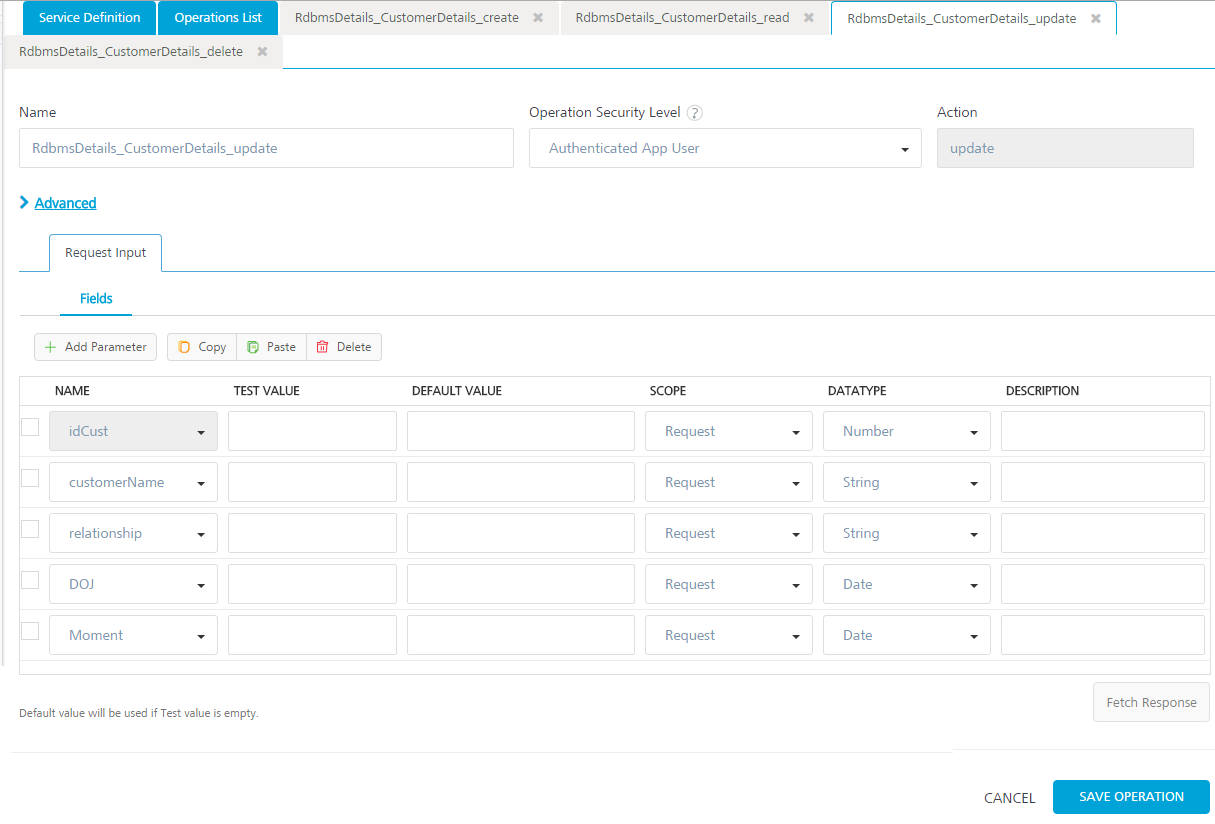
How to Configure a Database Service
With Kony Fabric database connector, you can connect to your own database as an endpoint. After you configure the database connector in Kony Fabric Console, you can perform create, read, update, and delete (CRUD) operations on data in the tables.
For example, banks maintain a store of users and their details. With Kony Fabric database connector, banks can connect to their own databases and manage customers data.
Advantages of Kony Fabric Database connector:
Admins can connect to the given database.
Admins can mange the databases using CRUD operations.
When an admin is creating CRUD operations, the admin can access the configured schema.
Limitations of Kony Fabric Database connector:
Currently Kony Fabric database connector supports MySQL, Oracle, and MS SQL databases.
Stored procedures support is available only for MySQL.
Plain SQL commands are not supported - for example, insert, select, and alter.
Using the database connector, an admin can only alter the data in tables - Data Manipulation Language (DML). An admin cannot alter the structure of the table - Data Definition Language (DDL). For example, an admin cannot add a column in the table.
Using the update operation, an admin can update multiple records at a time based on primary value.
Using the delete operation, an admin can delete one record at a time based on primary value.
Support for a single operation on multiple tables is not available. For example, the system does not allow the <Update> operation for Table1 and Table2.
Data types: All major data types are supported.
Binary Support is not available in RDBMS DataAdapter.
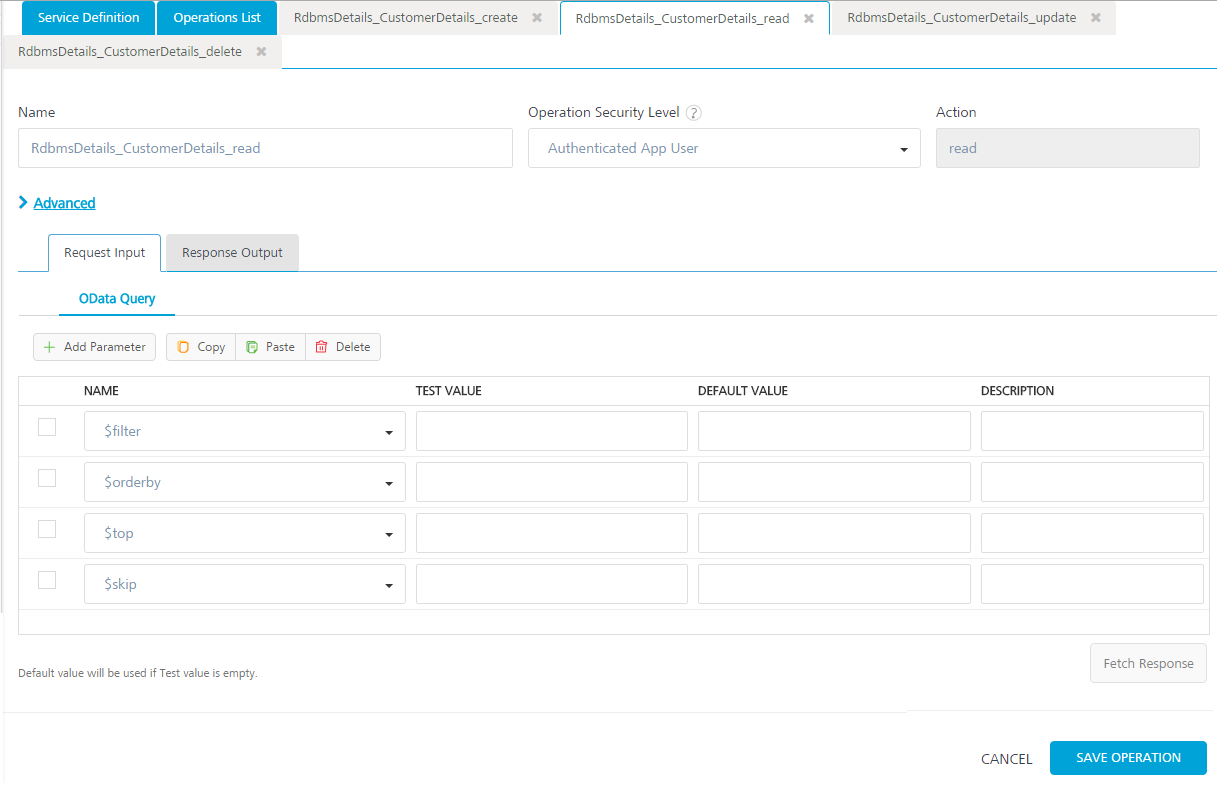
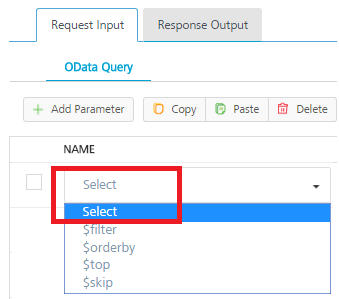
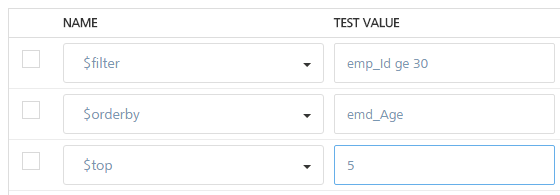
Kony supports four ODATA commands for the read operation such as $filter, $orderby, $top, and $skip .
Open Data Protocol (OData) is an open protocol to allow the creation and consumption of queryable and interoperable RESTful APIs in a simple and standard way. For more details, refer to http://www.odata.org/
Adding a database service involves the following steps:
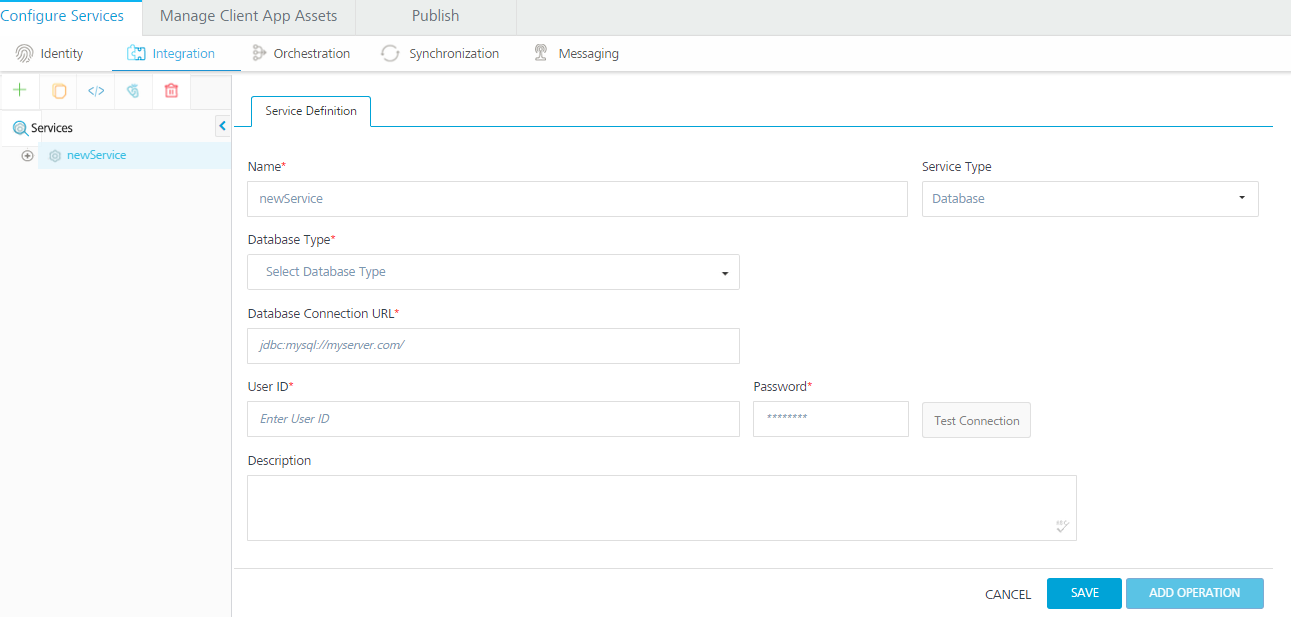
In the Name field, enter a unique name for your service. When you enter the name, the name is updated for the active service under the Services section in the left pane.
From the Service Type list, select Database. By default, XML is selected. If you select Database, the Database Type, Database Connection URL,and other details are displayed.
In the Database Type drop-down list, select the database - for example, MySQL.
In the Database Connection URL, enter the database connection URL - for example, jdbc:mysql://<ip_address>[:<port>]
Databased with proxy are supported in
Under the User ID, enter a valid user name for your database.
Under the Password, enter a valid password for your database.
To test your database connection details, click Test Connection. If the entered details are correct, the system displays the message: Valid Database connection details.
In the Description, enter the appropriate description about the service.
For on-premises, proxy support is not available for database service.
Click the Advanced tab to specify dependent JAR and API throttling. All options in the Advanced section are optional.
To specify dependent JAR, follow these steps:
Select the JAR containing preprocessor or postprocessor libraries from the drop-down list, or click Upload New to browse the JAR file from your local system. The step allows you to further filter the data sent to the back end:
Make sure that you upload a custom JAR file that is built on the same JDK version used for installing Kony Fabric Integration.
For example, if the JDK version on the machine where Kony Fabric Integration is installed is 1.6, you must use the same JDK version to build your custom jar files. If the JDK version is different, an unsupported class version error will appear when a service is used from a device.
API throttling enables you to limit the number of request calls within a minute. If an API exceeds the throttling limit, the API will not return the service response. To specify throttling, follow these steps:
In the Total Rate Limit text box, enter a required value. With this value, you can limit the number of requests configured in your Kony Fabric console in terms of Total Rate Limit.
In the Per IP Rate Limit text box, enter a required value. With this value, you can limit the number of IP address requests configured in your Kony Fabric console in terms of Per IP Rate Limit.
Enable API throttling in a clustered environment by configuring the KONY_SERVER_NUMBER_OF_NODES property in the server_configuration table available in Admin database. This property indicates the number of nodes configured in the cluster. The default value is 1.
Click SAVE to save your service definition. The system displays the success message: Service Saved Successfully. The Operations List tab appears only after the Service Definition is saved. For creating operations for a database service, refer to How To Create CRUD Operations for Database Service.
How to Create CRUD Operations for a Database Service
Once you configure the service definition for a database service, click ADD OPERATION to display the Operations List tab.
You can also display the Operations List tab. Follow these steps:
- Click the Operations List tab. - From the tree in the left pane, click Add > Add New Operation, shown below:
In the Operations List tab, follow these steps to configure operations:
From the Schema drop-down list, select the schema that is loaded based on your database configuration.
From the Object Type drop-down list, select the required objects such as table, view, or stored procedures:
If you select Table, you can select available tables from the Object drop-down, and then you can select CRUD operations for the tables.
If you select View, you can select available views from the Object drop-down and then you can select CRUD operations for the tables.
If you select Stored Procedures, you can select available stored procedures from the Object drop-down.
While adding operations to a database integration service, Kony Fabric allows you to select CRUD operations only for table and view object types.
From the Object drop-down list, select the required check boxes for objects for the selected object type. You can select one or more objects.
From the Operations drop-down list, select the required check boxes for CRUD operations for tables or views. You can select one or more CRUD operations.
Click the ADD OPERATION button. The new operations are created under the Configured Operations section.
Operation names are auto-generated in the format. The default name format of a database operation is <schema_name>_<table_name>_<operations>. You can change the operation name if required. For example, RdbmsDetails_CustomerDetails_create.
How to Create a Database Record with Create Operation
Under Configured Operations, hover your cursor over the create operation, click the Settings button, and then click Edit.
To edit an operation, you can also click the operation from the service tree pane, shown below.
The system displays the selected operation in the edit mode. The create operation has the Request Input tab.
You can add an entry by clicking the Add Parameter button if entries for the input and the output tabs do not exist.
- To make duplicate entries, select the check box for the entry, click Copy, and then click Paste.
- To delete an entry, select the check box for an entry, and then click the Delete button.
The Name field is prepopulated with fields names of the selected database. You can edit this field.
Select one of the following security operations in the Operation Security Level field. By default, the field is set to Authenticated App User:
Authenticated App User – indicates that the operation is secured. To use the operation, an app user must be authenticated by an associated identity service.
Anonymous App User – indicates that a user must have the app key and app secret to access the operation.
Public – indicates that the operation requires no special security.
The Action field is prepopulated with operation names of the selected database. You cannot edit this field.
Click the Advanced tab to configure the preprocessor and postprocessor for Java and JavaScript. All options in the Advanced section are optional. For more details, refer to Preprocessor and Postprocessor.
In the Request Input tab, do the following:
Integration services accept only form-url-encoded inputs for all input parameters provided in service input parameters (request input).
In the TEST VALUE filed, enter the user input for the selected column.
In the DEFAULT VALUE, enter the value if required. The default value will be used if the test value is empty.
Select request or session in the Scope field. By default, the Scope field is set to Request.
Request - Indicates that the value must be retrieved from the HTTP request received from a mobile device.
Session - Indicates that the value must be retrieved from the HTTP session stored on Kony Fabric.
The default data type for the selected column is loaded under the DATATYPE field.
In the DESCRIPTION, provide the description.
To validate the details, click Fetch Response. The result of the operation appears.
Click SAVE OPERATION to save the changes in the create operation.
How to Query a Database and Display Information with the Read Operation
Under Configured Operations, hover your cursor over the Read operation, click the Settings button, and then click Edit.
The system displays the selected operation in the edit mode. The Read operation has the Request Input and Response Output tabs.
You can add an entry by clicking the Add Parameter button if entries for the input and the output tabs do not exist.
In the read operation, the Name drop-down list contains a Select option that acts as a label for the list. Select itself is not a command.
- To make duplicate entries, select the check box for the entry, click Copy, and then click Paste.
- To delete an entry, select the check box for an entry, and then click the Delete button.
In the Request Input, configure the following ODATA commands to filter the data:
The NAME field in the Request Input is prepopulated with ODATA commands.
In the TEST VALUE filed, enter the query parameter for the selected ODATA command.
For example (sample employee table), shown below:
Command Name
Test value for the command
Result
$filter
emp_Id ge 30
Filters and displays data in the table based on age of employes who are older than 30.
$orderby
emp_Age
Arranges data in the table based on employees' age.
$top
5
Displays top five records in the table.
$skip
5
Displays all records in the table except top five records.
For example (sample configuration for ODATA commands), shown below:
In the DEFAULT VALUE, enter the value if required.
In the DESCRIPTION, provide the description.
To validate the details, click Fetch Response. The result of the operation appears.
Click SAVE OPERATION to save the changes in the read operation.
In the Response Output tab, configure the fields of the table for displaying the data:
The Name field in the Response Output tab is prepopulated with database columns.
Select request or session in the SCOPE field. By default, this field is set to Request.
Request - Indicates that the value must be retrieved from the HTTP request received from a mobile device.
Session - Indicates that the value must be retrieved from the HTTP session stored on Kony Fabric.
In the DESCRIPTION, provide the description.
To validate the details, click Test. The result of the operation appears.
Click SAVE OPERATION to save the changes in the read operation.
How to Update a Database Record with Update Operation
Under Configured Operations, hover your cursor over the Update operation, click the Settings button, and then click Edit.
The system displays the selected operation in the edit mode. The update operation has the Request Input tab.
The NAME field contains primary key of the table. You cannot modify these details.
The Name column is prepopulated with fields names in the database.
You can add an entry by clicking the Add Parameter button if entries for the input and the output tabs do not exist.
- To make duplicate entries, select the check box for the entry, click Copy, and then click Paste.
- To delete an entry, select the check box for an entry, and then click the Delete button.
Update the values in the fields, such as TEST VALUE, DEFAULT VALUE, and SCOPE, if required.
To validate the details, click Fetch Response. The result of the operation appears.
Click SAVE OPERATION to save the changes in the update operation.
How to Delete a Database Record with Delete Operation
Under Configured Operations, hover your cursor over the Delete operation, click the Settings button, and then click Edit.
The system displays the selected operation in the edit mode. The delete operation has the Request Input tab.
The NAME field contains the primary key of the table. You cannot modify these details. The Request Input tab contains only the primary key of the table.
In the TEST VALUE field, enter the valid primary key value.
Click Fetch Response to validate the details. If the test value matches the primary key in the database, the system deletes the record from the database.
Click SAVE OPERATION to save the changes in the delete operation.
How to Configure an API Proxy Service
With Kony Fabric API Proxy (pass-through proxy) integration service, you can forward the request and response without intermediate transformation (without affecting the actual request and response.)
For example:
When a back end returns the response with a huge data, and if there is no API Proxy enabled with the service, Kony Fabric converts the back end response to a JSON format before forwarding the response to a device. Users can use the API Proxy service that forwards a back end response in the original back end format to a device. By enabling API Proxy, the input (body and headers) of a client's input request is forwarded to the back end and the output response from the back end is forwarded to the device with no changes in the input request and output response.
You can configure API Proxy integration service for the following endpoints:
XML
JSON
To configure API Proxy integration service for XML or JSON endpoints, follow these steps:
In the Name field, provide a unique name for your service - for example, APIProxyService.
From the Service Type list, select APIProxy.
In the Base URL, type the URL of the back end of XML or JSON type.
In the Client Authentication field, select an identity provider from the drop-down list. This drop-down list shows identity providers only if you have created identity providers for OAuth 2.0 in the Identity page.
Click the Advanced tab to specify dependent JAR and API throttling. All options in the Advanced section are optional.
To specify dependent JAR, follow these steps:
Select the JAR containing preprocessor or postprocessor libraries from the drop-down list, or click Upload New to browse the JAR file from your local system. The step allows you to further filter the data sent to the back end:
Make sure that you upload a custom JAR file that is built on the same JDK version used for installing Kony Fabric Integration.
For example, if the JDK version on the machine where Kony Fabric Integration is installed is 1.6, you must use the same JDK version to build your custom jar files. If the JDK version is different, an unsupported class version error will appear when a service is used from a device.
API throttling enables you to limit the number of request calls within a minute. If an API exceeds the throttling limit, the API will not return the service response. To specify throttling, follow these steps:
In the Total Rate Limit text box, enter a required value. With this value, you can limit the number of requests configured in your Kony Fabric console in terms of Total Rate Limit.
In the Per IP Rate Limit text box, enter a required value. With this value, you can limit the number of IP address requests configured in your Kony Fabric console in terms of Per IP Rate Limit.
Enable API throttling in a clustered environment by configuring the KONY_SERVER_NUMBER_OF_NODES property in the server_configuration table available in Admin database. This property indicates the number of nodes configured in the cluster. The default value is 1.
Under the Web Service Authentication, select one of the following modes:
None: Select the option if you do not want to provide any authentication for the service.
Basic: Provide User ID and Password if the external Web service requires form or basic authentication.
NTLM: Your service follows the NT LAN Manager authentication process. You are required to provide the User ID, Password, NTLM Host, and NTLM Domain.
To enable the proxy, select the Use proxy from settings check box. By default, the check box is cleared. The Use proxy from settings check box dims when no proxy is configured under the Settings > Proxy.
Click SAVE to save your service definition. The system displays the success message: Service Saved Successfully. The Operations List tab appears only after the Service Definition is saved. The ADD OPERATION button in the Service Definition page is active only after you click the SAVE button.
Click ADD OPERATION to display the NewOperation page.
You can also display the NewOperation page. Follow these steps:
- Click the Operations List tab > CONFIGURE OPERATION. - From the tree in the left pane, click Add > Add New Operation, shown below:
Select one of the following security operations in the Operation Security Level field. By default, the field is set to Authenticated App User:
Authenticated App User – indicates that the operation is secured. To use this operation, an app user must be authenticated by an associated identity service.
Anonymous App User – indicates that a user must have the app key and app secret to access this operation.
Public – indicates that the operation requires no special security.
Select the required method for the operation from the HTTP Methods field.
The Target URL field is prepopulated with the URL that you provided at the Base URL field. You can add the suffix, if required.
For example, to the base URL, you can add suffix such as /latest or /sports to get latest news or sports news:
http://feeds.foxnews.com/foxnews/latest
http://feeds.foxnews.com/foxnews/sports
Click the Advanced tab to configure the preprocessor and postprocessor for Java and JavaScript. All options in the Advanced section are optional. For more details, refer to Preprocessor and Postprocessor.
Click Save Operation to save the operation. The system displays the Operation section for your service.
Limitations for API Proxy
API Proxy service operations and operations for which pass-through (inputs, headers, and outputs) is enabled cannot be used in orchestration services. For example, when you create an integration service with an API Proxy type or the operations of XML, SOAP, or JSON endpoints with pass-through enabled, the system does not show the services and operations while configuring orchestration operations.
Using the MBaaS Client SDK with API Proxy integration service is not supported.
How to Enable MBaaS Client SDK with API Proxy Integration Service
Using API proxy integration service not supported by default.
To enable MBaaS client SDK with API proxy integration service, a developer must write a foreign function interface (FFI) file to package the payload and send it out in the correct format (SDK only supports form-url-encoded data)
With API Proxy integration service is used, the client side metrics are not supported.
How to Enable Pass-through Proxy for Operations
You can also configure the following pass-through proxy flags in operations for connectors such as XML, SOAP, and JSON:
Under the Input Request > Body tab, select the Enable pass-through input body check box to forward the body of a client's request to the back end.
Under the Input Request>Header tab, select the Enable pass-through input header check box to forward headers of a client's request to the backend.
Under the Output Response tab, select the Enable pass-through output body check box to forward the response from the backend to a client.
How to Configure an AWS API Gateway Service
AWS API Gateway is a new data adapter of Kony Fabric integration services. With Kony Fabric AWS API Gateway integration service, you can connect to the services configured and deployed under API Gateway Service in Amazon Web Services.
Kony Fabric AWS API Gateway supports the following integration types of Amazon API Gateway:
Lambda Function
HTTP Proxy
Mock Integration
AWS Service Proxy
Kony Fabric supports AWS API Gateway services, which returns JSON response.
Adding an AWS API Gateway service involves the following steps:
In the Name field, provide a unique name for your service - for example, AWSDataAdapter.
From the Service Type list, select AWS API Gateway.
Regions: Select your region that you have configured AWS API Gateway for your AWS account.
In the AWS URL, the system displays the AWS API gateway URL for the selected region. You cannot modify these details.
In the Access Key ID field, enter your access key ID that you received from your AWS account.
In the Secret Access ID field, enter your secret access key ID that you received from your AWS account.
Click the Advanced tab to specify dependent JAR and API throttling. All options in the Advanced section are optional.
To specify dependent JAR, follow these steps:
Select the JAR containing preprocessor or postprocessor libraries from the drop-down list, or click Upload New to browse the JAR file from your local system. The step allows you to further filter the data sent to the back end:
Make sure that you upload a custom JAR file that is built on the same JDK version used for installing Kony Fabric Integration.
For example, if the JDK version on the machine where Kony Fabric Integration is installed is 1.6, you must use the same JDK version to build your custom jar files. If the JDK version is different, an unsupported class version error will appear when a service is used from a device.
API throttling enables you to limit the number of request calls within a minute. If an API exceeds the throttling limit, the API will not return the service response. To specify throttling, follow these steps:
In the Total Rate Limit text box, enter a required value. With this value, you can limit the number of requests configured in your Kony Fabric console in terms of Total Rate Limit.
In the Per IP Rate Limit text box, enter a required value. With this value, you can limit the number of IP address requests configured in your Kony Fabric console in terms of Per IP Rate Limit.
Enable API throttling in a clustered environment by configuring the KONY_SERVER_NUMBER_OF_NODES property in the server_configuration table available in Admin database. This property indicates the number of nodes configured in the cluster. The default value is 1.
To enable the proxy, select the Use proxy from settings check box. By default, the check box is cleared. The Use proxy from settings check box dims when no proxy is configured under the Settings > Proxy.
To test your AWS connection details, click Test Connection. If the entered details are correct, the system displays the message: Valid Gateway address and port.
Click SAVE to save your service definition. The system displays the success message: Service Saved Successfully. The Operations List tab appears only after the Service Definition is saved. The ADD OPERATION button in the Service Definition page is active only after you click the SAVE button.
How to Create Operations for an AWS API Gateway Service
Once you configure the service definition for an AWS API Gateway service, click ADD OPERATION to display the Operations List tab.
You can also display the NewOperation page. Follow these steps:
- Click the Operations List tab > CONFIGURE OPERATION. - From the tree in the left pane, click Add > Add New Operation, shown below.
From the API drop-down list, select the API that is deployed at Amazon Services.
From the Resource drop-down list, select the resource.
From the Stages drop-down list, select the stage.
From the Methods drop-down list, select the check boxes for the methods.
Click the ADD OPERATION button. The new operations are created under the Configured Operations section.
Operation names are auto-generated in the format. The default name format of a AWS API operation is <method_name><api_name><resource_name>. You can change the operation name if required.
How to Configure Operations for an AWS API Gateway Service
Once you create operations for an AWS API Gateway service, you can configure operations as follows:
Under Configured Operations, hover your cursor over the create operation, click the Settings button, and then click Edit.
The Name field is prepopulated with operation names. You can edit this field if required.
Select one of the following security operations in the Operation Security Level field. By default, the field is set to Authenticated App User:
Authenticated App User – indicates that the operation is secured. To use the operation, an app user must be authenticated by an associated identity service.
Anonymous App User – indicates that a user must have the app key and app secret to access the operation.
Public – indicates that the operation requires no special security.
Click the Advanced tab to configure the preprocessor and postprocessor for Java and JavaScript. All options in the Advanced section are optional. For more details, refer to Preprocessor and Postprocessor.
In the Request Input tab, do the following:
Integration services accept only form-url-encoded inputs for all input parameters provided in service input parameters (request input).
You can add an entry by clicking the Add Parameter button if entries for the input and the output tabs do not exist.
- To make duplicate entries, select the check box for the entry, click Copy, and then click Paste.
- To delete an entry, select the check box for an entry, and then click the Delete button.
Under the Body tab, do the following:
In the NAME field, enter the name for the request input parameter.
In the Body tab > NAME filed, the input parameters are prepopulated.
In the TEST VALUE filed, enter the user input for the selected column.
In the DEFAULT VALUE, enter the value if required. The default value is used if the test value is empty.
Select request or session in the Scope field. By default, the Scope field is set to Request.
Request - Indicates that the value must be retrieved from the HTTP request received from a mobile device.
Session - Indicates that the value must be retrieved from the HTTP session stored on Kony Fabric.
The default data type for the selected column is loaded under the DATATYPE field.
Enter the values for required fields such collection ID and record ID.
Select the Encode check box to enable an input parameter to be encoded. For example, the name New York Times would be encoded as New%20York%20Times when the encoding is set to True. The encoding must also adhere to the HTML URL encoding standards.
Under the Header, do the following: Based on the operation - for example, post or get -, provide custom HTTP headers.
To provide customer headers, click Header.
If AWS APIs with API Key Required is set to "true", the api key needs to be sent as request header as x-api-key.
In the NAME field, provide custom HTTP headers required by the external source.
SCOPE: Select request or session. By default, the field is set to Request. Four options are available in Kony Fabric under Request Input > Headers > Scope tab during configuration of any operation. The options primarily determine the source of the value of the header.
Request: If this option is selected, the Integration Server picks the value pairs from the client's request during run time and forwards the value pairs to the back-end.
The option helps a user to configure the default value. The default value is taken if the request does not have the header.
Session: If this option is selected, the value of header is picked from the session context based on the user configuration.
Constant: Constant is used to configure the value that is picked and sent to back end by the Integration Server during run time.
Expression: Select this option to configure the velocity template expressions for the header values.
You cannot edit the default value for the expression.
TEST VALUE: Enter a value. A test value is used for testing the service.
DEFAULT VALUE: Change the syntax if required.
DESCRIPTION: Enter a proper description.
To validate the details, click Fetch Response. The result of the operation appears.
In the Response Output tab, configure the fields of the table for displaying the data.
The Name field in the Response Output tab is prepopulated with properties of the output API.
Enter the values for required fields such as name, scope, data type, collection ID, record ID, format and format value.
To validate the details, click Test. The result of the operation appears.
Click Save Operation to save the operation. The system displays the Operation section for your service.
How to Configure a Salesforce Service
To configure your Salesforce service, follow these steps:
In the Service Name text box, enter a unique name for your service.
From the Service Type list, select Salesforce. By default, XML is selected. If you select Salesforce, the Choose Salesforce Authentication Type section is displayed.
Under Choose Salesforce Authentication Type, click one of the following modes:
Use Existing Identity Provider - to select an identity provider. This drop-down lists all identity providers only if you have already created identity providers for SAP in the Identity page.
To configure Use Existing Identity Provider, fill in the details for the following fields:
screen
From the Select Identity Provider list, select your Salesforce identity.
The details for the selected identity are displayed in the Endpoint URL text box. You cannot modify these details.
Under the User ID and Password, provide valid log-in credentials that you created while registering with Salesforce services.
To configure Specify Log-in Endpoint, fill in the details for the following fields:
screen
In the Endpoint URL, enter the URL - for example, https://login.salesforce.com/services/oauth2/token.
In the Client ID text box, enter a valid client id.
In the Client Secret text box, enter a valid client secret.
In the User ID text box, enter a valid user ID.
In the Password text box, enter a valid password.
Click the Advanced tab to specify dependent JAR and API throttling. All options in the Advanced section are optional.
To specify dependent JAR, follow these steps:
Select the JAR containing preprocessor or postprocessor libraries from the drop-down list, or click Upload New to browse the JAR file from your local system. The step allows you to further filter the data sent to the back end:
Make sure that you upload a custom JAR file that is built on the same JDK version used for installing Kony Fabric Integration.
For example, if the JDK version on the machine where Kony Fabric Integration is installed is 1.6, you must use the same JDK version to build your custom jar files. If the JDK version is different, an unsupported class version error will appear when a service is used from a device.
API throttling enables you to limit the number of request calls within a minute. If an API exceeds the throttling limit, the API will not return the service response. To specify throttling, follow these steps:
In the Total Rate Limit text box, enter a required value. With this value, you can limit the number of requests configured in your Kony Fabric console in terms of Total Rate Limit.
In the Per IP Rate Limit text box, enter a required value. With this value, you can limit the number of IP address requests configured in your Kony Fabric console in terms of Per IP Rate Limit.
Enable API throttling in a clustered environment by configuring the KONY_SERVER_NUMBER_OF_NODES property in the server_configuration table available in Admin database. This property indicates the number of nodes configured in the cluster. The default value is 1.
To enable the proxy, select the Use proxy from settings check box. By default, the check box is cleared. The Use proxy from settings check box dims when no proxy is configured under the Settings > Proxy.
Click SAVE to save your service definition. The system displays the success message: Service Saved Successfully. The Operations List tab appears only after the Service Definition is saved. The ADD OPERATION button in the Service Definition page is active only after you click the SAVE button.
Based on your Salesforce authentication, the system loads all tables such as objects and operations.
Select an object from the Object list that is auto-populated with all the existing Salesforce objects.
If you provide incorrect Salesforce endpoint details, the Object list will contain only _Login object.
Based on the object added in the previous step, the Operation name is listed with operations. Select the check boxes for required operations.
Click ADD OPERATION. The system adds your operation in the Operations List section, and it also adds your new Salesforce service into the Integration page.
Under Operations List, hover your cursor over the required operation that you added, click an operation under the Name column or click the Settings button, and then click Edit.
The operation details are displayed.
In the Name field, modify the name if required.
Select one of the following security operations in the Operation Security Level field. By default, the field is set to Authenticated App User:
Authenticated App User – indicates that the operation is secured. To use this operation, an app user must be authenticated by an associated identity service.
Anonymous App User – indicates that a user must have the app key and app secret to access the operation.
Public – indicates that the operation requires no special security.
In the Operation Path text box, modify the path if required.
You can add an entry by clicking the Add button if entries for the input and the advanced tabs do not exist. You can also delete an existing entry by clicking the Delete button.
Click the Advanced tab to configure the preprocessor and postprocessor for Java and JavaScript. All options in the Advanced section are optional. For more details, refer to Preprocessor and Postprocessor.
In the Input tab, provide the following details:
Integration services accept only form-url-encoded inputs for all input parameters provided in service input parameters (request input).
You can add an entry by clicking the Add Parameter button if entries for the input and the output tabs do not exist.
- To make duplicate entries, select the check box for the entry, click Copy, and then click Paste.
- To delete an entry, select the check box for an entry, and then click the Delete button.
The NAME field contains a unique identifier for a parameter. Change the identifier if required.
The TEST VALUE field contains a value to be used to test the service. Change the syntax if required.
In the DEFAULT VALUE field, change the syntax if required.
In the SCOPE, select request or session in the Scope field. By default, this field is set to Request.
Request - indicates that the value must be retrieved from the HTTP request received from the mobile device.
Session - indicates that the value must be retrieved from the HTTP session stored on Kony Fabric.
Select a data type in the DATATYPE field:
String - a combination of alpha-numeric and special characters. Supports all formats including UTF-8 and UTF-16 with no maximum size limit.
Date - Date format
If datatype is string, then the options in the Format Type are Currency, Number and Date.
If the datatype is number, then the options in the Format Type are Currency and Date.
If the datatype is boolean, then the options in the Format Type and Format Value text box are disabled.
Boolean - a value that can be true or false.
Number - an integer or a floating number.
Collection - a group of data, also referred to as data set.
Select the ENCODE check box to enable an input parameter to be encoded. For example, the name New York Times would be encoded as New%20York%20Times when the encoding is set to True. The encoding must also adhere to the HTML URL encoding standards.
Click the Output tab, and enter the values for required fields such as ID, scope, data type, collection ID, record ID, format and format value.
Click Test to view the results.
Click Save Operation to save the operation. The system displays the Operation section for your service.
How to Use Log-in Endpoint with Different Credentials for Design Time and Runtime
If the service is using a log-in endpoint, ensure that you specify the same set of credentials (Client ID, Client Secret, User ID, Password) for design time and run-time.
Because if the log-in endpoint credentials are different for design time and run-time, the system throws an error while accessing a service from an app.
Error 401: Request Unsuccessful Server responded with 401.
If you want to use log-in endpoint with different credentials for design time and run-time, then parametrize instance URL in the operation path, and send that URL from an app.
For example:
To parametrize an instance URL, follow these steps:
In the login operation, click Output tab, and make the changes, shown below:
In the getContact operation, make the following changes:
In the Operation Path text box, change the URL, for example, from https://ap1.salesforce.com/ to $<instanceURL>/.
In the Input tab, configure the following fields, shown below:
ID
Path
Scope
Encode
queryString
Select ID from contact
session
instanceURL
//OAuth/instance_url
session
No
Click Test. The contacts are fetched from the Salesforce.
Click Save Operation.
How to Configure Kony SAP Gateway
With Kony Fabric, you can access external Kony SAP services by using the Kony SAP Gateway connector. Based on your Kony SAP Gateway authentication, you can use Kony SAP libraries and objects along with the supported HTTP methods in your app.
Adding a Kony SAP Gateway service involves the following steps:
In the Name field, enter a unique name for your service.
From the Service Type list, select Kony SAP gateway. By default, XML is selected. If you select Kony SAP gateway, the Select authentication service section is displayed.
Under Select authentication service, click Specify Login Endpointone of the following modes:
Use Existing Identity Provider - to select an identity provider. This drop-down lists all identity providers only if you have already created identity providers for SAP in the Identity page.
To configure Specify Log-in Endpoint, fill in the details for the following fields:
In the Gateway address, enter the domain - for example, connect.kony.com.
In the Port text box, enter a valid port number ranging from 1 to 65535.
In the Header parameter name prefix * text box, enter the header - for example, KonySAP.
Under the User ID and Password, provide valid log-in credentials that you created while registering with Kony SAP Gateway services. For more details, refer to How to register SAP Sky services.
In the Default Caller ID, provide the ID that Kony SAP Gateway uses for logging and auditing.
In the Default Caller Group, provide the ID that Kony SAP Gateway uses for logging and auditing. This information is optional.
Click the Advanced tab to specify API throttling. All options in the Advanced section are optional.
API throttling enables you to limit the number of request calls within a minute. If an API exceeds the throttling limit, the API will not return the service response. To specify throttling, follow these steps:
In the Total Rate Limit text box, enter a required value. With this value, you can limit the number of requests configured in your Kony Fabric console in terms of Total Rate Limit.
In the Per IP Rate Limit text box, enter a required value. With this value, you can limit the number of IP address requests configured in your Kony Fabric console in terms of Per IP Rate Limit.
Enable API throttling in a clustered environment by configuring the KONY_SERVER_NUMBER_OF_NODES property in the server_configuration table available in Admin database. This property indicates the number of nodes configured in the cluster. The default value is 1.
To enable the proxy, select the Use proxy from settings check box. By default, the check box is cleared. The Use proxy from settings check box dims when no proxy is configured under the Settings > Proxy.
Click SAVE to save your service definition. The system displays the success message: Service Saved Successfully. The Operations List tab appears only after the Service Definition is saved. The ADD OPERATION button in the Service Definition page is active only after you click the SAVE button.
Based on your Kony SAP Gateway authentication, the system loads all tables such as libraries and objects along with supported HTTP methods.
Click ADD OPERATION to display the Operations List tab for adding operations.
You can also add operations by following these steps:
- Click the Operations List tab. - From the tree in the left pane, click Add > Add New Operation, shown below:
Click to View image
Under Operations List tab, from the Libraries list, select a library - for example, CRM. The system loads available objects and operations for the selected library.
From the Object list, select an object.
From the Operations (Http Methods) list, select the required check boxes for each operation.
To configure more operations for your Kony SAP Gateway integration service, repeat Steps a through b. You can select a new library and object, and supported operations.
Click ADD OPERATION. The system adds your operation to the Operations List page, and it also adds your new Kony SAP Gateway service into the Integration page.
To configure operations, under Operations List, hover your cursor over the required service, click the Settings button, and then click Edit.
The operation details are displayed.
In the Name field, modify the name if required.
Select one of the following security operations in the Operation Security Level field. By default, the field is set to Authenticated App User:
Authenticated App User – indicates that the operation is secured. To use the operation, an app user must be authenticated by an associated identity service.
Anonymous App User – indicates that a user must have the app key and app secret to access the operation.
Public – indicates that the operation requires no special security.
Select the HTTP Methods.
In the Operation Path text box, modify the path if required.
You can add an entry by clicking the Add button if entries for the input and the advanced tabs do not exist. You can also delete an existing entry by clicking the Delete button.
In the Request Input tab, provide the following details:
Integration services accept only form-url-encoded inputs for all input parameters provided in service input parameters (request input).
Under the Body tab, do the following:
The NAME field contains a unique identifier or filter for a parameter. Change the identifier if required.
The TEST VALUE field contains a value to be used to test the service. Change the syntax if required.
For example: Parameter name as filters and the test value $filter=<actual filters>
In the DEFAULT VALUE field, change the syntax if required.
Select request or session in the SCOPE field. By default, this field is set to Request.
Request - indicates that the value must be retrieved from the HTTP request received from the mobile device.
Session - indicates that the value must be retrieved from the HTTP session stored on Kony Fabric.
Select a data type in the DATATYPE field:
String - a combination of alpha-numeric and special characters. Supports all formats including UTF-8 and UTF-16 with no maximum size limit.
Boolean - a value that can be true or false.
Number - an integer or a floating number.
Collection - a group of data, also referred to as data set.
Select the ENCODE check box to enable an input parameter to be encoded. For example, the name New York Times would be encoded as New%20York%20Times when the encoding is set to True. The encoding must also adhere to the HTML URL encoding standards.
Based on the operation - for example, post or get - provide custom HTTP headers. To provide customer headers, click Header.
Click Fetch Response to view the response. You can add more properties to an input parameter such as scope and data types by following the below step.
Click the Header tab to provide the following customer headers. Based on the operation - for example, post or get - provide custom HTTP headers. Custom HTTP headers required by the external data source, shown below:
ID: The rows are created based on the selected operation. Change the value if required.
TEST VALUE: Enter a value. A test value is used for testing the service.
Scope: Select request or session. By default, this field is set to Request.
To validate the details, click Fetch Response. The result of the operation appears.
Click the Attributes tab to view schema. This is a meta-data schema for which user has configured at Kony SAP. The schema is in XML format.
For example, the schema includes elements for the configured tables, such as, table name, description, library name, group name, URL, methods.
Click the Response Output tab to view the output test values, such as name, scope, data type.
To validate the details, click Test. The result of the operation appears.
Based on the operation - for example, post or get - provide custom HTTP headers. To provide customer headers, click Advanced. In the Test values text box, provide custom HTTP headers required by the external data source, shown below:
Click SAVE OPERATION to save the operation.
How to Edit or Test an Existing Kony SAP Gateway Integration Service
If you want to edit an existing Kony SAP service, you can edit details such as service name, authentication service information, operations.
Each operation contains four tabs, including input, attributes, output, and advanced. If you want to test an existing operation for Kony SAP service - for example, get or put - enter necessary test values in the input and the advanced tabs. The results are displayed in the JSON format. The input values can be data types, test values, and session keys.
To edit or test an existing Kony SAP integration service, follow these steps:
In the Integration page, click one of your SAP services.
Make the necessary changes in the Service Definition and Operations sections. You can test an operation by inputting values. To test an operation, refer to How to configure Kony SAP Gateway Operations.
Click Done to save the changes. The system displays the Integration page.
How to Configure a MuleSoft Service
MuleSoft (Anypoint Platform™) is a platform that helps app developers to design custom APIs and deploy to a Mule Enterprise Service Bus runtime (ESB). With MuleSoft integration service in Kony Fabric, developers can interact with more than 50 types of connectors.
To integrate a MuleSoft service in Kony Fabric, developers need to create a project in MuleSoft Studio, export the project to a local system, and then deploy it to Cloud Hub. On top of the project deployment, a RESTful API modeling language (RAML) file needs to be built, which defines all the API definitions in the project. A RAML file also contains the defined schemas with properties. When a user creates a project from AnyPoint API Studio with any connector and builds a RAML file over the project, all the APIs can be used in Kony Fabric integration service. When a Kony Fabric user selects a MuleSoft connector from Kony Fabric Console, based on the cloud hub portal credentials of the MuleSoft connector, the system retrieves metadata from a RAML file and displays all APIs of a RAML file. Developers can add these APIs as operations in MuleSoft integration service in Kony Fabric Console.
Kony Fabric discovers the MuleSoft endpoints through a RAML file. Kony Fabric parses a RAML file and exposes all the MuleSoft endpoints through the integration service. Mobile app developers can use the configured MuleSoft integration service and access the backend systems supported by MuleSoft’s connectors.
Kony Fabric Console will process those projects created from AnyPoint Studio (MuleSoft) that are associated with RAML files.
Project created from AnyPoint Studio (MuleSoft) will not be consumed by portal if it does not use RAML file. Only MuleSoft projects created in the above specified manner using RAML files are supported in Kony Fabric Console.
Enterprise Service Bus (ESB): An architecture that allows different applications to communicate with each other by acting as a transit system for carrying data between applications within or outside your intranet. An ESB provides transaction management, routing, security, and other functionality for the messages.
In Kony Fabric Console, you can provide login credentials of MuleSoft or upload a RAML file to configure an integration service.
Advantagesof Kony Fabric database connector:
Developers can design custom APIs
Developers can use more than 50 types of connectors.
Limitations of Kony Fabric MuleSoft connector:
When an apiGroup is created, only one RAML file needs to be created. Multiple files are not supported.
Reconfiguration of apps during publish is not supported for MuleSoft.
The schema defined must always be in JSON format. XML schema is not supported.
API Gateway (On-premises / Cloud) and Mule ESB (On-premises) are not supported.
In the Name field, enter a unique name for your service. When you enter the name, the name is updated for the active service under the Services section in the left pane.
From the Service Type list, select MuleSoft. By default, XML is selected. If you select MuleSoft, the below details are displayed.
Under Choose API Discovery Type, click one of the following modes:
To upload a RAML File, follow these steps:
Click RAML File.
Click the Upload RAML File and select the RAML file from your local machine. The system adds your main RAML file to the console. The system displays the added RAML file's name under the Choose API Discovery Type section.
To use AnyPoint Platform URL, follow these steps:
Click AnyPoint Platform URL. The system displays the MuleSoft URL in the text box. You cannot modify these details.
Under the User ID and Password, provide valid log-in credentials that you created while registering with MuleSoft AnyPoint Platform.
To test your database connection details, click Test Connection. If the entered details are correct, the system displays the message: Valid MuleSoft connection details.
For on-premises, proxy support is not available for MuleSoft service.
Click the Advanced tab to specify dependent JAR and API throttling. All options in the Advanced section are optional.
To specify dependent JAR, follow these steps:
Select the JAR containing preprocessor or postprocessor libraries from the drop-down list, or click Upload New to browse the JAR file from your local system. The step allows you to further filter the data sent to the back end:
Make sure that you upload a custom JAR file that is built on the same JDK version used for installing Kony Fabric Integration.
For example, if the JDK version on the machine where Kony Fabric Integration is installed is 1.6, you must use the same JDK version to build your custom jar files. If the JDK version is different, an unsupported class version error will appear when a service is used from a device.
API throttling enables you to limit the number of request calls within a minute. If an API exceeds the throttling limit, the API will not return the service response. To specify throttling, follow these steps:
In the Total Rate Limit text box, enter a required value. With this value, you can limit the number of requests configured in your Kony Fabric console in terms of Total Rate Limit.
In the Per IP Rate Limit text box, enter a required value. With this value, you can limit the number of IP address requests configured in your Kony Fabric console in terms of Per IP Rate Limit.
Enable API throttling in a clustered environment by configuring the KONY_SERVER_NUMBER_OF_NODES property in the server_configuration table available in Admin database. This property indicates the number of nodes configured in the cluster. The default value is 1.
To enable the proxy, select the Use proxy from settings check box. By default, the check box is cleared. The Use proxy from settings check box dims when no proxy is configured under the Settings > Proxy.
Click SAVE to save your service definition. The system displays the success message: Service Saved Successfully. The Operations List tab appears only after the Service Definition is saved. For creating operations for a MuleSoft service, refer to How To Create Operations for MuleSoft Service.
Once you configure the service definition for a MuleSoft service, click ADD OPERATION to display the Operations List tab.
You can also display the Operations List tab. Follow these steps:
- Click the Operations List tab. - From the tree in the left pane, click Add > Add New Operation, shown below:
Click to View image
In the Operations List tab, follow these steps to configure operations:
From the Groups drop-down list, select the title of the RAML file that is uploaded at AnyPoint CloudHub.
Based on the selected groups, the Versions drop-down list is loaded with the versions of the RAML file.
From the Versions drop-down list, select the required version. You can select only one version of the RAML file.
From the Resources drop-down list, select the required resource.
From the Operations (Http Methods) drop-down list, select the required check boxes for methods that you defined in the RAML file. You can click Select all check box to select all the operations.
Click the ADD OPERATION button. The new operations are created under the Configured Operations section.
The system creates a JSON service for the MuleSoft service.
Operation names are auto-generated in the format. The default name format of a MuleSoft operation is <operation_name><resource_name>. You can change the operation name if required. For example, postfolder.
How to Configure Operations for MuleSoft Service
Once you create operations for MuleSoft service, you can configure the operations such as adding parameters, adding test values, and fetching the response.
Under Configured Operations, hover your cursor over the create operation, click the Settings button, and then click Edit.
To edit an operation, you can also click the operation from the service tree pane, shown below:
The system displays the selected operation in the edit mode.
The Name field is prepopulated with operation names. You can edit this field if required.
Select one of the following security operations in the Operation Security Level field. By default, the field is set to Authenticated App User:
Authenticated App User – indicates that the operation is secured. To use the operation, an app user must be authenticated by an associated identity service.
Anonymous App User – indicates that a user must have the app key and app secret to access the operation.
Public – indicates that the operation requires no special security.
The Operation Path field is prepopulated with MuleSoft URL. You can edit this field if required.
Click the Advanced tab to configure the preprocessor and postprocessor for Java and JavaScript. All options in the Advanced section are optional. For more details, refer to Preprocessor and Postprocessor.
In the Request Input tab, do the following:
Integration services accept only form-url-encoded inputs for all input parameters provided in service input parameters (request input).
You can add an entry by clicking the Add Parameter button if entries for the input and the output tabs do not exist.
- To make duplicate entries, select the check box for the entry, click Copy, and then click Paste.
- To delete an entry, select the check box for an entry, and then click the Delete button.
Under the Body tab, do the following:
In the NAME field, enter the name for the request input parameter.
In the Body tab > NAME filed, the input parameters are prepopulated based on the properties of the input schema of a RAML file.
In the TEST VALUE filed, enter the user input for the selected column.
In the DEFAULT VALUE, enter the value if required. The default value will be used if the test value is empty.
Select request or session in the Scope field. By default, the Scope field is set to Request.
Request - Indicates that the value must be retrieved from the HTTP request received from a mobile device.
Session - Indicates that the value must be retrieved from the HTTP session stored on Kony Fabric.
The default data type for the selected column is loaded under the DATATYPE field.
Select the Encode check box to enable an input parameter to be encoded. For example, the name New York Times would be encoded as New%20York%20Times when the encoding is set to True. The encoding must also adhere to the HTML URL encoding standards.
Under the Header, do the following: Based on the operation - for example, post or get -, provide custom HTTP headers. To provide customer headers, click Header.
In the NAME field, provide custom HTTP headers required by the external source.
TEST VALUE: Enter a value. A test value is used for testing the service.
DEFAULT VALUE: change the syntax if required.
SCOPE: select request or session. By default, this field is set to Request.
To validate the details, click Fetch Response. The result of the operation appears.
In the Response Output tab, configure the fields of the table for displaying the data:
The Name field in the Response Output tab is prepopulated with properties of output schema of a RAML file.
Enter the values for required fields such as name, path, scope, data type, collection ID, record ID, format and format value.
To validate the details, click Test. The result of the operation appears.
Click SAVE OPERATION to save the changes in the create operation.
How to Configure a RAML Service
To integrate a RAML service in Kony Fabric, a RAML file or Zip (with all dependent files) must be created, which defines all the API definitions and schemas with properties in the project. When a Kony Fabric user creates a service from Kony Fabric Console, the system retrieves metadata from a RAML file and displays all APIs of a RAML file.
Kony Fabric parses a RAML file and exposes all the endpoints through the integration service.
How to Configure Service Definition for RAML Service
In the Name field, enter a unique name for your service. When you enter the name, the name is updated for the active service under the Services section in the left pane.
From the Service Type list, select RAML.
If you select RAML, the below details are displayed
Under Connection Parameters, click Upload and select the RAML file from your local machine.
The system adds your main RAML file to the console. The system displays the added RAML file's name under the Connection Parameters section.
If required, select an identity provider from the Authentication list to link your service.
Click the Advanced tab to specify dependent JAR and API throttling. All options in the Advanced section are optional.
To specify dependent JAR, follow these steps:
Select the JAR containing preprocessor or postprocessor libraries from the drop-down list, or click Upload New to browse the JAR file from your local system. The step allows you to further filter the data sent to the back end:
Make sure that you upload a custom JAR file that is built on the same JDK version used for installing Kony Fabric Integration.
For example, if the JDK version on the machine where Kony Fabric Integration is installed is 1.6, you must use the same JDK version to build your custom jar files. If the JDK version is different, an unsupported class version error will appear when a service is used from a device.
API throttling enables you to limit the number of request calls within a minute. If an API exceeds the throttling limit, the API will not return the service response.
To specify throttling, follow these steps:
In the Total Rate Limit text box, enter a required value. With this value, you can limit the number of requests configured in your Kony Fabric console in terms of Total Rate Limit.
In the Per IP Rate Limit text box, enter a required value. With this value, you can limit the number of IP address requests configured in your Kony Fabric console in terms of Per IP Rate Limit.
Enable API throttling in a clustered environment by configuring the KONY_SERVER_NUMBER_OF_NODES property in the server_configuration table available in Admin database. This property indicates the number of nodes configured in the cluster. The default value is 1.
Under the Web Service Authentication, select one of the following modes:
None: Select the option if you do not want to provide any authentication for the service.
Basic: Provide User ID and Password if the external Web service requires form or basic authentication.
NTLM: Your service follows the NT LAN Manager authentication process. You are required to provide the User ID, Password, NTLM Host and NTLM Domain.
To enable the proxy, select the Use proxy from settings check box. By default, the check box is cleared.
The Use proxy from settings check box dims when no proxy is configured under the Settings > Proxy.
Click SAVE to save your service definition. The system displays the success message: Service Saved Successfully.
The Operations List tab appears only after the Service Definition is saved. The ADD OPERATION button in the Service Definition page is active only after you click the SAVE button.
How To Create Operations for RAML Service
Click ADD OPERATION to display the Operations List tab for adding operations.
Under Operations List tab, expand the Please Select drop down list. Based on the uploaded RAML file, all the supported operations will be displayed.
Expand an operation.
Under Objects and Services, select the required check boxes.
Click ADD OPERATION. The system adds your operation to the Operations List page.
To configure operations, under Operations List, click on a required service.
The operation details are displayed.
In the Name field, modify the name if required.
Select one of the following security operations in the Operation Security Level field. By default, the field is set to Authenticated App User:
Authenticated App User – indicates that the operation is secured. To use this operation, an app user must be authenticated by an associated identity service.
Anonymous App User – indicates that a user must have the app key and app secret to access the operation.
Public – indicates that the operation requires no special security.
Click the Advanced tab to configure the preprocessor and postprocessor for Java and JavaScript. All options in the Advanced section are optional. For more details, refer to Preprocessor and Postprocessor.
In the Input tab, provide the following details:
Input and Output must be defined in the RAML file only.
The NAME field contains a unique identifier for a parameter. Change the identifier if required.
The TEST VALUE field contains a value to be used to test the service. Change the syntax if required.
In the DEFAULT VALUE field, change the syntax if required.
In the SCOPE, select request or session in the Scope field. By default, this field is set to Request.
Request - indicates that the value must be retrieved from the HTTP request received from the mobile device.
Session - indicates that the value must be retrieved from the HTTP session stored on Kony Fabric.
Select a data type in the DATATYPE field:
String - a combination of alpha-numeric and special characters. Supports all formats including UTF-8 and UTF-16 with no maximum size limit.
Date - Date format
If datatype is string, then the options in the Format Type are Currency, Number and Date.
If the datatype is number, then the options in the Format Type are Currency and Date.
If the datatype is boolean, then the options in the Format Type and Format Value text box are disabled.
Currently the date datatype is not supported.
Boolean - a value that can be true or false.
Number - an integer or a floating number.
In the RECORD ID, provide an ID.
In the DESCRIPTION, provide a description of the Integration Service.
Click the Response Output tab to view the output test values, such as name, scope, data type.
To validate the details, select an environment from the Select Environment list and click Save and Test. The result of the operation appears.
Click SAVE OPERATION.
How to Configure Swagger Service
Swagger is a powerful open API specification framework backed by a large ecosystem of tools that helps you design, build, document, and consume your RESTful APIs.
To configure a Swagger service in Kony Fabric, a JSON or YAML file(s) (with all dependent swagger files or a single specification file) must be created which defines all the APIs and schemas. When a swagger service is created, and configured, the system retrieves the meta data from the imported single or the dependent JSON or YAML file(s) and displays the APIs of that file.
Kony Fabric parses the JSON or YAML file(s) and exposes all the endpoints through the integration service.
Configuring Service Definition for Swagger Service
To configure swagger in Integration service, follow these steps:
Click CONFIGURE NEW to configure a new service definition in Integration.
In the Service Definition tab, enter a unique name for the service in the Name field. The entered service name is updated under the All Services section in the left pane.
From the Service Type, drop-down list select Swagger.
On selecting the Service Type as Swagger, the following fields are displayed.
In the Connection Parameters section, click Upload to upload a JSON or YAML file(s) with swagger specifications.
The system imports the JSON or YAML file and displays the added file name under the connection parameters section.
If required, select an identity provider from the Authentication list to link your service.
Under the Web Service Authentication, select one of the following modes:
None: Select the option if you do not want to provide any authentication for the service.
Basic: Provide User ID and Password if the external Web service requires form or basic authentication.
NTLM: Your service follows the NT LAN Manager authentication process. You are required to provide the User ID, Password, NTLM Host and NTLM Domain.
Click the Advanced link to specify dependent JAR and API throttling. For detailed information, refer to Advanced tab.
In the Description field, enter the description for the defined service.
Click SAVE to save your service definition. The system displays the success message: Service Saved Successfully.
The Operations List tab appears only after the Service Definition is saved. The ADD OPERATION button in the Service Definition page is active only after you click the SAVE button.
How to Create Operations for Swagger Service
To create operations for the created service definition, follow these steps:
Click ADD OPERATION in Service Definition tab to display the Operations List tab for adding operations.
Under Operations List tab, expand the Please Select drop down list. Based on the uploaded JSON or YAML file, all the supported operations will be displayed.
Expand an Operation and under Services, select the required services.
Click ADD OPERATION. The system adds your operation to the Operations List page.
To configure operations under Operations List, click on a required service.
The operation details are displayed.
In the Name field, modify the name if required.
Select one of the following security operations in the Operation Security Level field. By default, the field is set to Authenticated App User. For more details, refer to Security Level.
Click the Advanced tab to configure the preprocessor and postprocessor for Java and JavaScript. All options in the Advanced section are optional. For more details, refer to Preprocessor and Postprocessor.
In the Request Inputtab, provide the following details:
The NAME field contains a unique identifier for a parameter. Change the identifier, if required.
The TEST VALUE field contains a value to be used to test the service. Change the syntax, if required.
In the DEFAULT VALUE field, change the syntax, if required.
In the SCOPE, select request or session in the Scope field. By default, this field is set to Request.
Request indicates that the value must be retrieved from the HTTP request received from the mobile device.
Session indicates that the value must be retrieved from the HTTP session stored on Kony Fabric.
Select a data type in the DATATYPE field:
String is a combination of alpha-numeric and special characters. Supports all formats including UTF-8 and UTF-16 with no maximum size limit.
Date is the Date format
If datatype is string, then the options in the Format Type are Currency, Number and Date.
If the datatype is number, then the options in the Format Type are Currency and Date.
If the datatype is boolean, then the options in the Format Type and Format Value text box are disabled.
Currently the date datatype is not supported.
Boolean a value that can be true or false.
Number an integer or a floating number.
In the RECORD ID, provide an ID.
In the DESCRIPTION, provide a description of the Integration Service.
Click Add Parameter to add a new record.
Select a record and click Copy to copy the record and click Paste to paste it.
Select a record and click Delete to delete the selected record.
To validate the details, select an environment from the Select Environment drop-down list and click Save and Fetch Response. The result of the operation appears in the Response Output tab.
Click the Response Output tab to view the output test values, such as name, scope, data type.
To validate the details, select an environment from the Select Environment list and click Save and Test. The result of the operation appears..
Click SAVE OPERATION.
Limitations of using Swagger
Following are few limitations to be followed before using Swagger:
Only Swagger 2.0 is supported.
For nested payloads, you cannot test the service from Admin Console in the case of Post/Put. You can only send a request through Admin Console or postman.
For any operation in Swagger the binary data is not supported.
If any scheme is not specified in your swagger file, by default HTTPS will be considered.
If an authentication is linked to your swagger file, you must define it at each operation level under security tag.
How to Save or Use a Version of a Service
You can save an integration service to a new version. Saving a new version of an integration service unlinks the current version of the service from the Kony Fabric application, and links the new version. A Kony Fabric app can be associated with only one version of an integration service.
To create a new version of an Integration service, follow these steps:
On the Integration tab, click the name of a service in the list of existing services. You can also select Edit from the Operations menu for a service.
The Service Definition tab appears.
Click the Version menu.
Select Save as new version.
The Save as dialog appears.
Type the version number of the new version of the service.
You can use major.minor numbering for versions. Kony Fabric supports major versions from 1 through 999, and minor versions from 0 through 99. Kony Fabric supports version numbers from 1.0 to 999.99. Note that the dot '.' is a separator for version numbers and does not function as a decimal.
Add a description of the new version.
Click OK.
Kony Fabric links the new version of the service to the Kony Fabric app, and unlinks the previous version.
To use a different version of an integration service, follow these steps:
On the Integration tab, click the name of a service in the list of existing services. You can also select Edit from the Operations menu for a service.
The Service Definition tab appears.
Click the Version menu.
Select a version of the service.
The Alert dialog appears. The Alert warns you that you are unlinking the current associated version of the service from the application.
Click OK.
Kony Fabric links the version that you selected to the Kony Fabric application.
How to Use an Existing Integration Service
Kony Kony Fabric allows you to use an existing integration service.
To use an existing integration service, follow these steps:
Go to the Integration tab. The page lists the existing services (if any).
In the Integration, click USE EXISTING from the tree in the left-pane or right pane.
To use an existing integration service, in the Integration page, you can also click USE EXISTING.
The Existing services dialog appears with a list of existing services.
To use a different version of an integration service, click the Version menu of the required service and select a version of the service.
Hover your cursor over service, and click the Select or Clone button.
Click Select to reuse (link) an existing service. If any changes made to this service, the changes will affect in all the apps using this service.
If a service is a part of a published app, you can rename that service only after the app is unpublished.
Click Clone to duplicate an existing service. If any changes made to this service will have no impact on the original service.
How to Use Actions on an Existing Integration Service
To use actions for existing services such as edit, clone, sample code, unlink, and delete, hover your cursor over the required service, click the Settings button to display the context menu. You can perform the following actions on an existing service:
Edit: Allows you to edit a service. After you edit a service, you have to republish all the apps that are using the service to apply the changes.
To know more about publishing an app, refer to Publish an app.
If a service is part of a published app, you can rename that service only after the app is unpublished. Refer to Unpublish an App.
Clone: Allows you to duplicate an existing service. Changes made to a cloned service will not impact the original service.
Sample Code: A dynamic code is generated based on the configuration of a service. You can use this code in your SDK.
Unlink: Allows you remove the service from the Integration tab of an app. When a service is unlinked, it is disassociated from a particular app.
If a service is a part of a published app, you can delete that service only after you unlink the service from all the published app.
Export: Allows you to export the integration service into your local system. The exported file is an .xml file.
Test the Login for an OAuth 2.0 Identity Service
When you are defining an operation for an integration service, you can request that Kony Fabric fetch the
response to the operation. If the integration service uses an OAuth 2.0 identity service for authorization, you must log in to the identity service before Kony Fabric can fetch the response from the back end.
When you first request that Kony Fabric fetch the
response, the service does not yet have the required token. You can then authorize Kony Fabric to generate the token.
Kony Fabric then pops up the sign in for the OAuth 2.0 identity provider. After you successfully sign in to the identity service,
Kony Fabric sends the request with the identity to the OAuth 2.0 back end. Kony Fabric gets the token and stores it in a cookie for Kony Fabric on the browser. Kony Fabric sends the token to the back end, and because the back end has the valid OAuth 2.0 token, the back end sends its response. The back end populates the identity backend response, the backend response, and the output result.
For the lifetime of the session, you can test an operation and you are not required to sign in again. In the identity backend response, you can view the token and clear the token if you want to test the login again.
To test the log in for an identity service, do the following:
Click Fetch Response.
The Identity Backend Response tab appears. Kony Fabric identifies that the integration service is linked to an OAuth identity service. A message informs you that the service needs a backend token. If the message does not appear, the integration service has the backend token.
Click Authorize.
The sign in screen for the identity service appears.
Enter your credentials and click Sign In.
The backend response is populated in the response pane.
To clear the cached token, in the Identity Backend Response tab, click Clear Token.
In the Identity Backend Response tab, you can click Copy to copy the results of the response to the clipboard. Click Expand to open the Identity Backend Response in its own window.
If a custom integration service (for example, MongoDB or RAML) is linked to an OAuth2 identity service, while testing an operation of the integration service from Kony Fabric Console, you must pass the x-kony-oauth2-access-token as header and access_token as header value.
Also, If a custom integration service (for example, MongoDB or RAML) is linked to an OAuth2 identity service, while testing an operation of the integration service from Admin Console, you must pass the x-kony-oauth2-access-token as header and access_token as header value.