
Mock Data Adapter
The Quantum Mock Data adapter capability helps you to continue to develop apps when the back-end services that an app connects to are not ready to be leveraged.
There are several instances in an app development life-cycle when back-end systems and app development happen in parallel and only the contract or interface for the app to communicate to a backend is finalized. In this scenario, you can create a response template to stub the response that is expected from the actual backend. The response template can have hard-coded values or use pre-built functions such as concat, firstName, lastName, gender, random, email, and phone, and options to randomize the output within the required criteria.
For example, in the scenario mentioned earlier, a Quantum app developer can create the service based on a stub template. The stub response template can be set for each operation of a service. The app developers can continue to develop apps based on a sample back-end response from the stub template.
IMPORTANT: Services built with Mock Data adapter will always give you mock data and cannot be switch between live backend and mock data like Stub backend response feature.
Configure Mock Data Adapter
To configure your Mock Data Adapter, provide the following details:
- In the Name field, provide a unique name for your service.
- From the Service Type list, select Mock Data.

-
 For additional configuration of your service definition, provide the following details in the Advanced section:
Field Description Custom Code Custom Code enables you to specify dependent JAR.
To specify dependent JAR, select the JAR containing preprocessor or postprocessor libraries from the drop-down list, or click Upload New to browse the JAR file from your local system. This step allows you to further filter the data sent to the back end.IMPORTANT: Make sure that you upload a custom JAR file that is built on the same JDK version used for installing Quantum Fabric Integration.
For example, if the JDK version on the machine where Quantum Fabric Integration is installed is 1.6, you must use the same JDK version to build your custom jar files. If the JDK version is different, an unsupported class version error will appear when a service is used from a device.You can download the uploaded jars to your local system.
NOTE: For more information on importing jar using CLI, refer to import-jar command.
Throttling API throttling enables you to limit the number of request calls within a minute. If an API exceeds the throttling limit, it will not return the service response.
- To specify throttling in Quantum Fabric Console, follow these steps:
-
In the Total Rate Limit text box, enter a required value. With this value, you can limit the number of requests configured in your Quantum Fabric console in terms of Total Rate Limit.
- In the Rate Limit Per IP text box, enter a required value. With this value, you can limit the number of IP address requests configured in your Quantum Fabric console in terms of Per IP Rate Limit.
-
- To override throttling in App Services Console, refer to Override API Throttling Configuration.
NOTE: All options in the Advanced section are optional.
- To specify throttling in Quantum Fabric Console, follow these steps:
-
In the Description field, provide a suitable description for the service.
- Click Save to save your service definition.
Create Operations for Mock Data
The Operations List tab appears only after the service definition is saved.
NOTE: Click Operations List tab > Configure Operation. The Configured Operations list appears.
To create an operation, follow these steps:
- Click SAVE & ADD OPERATION in your service definition page to save your service definition and display the NewOperation tab for adding operations.
OR
Click Add Operation to add a new operation or from the tree in the left pane, click Add > Add New Operation.Click to View image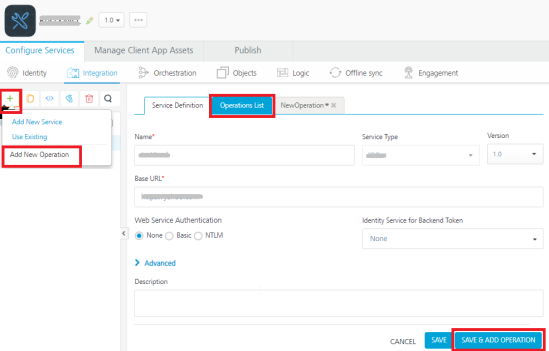
NOTE: To use an existing integration service, refer to How to Use an Existing Integration Service.
-
In the Operation Modal tab, follow these steps:
This tab contains the request input, response output, and advanced sections. The input values are data types, scope, and format types. By default, the system will display the Request Input tab.
NOTE: You can add an entry by clicking the Add button if entries for the input and the output tabs do not exist.
You can also delete an entry. Select the check box for an entry, and then click the Delete button. - To configure an operation, provide the following details:
- Authenticated App User – It restricts the access to clients who have successfully authenticated using an Identity Service associated with the app.
- Anonymous App User – It allows the access from trusted clients that have the required App Key and App Secret. Authentication through an Identity Service is not required.
- Public – It allows any client to invoke this operation without any authentication. This setting does not provide any security to invoke this operation and you should avoid this authentication type if possible.
- Private - It blocks the access to this operation from any external client. It allows invocation either from an Orchestration/Object Service, or from the custom code in the same run-time environment.
-
Configure your Mock data template in the Mock Data JSON Template text field. By default this field is enabled with a sample mock response template.
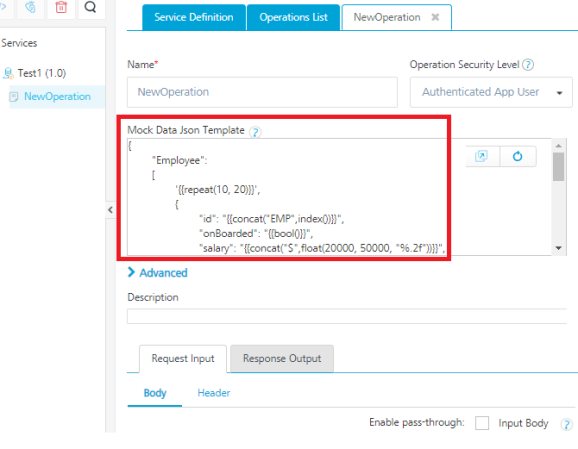
NOTE: For more information on Pre-built functions supported in Mock Data template, refer Mock Data Template and Supported Pre-built functions in Mock Data
-
For additional configurations of request (or) response operations, provide the following details in the Advanced section:
Field Description Custom Code Invocation - Preprocessor and Postprocessor (for Java and JavaScript) You can add pre and post processing logic to services to modify the request inputs. When you test, the services details of various stages in the service execution are presented to you for better debugging. All options in the Advanced section are optional. For more details, refer to Preprocessor and Postprocessor. Properties Additional configuration properties (timeout, cachable, unescape embedded xml in response, response encoding, number of connection retries allows you to configure service call time out cache response
Front End API It allows you map your endpoint/back-end URL of an operation to a front-end URL. Server Events Using Server Events you can configure this service to trigger or process server side events. For detailed information, refer Server Events. NOTE: All options in the Advanced section are optional.
| Field | Description |
|---|---|
| Name | It is prepopulated with the operation name. You can change the name if required. |
| Operation Security Level |
It specifies how a client must authenticate to invoke this operation. |
Configure Request Operation for Mock Data
Integration services accept only form-url-encoded inputs for all the input parameters provided in the service input parameters (request input).
- In the Request Input > Body tab, do the following:
- To forward the body of the client's request to backend as it is, select the Enable pass-through input body check box. For more details on API Proxy service, refer to How to Enable Pass-through Proxy for Operations.
- Click Add Parameter button to create new entries for the input.
NOTE: - To make duplicate entries, select the check box for the entry, click Copy, and then click Paste.
- To delete an entry, select the check box for an entry, and then click the Delete button. - Configure parameters in the client's body, do the following:
Field Description Name It Contains a Unique Identifier. Change the name if required. Value Select Request or Session. It is set to Request by default.
- Request indicates that the value must be retrieved from the HTTP request received from the mobile device.
- Session indicates that the value must be retrieved from the HTTP session stored on Quantum Fabric.
- Identity: If this is selected, you can filter the request parameters based on the response from the identity provider. For more details to configure identity filters, refer to Enhanced Identity Filters - Integration Services.
NOTE: For more information on Externalizing Identity Services, refer to Replace the Identity Service references in a Fabric app.
TEST VALUE Enter a value. A test value is used for testing the service. DEFAULT VALUE Enter the value, if required. The default value will be used if the test value is empty. Datatype Select one of the following data types.- String - A combination of alpha-numeric and special characters. Supports all formats including UTF-8 and UTF-16 with no maximum size limit.
- Boolean - A value that can be true or false.
- Number - An integer or a floating number.
- Collection - A group of data, also referred as data set.
Encode Select the check box to enable encoding of an input parameter. For example, the name New York Times would be encoded as New%20York%20Times when the encoding is set to True. The encoding must also adhere to the HTML URL encoding standards.
Description Provide a suitable description.
- In the Request Input > Header tab, do the following:
- To forward the body of the client's request to backend as it is, select the Enable pass-through input body check box. For more details on API Proxy service, refer to How to Enable Pass-through Proxy for Operations.
- Click Add Parameter button to create new entries for the input.
NOTE: - To make duplicate entries, select the check box for the entry, click Copy, and then click Paste.
- To delete an entry, select the check box for an entry, and then click the Delete button. - Configure parameters in the client's header, do the following:
Field Description Name It Contains a Unique Identifier. Change the name if required. Value Select Request or Session. It is set to Request by default.
By default, this field is set to Request. Five different options are available in Quantum Fabric under Request Input > Headers > VALUE during configuration of any operation. When you start editing this field, dependent identity services are auto populated. These options primarily determine the source of the value of the header.
- Request: If this option is selected, the Integration Server picks the value pairs from the client's request during run time and forwards the same to the back-end.
User has the option to configure the default value. This default value is taken if the request does not have the header.
- Session: If this option is selected, the value of header is picked from session context based on the user configuration.
- Constant: Constant is used to configure the value that is picked and sent to back-end by the Integration Server during the run-time.
- Expression: Select this option to configure the velocity template expressions for the header values.
You cannot edit the default value for expression.
- Identity: If this is selected, you can filter the request parameters based on the response from the identity provider. For more details to configure identity filters, refer to Enhanced Identity Filters - Integration Services.
NOTE: If the header value is scoped as a Request (or) Session and the same header is accessed under the Expression header value, then the expression must be represented as $request.header (or) $session.header.
Example: If a header 1 value is a request and header 2 value is an expression, then the value of the expression must be $Request.header1.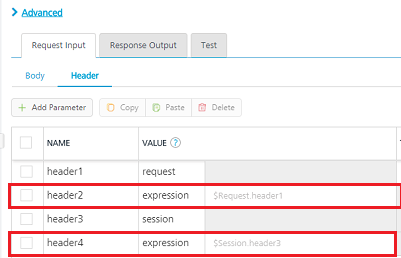
NOTE: For more information on Externalizing Identity Services, refer to Replace the Identity Service references in a Fabric app.
TEST VALUE Enter a value. A test value is used for testing the service. DEFAULT VALUE Enter the value, if required. The default value will be used if the test value is empty. Datatype Select one of the following data types.- String - A combination of alpha-numeric and special characters. Supports all formats including UTF-8 and UTF-16 with no maximum size limit.
- Boolean - A value that can be true or false.
- Number - An integer or a floating number.
- Collection - A group of data, also referred as data set.
Description Provide a suitable description. - Request: If this option is selected, the Integration Server picks the value pairs from the client's request during run time and forwards the same to the back-end.
- Click SAVE OPERATION to save the operation. The system updates the operation definition.
Create Response Operation for Mock Data
To forward the response to the client as it is, select the Enable pass-through input body check box. For more details on API Proxy service, refer to How to Enable Pass-through Proxy for Operations.
- Click the Response Output tab, and enter the values for required fields such as name, scope, data type, collection ID, record ID, format and format value.
NOTE: If you define parameters inside a record as the session, the session scope will not get reflected for the parameters.
- Click SAVE OPERATION to save the operation. The system updates the operation definition.
If you click Cancel, the Edit Service Parameters window will close without saving any information.
NOTE: Only JSON Path is supported for Mock Data response parsing.
NOTE: You can view the service in the Data Panel feature of Quantum Visualizer. By using the Data Panel, you can link back-end data services to your application UI elements seamlessly with low-code to no code. For more information on Data Panel, click here.
How to Test a Mock Data Response from Admin Console
- Publish your app to a runtime server.
- Go to the runtime server in Admin Console.
- Go to the Integration Services tab.
- For the Mock Data service that you created, select the stubbed operation from the Operations list.
- Click Get Response.
NOTE: The
X-Kony-Stub-Response headerastruein the back-end response indicates that the response is generated from the Mock Data template.
Advanced Parameters in Mock Data
How to Configure a Request Input and Request Header Parameters in Mock Data
You can access input parameters in a Stub template by using the {{requestBody("<request_param_name>")}} function. Additionally, you can access headers by using the {{requestHeader("<header_name>")}} function.
For example, you want to send the testUser request input parameter to the Stub template and the value of the parameter is defined in the Input Parameters section of Console. You can access the input parameter in the stub template as "inputtest": "{{requestBody("testUser")}}".
The following sample Stub template has been configured with the testUser request input parameter.
 [
  '{{repeat(30,40)}}',
  {
    "locationID": "{{index()}}",
    "company": "{{toUpperCase(company())}}",
    "phone": "+1 {{phone()}}",
    "address": "{{integer(100, 999)}} {{street()}}, {{city()}}, {{state()}}, {{integer(100, 10000)}}",
   "inputtest": "{{requestBody("testUser")}}",
    "latitude": "{{float(-90.000001, 90)}}",
    "longitude": "{{float(-180.000001, 180)}}",
    "office":"{{random("HR Head Office","Sales Head Office","Marketing Head Office","Development Center")}}"
  }
]
NOTE: Quantum functions for request input and header are as follows:
- To access any header with name, requestHeader: Syntax: {{requestHeader("<header_name>")}}
- To access a request parameter, requestBody: Syntax: {{requestBody("<request_param_name>")}}
Mock Data Template and Pre-built Functions Supported in Mock Data Template
Mock Data Template
The back-end stubbed response specifies a Mock Data template for stubbing and returning dynamically-generated mock data.
The following table details a sample Mock Data response template and a back-end response that is generated based on the Mock Data template.
|
Sample Mock Data Template (JSON) |
Sample Mock Data Response |
|---|---|
 [
  '{{repeat(1,2)}}',
  {
    "locationID": "{{index()}}",
    "company": "{{toUpperCase(company())}}",
    "phone": "+1 {{phone()}}",
    "address": "{{integer(100, 999)}} {{street()}}, {{city()}}, {{state()}}, {{integer(100, 10000)}}",
    "latitude": "{{float(-90.000001, 90)}}",
    "longitude": "{{float(-180.000001, 180)}}",
    "office":"{{random("HR Head Office","Sales Head Office","Marketing Head Office","Development Center")}}"
  }
]
|
[{
"locationID": "0",
"company": "RODEOMAD",
"phone": "+1 371-222-9269",
"address": "671 Division Place, Grill, South Dakota, 9220",
"latitude": "-0.29528046",
"longitude": "159.72824",
"office": "Marketing Head Office"
},
|
Pre-built Functions Supported in Mock Data Template
The following list of the sample pre-built functions are supported in the Mock Data response template:
| Description | repeat function repeats JSON or XML objects randomly based on the value range provided in the syntax. This is typically set at the beginning of a collection to repeat number of times as required. For example, it can be set to get a random number of transactions for an account for a set format by setting repeat function at the head of the collection as shown in the default template above. |
| Syntax | '{{repeat (<lower_value>, <upper_value>)}}'
|
| Sample Mock Data template | '{{repeat(30,40)}}'
|
| Description | repeat function repeats JSON or XML objects randomly based on the fixed number provided in the syntax. This is typically set at the beginning of a collection to repeat number of times as required. For example, it can be set to get a random number of transactions for an account for a set format by setting repeat function at the head of the collection as shown in the default template above. |
| Syntax | '{{repeat (<number>)}}'
|
| Sample Mock Data template | '{{repeat(2)}}'
|
| Description | Generates a random integer in the specified range. |
| Syntax | |
| Sample Mock Data template | "productRating":"{{integer(0,5)}}"
|
| Sample Mock Data response | |
| Description |
Generates a random 32-bit floating point number in the specified range. |
| Syntax | |
| Sample Mock Data template | "floatrange": "{{float(3,9)}}"
|
| Sample Mock Data response | |
| Description |
Generates a random 32-bit floating point number in the specified range of floating point numbers, with an option to round of the number of decimal places. |
| Syntax | |
| Sample Mock Data template | "floatrange": "{{float(3,9,"%.2f")}}"
|
| Sample Mock Data response | |
| Description | Generates a random 64-bit double number in the specified range. |
| Syntax | |
| Sample Mock Data template | "double": "{{double(2,8)}}"
|
| Sample Mock Data response | |
| Description | Generates a random long number in the specified range. |
| Syntax | |
| Sample Mock Data template | "network":"{{long(200,500)}}"
|
| Sample Mock Data response | |
| Description |
Generates a random GUID. |
| Syntax | |
| Sample Mock Data template | "objects": "{{uuid()}}"
|
| Sample Mock Data response | |
| Description |
Generates a random 16 bytes hexadecimal string. |
| Syntax | |
| Sample Mock Data template | |
| Sample Mock Data response | |
| Description |
Generates a random hexadecimal string according to the specified size in bytes. |
| Syntax | |
| Sample Mock Data template | |
| Sample Mock Data response | |
| Description |
Generates a hexadecimal string of size 12 bytes. |
| Syntax | |
| Sample Mock Data template | |
| Sample Mock Data response | |
| Description |
Generates a random Boolean value, either True or False. |
| Syntax | |
| Sample Mock Data template | |
| Sample Mock Data response | |
| Description |
Generates a random Boolean value, either True or False as per the given probability. |
| Syntax | |
| Sample Mock Data template | "stockAvailable": "{{bool(0.9)}}"
|
| Sample Mock Data response | "stockAvailable": "true"
|
| Description | Generates an incrementing index integer for each record with a specific starting point. |
| Syntax | "{{index()}}"
|
| Sample Mock Data template | "locationID": "{{index()}}"
|
| Sample Mock Data response | "locationID": "0"
|
| Description | Generates an incrementing index integer for each record based on the name of the index. |
| Syntax | "{{index("index-name")}}"
|
| Sample Mock Data template | "index-number": "{{index("abc")}}"
|
| Sample Mock Data response | "index-number": "42"
|
| Description |
Generates an incrementing index integer for each record with a specific starting point. |
| Syntax | "{{index(78)}"
|
| Sample Mock Data template | "index-number": "{{index(78)}}"
|
| Sample Mock Data response | "index-number": "4248"
|
| Description | Generates an incrementing index integer for each record based on both a specific starting point and name of the index. |
| Syntax | "
|
| Sample Mock Data template | "index-name-number": "{{index("abc",78)}}"
|
| Sample Mock Data response | "index-name-number": "626"
|
| Description | Generates a random dummy text. User must specify the count of words required. |
| Syntax | "
|
| Sample Mock Data template | "productDescription": "{{lorem(5, "words")}}"
|
| Sample Mock Data response | "productDescription": "lorem ipsum porta sit curabitur"
|
| Description |
Generates a random dummy paragraph. User must specify the count of paragraphs required. |
| Syntax | "{{lorem(count,"paragraphs")}}"
|
| Sample Mock Data template | "about": "{{lorem(2, "paragraphs")}}"
|
| Sample Mock Data response | "about": " Lorem ipsum eros amet accumsan non quisque ut molestie nullam sagittis tincidunt.Lorem ipsum quis aliquam nostra.
|
| Description |
Generates a random phone number. The phone number is preceded by For example, for USA/Canada, the phone number format is |
| Syntax | "{{phone()}}"
|
| Sample Mock Data template | "phone": "+1 {{phone()}}"
|
| Sample Mock Data response | "phone": "+1 371-222-9269"
|
| Description |
Generates a random gender value, either male or female. |
| Syntax | "{{gender()}}"
|
| Sample Mock Data template | "gender": "{{gender()}}"
|
| Sample Mock Data response | "gender": "female"
|
| Description |
Generates the current date. |
| Syntax | "{{date()}}"
|
| Sample Mock Data template | "date": "{{date()}}"
|
| Sample Mock Data response | "date": "Tue, 11 Sep 2018 10:55:44 GMT"
|
| Description |
Generates the current date in the specified date format. |
| Syntax | "{{date("java-simple-date-format")}}"
|
| Sample Mock Data template | "date_format": "{{date("dd-MM-yyyy HH:mm:ss")}}"
|
| Sample Mock Data response | "date_format": "11-09-2018 12:00:00"
|
| Description |
Generates a random date in the specified range and specified format. Your date range input must be in this format: |
| Syntax | "{{date("begin-date","end-date","java-simple-date-format"}}"
|
| Sample Mock Data template | |
| Sample Mock Data response | "date_of_joining": "2015-12-22T22:00:33 +0000"
|
| Description |
Generates a random date in the specified range of dates with default format. Your input must be in this format |
| Syntax | "{{date("begin-date","end-date")}"
|
| Sample Mock Data template | |
| Sample Mock Data response | "date_default_format": "Tue, 21 Jun 2016-06-21T19:26:18 +0000"
|
| Description |
Generates the current timestamp (milliseconds, between the current time and midnight, January 1, 1970 UTC): |
| Syntax | "
|
| Sample Mock Data template | |
| Sample Mock Data response | "time": "1536662962710"
|
| Description |
Generates the current timestamp (milliseconds, between the current time and midnight, January 1, 1970 UTC) between two dates with default format. Your input must be in this format |
| Syntax | "{{timestamp("begin-date","end-date"}}"
|
| Description |
Generates a random country name. |
| Syntax | "
|
| Sample Mock Data template | |
| Sample Mock Data response | "country": "Montenegro"
|
| Description |
Generates a JSON mapping with all country codes and country name. |
| Syntax | "
|
| Description |
Generates a JSON mapping with given country codes and country name. |
| Syntax | "
|
| Description |
Generates a random city. |
| Syntax | "
|
| Sample Mock Data template | |
| Sample Mock Data response | "city": "Belva"
|
| Description |
Generates a random state name. |
| Syntax | "
|
| Sample Mock Data template | |
| Sample Mock Data response | "state": "Pennsylvania"
|
| Description |
Generates a random company name. |
| Syntax | "
|
| Sample Mock Data template | |
| Sample Mock Data response | "company": "Gorganic"
|
| Description |
Generates a random last name. |
| Syntax | "
|
| Sample Mock Data template | |
| Sample Mock Data response | "lastname": "Randolph"
|
| Description |
Generates a random first name. |
| Syntax | "
|
| Sample Mock Data template | |
| Sample Mock Data response | "firstname": "Mays"
|
| Description |
Generates a random username based on the first initial of your random first name and random last name in lowercase. |
| Syntax | "
|
| Sample Mock Data template | |
| Sample Mock Data response | "username": "nbarr"
|
| Description |
Generate a random email address in the standard format. |
| Syntax | "
|
| Sample Mock Data template | |
| Sample Mock Data response | "email": "irma.england@mazuda.com"
|
| Description |
Generates a random email address with the specified domain name in the standard format. |
| Syntax | "
|
| Sample Mock Data template | |
| Sample Mock Data response | "email": "wilson.allison@mydomain.com"
|
| Description |
Generates a random social security number. |
| Syntax | "
|
| Sample Mock Data template | |
| Sample Mock Data response | "ssn": "285-59-5039"
|
| Description |
Generates a random ipv4 address. |
| Syntax | "
|
| Sample Mock Data template | |
| Sample Mock Data response | "ipv4": "218.110.1.153"
|
| Description |
Generates a random ipv6 address. |
| Syntax | "
|
| Sample Mock Data template | |
| Sample Mock Data response | "ipv6": "
|
| Description |
Generates a random ipv6 address with all the alphabetical characters in uppercase. |
| Syntax | "{{ipv6("upper")}}"
|
| Description |
Generates a random ipv6 address with all the alphabetical characters in lowercase. |
| Syntax | "{{ipv6("lower")}}"
|
| Description |
Generates a string by concatenating all the strings given as inputs. |
| Syntax | "{concat("A","B","C","D")}}"
|
| Sample Mock Data template | |
| Sample Mock Data response | "id": "EMP2942"
|
| Description |
Generates a substring from the given string and the starting position. |
| Syntax | "{{substring("word",3)}}"
|
| Sample Mock Data template | |
| Sample Mock Data response | "substring":"pleApps"
|
| Description |
Generates a substring from the given string, the starting position, and the end position. |
| Syntax | "{{substring("long word", 1, 6)}}"
|
| Sample Mock Data template | |
| Sample Mock Data response | "substring":"ample"
|
| Description |
random function provides string values to each record randomly based on the predefined sample string values provided while invoking the function. |
| Syntax | "
|
| Sample Mock Data template | "office":"{{random("HR Head Office","Sales Head Office","Marketing Head Office","Development Center")}}"
|
| Sample Mock Data response | "office": "Marketing Head Office"
|
| Description |
Generates a random string with alphabetic characters of length between 10 to 20 characters. |
| Syntax | "
|
| Sample Mock Data template | "alpha": "{{alpha()}}"
|
| Sample Mock Data response | "alpha": "jFulYDTuFQBk"
|
| Description |
Generates a random string with alphabetic characters and length in the given range. |
| Syntax | "{{alpha(min,max)}}"
|
| Sample Mock Data template | "alphaRange": "{{alpha(15,20)}}"
|
| Sample Mock Data response | "alphaRange": "hTyLpLYMHGJkYrEB"
|
| Description |
Generates a random string with alphabetic characters of given length. |
| Syntax | "{{alpha(length)}}"
|
| Sample Mock Data template | "alphaLength": "{{alpha(7)}}"
|
| Sample Mock Data response | "alphaLength": "ZKziDST"
|
| Description |
Generates a random string with alpha-numeric characters of length between 10 to 20 characters. |
| Syntax | "{{alphaNumeric()}}"
|
| Sample Mock Data template | "alphaNumeric": "{{alphaNumeric()}}"
|
| Sample Mock Data response | "alphaNumeric": "hIrUkxDzdH4VIR86g6G"
|
| Description |
Generates a random string with alpha-numeric characters of length in the specified range. |
| Syntax | "{{alphaNumeric(min,max)}}"
|
| Sample Mock Data template | "alphaNumericRange": "{{alphaNumeric(15,20)}}"
|
| Sample Mock Data response | "alphaNumericRange": "k5BBh4U45o19vhaO4LQ"
|
| Description |
Generates a random string with alpha-numeric characters of the given length. |
| Syntax | "{{alphaNumeric(length)}}"
|
| Sample Mock Data template | "alphaNumericLength": "{{alphaNumeric(7)}}"
|
| Sample Mock Data response | "alphaNumericLength": "Zphdrag"
|
| Description |
Converts the string value to lowercase letters. |
| Syntax | "{{toLowerCase(company())}}"
|
| Sample Mock Data template | "company": "{{toLowerCase(company())}}"
|
| Sample Mock Data response | "company": "rodeomad"
|
| Description |
Converts the string value to uppercase letters. |
| Syntax | "{{toUpperCase(company())}}"
|
| Sample Mock Data template | "company": "{{toUpperCase(company())}}"
|
| Sample Mock Data response | "company": "RODEOMAD"
|
| Description |
If you want to escape braces from within a function use a single escape character as seen in the example below: |
| Syntax | "{{concat("\{", "test", "\}")}}
|
| Description |
Mock Data service supports nesting functions as well. For example, if you wanted to create results that looked like dollar amounts, you can do the following: |
| Syntax |
or something like this if you wanted a capitalized F or M:
|