
How to Upgrade Jasper Reports Server
This section explains how to upgrade Jasper Reports Server from V 7.1 to V 8.0.2.
IMPORTANT: To get access to the reports created with the latest features, Quantum recommends upgrading Jasper Professional edition to V 8.0 with Fabric V 9 or latest.
To Upgrade JasperReports Server, follow these steps:
-
Back up your JRS War file, as follows:
- Create a folder where you can save your
jasperserver-pro.warfile. For example,C:\JS_BACKUPor/opt/JS_BACKUP.
- Copy the
<tomcat>/webapps/jasperserver-proto<path>/JS_BACKUP.
- Create a folder where you can save your
-
Back up your JasperServer Database.
- Create a folder where you can save your JasperServer database. For example,
C:\JS_BACKUPor/opt/JS_BACKUP. - Run the following commands for PostgreSQL.
cd <path>/JS_BACKUP
<jrs-server-home>/postgresql/bin/pg_dump.exe --host=<host> --port=<port> --username=<username> jasperserver > js-db-7.1-dump.sql
- Create a folder where you can save your JasperServer database. For example,
-
Export the current Repository Data, as follows:
- Command for Windows
cd <js-install-7.1>/buildomatic
js-export.bat --everything --output-zip js-export-7.1.zip
- Command for Linux.
cd <js-install-7.1>/buildomatic
js-export.sh --everything --output-zip js-export-7.1.zip
- Command for Windows
-
Download the JRS 8.0.0 WAR file from http://support.jaspersoft.com.
-
Extract all files from the
jasperreports-server-8.0.0-bin.zipto a local system - for example,<js-install-8.0.0>(C:\Jaspersoft on Windows, /home/<user> on Linux).IMPORTANT: If the system displays the error
The filename or extension is too long -
Configure the buildomatic for your Database and Application Server, as follows:
- Copy the
postgresql_master.propertiesconfiguration file located in<js-install-8.0.0>/buildomatic/sample_conf/postgresql_master.properties - Paste the
postgresql_master.propertiesfile to<js-install-8.0.0>/buildomatic. - Rename the
postgresql_master.propertiestodefault_master.properties.For example,
From
<js-install-8.0.0>/buildomatic/postgresql_master.propertiesto
<js-install-8.0.0>/buildomatic/default_master.properties. - Edit the
default_master.propertieswith your database and application server details.- appServerDir=<your Tomcat Server location where you have deployed JasperServer>
- dbUsername=postgres
- dbPassword=postgres
- dbHost=localhost
- dbPort=<port of the database server/postgresql>
- Copy the
-
Download the hotfix_JRSPro8.0.2_cumulative_20221102_0944 from TIBCO Support.
- Copy the
hotfix_JRSPro8.0.2_cumulative_20221102_0944\js-install\buildomatic\install_resourcestojs-install-8.0.0>\buildomatic\install_resources. -
Upgrade to JasperReports Server 8.0
- Stop your application server (Tomcat Server)
- Start your database server (Postgres Server)
- Run the following command:
Command to run in Windows
cd <js-install-7.1>/buildomatic

js-upgrade-newdb.bat <path>\js-export-7.1.zip
Command to run in Linux
$ cd <js-install-7.1>/buildomatic

$ ./js-upgrade-newdb.sh <path>/js-export-7.1.zip
Output Log Location: The output logs are available at <js-install-7.1>/buildomatic/logs/js-upgrade-<date>-<number>.log
-
Apply the
hotfix_JRSPro8.0.2_cumulative_20221102_0944hotfix. Follow readme.txt file under thehotfix_JRSPro8.0.2_cumulative_20221102_0944hotfix_JRSPro\jasperserver-pro\WEB-INFfolder to apply the hotfix. -
Start and Log into JasperReports Server 8.0.2.
- Start your application server (Tomcat server).
IMPORTANT: During the server startup, if the following error message is displayed::
java.lang.NoClassDefFoundError: org/apache/axis/AxisFault
In this case, add the following jars to the path <Jaspersoft Install Directory 8.0.0>/apache-tomcat/webapps/jasperserver-pro/WEB-INF/lib.
- WEB-INF/lib/axis-1.4-JS-4.jar
- WEB-INF/lib/axis-jaxrpc-1.4-JS-1.jar
- WEB-INF/lib/axis-saaj-1.4.jar
- WEB-INF/lib/wsdl4j-1.5.1.jar
These jar files are available in themiscfolder of the jasper-reports.zip. - Clear your browsing cache.
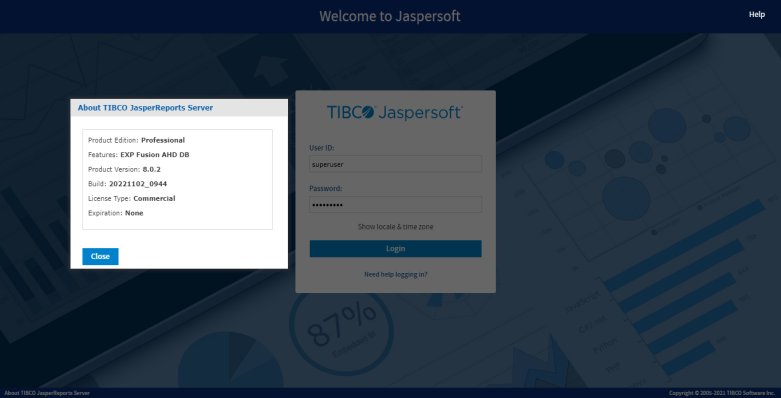
- Log in to the JasperReports Server. You can view the JasperReports Server version upgraded to V8.0.2.
To check the upgraded version of the Jasper Reports Server, click the link specified in the footer immediately after the upgrade. The About TIBCO JasperReports Server dialog appears with upgraded details, shown below:
- Start your application server (Tomcat server).
-
Perform the Post-Installation tasks as specified in the Post-Installation Tasks.
-
Clear the application server's Work and Temp folder.
- Go to
<tomcat>/workfolder and delete all the files and folders in that directory. - Go to
<tomcat>/tempfolder and delete all the files and folders in that directory.
- Go to
-
Clear the Repository Cache Database table.
- Run the following commands in the JasperServer's PostgreSQL DB with
postgresuser.update JIRepositoryCache set item_reference = null;
delete from JIRepositoryCache;
Now your JasperReports Server is upgraded to V 8.0.2, and all the analytics information from the previous version is available in the upgraded version.
- Run the following commands in the JasperServer's PostgreSQL DB with
-
Configure the JasperReports Server. Refer to How to Configure the JasperReports Server.
-
Configure Quantum Fabric in the JasperReports Server. Refer to How to Configure Quantum Fabric in the JasperReports Server.