Use Back-End Services in Visualizer
The Data panel feature in Kony Visualizer enables you to link back-end data services to your application's user interface (UI) elements seamlessly, with low-code to no-code. You can use the sample services in the Data panel to bind back-end services to your apps and test the UI. If you are an advanced user of Kony Visualizer and have previously created back-end services in your Kony Fabric instance, you can view those services in the Data panel. Furthermore, you can create new back-end services from the Data panel and associate the services with your apps.
The Data panel leverages the Kony Fabric Stub Back-End Response feature. For more information on Kony Fabric Stub Back-End Response, click here.
The Data panel is available in both Kony Visualizer and Kony Visualizer Enterprise, and it contains two lists: Sample Services and Project Services.
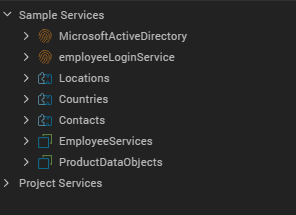
The Sample Services drop-down list contains various sample services that you can directly start using in your app. These configured sample services come pre-built with Kony Visualizer.
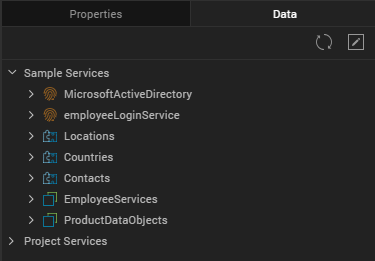
You can use Project Services to create a new service. You can now create, edit, and delete various services from within Visualizer. These services are as follows:
- Identity Service
- Integration Service
- Object Service
The following topics have been covered in this document:
- Use Sample Services
- Use Existing Services
- Create and Use New Services
- Use Project Services
- Send Data between Two Forms
- Associated Data Panel Features
Use Sample Services
This section provides information on how to discover and use existing sample services in an app.
In Visualizer, a set of sample Integration and Object services are bundled. These services are uploaded to Kony Fabric when the sample data is dragged onto a form. When you drag and drop a sample service operation on a form, a project service is added. This is the operation with which the view mapping action is associated.
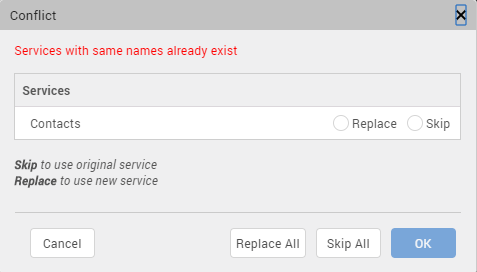
If the sample service that you are trying to create already exists, a Conflict window appears. You must perform any one of the following actions:
- Select the Skip radio button, and then click Ok to use the original service.
- If multiple instances of the same service exist and you want to use the original service, click Skip All.
- Select the Replace radio button, and then click Ok to use a new service.
- If multiple instances of the same service exist and you want to use a new service, click Replace All.
If any services are already associated to your Kony Fabric application, you can view them in the Data panel. You can drag and drop these services on to various widgets in a form. When you perform the drag and drop action, the code is auto-generated to bind the UI element to the back-end service.
The type of code generated depends on:
- The type of service that is being created (GET, POST, DELETE, UPDATE)
- The type of widget it is being mapped to
- Once a data widget is linked to the Post Operation, the data is sent based on test parameters and not based on the label's text value.
Use and Bind a Sample Service
This section provides information on how to use a sample service and bind it to a form of your application.
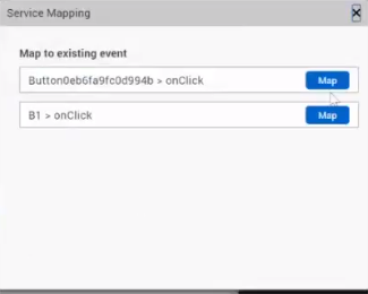
Note: If you invoke the same service and operation on any action in a form or its child widgets, the mapping gets added to that service call. If multiple such service calls exist, you must select the service call to which you want to add the mapping.
Use a Sample Identity Service
You can view Identity services in the Data panel. You can also set up new Identity services. Once you configure the Identity service, you can view the request and response parameters in the Data panel.
The login credentials for the bundled sample Identity service are as follows:
- User ID: testuser@samples.kony.com
- Password: test@123
To use a sample Identity service, do the following:
- In Kony Visualizer, create a new project or open an existing one.
- Create a form; for example, frmSample.
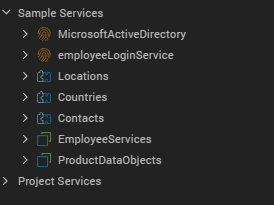
- From the Data panel, click Sample Services. The list of pre-configured services appears.
- Expand MicrosoftActiveDirectory; the login and logout services appear.
- Drag and drop the login service on to the form.
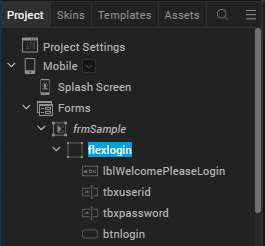
- Post this action, widgets are added to the form and the Identity service is associated with the form. The service also appears under Project Services in an auto-highlighted state. Here, the MicrosoftActiveDirectory service is auto-highlighted.
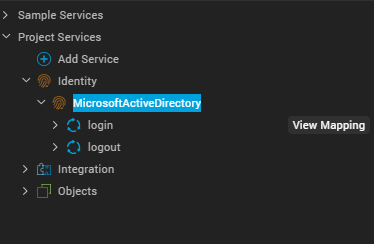
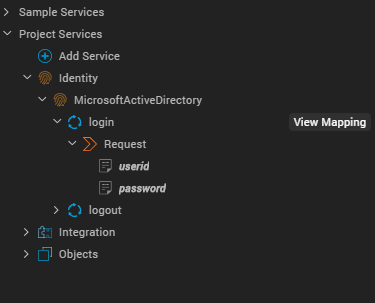
You can expand the login service to view its Request parameters. The mapped parameters of any service appear in a bold and italics style to differentiate from unmapped parameters. Here, userid and password are displayed in a bolded and italicized manner.
You can also click View Mapping to view the mapping details of the login service in the Action Editor. The specific operation of the service is auto-highlighted in the Action Editor.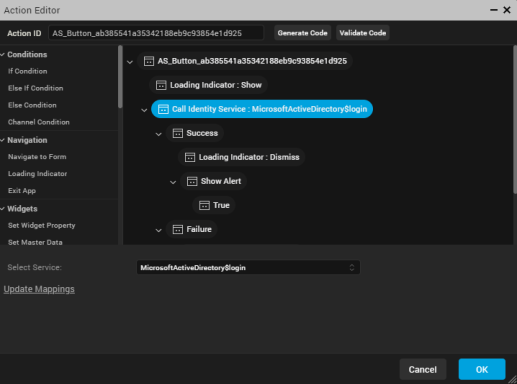
Click Generate Code to view all the mappings of the login operation.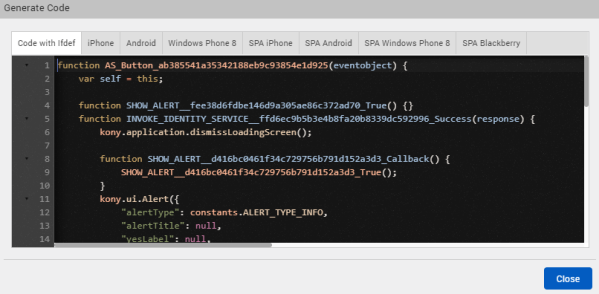
Dragging and dropping operations onto the form leads to the auto-generation of UI elements.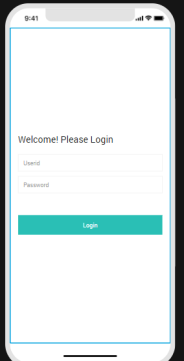
Use a Sample Integration Service
You can view Integration services in the Data Panel. You can also set up new data sources. Once you configure the Integration service, you can view the request and response parameters in the Data panel.
To use a sample Integration service, do the following:
- In Kony Visualizer, create a new project or open an existing one.
- Create a form; for example, frmSample.
- From the Data panel, select Sample Services. The list of pre-configured services appears.
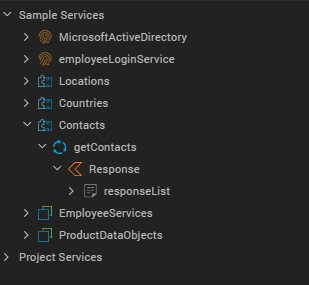
- Expand any Integration service. Here, Locations, Countries, and Contacts are the sample Integration services.
- Expand any service to view its available Request or Response parameter. The respective responseList or requestList is auto-displayed. Here, Contacts > getContacts > Response > responseList.
- You can perform any of the following actions:
- Drag and drop the service onto your form.
A dialog box appears asking you to generate either a List, or a Details, or an Entry form. You can select any of the three options as follows:- List Using Response: If the response contains a collection, a Segment is added to the parent form. This Segment is mapped to the Response parameter of the service.
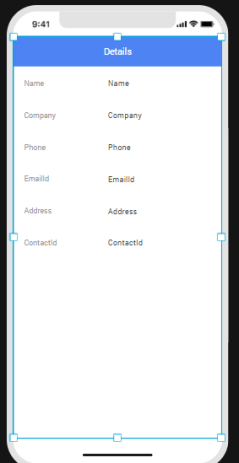
- Details Using Response: A FlexContainer with Labels is added. These Labels are mapped to the Response parameter of the service.
- Entry form for Request: A FlexScrollContainer containing TextBoxes and Labels is added. The TextBoxes are mapped to the Request parameter of the operation.
- Alternatively, you can directly drag and drop either the Response or Request parameter of the service onto the form:
- Drag and drop Response parameter: If a service invocation already exists in the form, the Response parameter is added to the mapping of that service invocation. Otherwise, a new service invocation is added to the form's onMapping Event.
- Drag and drop Request parameter: If a service invocation already exists in the form, this mapping is appended to it. Otherwise, a new service invocation is added on a generated Button widget.
- Drag and drop the service onto your form.
- Post this action, widgets are added to the form and the Integration service is associated with the form.
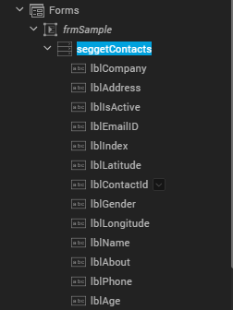
The selected Integration service appears under Project Services. You can expand any service to view its Request or Response parameters. The mapped parameters of any service appear in a bold and italics style to differentiate from unmapped parameters. Here, responseList is displayed in a bolded and italicized manner.
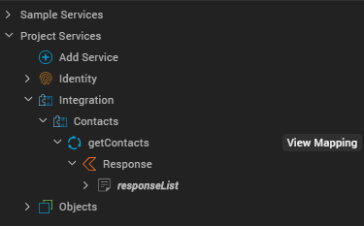
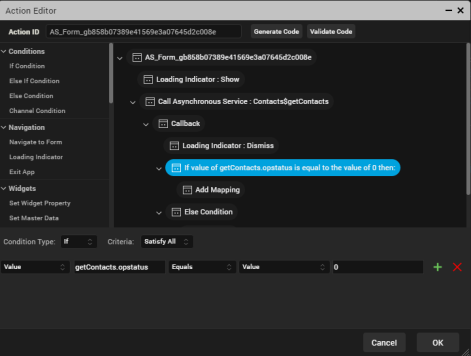
You can also click View Mapping to view the mapping details of the getContacts service in the Action Editor. The specific operation of the service is auto-highlighted in the Action Editor.
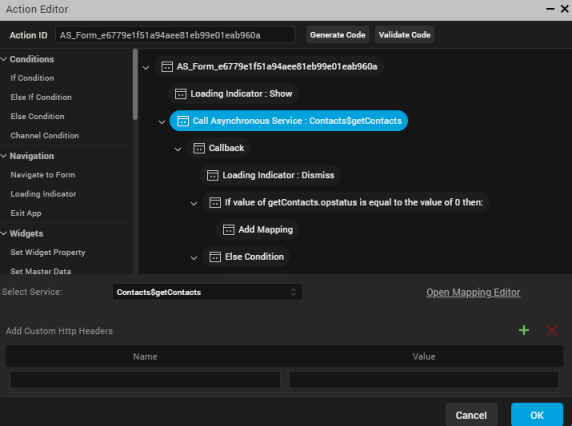
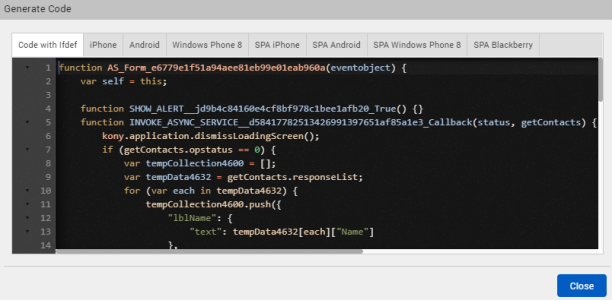
Click Generate Code to view all the mappings of the getContacts operation.
Dragging and dropping operations onto the form leads to the auto-generation of UI elements.
Use a Sample Object Service
To use a sample Object service, do the following:
- In Kony Visualizer, create a new project or open an existing one.
- Create a form; for example, frmSample.
- From the Data panel, select Sample Services. The list of pre-configured services appears.
- Expand any Object service. Here, EmployeeDataObjects and ProductDataObjects are the sample Object services.
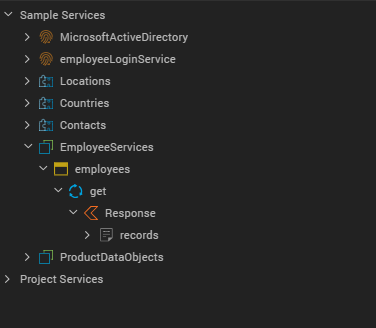
- Expand any Object service to view its available Request parameter. The respective responseList or requestList is auto-displayed. Here, Employee Services > employees > get > Response > records.
- You can perform any of the following actions:
- Drag and drop the service on to your form.
A dialog box appears asking you to generate either a List, or a Details, or an Entry form. You can select any of the three options as follows:List Using Response: If the response contains a collection, a Segment is added to the parent form. This Segment is mapped to the Response parameter of the service.
- Entry form for Request: A FlexScrollContainer containing TextBoxes and Labels is added. The TextBoxes are mapped to the Request parameters of the service.
Note: For the GET method in Object Services, the Entry form for Request option is disabled.
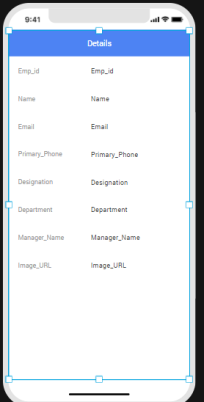
- Details Using Response: A FlexContainer containing Labels is added. These Labels are mapped to the Response parameters of the service.
- Alternatively, you can directly drag and drop either the Response or Request parameter of the service onto the form:
Drag and drop Response parameter: If a service invocation already exists in the form, this is added to the mapping of that service invocation. Otherwise, a new service invocation is added to the form's onMapping Event.
- Drag and drop Request parameter: If a service invocation already exists in the form, this mapping is appended to it. Otherwise, a new service invocation is added on a generated Button widget.
- Drag and drop the service on to your form.
- Post this action, widgets are added to the form and the Integration service is associated with the form.
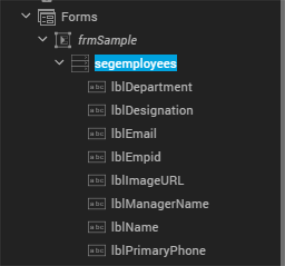
The selected Object service appears under Project Services. You can expand any service to view its Request or Response parameters. The mapped parameters of any service appear in a bold and italics style to differentiate from unmapped parameters. Here, records is displayed in a bolded and italicized manner.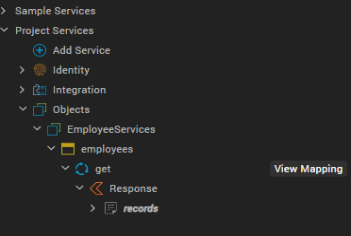
You can also click View Mapping to view the mapping details of the get service in the Action Editor. The specific operation of the service is auto-highlighted in the Action Editor.
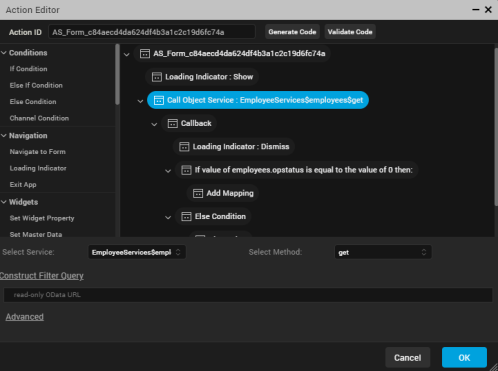
Click Generate Code to view all the mappings of the get operation.
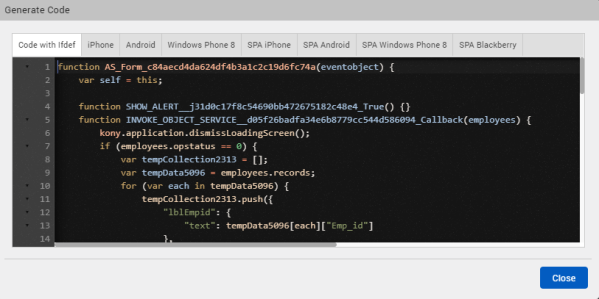
Dragging and dropping operations onto the form leads to the auto-generation of UI elements.
Use Existing Services
This section explains how to use and configure existing Identity, Integration, and Object services in your application by using the Data panel.
From the Data panel, configure existing sample services through a simplified view of Kony Fabric console. You can view the associated services in your corresponding Kony Fabric app.
To select and use an existing Identity/Integration/Object service, do the following:
- In Kony Visualizer, create or open your project.
- From the Data panel, select Project Services from the list. The list of available services appears.
- Click Add Service. A list of options appears.
-
Click Use Existing. A list of options appears.
- Select either Identity, Integration, or Objects, and then sign in to your Kony account to use the required service available in your Kony Fabric instance:
- For Identity service: The Select Identity Service(s) window appears.
Choose the required Identity service; if no service is available in your Kony Fabric Console, you need to configure one. Specify the details in the required fields, and then click Save. For more information on how to create an Identity service, click here. - For Integration service: The Select Integration Service(s) window appears.
Choose the required Integration service; if no service is available in your Kony Fabric Console, you need to configure one. Specify the details in the required fields, and then click Save & Add Operation. For more information on how to create an Integration service, click here. In this case, the Salesforce Integration service.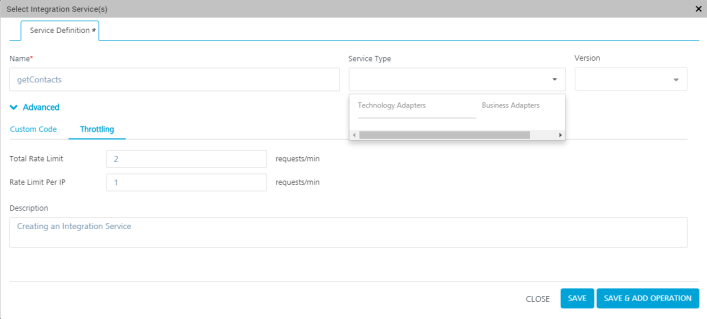
- For Object service: The Select Object Service(s) window appears.
Choose the required Object service; if no service is available in your Kony Fabric Console, you need to configure one. Specify the details in the required fields, and then click Save & Generate. For more information on how to create an Object service, click here.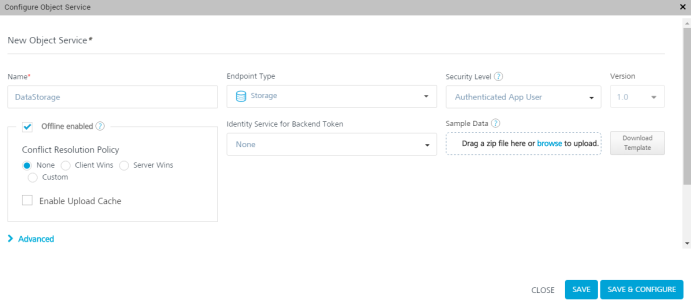
- For Identity service: The Select Identity Service(s) window appears.
- Once the service is created, it is displayed in the Project Services list. You can then directly drag and drop the service onto a form and start using it.
Create and Use New Services
This section explains how to create new services by using the Data panel and how to use those services in your application.
From the Data Panel, you can set up new data sources (Kony Fabric services) through a simplified view of Kony Fabric console. You can view the associated services in your corresponding Kony Fabric app.
Create a New Identity Service
If your Identity service type is a basic one, the input parameters are username and password. Even for the OAuth password grant type of service, the parameters are username and password. For all other types of OAuth services, there are no input parameters. The SAML Identity service follows a similar pattern as the OAuth service.
You can view two types of operations for Identity services: login and logout. The SDK code is auto-generated for each operation. You can edit an Identity service by right-clicking on the service and then selecting the Edit option.
To create a new Identity service, do the following:
- In Kony Visualizer, open your project.
- From the Data panel, select Project Services from the list. The list of available services appears.
- Click Add Service. A list of options appears.
- Click Configure New to configure a new Identity service. A list of services that you can configure appears.
- Under Authenticate, select an Identity service; in this case, Microsoft Active Directory.

- The Configure Identity Service window appears, by using which you need to configure the Microsoft Active Directory service. Specify the details in the required fields, and then click Save. For more information on how to create an Identity service, click here.
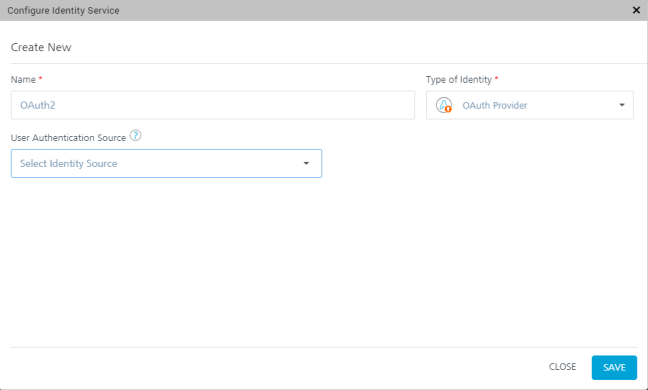
- Once the service is created, it is displayed in the Project Services list. You can then directly drag and drop the service onto a form and start using it.
When you drag and drop an Identity service onto a form, various widgets are created automatically on the form based on the type of service: OAuth or Non-OAuth. For a Non-OAuth service, two text fields (username and password) and a button (Login) are generated. For an OAuth service, only a Login button is generated.
When you click the View button, the newly created form appears. The form’s pre-show invokes the Identity service and passes the reference of the Browser widget. You can modify the Browser widget, which you linked to the button, with a different Browser widget.
Note: The Data panel supports all types of Identity providers such as Kony User Store, Google, Salesforce, and Facebook.
Note: The reference of the device Browser widget is mandatory for Google OAuth 2.0 services. For this service, the deeplink URL is auto-generated by Kony Visualizer.
Create a New Integration Service
By default, you can view Integration services in the Data panel. You can also set up new data sources. Once you configure the Integration service, you can view the request and response parameters.
To create a new Integration service, do the following:
- In Kony Visualizer, open your project.
- From the Data panel, expand Project Services. The list of available services appears.
- Click Add Service. A list of options appears.
- Click Configure New to configure a new Integration service. A list of services that you can configure appears.
- Under Get Data, select an Integration service; in this case, Salesforce.
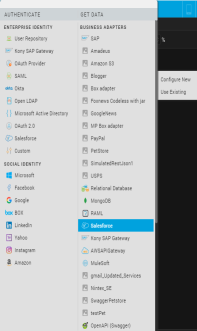
- The Configure Integration Service window appears, by using which you need to configure the Salesforce service. Specify the details in the required fields, and then click Save & Add Operation. For more information on how to create an Integration service, click here. In this case, the Salesforce Integration service.
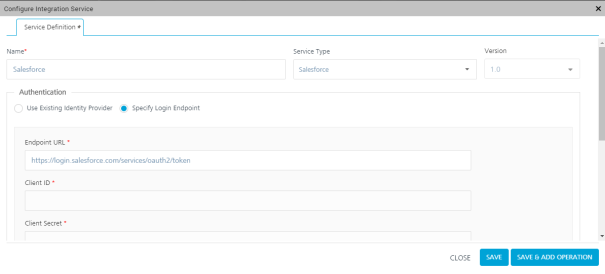
- Once the service is created, it is displayed in the Project Services list. You can then directly drag and drop the service onto a form and start using it.
Create a New Object Service
You can view Object services in the Data panel. You can also set up new data sources. Once you configure an Object service, you can view the request and response parameters.
To create a new Object service, do the following:
- In Kony Visualizer, open your project.
- From the Data panel, expand Project Services. The list of available services appears.
- Click Add Service. A list of options appears.
- Click Configure New to configure a new Object service. A list of services that you can configure appears.
- Under Get Data, select an Object service. Here, Data Storage is the Object service.
Note: From V8 SP4 Fixpack 20 onwards, the Data Storage Object service is available under the Storage Adapters section in the list of services.
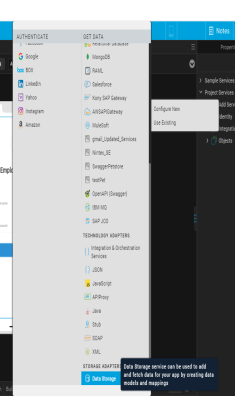
- The Configure Object Service window appears, by using which you need to configure the Data Storage service. Specify the details in the required fields, and then click Save & Generate. For more information on how to create an Object service, click here.

- Once the service is created, it is displayed in the Project Services list. You can then directly drag and drop the service onto a form and start using it.
Unlink a Service
You can unlink a service from your project by right-clicking the service and selecting Unlink.
To unlink a service, do the following:
- In Kony Visualizer, open your project.
- From the Data panel, expand Project Services. The list of available services appears.
- Right-click the service that you want to unlink. A list of options appears.
- Select Unlink. The Confirm Service Unlinking window appears. This window provides details on the operations and their respective action sequences that will be unlinked for that service, and asks for your confirmation whether you want to unlink the service.
- Click Ok. The service is removed from the Project Services list.
Edit a Service
You can edit a service that is added to your project by right-clicking the service and selecting Edit.
To edit a service, do the following:
- In Kony Visualizer, open your project.
- From the Data panel, expand Project Services. The list of available services appears.
- Right-click the service that you want to edit. A list of options appears.
- Select Edit. The service opens in Kony Fabric. Here, while editing an Integration service, the Edit Integration Service window appears.
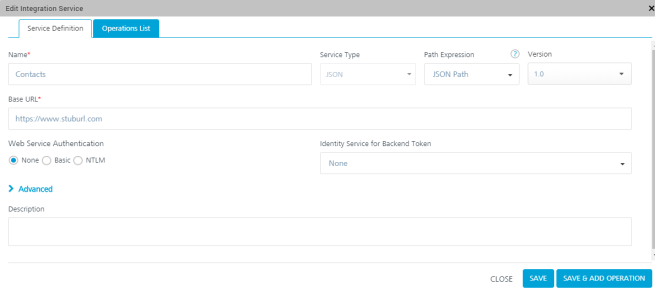
- Make the required changes, and then click Save & Add Operation. The selected service is updated with your changes.
Use Project Services
This section provides information on how to discover and use a Project service from the Data panel.
Use an Identity Project Service
To use an Identity Project service, do the following:
- In Kony Visualizer, open your project.
- Create a form; for example, frmSample.
- On frmSample, add button widgets to which you want to add the service.
- From the Data panel, expand Project Services. The list of services appears.
- Expand the service that you want to use.
- Drag and drop appropriate services on to the buttons. The Identity service is associated with the form.
Use an Integration Project Service
To use an Integration Project service, do the following:
- In Kony Visualizer, open your project.
- From the Data panel, expand Project Services. The list of available Project services appears.
- Expand the service that you want to use and view the requests/responses of the service.
- Drag and drop the service onto your form. The service is associated with the form.
Use an Object Project Service
To use an Object Project service, do the following:
- In Kony Visualizer, open your project.
- From the Data panel, expand Project Services. The list of available services appears.
- Expand the service that you want to use and view the requests/responses of the service.
- Drag and drop the service onto your form. The service is associated with the form.
Send Data between Two Forms
Previously, if you wanted to send data from one form to another, you had to save the data in a global variable first and then you would be able to use it. From V8 SP4 onwards, you can send data between two forms by using Action Editor. You can enter any data, such as an object or a variable, in the Action Editor UI and then send it to another form.
To send data between two forms, follow these steps:
- In Kony Visualizer, create a new project.
- Create two new forms; for example, say frm1 and frm2.
- Add a button to frm1.
- Select the button, and then go to Properties > Action.
- For the onClick Event, click Edit. The Action Editor appears.
- From the list of actions on the left, scroll to the Navigation section, and then click Navigate to Form. The navigation action is added to the button.
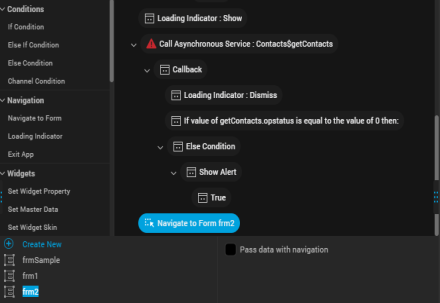
- In the lower section of the Action Editor, select frm2.
Note: Alternatively, you can click Create New to create a new form; say, frm3. And set the onClick navigation for the button to frm3.
- Select the Pass data with navigation check box. The form frm1and all of its widgets are listed in a nested structure along with defined local Variables, if any.
- You can select the required widget data properties or local variables of frm1 to pass data on navigation from frm2. As you select multiple widget properties, the Navigation Object is constructed as key-value pairs.
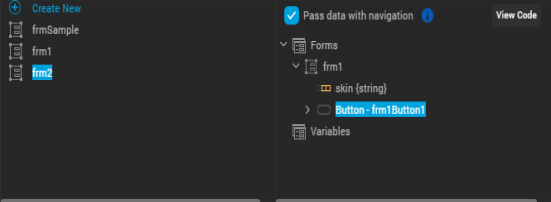
- Click View Code to view the default code for the Navigation Object that has been constructed.

Alternatively, you can select the Custom Input check box to create your customized Navigation Object or navigation flow data. - Click Generate Code to verify the data that is sent to frm2.
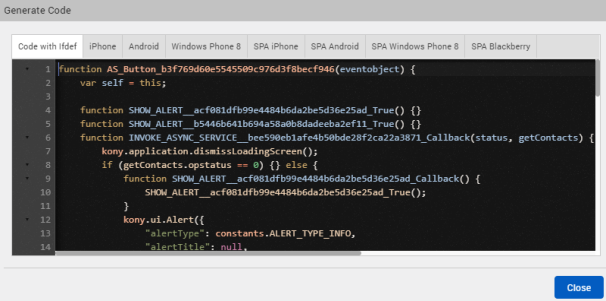
To use the data that is received from frm1, follow these steps:
- Click frm2, and then go to Properties > Action.
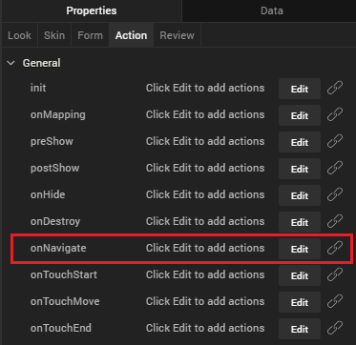
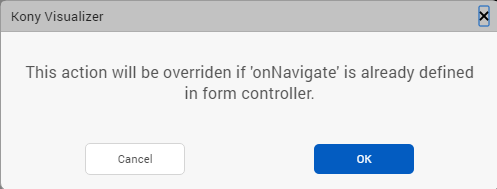
- For the onNavigate Event, click Edit. A confirmation dialog box appears stating that if you have already defined the onNavigate Event in FormController, the current action will not be respected.
- Click Ok. The Action Editor appears.
- From the list of actions on the left, scroll to the Functions section, and then click Add Snippet. The code snippet is added to frm2.
- Click Generate Code. For this action sequence, you can access the data from the eventobject argument. This is the same argument that was passed from frm1.
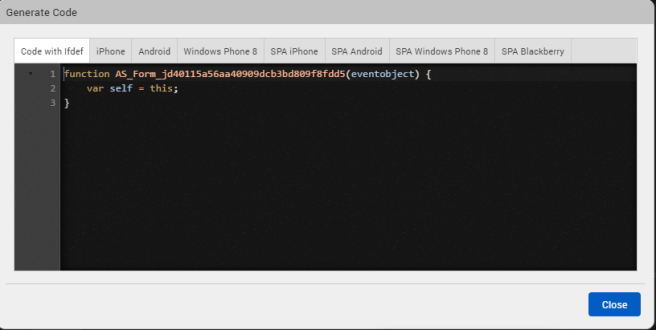
- Click Close.
Associated Data Panel Features
Mapping Event
Mapping event is available in the Mapping Editor. Service invocations dropped on a form or a FlexContainer in a canvas are mapped to the mapping event .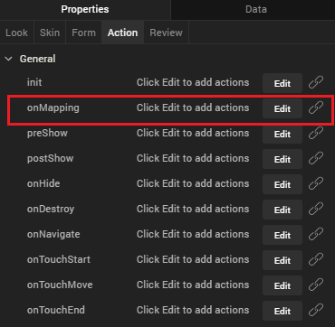
Note: If you add code to the preshow event dynamically, the new code added will override the mapping event.
View Mapping
When View Mapping is selected for a service on the data panel, the associated action is displayed.
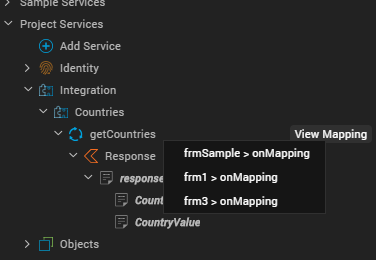
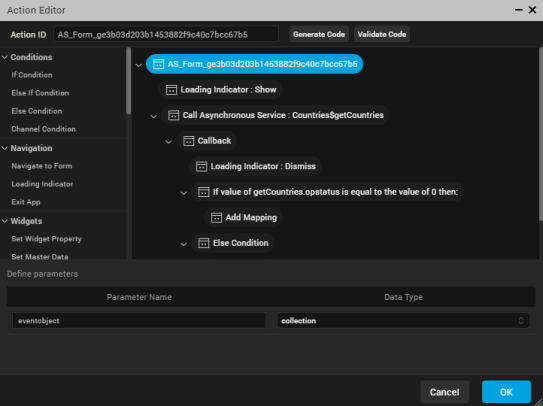
If more than one action sequence is associated to a service, a fly-out menu is displayed with a drop-down list. You can select the Mapping Action Sequence you want to view. This opens the Action Editor. For more information, refer Action Editor.
Manual Refresh
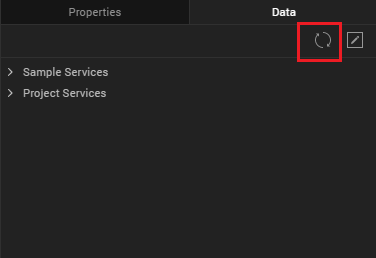
You can refresh the data in the Data panel manually by using the Refresh icon. When you click the Refresh icon, the Data panel fetches the latest data from your associated Kony Fabric application. You can use this Refresh icon to update any changes you made to your Kony Fabric service by using the Kony Fabric console, in Visualizer.
Edit Icon
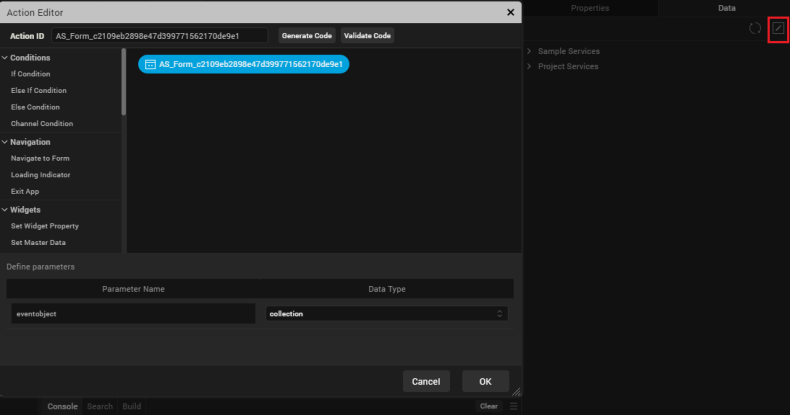
An Edit icon is available in the Data panel to edit the mapping event associated with any form. You can view the form-level mappings of a form in the Action Editor by clicking the Edit icon. If a form is not open or if a form does not have any mapping event associated with it, the Edit icon is disabled. For more information on mapping, click here.
Service Invocation
When a network call is made to invoke an async service, the action sequence appears in the Data panel. For containers, when you drag and a drop an operation or the response from the data panel, the async service invocation is added to the mapping event. Response parameters are auto-generated on the form. You can also invoke an Identity service by using the drag-and-drop feature onto a login form. Network actions are used to generate the service invocation.
Highlighted View of Mapped Widgets
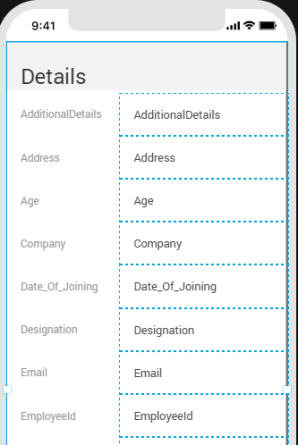
When you select a service or its associated operation from the Data panel, the mapped UI elements are highlighted on the form.
When the Data panel goes out of focus or if you select another form, the highlight effect disappears.
Delete Mapped Widgets
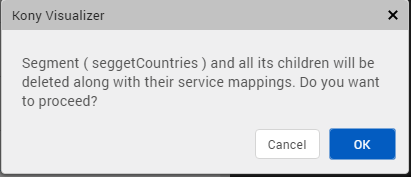
You can delete any mapped widget that is mapped to services by right-clicking the widget, and then selecting Delete. Visualizer displays a confirmation popup before you can proceed with the widget deletion. The display of this alert helps prevent any accidental deletions and service failures. Click Ok to delete the widget and all its children widgets along with the service mappings.
Action Sequences
The following action sequences are auto-generated for responses.
Loading Indicator
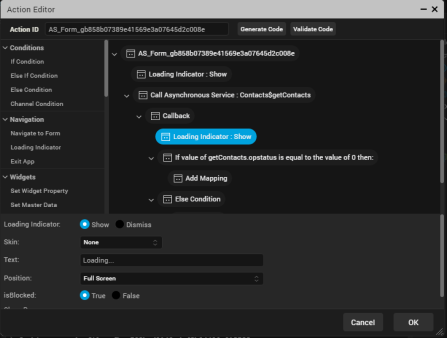
When enabled, the loading progress of a service call is displayed until the response is completed. You also have the option to not display (dismiss) the loading indicator.
Data Type Conversion
When you map a non-matching data type, a popup appears alerting you of the same. The non-matching data type is then implicitly converted before being mapped.
Note: The Calendar Date data type is not converted.
Note: You cannot map Boolean and Date fields to widget positional properties such as left, top, right, and bottom.
If you want to view the data type conversion, click Generate Code in the Action Editor.
The following data types are converted:
- Boolean
- String
- Number (can be further converted as int and float)
Status Check
The Data panel auto-generates actions to perform a service status check and map the widgets on the success of the service call.
You can also define your own IF condition blocks by using the Action Editor.
| Copyright © 2013 Kony, Inc. All rights reserved. |

