
Build an SPA Application
The process of building an app differs between Kony Visualizer and Kony Visualizer Classic. Select the procedure for the edition that you are using.
This topic contains the following sections:
- Build an SPA Application for Kony Visualizer
- Build an SPA Application for Kony Visualizer Classic
- Web App Compatibility Mode
- Secure your Web Applications
Build an SPA Application for Kony Visualizer
To build an SPA application for Kony Visualizer, do the following:
- Indicate that you want to build the app for the SPA environment. To do so, on the Edit menu, click Preferences.
- On the left pane of the dialog box, click Functional Preview, and then in the right pane, click the HTML 5 SPA checkboxes for the platforms and channels that you want to generate an SPA build of. Click Apply.
- On the Run menu, click Run.
- After the build is completed, open your browser. Ensure that it is in Developer mode.
- Open the app. The URL for doing so should be as follows:
localhost:9989/<ProjectName>/p
For Desktopweb, the URL should be:localhost:9989/<ProjectName>/kdw
Build an SPA Application for Kony Visualizer Classic
To save time and effort you can rebuild your app with your most recent build settings, or you can build with new or different settings.
To build an app with your most recent build settings, do the following:
- On the Product menu, click Build Last.
To build an app with new or different settings, do the following:
- On the Product menu, click Build.
- In the Build Generation dialog box, select the channels and platforms for which you want to build your app. For example, you may want to build a native type of app for Mobile (phone) devices and Tablet devices for the iOS and Android platforms. Also, select the HTML SPA checkboxes among the relevant platforms and channels that you are building for. For more information about native and SPA apps, see Types of Applications.
- Select the build mode, either debug or release.
- Debug mode. To help you identify and fix errors, Kony Visualizer emits the complete symbolic debug information . To lessen the amount of time necessary to complete the build, the build is not optimized for code execution, so it may tend to execute slower than a build optimized for release. Also, the inclusion of the symbolic debug information causes the final executable to be larger than a release build.
- Release mode. Kony Visualizer optimizes the build for execution, requiring more time to generate the build. It also does not emit the complete symbolic debug information, making the final executable smaller than a debug build.
- Click Build, and address any dialog boxes that appear.
- After the build is completed, open your browser. Ensure that it is in Developer mode.
-
localhost:8888/<ProjectName>/p
For Desktopweb, the URL should be:localhost:8888/<ProjectName>/kdw -
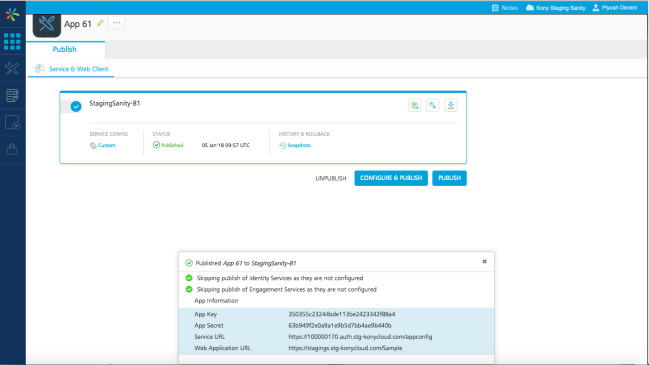
If your SPA app is published to Kony Fabric runtime server, the URLs of the SPA app are printed on the Kony Fabric Publish section. To access the publish page, navigate to File > Publish to KonyFabric. For more details, see the images below:
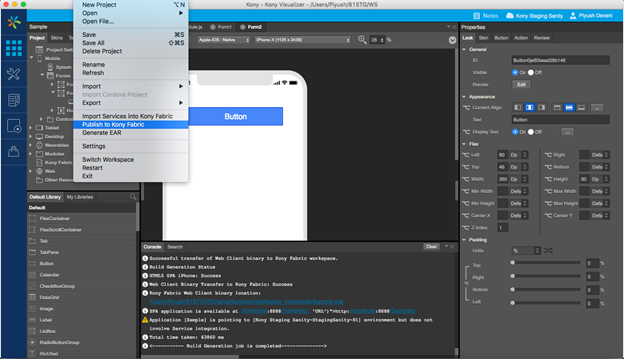
Note: You can also locate the URL in the Console log.
Web App Compatibility Mode
Starting with Kony Visualizer V8 Service Pack 2 on Kony Cloud, the Kony Fabric Server supports a new optimized web app package format that improves the app performance and minimizes downtime during deployments. Visualizer automatically picks the right format based on the version of the selected Kony Fabric Environment. Alternatively, you can force the Compatibility Mode to build the web app package using the older format irrespective of the selected environment. You can choose Compatibility mode from the Project Settings pane.
To select compatibility mode, do the following:
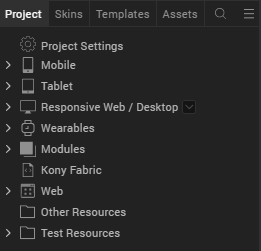
- In Kony Visualizer, from Project Explorer, select Project Settings.
- In the Project Settings pane, select Force Web App Build Compatibility Mode.
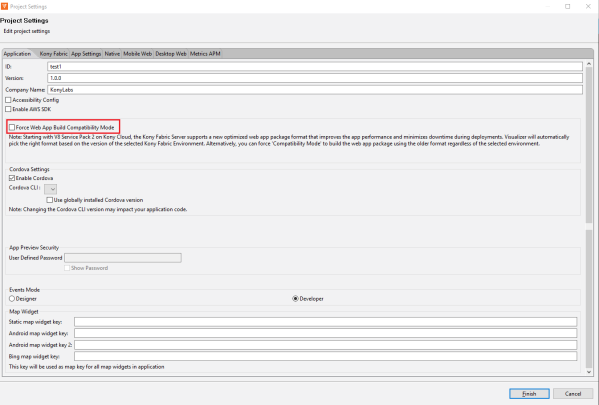
- Click Finish.
Secure your Web Applications
Client- side attacks leave your web applications vulnerable, allowing attackers to steal data. Obfuscators protect your apps from reverse engineering and malware attacks. Using Kony Visualizer V8 SP4, you can create a post-build hook for your SPA or Desktop Web applications.
Note: Ensure that the Kony application is working before you implement obfuscation. Also, make sure that the obfuscation of the web artifact works before importing it into Kony Visualizer.
Note: When you build a Responsive Web or SPA application in Release mode, both the obfuscation and minify features are available in the build. The presence of these two features increases the total build time of the project.
If you want to disable the minify feature before building the Responsive Web or SPA project, create a folder named custombuild under Project Resources. You must then place the spadw.properties file with minify as false, in the following path: <project-loc>/custombuild/spadw.properties.
Here is the sample code to disable minify in Release mode:minify=false
To implement obfuscation in your web apps, do the following:
- Navigate to the location of your project. For example,
<your workspace folder>/<appid>/. - Create a new folder with the name custombuild.
- In the custombuild folder, create a new file, build.xml.
-
In the build.xml file, create an ANT task, postbuild.
- In the postbuild task, write a code that implements an obfuscation of your choice.
- After you implement an obfuscation, write a code to replace the existing artifact in the web artifact folder with the protected artifact.
The protected artifact is generated as the output from the obfuscator tool.
Here is an example of the contents of the build.xml file with the postbuild task:
<?xml version="1.0" encoding="UTF-8"?> <project name="CustomBuildTask" basedir="."> <target name="postbuild" description="post build for spa/desktopweb"> <echo message="Post Build Started for Project :: ${projname}" /> <!-- Code to generate protected artifact from chosen obfucator and replacing the existing webartifact --> <!-- App Developer Code start --> <exec executable="cmd" failonerror="true"> <arg line="${project.loc}\custombuild\somebatch.bat --app ${webartifactpath} -- ANY OTHER INPUTS FOR YOUR OBFUSCATOR" /> <redirector output="${basedir}\protected_ob.log" alwayslog="true"></redirector> </exec> <!-- start error message code - to halt the system when any error occurs --> <loadfile srcfile="${basedir}\protected_ob.log" property="errorline"> <filterchain> <linecontains> <contains value="ERROR, UNEXPECTED EXCEPTION"></contains> </linecontains> </filterchain> </loadfile> <fail message="Unable to obfuscate - ${errorline}"> <condition> <contains string="${errorline}" substring="ERROR, UNEXPECTED EXCEPTION"/> </condition> </fail> <!-- error message Code end --> <!-- replacing old artifact with protected artifact start--> <move file="${webartifactfolder}/${projname}.${webartifacttype}" tofile="${webartifactfolder}/${projname}-old.${webartifacttype}"/> <move file="${basedir}/protected_${projname}.${webartifacttype}" tofile="${webartifactfolder}/${projname}.${webartifacttype}"/> <!-- replacing old artifact with protected artifact end--> <!-- App Developer Code end --> </target> </project> - Once you create the ANT task, save and close the file.
- Build the project. After the project is built, the protected binary is uploaded to Kony Fabric.
Once the build is completed, you must publish the app to your Fabric environment. Once you publish the app, you will get the Web Application URL.
Note: Ensure that you exclude any variables with global scope from obfuscation.
| Rev | Author | Edits |
| 7.0 | NMK | NMK |
| Copyright © 2013 Kony, Inc. All rights reserved. |