
Map Widget Properties to One Another
Mapping provides an easy way of linking a widget property (or skin, variable, or an i18n key) to another widget. Mapping also allows you to achieve a uniform look and feel across the design, and reduces the effort required to design an app since any modification made to a widget property results in modifying all its linked widget properties. Click any of the following topics for more information.
Locate Properties by Filtering and Searching
Map Data with the Help of Expressions
Map a Collection to a Widget or a Service Parameter
Mapping Overview
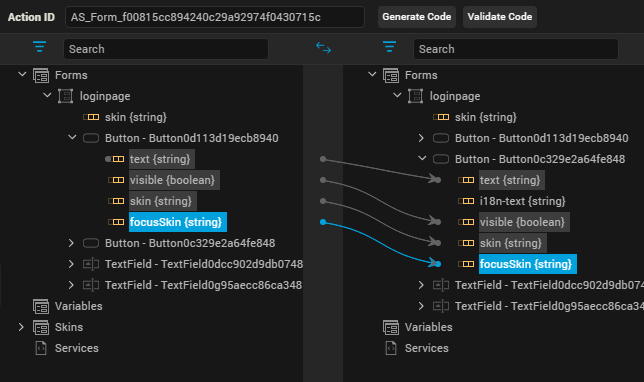
The Mapping Editor consists of two panes: the source and the target.
Source
The left pane of the Mapping Editor is called the Source, and contains the following folders:
- Forms: Lists all the forms and their child widgets. All the properties of a form and its child widgets that can be mapped are displayed.
- Popups: Lists all the pop-ups and their child widgets. All the properties of a pop-up and its child that can be mapped are displayed.
- Headers: List all the header templates and their child widgets. All the properties of a header and its child that can be mapped are displayed.
- Footer: List all the footer templates and their child widgets. All the properties of a header and its child that can be mapped are displayed.
- Variables: List all the variables created for a project.
- Skins: List all the skins available for a form (or pop-up) and its child widgets.
- i18n Keys: List all the i18n keys available for the project.
Target
The right pane of the Mapping Editor is called the Target, and contains the following folders:
- Forms: Lists all the forms and their child widgets. All the properties of a form and its child widgets that can be mapped are also displayed.
- Popups: Lists all the pop-ups and their child widgets. All the properties of a pop-up and its child that can be mapped are also displayed.
- Headers: List all the header templates and their child widgets. All the properties of a header and its child that can be mapped are also displayed.
- Footer: List all the footer templates and their child widgets. All the properties of a header and its child that can be mapped are also displayed.
- Variables: List all the variables created for a project.
Note: Skins and i18n keys folders are unavailable in the Target pane.
Important Considerations
-
The datatype for both the source and the target has to be the same. If they’re not, Kony Visualizer notifies you.
- You cannot map across channels. That is, you cannot map the widget text of a Mobile channel to the widget text of a Tablet (or Desktop) channel.
- If a form is forked (e.g. iOS:Native), only when the source and target are of same platform (iOS:Native) are the mapped values are applied during functional preview.
- A source element can have one-to-many mappings, but a target element can have only one-to-one mapping. That is, a source element can be linked to multiple target elements. But a target element can only be linked to one source element.
- While mapping skins, source and target widgets should be of the same type. That is, you can map a skin of a Button to another Button only.
- The data type of the source and target should be same. That is, if the source data type is String, you can map it only to a target element of data type String.
- When you map a collection to another collection, you must first map at the parent-level (map one collection to the other collection) and then map the elements.
- If the source and target widgets are of the same type, and the values of the two properties being mapped are identical, you cannot map them.
- Since tabs are listed under form elements, you cannot map any data to a tab widget using the Mapping Editor.
- For service mappings, do not use structures that have more than simple key value pairs and attributes. Break out complex structures and use code to get the lost values.
- Kony service mappings cannot support dynamic associations or hierarchical structures. Use code to work around this limitation
Map Properties to One Another
It's important to note that, after mapping, any changes you make to the target element effects the source element as well.
To map properties, do the following:
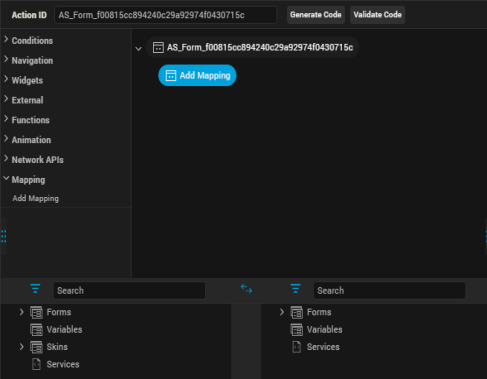
- From the left pane of the Action Editor, under the Mapping section, click Add Mapping. Doing so opens the Mapping Editor.
- From the Source pane, navigate to a widget's property, and then click it. You can make it easier to locate the property you want by using the Filter drop-down list to filter the app's forms and widgets according to any of the following criteria: Widget ID, Widget Category, Variables, Skins, I18N Keys, Mapped Elements, and Services.
- From the Target pane, navigate to a widget's property, and then click it. Doing so establishes a mapping relationship between the source element and the target element. You can make it easier to locate the property you want by using the Filter drop-down list to filter the app's forms and widgets according to any of the following criteria: Widget ID, Widget Category, Variables, Skins, I18N Keys, Mapped Elements, and Services.
- To save the changes you have made to the action sequence, press Ctrl+S.
Add an Expression
You can write a code snippet on a target element for manipulating a widget property.
To add an expression, do the following:
- Right-click the target element.
- Click Add Expression.
- Type the code and save the project. Example of an expression:
"Welcome " + loginPage.FirstName.text + loginPage.LastName.text;;
Unlink Mapped Properties
To unlink a mapping or to remove any expression, do the following:
- In the Target pane, right-click a property that is mapped to a source property.
- Click Unbind.
- To save the changes you have made to the action sequence, press Ctrl+S.
Locate Properties by Filtering and Searching
The elements under Source and Target in the Mapping Editor can be sorted by either filtering or searching. When you search, the pane lists only those elements that match what you type in the Search box. The Filter feature includes the following filtering parameters:
| Filter Category | Description |
|---|---|
| All | Displays all the elements |
| By Widget Id | Displays widgets sorted by their ID |
| By Widget Category | Displays widgets sorted by their categories |
| Variables | Displays only variables, both local and global |
| Skins | Displays only skins |
| I18N | Displays only i18n keys |
| Services | Displays only services |
- To save the changes you have made to the action sequence, press Ctrl+S.
Map Data with the Help of Expressions
You can also map data to widgets or service parameters by creating an expression. When you write an expression to map the data, you can perform the required operations on the data before mapping it to the selected element.
Note: You can add an expression only to the elements that have a data type associated with it. These elements can be service parameters or attributes of a widget. You cannot add an expression at the widget name or service name level.
To map data with the help of an expression, do the following:
- In the Mapping Editor, select the element in the Target to which you want to map data.
- Right-click this element, and then click Add Expression. Doing so displays the Expression Editor.
- Define the required expression, and then click outside of the Expression Editor. The data derived out of the expression is mapped to the selected element, and a red circle appears next to the element indicating that it has an expression.
- To save the changes you have made to the action sequence, press Ctrl+S.
Map a Collection to a Widget or a Service Parameter
When you want to map elements within a collection to a widget or a service parameter, the first element in the collection gets mapped to the widget by default.
Note: You have to explicitly edit the expression to modify the index of the collection that needs to be mapped.
To edit the collection index value, follow these steps:
- On the Source pane of the Mapping Editor, select an element within the collection as the source by clicking it.
- On the Target pane, click a widget (or service parameter) that has the same data type as the collection element. The first element within the collection gets mapped to the widget you selected.
- Right-click the mapped widget (or service parameter), and then click Edit Expression. Doing so opens the Expression Editor.
- Delete the default index value in the expression and provide the required index value. For example, students[3]["name"] indicates that you have mapped the value at the third index of name within the students collection.
- Click OK.
- To save the changes you have made to the action sequence, press Ctrl+S.
| Copyright © 2013 Kony, Inc. All rights reserved. |