
Publishing Native Client Binaries from Kony Fabric to Kony Management
This section details how you to publish native client binaries to Kony Enterprise Store using Kony Fabric Console. To publish native client binaries, you must create an app in Kony Fabric Console, upload the required native client binaries through the Manage Client App Assets tab, and then publish these binaries to Kony Management through Publish tab > Native Client tab.
Important: The native client binaries uploaded for iOS, Android, and Windows platforms are only published to Kony Management. However native client binaries only available in Kony Enterprise Store if the publish workflow state is selected as Active and not Draft.
In this document, Kony Management is referred to Kony Management Stage.
Limitations:
- After any version of a client binary is published, if you update the description of the client binary and re-publish the binary, the system does not update the description in Kony Management Console.
- When you select the
-- Select Version --from the drop-down list for platforms, and click Publish, the system removes all versions of that client binaries if present in Kony Management runtime.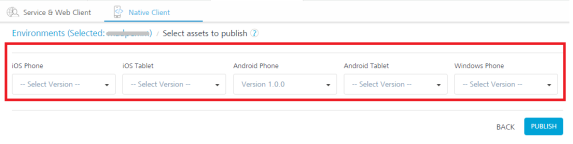
- Publish operation is cumulative. For example, if iOS Phone binaries are previously published, and now you want to publish iOS Tablet binaries, should not select the
--Select Version-- - If you delete any version of client binary after it is published, you can remove the version in Kony Management Console by one of the following two ways:
- Delete older published versions of client binaries via Kony Management Console.
- Select the
-- Select Version --from platforms drop-down list and publish the app. This will remove all the versions of clients in the Kony Management runtime.
Publish the versions against from lowest version.
- If a downgraded version is published to Kony Management, the same version does not get downgraded in Kony Management as Kony Fabric currently does not support downgrade of application.
-
If any publish fails for native client binaries, the environment status changes to
Not Published. Kony Fabric does not track the publish failures for native client binaries as of now.
To publish native client binaries to Kony Management, follow these steps:
- In Kony Fabric Console, go the app for which you uploaded native client binaries.
- Click the Publish tab. By default, the Service & Web Client Publish tab is selected.
- Click the Native Client tab. The Native Client tab lists clouds or environments configured for the Kony Fabric account. The list also displays the following app status for that cloud or environment.
- Published: An app is published to a cloud or environment. You can unpublish the app, if required.
- Not Published: An app is not published to a cloud or environment. You can publish the app, if required.
An app is canceled while publishing or unpublishing. You can publish or unpublish the app, if required. Refer to Limitations:
- Under the Select environment to publish, click the appropriate Kony Management environment for publishing.
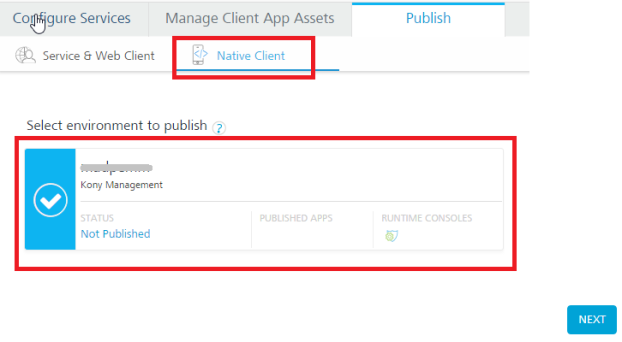
Note: The NEXT button dims when you have not selected any environment. When an environment is selected, only then the NEXT button is available.
- Click NEXT to select assets to publish.
The uploaded binary versions are loaded in the drop-down list for each of the platforms. - Select the binary version from the platforms drop-down lists.
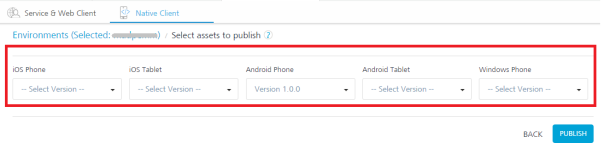
- After you select binary versions for platforms, click PUBLISH.
The Publish Options window appears. Kony Fabric Admin can choose PUBLISH AS PREVIEW or PUBLISH TO APPSTORE.
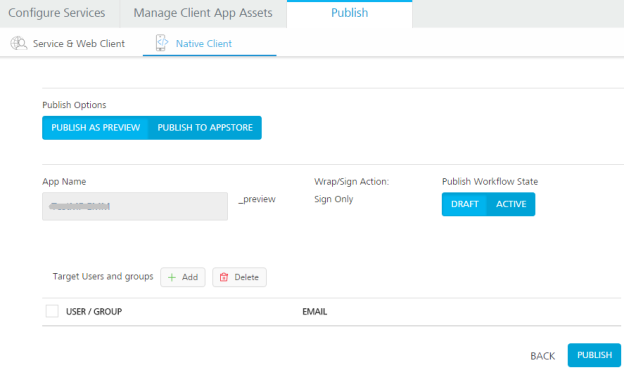
You can publish the app binaries as preview to Kony Management directly.
Important: The published app is available in Kony Management Console. Also the app is available in Kony Enterprise Store only if workflow state is selected as ACTIVE.
You can select Kony Management users or groups and target the native binaries to be published. When a Kony Management Admin updates these binaries and targets the uploaded versions of the app binaries, these binaries are available only to the selected users or groups. These users or groups will be notified about native app. Kony Fabric admin can target all Kony Management users or groups (Local users/groups, Microsoft Active Directory, and SAP) except cloud users. Kony Fabric admins can continuously push test versions of native apps to selected users or groups.
- Choose one of the publish options as follows:
- To publish an app as preview, click PUBLISH AS PREVIEW. The system displays the current app with a suffix of
<Appname>_preview. Preview apps are always sign only and can be installed on the same device alongside the production copy of the same app. These apps will be displayed as<Appname>_previewon user devices or spring board. - To publish an app as a production copy, follow these steps:
- Click PUBLISH TO APP STORE.
- Select one of the following options under Under Wrap/Sign Action:
SIGN ONLY: an app is set to sign only before publishing.
WRAP & SIGN: an app is wrapped and signed before publishing.
- To publish an app as preview, click PUBLISH AS PREVIEW. The system displays the current app with a suffix of
- Select the publish state in Publish Workflow State:
- DRAFT: If DRAFT is selected, the app is published to Kony Management Console.
- ACTIVE:If ACTIVE is selected, the app is published to Kony Management Console and Kony Enterprise Store as well.
Important: If Publish Workflow State is selected as ACTIVE, you must target users or groups before publishing. Else the publish fails.
If Publish Workflow State is selected as DRAFT, Kony recommends that you target users or groups. It is an optional. - To targeting users or groups, follows these steps:
- Under Target Users and groups, click the Add button to display the Select Users / Groups window. The Select Users / Groups window displays names of users and groups from Kony Management.
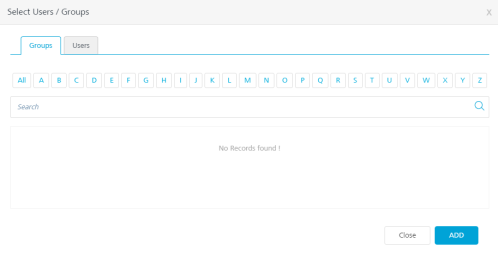
- Under Select Users / Groups, follow these steps:
- Add Groups and Users:
- Groups: Click Groups and select the check boxes for the groups, as required. You can click the filter buttons (All or A, B, C) or type the name of the group for filter groups from Kony Management Environment.
- Users: Click Users and select the check boxes for the users, as required. You can click the filter buttons (All or A, B, C) or type the name of the group for filter users from Kony Management Environment.
- Click ADD to add the selected users and groups under the Target Users and groups. The system closes the Select Users / Groups window.
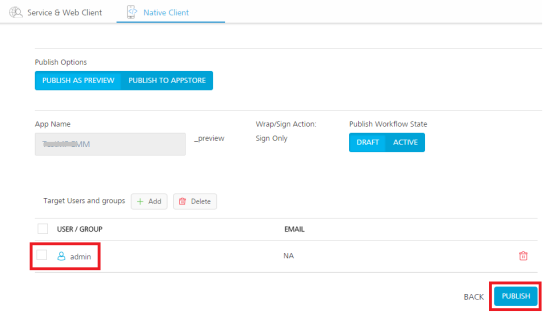
You can delete users or groups from the Target Users and groups list. To delete any added users or groups, select the required check boxes and click the Delete button.
Note: Ensure that you do not close the publish progress dialog while the app publish is in progress.
- Under Target Users and groups, click the Add button to display the Select Users / Groups window. The Select Users / Groups window displays names of users and groups from Kony Management.
-
Click the PUBLISH button to start the publishing.
The process of publishing the app and binaries begins. To view the various stages involved in publishing an app, click + Details. To cancel the publishing, click CANCEL.
- After the status changes to Published in the Publishing dialog, click OK to confirm the publishing.
For more details, refer to Uploading Client Binaries to Kony Fabric Console.
| Copyright © 2020 Kony, Inc. All rights reserved. |