
OAuth Provider Identity Service
With OAuth Provider identity service, a user can configure an OAuth provider for authentication.
Service Configuration in Kony Fabric OAuth Provider
Different service providers implement service configuration as per their standards. Kony Fabric OAuth Provider identity service retrieves service configuration from the selected User Authentication Source and saves these attributes in Kony Fabric Identity Sessions.
How to Configure a Kony Fabric OAuth Provider Identity Service
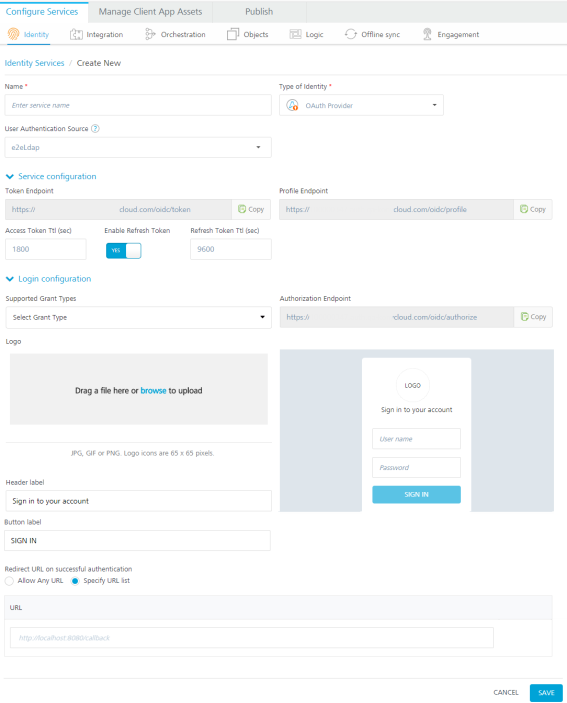
To configure an identity service using Kony Fabric OAuth Provider authentication mode, follow these steps:
- Under the Identity service designer page, type a name for the service in the Name text box.
- From the Type of Identity list, select OAuth Provider.
Note: Fields marked with an asterisk are required.
- From the User Authentication Source list, select an identity service that to be used as the authentication source provider for this OAuth provider.
Important: Currently the
The Service Configuration details appear. The details include Token Endpoint, Profile Endpoint, Access Token Ttl (sec), and Enable Refresh Token.
- Click the Service Configuration and configure the required fields:
- The Access Point Token Ttl (sec) sets the session time of the token. By default, the value is set to 1800 seconds. Modify the access token ttl value if required.
- From the Enable Refresh Token toggle button, select Yes if you want to enable refresh token.
- Click the Login configuration and configure the required fields:
- From the Supported Grant Type list, select the required grant type from the drop-down menu. The following are the different grant types you can select:
- Authorization Code: An authorization code grant type is used if the client wants to request access to protected resources on behalf of another third-party user. When the client requests for the authorization, the authorization server redirects to the third party URL. The client enters the authorization code and gains access to the protected resources. In the Authorization code, you can configure the following:
- Logo: You can configure the logo that you want to appear on the authorization login page. You can drag a file or browse to upload a file. You can add a JPG, GIF, or PNG. The logo icon size should be 65 x 65 pixels.
- Header Label: In the Header Label text box, enter the text you want to display below the logo on the login page.
- Button Label: In the Button Label text box, enter the text you want to display for authorization. For example, Sign In.
Important: For a custom identity service, you must configure the additional Sign in Parameters details along with the Logo, Header label, and Button label.
- Follow the below step only for a custom entity service. If you have selected the Custom identity service in the User Authentication Source list, the Sign in Parameters section appears. Configure the sign in parameters for the login screen.
Input Type Service Input parameter Display Name Select the type of input field as Text or Password. The Service Input parameter is assigned to the attribute
<<name>>of the input element.Enter the Service Input Parameter as per your server requirement as per your server.
The Display Name is assigned to the attribute
<<placeholder>>of the input element.Enter the Display Name that you want to display in Login page of a client app.
* For example, the following is a sample code for the Text input type.
<input class="form-control" type="text" name="UserName" placeholder="userID">
**For example, the following is a sample code for the Password input type.
<input class="form-control" type="password" name="password" placeholder="secret">

Redirect URL on successful authentication:
- Any URL: Select this to use any URL on successful authentication.
- Allowed URL list: Select this to use a specific set of URLs on successful authentication.
URL: In the URL text box, enter the allowed URLs.
- Resource Owner Password: On selecting this grant type, the client needs to provide the Token Endpoint. The client provides their access credentials to access the URL provided in the Token Endpoint. The back-end server validates these credentials. If the credentials are valid, it redirects back to the Console.
- Client Credentials: When the client credentials grant type is selected, the client can request an access token using only its client credentials when the client is requesting access to the protected resources under its control, or to those of another resource owner that has been previously set up with the authorization server.
- Authorization Code: An authorization code grant type is used if the client wants to request access to protected resources on behalf of another third-party user. When the client requests for the authorization, the authorization server redirects to the third party URL. The client enters the authorization code and gains access to the protected resources. In the Authorization code, you can configure the following:
- From the Supported Grant Type list, select the required grant type from the drop-down menu. The following are the different grant types you can select:
- Click the Advanced to provide additional configuration of your service definition:
- Now you can enable or disable the integrity check for an identity service at the provider level. If the integrity is disabled at the provider level, then the provider is meant for server-to-server communication only. To disable the integrity check, In Advanced, select the Restrict to Fabric Server to Server Authentication check box. This setting blocks a traditional client app from using an identity service. It will only allow the identity service to be used from a Kony Fabric Server to authenticate and invoke services.
- Concurrent User Logins: Select one of the following three options to configure concurrent user login sessions. For more information, refer to Concurrent User Logins.
- Allow concurrent user sessions (no restrictions): When this option is selected, an app user with unique credentials is allowed to have multiple apps from different instances.
- Allow only one active user session per app: Logging into simultaneous instances of the same app is not supported. When this option is selected, an app user can log in to only one instance of client apps linked to a specific Fabric app which has the identity service linked.
- Allow only one active user session across all apps: Logging to simultaneous instances of the same app or across apps is not supported. When this option is selected, a unique app user can log in to only one instance of client apps linked to all Fabric apps using the identity service.
Important: Apps enabled for SSO will not work if the option is selected, Allow only one active user session across all apps.
- After entering the above details, click SAVE to save the service. The system displays the Identity page. The Kony Fabric OAuth Provider identity service is configured.
-
Navigate to the Apps pane from the left pane.
-
Create an app and link the above created OAuth Provider under the Identity tab.
-
Navigate to the Publish tab and publish the app. App key and secret which are displayed after publish will serve as the client id and secret for the provider.
Note: You can view the service in the Data Panel feature of Kony Visualizer. By using the Data Panel, you can link back-end data services to your application UI elements seamlessly with low-code to no code. For more information on Data Panel, click here.
How to Use a Kony Fabric OAuth Provider
Once the OAuth provider is configured, and the application is published, the OAuth provider is ready for use. To use the OAuth Provider in the authorization code flow, follow these steps:
- From your OAuth provider configuration page, copy the authorization endpoint and the token endpoint.
- From the app publish page, copy the app key and the app secret.
The app key and the app secret serve as the client ID and the client secret or OAuth 2.0. -
Invoke the authorization request API in an internet browser with appropriate parameters.
The Syntax for Authorization API is
<Authorization endpoint>?client_id=<appkey>&scope=<space separated values of one or more of valid scopes >&response_type=code&redirect_uri=<valid redirect uri>&prompt=<value>Parameter Required Description client_id Yes The App Key string that you obtain from the Publish page. response_type Yes If the value of response_type is code, the API launches a Basic flow. You should pass a POST query/request to the token endpoint to acquire the tokens.
scope Yes The scope parameter supports the following values:
- openid
- profile
redirect_uri Yes It determines the location of the response that is sent. redirect_uri should be the HTTP endpoint on your server that receives the response from Kony OAuth Provider.
In the Redirect URL on successful authentication field, you can either select Allow any URL or Specify URL list. In both cases, the Authorization API sends the authorization code to the redirect URI provided in the API. But for the Specify URL list option, the redirect_uri value must match one of the authorized redirect URIs as specified in the OAuth Provider. If this value does not match an authorized URI, a redirect_uri_mismatch error is thrown.
prompt Optional A space-delimited list of string values that specifies whether the authorization server prompts the user for re-authentication and consent.
The prompt parameter supports the following values:
- consent: The authorization server prompts you for consent before returning information to the client.
- login: If you have already signed in, and passed login as an input to prompt, the authorization server prompts you to sign in again.
Note: If you invoke the authorization API without passing the parameter prompt, the API takes consent as the value by default.
- Enter login credentials and then click submit.
A consent screen displays details of resources granted access. - Grant access as required. Once authorized, an authorization code is generated and the screen is redirected to a new URL with the code as the query parameter.
For example, http://myredirect?code=XYZ - Make a POST call to the token endpoint with the code obtained in the previous step.
For example, https://100000058.auth.konycloud.com/oidc/token/myproviderRequest Method: POST
Request Body:
code=<CODE>
Sample Response:
200 OK
{
"access_token":"eyAi.....",
"token_type":"Bearer",
"expires_in":1799,
"scope":"profile"
}Or you can pass the
Request BodyasKey-Valuepair. For example,code:2510b2d0-c3b1-4426-bfa8-c4f721c94d8b grant_type:authorization_code scope:profile client_id:fed6c7fc60454b62efaf9ca42d719fa2 client_secret:ed11ac1da0b54e06afeb88e10b9d3458 redirect_uri:https://manage.kony.com
Important: For a custom identity service, you must pass the
X-Kony-RequestIdin the header (value for X-Kony-RequestIdcan be a random value.)You can use the access token to invoke your Kony Fabric integration services.
- To get the profile, pass the token obtained in the previous step:
-
Invoke a GET call on
https://<<accountnumber>>.auth.konycloud.com/oidc/profilewith the following contentheader:Authorization : Bearer<space><token received in the previous step>For example,
https://100000012.auth.konycloud.com/oidc/profile
Authorization:Bearer eyAidHl…..H3mspKIPnAKzEbyc - Or you can invoke a Curl call with the token received in the previous step:
For example,Curl -X GET " https://100000012.auth.konycloud.com/oidc/profile " -H "accept: application/json" -H
"Authorization: Bearer eyAidHl….kVNGAz3jDd36MXuhWmaQ" - To sign out of the OAuth Provider, invoke the following API in an internet browser.
https://<<accountnumber>>.auth.konycloud.com/oidc/logout/<provider_name>?target_url=<redirect_url>For example,
https://100002634.auth.konycloud.com/oidc/logout/OAuthProvider11Note: If you do not pass the target URL parameter, the API displays a logout success message. Otherwise, it redirects to the specified URL.
Note: For more information on how you can integrate Kony OAuth Provider, User Repository, and OAuth 2.0 Identity services to create a basic login form, refer to a Base Camp article: Exploring Kony OAuth Provider.
| Copyright © 2020 Kony, Inc. All rights reserved. |