
Publishing a Web App in Quantum Visualizer
Overview
Web Publish, a feature introduced in Quantum Visualizer V8 SP4, enables you to build and publish a web app from Quantum Visualizer to your Quantum Fabric cloud.
Seamless in-app Build and Publish Experience
Starting with Quantum Visualizer V8 SP4, you can publish a web app to Quantum Fabric, without leaving the Visualizer window. Earlier, one had to design their web app in Visualizer and then open the Quantum Fabric console to the publish the web app. This process has now been simplified.
The Build and Publish Web feature is available in the Build menu of the Quantum Visualizer application.
The publish process occurs in the background, and you can continue to use the Visualizer canvas while the app is being built and published.
Access to the Published URL within Quantum Visualizer
Once the publish is complete, the published URL is displayed on the Build tab in Quantum App. When you click the URL, the Visualizer Preview window opens. For more information on the Visualizer Preview window, click here.
You can also click on Copy beside the URL to copy it and view the app in a web browser of your choice.
The Build tab in Visualizer displays the status of your app publish. If there are any errors, they appear in the Build tab. You can switch to the Console tab for a detailed view of the error logs.
Prerequisites
Following are the prerequisites to publish a Web App within Quantum Visualizer:
- Sign in to your Quantum Cloud account.
- Link a new or an existing fabric app to your Visualizer Project.
When you try to publish the app without logging into Quantum Fabric, the login window appears.
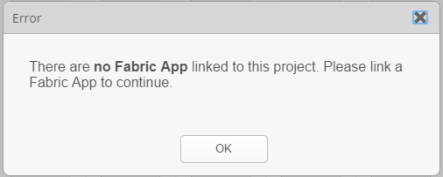
If you try to publish the app, even when you do not have an associated Quantum Fabric app, you will get a prompt to link a Quantum Fabric app.
![]()
To change the selected Cloud account or Environment, go to Project Settings > Quantum Fabric. hen, click the Quantum Fabric tab. At the top of this tab, under Quantum Fabric Environment, select an environment from the drop-down list. Click Done. If you do not see any environments listed, you need to create one. For more information, refer Environments in the Quantum Fabric Console User Guide.
To publish the Quantum Visualizer web app to Quantum Fabric, the app needs to be associated with a Quantum Fabric app.
If no Fabric App is associated to your Visualizer project, an error message is displayed.
You must either create a new Quantum Fabric app or use an existing one. For information on how to create a new Quantum Fabric app, see How to Add Applications in the Quantum Fabric Console User Guide.
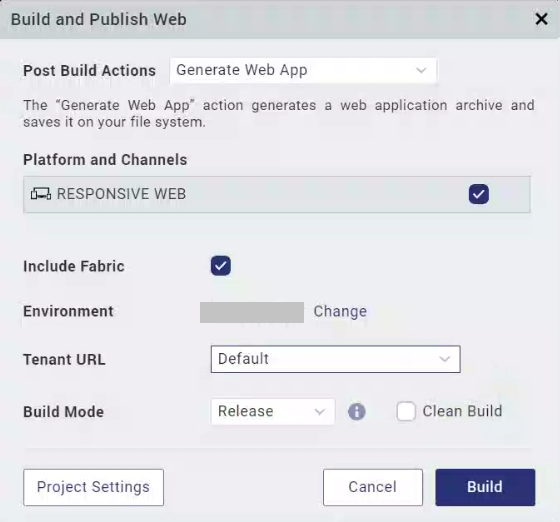
Post Build Actions
The Build and Publish Web option in Quantum Visualizer builds the application for the selected Web platforms and performs the selected Post Build Action. You must choose the Post Build Action in the Build and Publish Web window, before the build process begins. There are three types of Post Build Actions:
- Build and Publish Web App – This action publishes the application to your Quantum Fabric environment.
- Generate Web App – This action generates the archive for your Web application and saves it on your file system.
The Post Build Action is initiated after the Build is complete.
Build and Publish Web App
The Build and Publish Web App action publishes the application to your Quantum Fabric environment and enables you to view your app by providing a link.
The Build and Publish Web app option also publishes the Quantum Fabric app to the Quantum Cloud.
To publish an app to the Quantum Cloud, logging in to your Quantum Account is mandatory.

Generate Web App
The Generate Web App action generates the archives for your Web application and saves it on your file system. The Visualizer project does not have to be linked to Quantum Fabric to complete this action.
Once the build is complete, the generated web archives will appear in your project's Quantum Visualizer workspace > binaries folder. You can then upload and publish the app on Quantum Fabric.
Alternatively, once the build is complete, you will get notified by an email from "Quantum Visualizer – Build Service", with download links for all these binaries.
Publish a Web app
Before you publish a web app, ensure that you have a project in which you have a Web app designed.
To publish a Web app, follow these steps:
- Open the Quantum Visualizer project in which you have designed a web app.
- Sign in to your Quantum Cloud account.
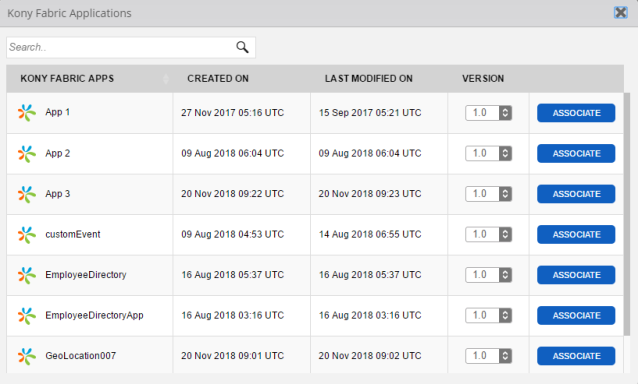
- Link your Visualizer Project to a Quantum Fabric app. You can link your Project to a new or an existing Fabric app.
- On the Data & Services panel, click the hamburger menu near the Refresh button.
- Click either Create New App or Link to Existing App. The Quantum Fabric console appears.
- If you have not already, sign in to your Quantum Fabric account by using your cloud credentials.
- If you choose:
- Create New App, a new Fabric app with the same name as the Visualizer Project is created.
- Link to Existing App, a list of existing apps from your Quantum Fabric account are displayed.
- To select the Quantum Fabric app that you want to associate your Quantum Visualizer app with, click Associate beside the App Name.
The app you chose/created is successfully linked to your Visualizer Project. - Close the Quantum Fabric window and return to Quantum Visualizer by clicking on the Visualizer icon on the left navigation pane.
- From the main menu of Quantum Visualizer, select Build > Build and Publish Web.
The Build and Publish Web window appears. - Select the required Platforms and Channels for which you want to build and publish your web app.
- From the Post Build Action drop-down menu, select the desired Post Build Action. For more details about the Post Build Action, click here.
- You can choose to change the cloud environment on which your app will be published. To do so click on Change beside the Environment option.
- If your Quantum Fabric app uses Custom Tenant URLs, you can select the required URL from the Tenant URL drop-down. By default, the Tenant URL is set to Default.
NOTE: Support to select the Tenant URL has been added from the Quantum Visualizer 202310.0.1 release to connect to an on-premise Quantum Fabric Environment.
- From the Build Mode drop-down list, select your desired build mode.
- Debug mode - To help you identify and fix errors, Quantum Visualizer emits the complete symbolic debug information . To lessen the amount of time necessary to complete the build, the build is not optimized for code execution, so it may tend to execute slower than a build optimized for release. Also, the inclusion of the symbolic debug information causes the final executable to be larger than a release build.
- Release mode - Quantum Visualizer optimizes the build for execution, requiring more time to generate the build. It also does not emit the complete symbolic debug information, making the final executable smaller than a debug build.
- Protected Mode - Applications built in Quantum Visualizer can use the additional security enhancements by building the application in the Protected Mode. Quantum VisualizerPlatform code for iOS and Android is equipped with mechanisms that can protect your application by detecting attacks like tampering, swizzling, debugging, jail breaking (iOS), rooting (Android), and information disclosure. Additional security mechanisms are provided through the use of White Box Cryptography to protect application business logic and source code. Application reacts to the attack by exiting upon detecting attacks to prevent further attempts.
If you choose to build an application in Protected mode, then setting the public and private keys is mandatory. To do so, go to Project Settings > Protected Mode. For more details on how to generate public and private keys, click here. - Test Mode - To help you identify and fix errors, Quantum Visualizer provides the ability to Test the application on the device or an emulator. When you build an app using the Test Mode, you can leverage the Jasmine testing framework of Quantum Visualizer to thoroughly test your app and ensure your application is errors free. You can run jasmine test cases, test suites and test plans by building an app using the Test mode.
- Once all the required settings are ready, click Build.
The progress of the Web App Publish is displayed in the Build tab of Visualizer.
Once the publish process is complete, a Web App URL appears on the Build tab. - Click on the generated URL to preview your Web app in the Live Preview mode.
The Visualizer Preview window appears. You can use this window to debug the application. - You can also click on Copy to copy the URL to your clipboard and view it in a web browser of your choice.

- Click on View Logs to access the logs of the publish process.
- An Application was deployed mail will also be sent to your registered e-mail account. This mail will contain the App details along with the App URL. Click on the URL in the mail to open the web app in your default web browser.
Enable Node Build for Responsive Web Apps
From the V9 ServicePack4 Fixpack 21, the build performance of Responsive Web Apps (that use the CSS Library mode) has been enhanced to use Node builds. With the introduction of Node builds, the time taken to build a Responsive Web App has reduced significantly.
Follow these steps to enable Node Builds for Responsive Web Apps:
- Navigate to the location of your project. For example,
<your workspace folder>/<appid>/. - Create a New Folder with the name custombuild (if it doesn’t already exist).
- In the custombuild folder, create a new file, spadw.properties.
-
In the spadw.properties file, add the following entry:
desktopwebNodeBuild=true - Save and close the file.
-
Build and Publish the project as usual.
Observe the time taken to build the app is less than half the time it used to take.
- Functional Modules
- Search Engine Optimization
- Minification of CSS files in Release Mode
Improve the Load Time for Micro App-based Web Apps
Prior to the V9 Service Pack 7 release, the assets (both static and dynamic) associated with web-based Micro Apps were packaged into a single file and pre-loaded when the app was launched. The process of pre-loading the assets increases the load time of the app.
From the V9 Service Pack 7 release, when you build a Responsive Web App that uses the Micro App architecture, Quantum Visualizer internally categorizes the assets, merges them, and loads them on an on-demand basis.
The assets associated with the app are categorized into the following two types:
- Static Assets: Components, Templates, Form Controllers, and other modules (including nested components and breakpoint data) that you can drag-and-drop onto a Form on the Visualizer Canvas are static assets. Static assets are available at design time.
- Dynamic Assets: Components, Templates, Form Controllers, and other modules that are created dynamically or changed at the data level constitute the dynamic assets. Dynamic assets are created or updated at runtime.
The Responsive Web Framework identifies the dependencies for each Form, and performs static analysis of the assets. The dependent static assets of each Form are then packaged into a file (moduleDependencies.json), which is invoked asynchronously when the app navigates to the Form.
If the project contains dynamic assets, developers must define them for each micro app in the dynamicRequireAssets.json file.
During the build process, Quantum Visualizer merges all the dynamic assets of the linked Micro Apps with the static assets, and loads them when the app navigates to the Form.
To enable the faster load process for Micro Apps on the Responsive Web Framework, follow these steps:
- Navigate to the location of your project. For example,
<your workspace folder>/<appid>/. - Open the projectproperties.json file, and add the following code snippet in the file:
"optimizeAssetLoading: true"
NOTE: The form-based loading of assets is only enabled when you specify the optimizeAssetLoading flag with the value as true.
If you do not specify the optimizeAssetLoading flag, or if you set the value of the flag as false, the assets are pre-loaded when the app is launched. - Save and close the file.
- In the project's root folder, create a new file, dynamicRequireAssets.json.
- In the dynamicRequireAssets.json file, define a list of the dynamic assets in the project.
NOTE: If the project does not contain dynamic assets, you do not need to create the dynamicRequireAssets.json file.
- Save and close the file.
-
Build and Publish the project as usual.
Observe that the time taken to load the assets is significantly less than before.
Here is a sample dynamicRequireAssets.json file for reference:
{
"forms": {
			"form1": [
				{
					"type": "cwc",	//component with contract
					"path" : "com.app1.wid1"
				},
				{
					"type" : "t", //template
					"path": "mainapp1.flxSampleRowTemplate" //id of the template
				},
				{
					"type" : "t", //template
					"path": "microapp1.flxSampleRowTemplate" //id of the template that resides in the child micro app
				},
				{
					"type": "cwoc",	//component with out contract
					"path" : "com.app1.wid2"
				},
				//Break point static data of the corresponding form
				{
					"type": "cwoc",	//component with out contract
					"path" : "com.app1.wid2"
				}
			],
			"appGrpup1" : {
				"appGropu2": {
					"form3": [], // form3 does not have any static templates or components
					"form4": [{
						"type": "cwoc",	//component with out contract
						"path" : "com.app1.wid2"
					}]
				},
				"form2": []
			}
		},
		"templates" :{
			// If any template has nested components, add only those entries
			"flx1" : [
				{
					"type": "cwoc",	//component with out contract
					"path" : "com.app1.wid2"
				},
				{
					"type": "cwoc",	//component with out contract
					"path" : "com.app1.wid3"
				},
			]
		}
	},}