
Public Key Pinning
SSL Pinning
SSL Pinning is the process of associating a host with their expected X509 certificate or a public key. Once a host's certificate or public key is known or identified, the certificate or public key is associated or 'pinned' to the host. This offers protection against certificate forgery.
You have to take the following decisions in the pinning process:
- What must be pinned: Either pin the certificate or pin the public key. Kony supports both Certificate pinning and Public Key pinning.
-
Which certificate/public key to pin against in the chain: The certificate/public key that you choose for pinning impacts the level of security that can be achieved, and this security level decreases as you navigate up the certificate chain from leaf to root certificate. You must pin either the leaf in chain or the intermediate CA. Typically, you should choose the organizational CA as the intermediate CA for pinning.
Public Key Pinning
Quantum has previously rolled out the Certificate Pinning feature. The drawback of Certificate Pinning is that when the server rotates its certificate on a regular basis, you would need to update the application regularly as well.
The Public Key Pinning feature addresses the downside of certificate pinning. By using key pinning, you can avoid frequent application updates as the pubic key can remain same for longer periods.
So if you want to minimize your maintenance efforts and still want a secure communication through your application, then leveraging the HTTP Public Key Pinning feature is the best solution.
NOTE: For Android, you can alternatively achieve Public Key Pinning by using Android Network Security Configuration for API level 24 and later. To learn more about the differences between the Kony Public Key Pinning and Android Network Security Configuration features, click here.
Enable Public Key Pinning
To enable the Public Key Pinning feature for a Quantum Visualizer Application, follow these steps:
-
In your Quantum Visualizer project, from the Project Explorer, click Project Setings. The Project Settings window appears.
- Click the Native tab. A horizontal list of sub-tabs appears under Native.
- Follow these steps for the required platform:
- For Android: Go to Android > Mobile/Tablet. From the Network Trust Config drop-down list, select Allow Pinned.
If the Allow Pinned option is not available in Visualizer, you can manually specify the networktrustconfig property in the androidbuild.properties file. - For iOS: In infoplist_configuration.json file, add the entry { "KonyHTTPPublicKeyPinning" = true }. For more information on how to configure custom key value pairs in iOS platform, click here.
- For Android: Go to Android > Mobile/Tablet. From the Network Trust Config drop-down list, select Allow Pinned.
In addition, you must provide the <workspace>/<platform-specific-path-to-certs>/public_keys.json file. This file contains all the information on the domain versus the pins configuration (the JSON format is explained in the next section).
Path of public_keys.json file in different Platforms and Channels
In iOS
- For iPhone: <workspace>/<app>/resources/mobile/native/iphone/certs/public_keys.json
-
For iPad: <workspace>/<app>/resources/tablet/native/ipad/certs/public_keys.json
In Android
- For mobile: <workspace>/<app>/resources/mobile/native/android/assets/certs/
-
For tablet: <workspace>/<app>/resources/tablet/native/androidtab/assets/certs/
Format of the JSON File for the Public Keys (certs/public_keys.json)
{
    "domain-expression1": [
        "sha256-pin1",
        "backup-sha256-pin2",
        // ...
    ],

    "domain-expression2": [
        "sha256-pin3",
        "backup-sha256-pin4",
        // ...
    ],
    // ...
}
Domain Name (Expression) Rules
The rules for the domain names/expressions in the public_keys.json file are as follows:
- Wildcard patterns are permitted in hostnames (domain name expressions). The wildcard pattern rules are as follows:
- * is only permitted in the left-most domain name label and must be the only character in the hostname label.
For instance, *.kony.com is permitted. But, *a.kony.com, a*.kony.com, a*b.kony.com, and a.*.kony.com are not permitted. - * cannot match across domain name labels.
For example, *.kony.com matches manage.kony.com, but it does not match sub.manage.kony.com.
- * is only permitted in the left-most domain name label and must be the only character in the hostname label.
- If the hostname is pinned directly as well as via wildcard pattern, both direct and wildcard pins are used for pin validation.
For example, if *.kony.com is pinned with pin1 and manage.kony.com is pinned with pin2 to check *.manage.kony.com: both pin1 and pin2 are used.
Example
{
    "*.kony.com": [
        "rSV28bZT885DlLB9/wTzyMuYG+VdA0OlRjjzC72rxno=",
        "JSMzqOOrtyOT1kmau6zKhgT676hGgczD5VMdRMyJZFA="
    ],

    "manage.kony.com": [
        "HA8d0iApa5nQhToDQIcwYQmDYi1rd07MLck8Px4+31B=",
        "JSMzqOOrtyOT1kmau6zKhgT676hGgczD5VMdRMyJZFA="
    ],

    "*.amazon.in": [
        "VkvE/TdvozXh8Frp01wrxI0nh63JIE7FKRt2EQ+Phew="
    ]
}
Remarks
-
The Public Key Pinning feature is supported on iOS, Android, and Windows 10 tablet and Windows 10 mobile.
-
The Public Key Pinning feature is applicable for kony.net APIs, and is not applicable for the kony.ui.Browser widget.
- It is recommended to specify at least one backup pin along with the valid leaf certificate pin. You must not choose the backup pin from the current certificate chain of the host, that is being pinned. You should always choose a pin that is not yet deployed on the server as a backup pin.
-
Public Key Pinning does not work in case of self-signed certificates.
-
For Android, while using Public Key Pinning, you must set the minimum SDK version as 17 or later.
-
From V8 SP4 onwards, the Allow Self Signed/ Untrusted Certs option has been renamed as Network Trust Config.
-
The public_keys.json file specifies a white list of domains and their pins. Consequently, the kony.net network calls made to any other domain that is not listed in the public_keys.json file will fail.
Generate SPKI Pin Hash
To generate the SPKI Pin Hash from the certificate, follow one of these procedures:
Generate by using the KonySSLPinningTool.jar Tool
Follow these steps to use the KonySSLPinningTool.jar file and generate SPKI hashes:
- Download the zipped KonySSLPinningTool Jar file to your local system, and then unzip it.
NOTE: You must run the KonySSLPinningTool.jar file with Java 8 or later.
-
Run the following command to generate SPKI Pins Hashes for the entire certificate chain from leaf to root:
java -jar KonySSLPinningTool.jar --cert_format DER --ssl_host HOST_NAME --ssl_port PORT
here, HOST_NAME: The host name of your server.
PORT: HTTPS port on which your server is listening. It defaults to 443, if --ssl_port option is not specified.
This command prints the SPKI hashes on the console and saves them to a file.
You can get additional information on the supported command line arguments by using this command: java -jar KonySSLPinningTool.jar –help
Retrieve Certificate and Generate SPKI Pin Hash from the Certificate
Follow these steps to retrieve the certificate by using either the openssl command or by using any web browser.
- Use the following openssl command to get the leaf certificate for a site.
openssl s_client -servername <HOST_NAME> -showcerts -connect < HOST_NAME >:<PORT> </dev/null 2>/dev/null|openssl x509 -outform PEM >mycertfile.pem
where, HOST_NAME: The host name of your server.
PORT: HTTPS port on which your server is listening. The port number is usually 443, unless configured differently.
NOTE: This command may return a different certificate when the server supports Server Name Indication (SNI).
So while using with servers that support SNI, you must ensure that the openssl version is 1.1.1a or 1.0.2q or later, which has SNI extension enabled by default, or alternatively, use Browser to fetch certificates.
NOTE: You can verify the Open SSL version by using the following command: openssl version
- Alternatively, you can retrieve the certificates by using browser by opening any HTTPS URL of the required domain in your web browser and export the certificate (leaf or any intermediate) by inspecting the certificates fetched from the HTTPS connection. Note that the certificate-exporting procedure may vary from browser to browser and from version to version of the same browser. You can consult the respective browser usage guides for the relevant procedure.
- Use the following command to generate the SPKI Pin hash from the certificate:
openssl x509 -in mycertfile.pem -pubkey -noout | openssl pkey -pubin -outform der | openssl dgst -sha256 -binary | openssl enc -base64
Android Network Security Configuration
As a security improvement , apps that target Android 7.0 (API level 24 and later) and later will no longer trust user-installed certificates on devices with Android 7.0 and later.
From Android 7.0 devices and later, Android has offered a way to customize app behavior for all secure HTTPS communications that originate out of the application (including the WebView/Browser widget network calls) without touching the application code. This is achieved by using a Network Security Configuration that is defined as an xml resource (network_security_config.xml file) in the application.
This xml file helps you to customize the following features in the application:
- Certificate Pinning: Helps you to specify which certificates are to be trusted for all secure connections that originate out of the application. Typical examples of certificates pinned include self-signed certificates or a restricted set of organizational and public CAs.
-
Public Key Pinning: Lets an application limit which server keys are to be trusted for secure connections.
- Debug-only Overrides: Helps you to do a different trust configuration for only debug builds.
- Clear Text Traffic Opt-out: Helps the application to restrict any HTTP communication or clear text traffic that originates out of the application.
NOTE: For the apps that target Android 9 PIE or later (API level 28 or later), all HTTP communications are disabled by default.
For more information on the usage of the Android Network Security Configuration feature, refer the following links:
-
https://developer.android.com/training/articles/security-config
-
https://developer.android.com/about/versions/nougat/android-7.0#network_security_config
Add Android Network Security Configuration
If you want to add support for the Network Security Configuration feature to your existing Kony Andorid project, follow these steps:
NOTE: This feature works only for devices with Android API level 24 and later.
- In Quantum Visualizer, go to Project Settings > Native >Android >Tags >Application Tag Attributes.
-
Add the following application tag entry in the app’s Manifest file:
android:networkSecurityConfig="@xml/network_security_config"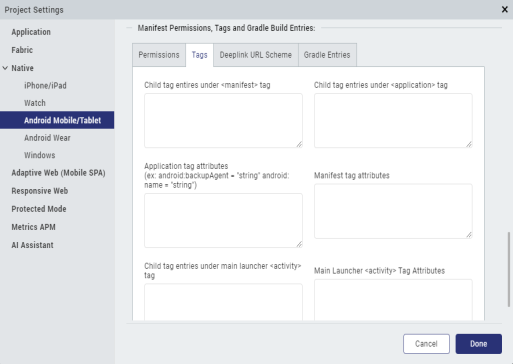
-
Add the network_security_config.xml file in the following path, as appropriate:
- For mobile: <vizproject>/<app>/resources/mobile/native/android/xml/network_security_config.xml
- For tablet: <vizproject>/<app>/resources/tablet/native/android/xml/network_security_config.xml
Kony Public Key Pinning vs. Android Network Security Configuration
The following table illustrates the differences between Kony HTTP Public Key Pinning and Android Network Security Config.
| Difference Aspect | Kony Public Key Pinning | Android Network Security Configuration |
| Support Scope | kony.net.* JS APIs | Entire application including kony.net.* , FFI network calls, and WebViews (including Kony Browser widget) |
| Hosts Allowed | Network calls to non-pinned hosts fail by default, which is in line with the certificate pinning feature and the pinned hosts are allowed after the pin is successfully validated | Network calls to non-pinned hosts are also allowed |
| Can Certificate Pinning and Public Key Pinning be applied at the same time? | Mutually Exclusive | Both can be configured simultaneously |
| Precedence when both features are configured | Respected after Android Network Security Configuration (if already configured) rules are applied | Takes first precedence. |
| Pin Generation Mechanism | SPKI (Subject Public Key Info) | SPKI (Subject Public Key Info) |
| Supported Andorid Versions | 17 and later (Android 4.2.x) | 24 and later (Android 7) |
| Supported Kony Versions | V8 SP4 onwards | Applicable in any Kony version |