
Generating Third-party Native Bindings
Temenos Quantum provides a tool to generate third-party native bindings for the iOS and Android platforms, using which you can generate frameworks that you can import into Quantum Visualizer to consume in your application. To download and access the NFI Generation Tool, contact Temenos Support.
Generating iOS Third-party Native Binding Package
To generate the NFIs, contact the Temenos Support team to download and access the NFI Generation Tool.
By using the NFI Generation Tool on the iOS platform, you can generate JavaScript bindings for a third-party framework by configuring a few parameters and building the Native bindings.
The details of the third-party native bindings are added in the config.plist file that is part of the NFI Generation Tool.
The generated bindings output is an archive file which you can either add or import into Quantum Visualizer through the Manage Native Function APIs section in the Edit menu.
NOTE: All the steps mentioned here are to be performed on a Mac system.
Pre-requisites
- A third-party framework
- NFI Generation Tool from Quantum
The process of generating native bindings and using them in a Visualizer project includes the following three stages.
Stage 1: Generate the Third-party Framework
Based on the Xcode version that you are using to build the NFIs, you can generate the third-party framework files by using any of the following methods:
- For Xcode 13, and earlier versions - Generate .framework Files
- For Xcode 14, and later versions - Generate .xcframework Files
IMPORTANT: If you already have an existing third-party framework, you can skip this step and go to the next step, Modifying the config.plist.
Generate .framework Files
Follow these steps to generate the .framework files for the Third-party Native framework:
- Open your project in XCode.
Ensure that the project is ready for the build. - Open the header file of the project.
For example,logger.h. - On the extreme right-hand side, ensure that the Target Membership of the header in the project is set as Public.
- In XCode, build your framework for the Generic iOS Device.
- If you want to verify the third-party framework on a simulator, build your framework again for the specific simulator that you want to use for testing.
Now, you must bind the two different outputs into one file. - Open the terminal., and type the following command:
lipo -create - In the finder, open the folder where the build files are available for the iPhone simulator.
For example, the Release-iphonesimulator > YourProject.framework folder.NOTE: You can also find this path in the Settings > Locations > Derived Data section of the Xcode project.
- Drag and drop the executable file with the project name into the terminal.
/Users/username/Library/Developer/XCode/DerivedData/projectname/Build/Products/Release-iphonesimulator/projectname.framework/Projectname - In the finder, navigate to the folder where the build files are available for the iPhone OS.
This time from the Release-iphoneos>YourProject.framework folder. - Drag and drop the executable file with the project name into the terminal.
/Users/username/Library/Developer/XCode/DerivedData/projectname/Build/Products/Release-iphoneos/projectname.framework/Projectname - Type – output after the text.
- In the finder, navigate to the folder where the build files are available.
For example, the Release-iphoneos>YourProject.framework folder. - Drag and drop the executable file with the project name into the terminal.
/Users/username/Library/Developer/XCode/DerivedData/projectname/Build/Products/Release-iphoneos/projectname.framework/Projectname - The final command before it is executed appears as follows:
lipo -create
 /Users/username/Library/Developer/XCode/DerivedData/projectname/Build/Products/Release-iphonesimulator/projectname.framework/Projectname
 /Users/username/Library/Developer/XCode/DerivedData/projectname/Build/Products/Release-iphoneos/projectname.framework/Projectname   -output /Users/username/Library/Developer/XCode/DerivedData/projectname/Build/Products/Release-iphoneos/projectname.framework/Projectname
When you execute the command, the two different outputs are combined into one output that contains all the required architectures to view the app on iOS devices and iOS simulators.
- Copy the .framework folder of the project, and paste it at any location of your MAC system.
Generate .xcFramework Files
Follow these steps to generate the .xcFramework files for the Third-party Native framework:
- Open your project in XCode.
Ensure that the project is ready for the build. - Open the header file of the project.
For example, logger.h. - On the extreme right-hand side, ensure that the Target Membership of the header in the project is set as Public.
- In XCode, build your framework for the Generic iOS Device.
- If you want to verify the third-party framework on a simulator, build your framework again for the specific simulator you want to use for testing.
Now, you must generate the .xcframework output by providing the path of the input folder. - Open the terminal, and type the following command:
xcodebuild -create-xcframework - In the finder, open the folder where the build files are available for the iPhone simulator.
For example, the Release-iphonesimulator > YourProject.framework folder.NOTE: You can also find this path in the Settings > Locations > Derived Data section of the Xcode project.
- Drag and drop the framework file with the project name into the terminal.
/Users/username/Library/Developer/XCode/DerivedData/projectname/Build/Products/Release-iphonesimulator/projectname.framework - In the finder, navigate to the folder where the build files are available for the iPhone OS.
This time from the Release-iphoneos>YourProject.framework folder. - Drag and drop the framework file with the project name into the terminal.
/Users/username/Library/Developer/XCode/DerivedData/projectname/Build/Products/Release-iphoneos/projectname.framework - The final command before it is executed appears as follows:
xcodebuild -create-xcframework
 -framework /Users/username/Library/Developer/XCode/DerivedData/projectname/Build/Products/Release-iphonesimulator/projectname.framework
 -framework /Users/username/Library/Developer/XCode/DerivedData/projectname/Build/Products/Release-iphoneos/projectname.framework
 -output path/projectname.xcframework
When you execute the command, the two folders that contain individual bindings for the iOS device and the iOS simulator are available under a single .xcframework folder.
- Copy the .xcframework folder of the project, and paste it at any location of your MAC system.
Stage 2: Modify the config.plist
The config.plist file is an artefact that is part of the Scripts folder of the NFI Generation Tool.
The config.plist file contains several parameters. For information on the parameters and what they do, click here.
Follow these steps to modify the config.plist file:
- In the downloaded NFI Generation tool, navigate to the Scripts folder.
For example,. ../nativebindings/iOS/nativebinding/scripts. - Open the terminal in the folder.
You can use the Options + Right-click shortcut to open the Terminal. - Type the
open config.plistcommand.
The config.plist file opens. - In the config.plist file, under the ThirdPartyBuildFrameworks key, copy and paste an existing framework configuration, and rename it.
For example, you can set the name of the framework ascustomlogger.In the Framework that you create, configure the following keys:
Under the ThirdPartyBuildHeaders key, remove any existing entries and create new entries for all the header files in the project.
For example, if you have only one header file, for the item0, enter the value Logger.h.Under the ThirdPartyBuildHeaderCommonPath key, provide the path of the header file.
For example, if your framework is CustomLogger.framework, then your folder structure would appear as follows:- For .framework:
 CustomLogger.framework
(for example, Users/username/Documents/Customerlogger /CustomLogger.framework/Headers) - For .xcframework:
CustomLogger.framework
(for example, Users/username/Documents/Customerlogger /CustomLogger.xcframework/DeviceorSimulatorFolder/CustomerLogger.framework/Headers)
- For .framework:
Under the ThirdPartyRootDir key, provide the path that contains the framework.
For example, if your framework is CustomLogger.framework, then your folder structure would appear as follows.- For .framework:
CustomLogger.framework
(for example, Users/username/Documents/Customerlogger /CustomLogger.framework) - For .xcframework:
CustomLogger.framework
(for example, Users/username/Documents/Customerlogger/CustomLogger.xcframework)
- For .framework:
- Modify the value of the Enabled key to Yes.
When you set the value as Yes, the framework is included in the build process.
If you set the value as No, the framework is not added in the build process. - Save the config.plist file, and close it.
Generate Native Bindings for Supported Architectures in System Frameworks
Support for the SupportedArchs key has been added in the Config.plist file to generate native bindings for system frameworks.
The SupportedArchs key is a dictionary that contains the details of the architectures used for the device and the simulator.
NOTE: From the Xcode 14 release, support for the i386 simulator architecture, and the armv7 and armv7s device architectures is deprecated .
The native bindings can be generated for the following types of architectures:
To generate the native bindings for the root-level architecture, add the SupportedArchs key at the root-level in the “Config.plist” file as follows:
Through Xcode:
Through Code: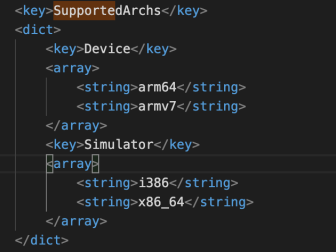
Third-Party Framework-Level Architecture
To generate the native bindings for the third-party framework-level architecture, add the SupportedArchs key at the framework-level in the “Config.plist” file as follows:
Through Xcode:
Through Code:
The generation of native bindings for a device or simulator varies as follows based on the architectures defined:
- If you only define the root-level architectures, the native bindings will only support root-level architectures.
- If you define the root-level architectures and the framework-level architectures, the native bindings will support the framework-level architectures.
- If you only define the framework-level architectures, the application will not run.
NOTE: If you define the framework-level architectures for a device and do not define the simulator architectures, the native bindings will not be generated for the simulator.
Generate Outputs for NFI Frameworks
Support for the Mode key has been added in the Config.plist file to generate NFI outputs based on the provided input mode. The Mode key can be used at the root-level or at the third-party level in the Config.plist file. The possible input values for the Mode key are as follows:
- FWKS: For .framework NFI Outputs
- XCFWKS: For .xcframework NFI Outputs
NOTE: The default value for the Mode key is XCFWKS
Here is a sample implementation of the Mode key in the Config.plist file:
<key>Mode</key>
<string>XCFWKS</string>
To generate the native bindings for the System Frameworks, you can use the following commands:
-
Generate native bindings in the output for all the System Frameworks:
python build_native
-
Generate native bindings in the output for the Foundation Framework:
python build_native -fw Foundation
-
Generate native bindings in the output for the Foundation and UIKit Frameworks:
python build_native -fw Foundation,UIKit
NOTE: To generate bindings for multiple frameworks, provide comma-separated values as the input.
Limitations
- While generating native bindings for a framework, ensure that you provide all the headers for which the NFI must be generated.
Support to provide the default framework header that contains all the public headers is not available. - Support for C pointers is not available. This is a native limitation.
- Swift libraries are not supported. You can wrap Objective C wrappers over swift library APIs as a workaround.
- Caching of the NFI is enabled so as to avoid rebuilding for each .KAR extraction. If the third party NFI is regenerated, execute the option
--cleanJSLibs to ignore caching. - Modern objective types may not work as desired. For example, NS_ENUM.
- While using PassKit, you will not receive the following callback of PKAddPaymentPassViewControllerDelegate protocol. This is a native issue.
- (void) addPaymentPassViewController: (PKAddPaymentPassViewController * ) controller generateRequestWithCertificateChain: (NSArray < NSData * >*) certificates nonce: (NSData * ) nonce nonceSignature: (NSData * ) nonceSignature completionHandler: (void( ^ )(PKAddPaymentPassRequest * request)) handler;
Cache Dependent Frameworks during NFI Generation
While generating NFIs that use dependent frameworks, if you have to make multiple updates in the NFIs, the time taken for each build is high as the dependent frameworks are also packaged for each build.
To improve the build time, the NFI tool has been updated to support caching of the dependent frameworks. When you enable caching in the NFI tool, the framework dependencies are stored in the cache during the first build and used in consequent builds.
Support for the EnableCache, ClearCache, and FwksNotToCache keys has been added in the Config.plist file to implement caching during NFI generation.
Configure the EnableCache key to implement caching for the dependent frameworks in the NFI generation during the first build. Each subsequent build will then use the cached data to package the dependent frameworks in the NFI.
Use the FwksNotToCache key to specify the list of frameworks that must not be part of the cached data. If you do not specify this key in the config.plist file, all the dependent Frameworks are cached by the NFI tool.
Configure the ClearCache key to delete the data stored in the cache.
Ensure that you add the keys in the following format in the config.plist file:
- If any of the build processes fail, the dependent frameworks will not be stored in the cache.
- If you stop or interrupt a build in progress, ensure that you clear the cache or delete the specific dependent framework (that was interrupted) from the cache.
- Ensure that you do not share the cache folder across systems as sharing the cache may cause inconsistencies in the versions of the dependent frameworks.
Config.plist Parameters
- SDK_DIR: iPhoneOS SDK path.
Run the following command to find the SDK path:xcrun --sdk iphoneos --show-sdk-path - SDK_VERSION: The iOS SDK Version in Xcode, using which the bindings are generated.
- TARGET_VERSION: The Minimum Deployment Target.
- ThirdPartyBuildFrameworks: A set of configurations for third party frameworks, for which the JS bindings need to be generated.
NOTE: The lipo -create command fails when both the device and simulator use the arm64 slice architecture.
If the simulator has arm64 architecture support, you must provide XCFWKS as the input.
Stage 3: Generate the Native Bindings
IMPORTANT: If you are creating the framework for the first-time, open the terminal in the Scripts folder of the NFI tool, and enter the ./install.sh command to install the GYP tool.
To generate the native bindings, do the following:
- Open the terminal and execute the
Python3 build_tp.pyccommand.
When executed, the script starts the build process, and generates the bindings for the framework.
If you have multiple frameworks, and do not want all the frameworks to be generated, exclude the frameworks that you do not want to build by adding the frameworks to the BindingsIgnoreList under the Root. - The generated framework is available at the iOS > nativebindings > products path.
You can use this file to import into Visualizer. For information on how to import the file into Visualizer, click here.
NOTE: As MacOS versions 12.3 (and later) use Python 3 as the default language, ensure that you use the upgraded NFI Generation Tool that supports Python 3.9.6.
Generating Android Third-party Native Bindings
Using this tool, you can generate an NFI bindings archive file and also generate documentation for the framework. If you want to generate documentation, you must provide the source file in the tool.
NOTE: Providing the source files location (for -sp) and list of packages (in the whitelist.txt) is mandatory to generate Intellisence and documentation.
- Once you import the archive file into Quantum Visualizer using the Import feature, the following tasks are taken care of automatically.
- The .jar and .aar files copy into the project. The path might be as below,
<Kony Visualizer Workspace>/<Project Folder>/resources/customlibs/libs/android/ - The library will be supported in Intellisense while writing the code. For Intellisense to work, you must provide the source file to the tool.
- If you do not need the Intellisence and documentation, then you can copy the .aar or .jar libraries generated in the following path of the Kony project and start writing the NFI code without generating the bindings.
<Kony Visualizer Workspace>/<Project Folder>/resources/customlibs/libs/android/
Before you get started, ensure that you have the following:
- Third-party native bindings generation tool from Temenos
- Python installed on your system
- Ant installed on your system
- Ensure that you configure Environment Variables for JAVA_HOME, ANT_HOME.
- Ensure that in Environment Variables, you configure the PATH with the installation folder for Python.
Keep the jar/aar libraries ready for which you want to write NFI code. You can generate these jar/aar files using any IDE.
The .aar file will help in binding the other resources that are required in the project for the native framework to run correctly.
- Navigate the MKModule folder in the tool you downloaded from Temenos.
../nativeframeworks/android/mkmodule - Open whitelist.txt file.
This file should contain the list of packages in the library of which you want to generate documentation and Intellisence. - In the file, remove all other entries and add the src file path in it. Retain the path after src till your module name.
For example, if the src path was NFI\src\com\example\nfilibrary, where Example is the Android project name, and NFILibrary is the module name, retain the path \com\example\nfilibrary - Replace the slash with .(period), for example, com.example.nfilibrary.
- Save the whitelist text file and close it.
- Open the build.xml with a text editor.
- For the key <target name="run-docgen">, make the following entry for <ar line =
<arg line='/c "python mkmodule.py -mn "Test" -mv "1.1" -md "Test" -av "4.0" -wl whitelist.txt –sp “D:\TestProject\src” -tp "D:\ TestProject \build\JARlibrary.jar""' />
The command contains eight parts. For information on the command options, click here. - Make the required changes to the build.xml file and close it.
- Navigate the MKModule folder in the tool you downloaded from Temenos.
For example,.../nativeframeworks/android/mkmodule - In the File Explorer in the file path, type CMD.
The Command prompt opens. - Execute the command ant -f build.xml.
- The native bindings will be generated, and the module can be found in the path
.../nativeframeworks/android/mkmodule/dist
You will find both unzipped and zipped files in the folder. The generated documentation is available in the dist/documentation folder for the packages you have given in whitelist.txt file. - Open Visualizer, using the Import a third-party library feature, import the .zip file into the project and use the classes as required.
Command Options
The following table explains each one of the commands that are used in this code.
| Command option | Name | Description |
|---|---|---|
| -mn | Module name | Name of self-sufficient module. This is the name by which the bindings are generated. |
| -mv | Module version | Version of self-sufficient module |
| -md | Module description | Description of self-sufficient module |
| -sp | Source files location | Absolute path source files |
| -tp | Third-party sources | Third-party library location |
| -tpd | Directory of the Third-party sources | Location of the third-party directory |