
Load Testing Kony Fabric Sync Services with Apache JMeter
This section explains the steps required to record Kony Fabric Sync service calls with Apache JMeter. If you are new to JMeter, create a test plan by recording Kony Fabric Sync service calls with JMeter using Android emulator.
Download and install JMeter from http://jmeter.apache.org/download_jmeter.cgi
Prerequisite
- Kony Fabric Sync Server
- Kony Fabric Sync Application must be synched with data resources to get data.
Note: This document does not explain how to use JMeter in detail. For more information on using JMeter, refer to http://jmeter.apache.org/usermanual/
Make sure Kony Fabric Sync Server is running and the Kony Fabric Sync application is reset.
To perform load testing on Kony Fabric Sync Service calls, do the following:
- Build a basic test plan in JMeter
- Navigate to JMETER_HOME/bin.
- Launch jmeter.bat. JMeter window appears.
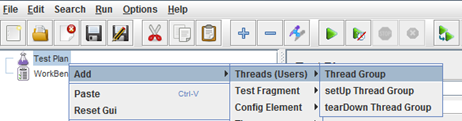
- Right-click on Test Plan and then select Add > Threads (Users) > Thread Group. Thread group is added to test plan.
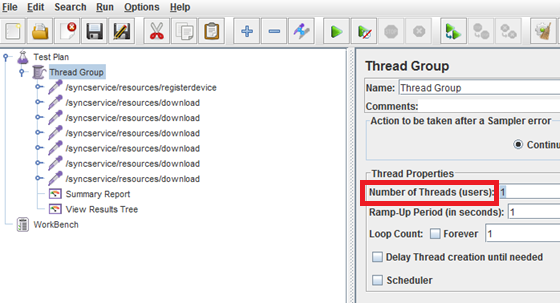
- Click Thread Group. Thread group window appears.
- Under Thread Properties, enter the number of threads or users you want to view.
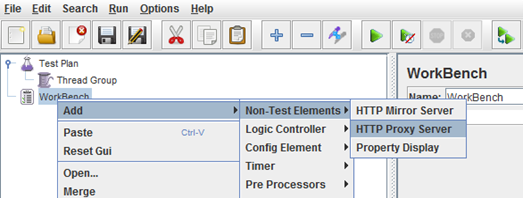
- Add a HTTP Proxy Server.
- In JMeter, right-click on WorkBench and then select Add > Non-Test elements > HTTP Proxy Server. HTTP proxy server is added to WorkBench.
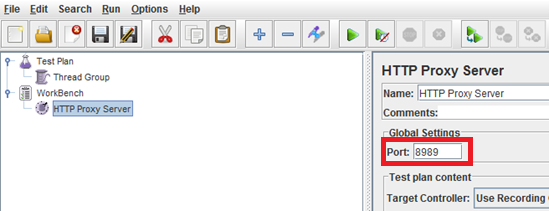
- Click HTTP Proxy Server. HTTP Proxy Server details appear.
- Under Global Settings, enter Port number.
- In JMeter, right-click on WorkBench and then select Add > Non-Test elements > HTTP Proxy Server. HTTP proxy server is added to WorkBench.
- Set up Android emulator.
- From Kony Visualizer, launch Android emulator.
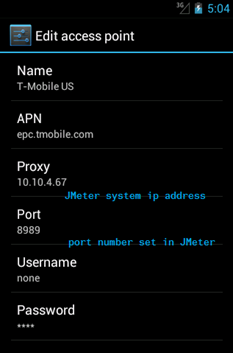
- Navigate to Settings > Wireless & Networks > Mobile Networks > Access Point Names.
- Select default access point name, T-Mobile US.
- In the T-Mobile US proxy, edit the following.
- Proxy: Set the IP address of the system where JMeter is running.
- Port: Enter the port number specified in JMeter.
- Launch Kony Fabric Sync application in the Android emulator and start the Kony Fabric Sync application.
- In JMeter, click Start to start load test.
Recording Kony Fabric Sync Requests of a Windows 7 Desktop Application with JMeter
To record Kony Fabric Sync requests of a Windows 7 desktop application with JMeter, follow these steps:
- In your Internet Explorer, from the Tools menu, click Internet Options. The Internet Options window appears.
- Click on Connections tab.
The Connections tab details appear. - Click LAN Settings
The Local Area Network settings window appears. - Under Proxy Server, select Use a proxy server for LAN.
- Click Advanced.
The Proxy Settings window appears. - Enter the following details
- HTTP: Enter HTTP server details.
- Port: Enter port number.
-
Navigate to JMETER_HOME/bin.
- Launch jmeter.bat. JMeter window appears.
- Right click on Test Plan and then select Add > Threads (Users) > Thread Group. Thread group is added to test plan.
-
In JMeter, right-click on WorkBench and then select Add > Non-Test elements > HTTP Proxy Server. HTTP proxy server is added to WorkBench.
- Click HTTP Proxy Server. HTTP Proxy Server details appear.
- Under Global Settings, enter Port number. This is the same number you have provided in your Internet Explorer proxy settings.
- In JMeter, click Start to start load test.
Note: To compare the load test results, refer to Monitor and Tune Kony Fabric Sync Server Performancesection in Server Planning Guide on Kony Documentation Library.
| Copyright © 2013 Kony, Inc. All rights reserved. |