
Upgrading Tomcat Manually from 7.0.x to 7.1.x
Kony MobileFabric Sync Framework is a comprehensive synchronization platform that enables developers to add synchronization capabilities to mobile applications. This topic talks about manually upgrading Kony MobileFabric Sync Framework on Tomcat server from 7.0.x to 7.1.x without an installer.
How to Upgrade Kony MobileFabric Sync
The manual upgrade of Kony MobileFabric Sync includes the following steps:
- Downloading the Required Files
- Upgrade MobileFabric Sync Console Database
- Upgrade Property Files
- Upgrade WAR Files
- Verifying the MobileFabric Sync Version
Note: You must stop the Tomcat server before you start upgrading Kony MobileFabric Sync.
Download the Required Files
If you are required to install/upgrade MobileFabric manually due to your business polices, please contact productsupport@kony.com for approval and to obtain access to the MobileFabric manual install artefacts.
Important: Manual installs not approved by Kony will not be supported.
Upgrade the MobileFabric Sync Console Database
- Extract the
syncconsole-<database name>zip file. For information on Downloading DB_scripts, refer section Download the Required Files. - The extracted folder contains the upgrade scripts for the respective databases used.
Executing Upgrade Script Files
If you are upgrading Sync Server from its current version to newer version, execute all available upgrade scripts between two versions in ascending order.The extracted upgrade scripts will be used to update the sync console schema from 7.0.x GA to 7.1.0.x GA. They are to be run using flyway software. For updating the extracted scripts, follow these steps:
- Download the flyway software from http://flywaydb.org/getstarted/download.html
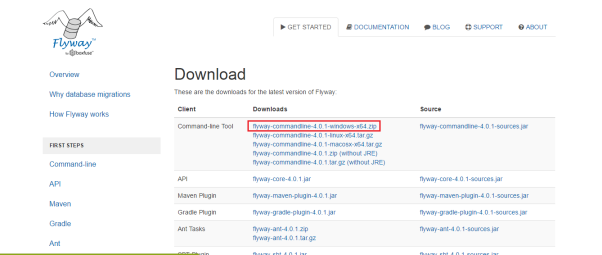
- Extract the flyway folder (flyway-commandline-4.0.1-windows-x64.zip) to find flyway-4.0.1<any-available-version>.
-
Copy the scripts from sync-7.0.x\sync\syncconsole-<database name> to flyway-4.0.1/sql folder.
-
Set the following properties in flyway configuration file flyway.conf under flyway-4.0.1/conf.
- Set the below properties based on the syncconsole db machine.
flyway.url= flyway.user= flyway.password= flyway.schemas= flyway syntax: MSSQL flyway.url=jdbc:sqlserver://<host>;databaseName=<database name> flyway.user=<user name> flyway.password=<password> If you don’t specify schema name, by default DBO will be considered as schema name. MYSQL flyway.url=jdbc:mysql://<host>:<port> flyway.user=<user name> flyway.password=<password> flyway.schemas=<schemaName> Oracle flyway.url=jdbc:oracle:thin<host>:<port>/<service> flyway.user=<user name> flyway.password=<password> flyway.schemas=<schemaName> DB2 flyway.url=jdbc:db2://<host>:<port>/<DatabaseName> flyway.user=<user name> flyway.password=<password> flyway.schemas=<schemaName> -
We have to set the 7.0.0 schema as baseline for flyway. To do that set the below flyway properties:
flyway.baselineVersion=7.0.0
flyway.baselineDescription=V7_0_0__syncconsole-<database name>.sql
flywaybaselineOnMigrate=true
- Set the placeholder value for SYNC_LOG_LOCATION (With this, you will be able to generate the logs at specified location).
flyway.placeholders.KONY_SYNC_LOG_LOCATION=<Your Log Location> - Set the placeholder value for SYNC_LOG_OPTION. It can have two values.
- logfile - logs will be stored into files.
- database - logs be stored into database
flyway.placeholders.KONY_SYNC_LOG_OPTION=<Your LogOption>
- Set the below properties based on the syncconsole db machine.
-
Open command prompt under flyway folder flyway-4.0.1 and run the below commands:
- flyway baseline

- flyway migrate
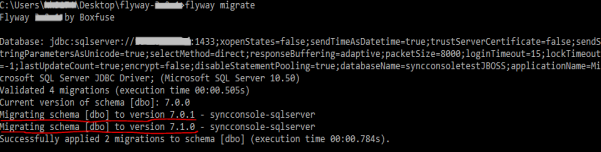
- flyway baseline
Creating a Table space
- If you are using DB2 as syncconsole database then you need to create a tablespace before running the 7.1.0 script.
- Create the Big tablespace with big bufferpool of 32K page size. Only DB2 database administrator (DBA) or equivalent DB user will have access to create database with default tablespace with particular pagesize/bufferpool. In DB2, whenever Binary Large Object (BLOB) and Character Large Object (CLOB) are used, you need to have the database created with default tablespace as well as default temp tablespace with big pagesize of 32k.
- To create a LOB tablespace
CREATE LARGE TABLESPACE <LOB_Tablespace_Name> IN DATABASE
PARTITION GROUP IBMDEFAULTGROUP
PAGESIZE 32K MANAGED BY AUTOMATIC STORAGE EXTENTSIZE 32
PREFETCHSIZE AUTOMATIC
BUFFERPOOL BIGBUFFERPOOL  OVERHEAD 7.5 TRANSFERRATE 0.06
AUTORESIZE YES
INITIALSIZE 32M NO FILE SYSTEM CACHING;
COMMIT;
CREATE SYSTEM TEMPORARY TABLESPACE "BIGTEMP"  IN DATABASE
PARTITION GROUP IBMTEMPGROUP
PAGESIZE 32K  MANAGED BY AUTOMATIC STORAGE  USING STOGROUP
IBMSTOGROUP  EXTENTSIZE 1M
PREFETCHSIZE AUTOMATIC BUFFERPOOL BIGBUFFERPOOL;
COMMIT;
CONNECT RESET;
- To create an index tablespace
CREATE LARGE TABLESPACE <Index_Tablespace_Name> IN DATABASE
PARTITION GROUP IBMDEFAULTGROUP
PAGESIZE 32K MANAGED BY AUTOMATIC STORAGE EXTENTSIZE 32
PREFETCHSIZE AUTOMATIC
BUFFERPOOL BIGBUFFERPOOL  OVERHEAD 7.5 TRANSFERRATE 0.06
AUTORESIZE YES
INITIALSIZE 32M NO FILE SYSTEM CACHING;
COMMIT;
To create a tablespace for tables and Data
CREATE LARGE TABLESPACE <Data_Tablespace_Name> IN DATABASE PARTITION GROUP
IBMDEFAULTGROUP
PAGESIZE 32K MANAGED BY AUTOMATIC STORAGE EXTENTSIZE 32
PREFETCHSIZE AUTOMATIC
BUFFERPOOL BIGBUFFERPOOL  OVERHEAD 7.5 TRANSFERRATE 0.06 AUTORESIZE YES
INITIALSIZE 32M NO FILE SYSTEM CACHING;
COMMIT;
- Replace <Database_name> with your actual database name.
CONNECT TO <Database_name>;
CREATE BUFFERPOOL BIGBUFFERPOOL IMMEDIATE ALL DBPARTITIONNUMS
SIZE AUTOMATIC NUMBLOCKPAGES 100 BLOCKSIZE 100 PAGESIZE 32K;
COMMIT;
- If you are using ORACLE as syncconsole database, follow the below steps:
- Create the following three tablespaces. These tablespaces will be used to move already created MF database objects which were placed in default USERS tablespace
- Tables and data tablespace: MF_DATA
- Index tablespace: MF_INDEX
- Lob tablespace: MF_LOB_DATA
You can create these 3 tablespaces in the following way:
- Using an SQLPlus or another Database client, connect to you Oracle database as Sysdba.
- Replace the <DATA_FILE_PATH> with actual data file path on the Oracle database server.
Create three tablescapes (MF_DATA, MF_INDEX, and MF_LOB_DATA) by executing the command below (you need to grant create tablespace privilege to <install-user>).
CREATE TABLESPACE MF_DATA DATAFILE '<DATA_FILE_PATH>/MF_DATA_01.DBF'
SIZE 2048M AUTOEXTEND ON NEXT 100M MAXSIZE 5120M;
CREATE TABLESPACE MF_INDEX DATAFILE '<DATA_FILE_PATH>/MF_INDEX_01.DBF'
SIZE 2048M AUTOEXTEND ON NEXT 100M MAXSIZE 5120M;
CREATE TABLESPACE MF_LOB_DATA DATAFILE '<DATA_FILE_PATH>/MF_LOB_DATA_01.DBF'
SIZE 2048M AUTOEXTEND ON NEXT 100M MAXSIZE 5120M;
Provide quota on all the above 3 tablespaces (MF_DATA, MF_INDEX and MF_LOB_DATA tablespaces) to MF database user. Map the <MF-schema-user> with all the 3 tablespaces by executing the command below.
ALTER USER <MF-schema-user> QUOTA UNLIMITED ON MF_DATA;
ALTER USER <MF-schema-user> QUOTA UNLIMITED ON MF_INDEX;
ALTER USER <MF-schema-user> QUOTA UNLIMITED ON MF_LOB_DATA;
- Create the following three tablespaces. These tablespaces will be used to move already created MF database objects which were placed in default USERS tablespace
Upgrade Property Files
Note: You need to stop the Tomcat server before you start upgrading Kony MobileFabric Sync.
To upgrade property files in Sync Server, follow these steps:
- Extract the Properties zip file that is downloaded in the section Download the Required Files.
- Navigate to <sync.home>\conf directory, and replace the existing property files with downloaded property files.
Note: Make sure you are retain the property syncservices.jndi.prefix from the old syncconsole.properties file.
Upgrade WAR Files
To upgrade the WAR files, follow these steps:
- Take the syncconsole.war and syncservice_tomcat.war from the downloaded artifacts.
- Rename the syncservice_tomcat.war to syncservice.war.
-
Take the backup of old WAR files.
-
Delete the existing WAR files from Home\apache-tomcat-7.0.52\webapps location and copy the downloaded WAR files to the Tomcat webapps folder.
-
Start the Tomcat server and perform sync sanity on the upgraded server.
Verify MobileFabric Sync Version
To verify if you have upgraded Kony MobileFabric Sync version correctly, log on to Sync Console, and click Configuration. The Configuration Details screen appears.
The MobileFabric Sync version upgrade details will be updated against the property value of Kony MobileFabric Sync version.
| Rev | Author | Edits |
| 7.1 | GS | GS |
| Copyright © 2013 Kony, Inc. All rights reserved. |