
Permission Set
A permission set is a collection of settings that give users access to various functions on a page. Permission set may be granted to any number of users. For example, in the
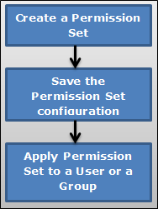
The process to create a new Permission Set is as follows:
- Create a new Permission Set.
- Save the configuration details.
- A new Permission is created at the end of this activity.
- Apply Permission set to a user or a group.
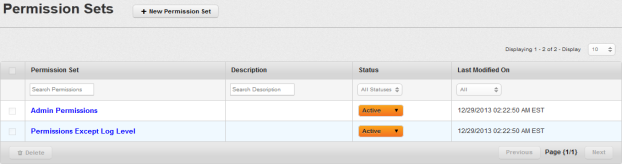
From the Access Management tab, click Permission Set. The Permission Set page appears with the list of permissions. The list view displays a list of all the permissions along with other details. You can search the permissions based on each column.
You can navigate the list view through the Previous and the Next buttons.
The Permissions list view displays the following columns:
| Columns | Description |
|---|---|
| Permission Set | Displays the name of the Permission Set. |
| Description | Description of the Permission Set detailing features and functionality. |
| Status | Displays the current status of the Permission set as Active or Inactive. |
| Last Modified On | Displays the date on which the Permission set was last modified. |
You can perform the following activities from the Permission Set page:
- Creating a Permission Set
- Updating a Permission Set
- Searching for Permission Sets
- Activating/Deactivating a Permission Set
- Deleting Permission Sets
Creating a Permission Set
Only an Admin can create a Permission Set.
To create a Permission Set, follow these steps:

- To create a new Permission Set, click the + New Permission Set button next to the Permission Set label at the top of the page.
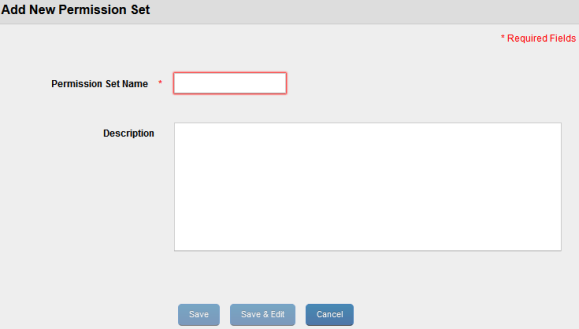
Add New Permission Set window appears.
- Enter details for the following fields:
Permission Set Name: Enter an appropriate name for the Permission Set.You cannot create permission set names with Special characters such as / \ [ ] : ; | = , + * ? < > @ "
- Description: Enter an appropriate description of the Permission Set that clearly indicates its objective.
- Click the Save button to save the details. In the confirmation message that appears, click OK to continue.
The newly added permission set is displayed in the list view. By default, the newly created Permission Set appears as active in the list view under Status column.
-
Click the Save and Edit button to update the Permission Set. This action opens the Permission Set details page. You can update the permission sets by following the next procedure.
Adding/Updating a Permission Set
You add permissions to provide App Management page permissions to a user. By providing page level permissions, the User has permissions to view the page and perform all actions on the page.
To add/update details of a permission set, follow these steps:
- Click the required permission set in the list view that you need to update.
The Permission Set Details page appears.
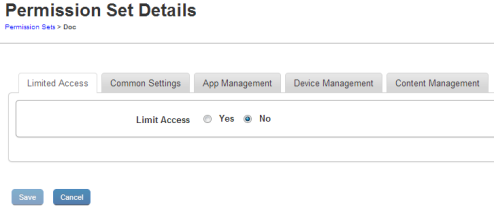
The Permission Set Details page includes the following tabs:
- Description
- Limited Access
- Common Settings
- App Management
- Device Management
- Content Management
- Description: Displays a brief description about the Permission set (entered by a user).
- Limited Access To Device List: By default, the Limit Access option is set to No. Select Yes to set limited access definition. By choosing Yes, you can create a permission set that grants limited access to users, groups, devices, device sets, folders, and targeting. Assigning the same to a user makes that user a limited administrator.
For more details, refer to Limited Access to Users, Groups and Device List. - Common Settings
- Dashboard: When Yes is selected, a user views the dashboard of EMM. If No is selected, the link for Dashboard is not visible in the left navigation panel.
Access Management Page Permissions: By choosing yes against each option, an administrator can grant a user access to the following pages in the access management section:
- Reports: The administrator views and accesses the Reports page from the left navigation panel. This is a prerequisite to view report details and perform any action on reports.
- Users: The administrator views and accesses the Users page from the left navigation panel. This is a prerequisite to view user details and perform any action on users.
- User Details: The administrator views details of Users. This is a prerequisite to update user details, modify groups associated with the user.
- Groups: The administrator views and access the Groups list page from the left navigation panel. This is a prerequisite to view Group Details and perform any action on Groups.
- Group Details: The administrator views details of the Groups. This is a prerequisite to update group details or modify Users associated with Groups.
- Permissions Set: The administrator views and access the list of Permission Sets. This is a prerequisite to view Permission Set Details and perform any actions on Permission Sets.
- Permission Set Details: The administrator views details of Permission Sets. This is a prerequisite to update permissions and define limited access.
- Access Management Action Permissions: By setting any of the following actions to yes, an administrator allows a user to perform that action.
- Reports:
- Device Inventory Report: Set to Yes to user to create a device inventory report.
- App Inventory Report: Set to Yes to create an app inventory report.
- Content Download History Report: Set to Yes to create a content download history report.
- Compliance Actions Report: Set to Yes to create a compliance actions report.
- App Usage Report: Set to Yes to create an app usage report.
- Call Usage Report: Set to Yes to create a call usage report.
- SMS Usage Report: Set to Yes to create an SMS usage report.
- App Network Usage Report: Set to Yes to create an app network usage report.
- User Device Report: Set to Yes to create a user device report.
- App Rating Report: Set to Yes to create an app ratings report.
- Users:
- Create User: Set to Yes to create local users in EMM.
- Delete User: Set to Yes to delete users
- Update User Details: Set to Yes to modify user details. This is a prerequisite to Add/Remove Groups to/from User.
- Import User from AD: Set to Yes to import new users from Active Directory into EMM.
- Add/Remove Groups to/from User: Set to Yes to associate another user with groups or remove such associations.For this action the Add/Remove Users to/from Group also must be set to Yes.
- Apply Permission Set to Users: Set to Yes to apply and modify permission sets applied to other users.
- Define Permissions: Enter permission sets applicable on the user.
- Assign Custom Attributes to Users: Set to Yes to assign custom attributes to users.
- Sync Selected Users: Set to Yes to begin an ad hoc sync with Active Directory for the selected users.
- Reset Password: Set to Yes to reset the password for local users only.
- Groups:
- Create Group: Set to Yes to allow a user to create local groups.
- Delete Group: Set to Yes to allow a user to delete
- Update Group Details: Set to Yes to allow a user to update group details. This is a prerequisite to Add/Remove users to/from a group.
- Import Group from AD: Set to Yes to allow a user to import new groups from Active Directory to EMM.
- Add/Remove Users to/from Group: Set to Yes to allow a user to modify the users associated with groups. For this action, the Add/Remove Groups to/from User also must be set to Yes.
- Apply Permission Set to Groups: Set to Yes to allow a user to add or modify permission sets assigned to Groups.
- Define Permissions: Enter permission sets applicable on the user.
- Assign Custom Attributes to Groups: Set to Yes to assign custom attributes to groups.
- Sync Selected Groups: Set to Yes to initiate an ad hoc sync with active directory for the selected groups.
- Permission Sets:
- Create Permission Set: Set to Yes to allow a user to create permission sets.
- Delete Permission Sets: Set to Yes to allow a user to delete permission sets.
- Update Permission Set Details: Set to Yes to allow a user to update Permission Set Details. This is a prerequisite for Limit Access.
- Limit Access: Set to Yes to allow a user to limit Permission Set Details.
- Reports:
- Settings Page Permissions: By checking yes against each of the following pages, you grant a user access to those pages.
- Content Settings
- Content Settings: You can view and access the Content Settings page from the left navigation panel. You must have this permission to enable any other pages and actions under Content Settings Actions.
- Usage Settings: Set to Yes to see the Usage Settings for Content Management. This is a pre-requisite to the action - Update Usage Settings.
- Message Templates: Set to Yes to view all the automated message templates relevant to Content Management. This is a pre-requisite to the action - Edit Message Template.
- Error Messages: Set to Yes to view all the Policy Error messages that Users would see on their devices if they violated any policies. This is a pre-requisite to the action - Update Error Messages.
- Device Settings:
- Device Settings: Set to Yes to view and access the Device Settings page from the left navigation panel. This is a pre-requisite to being able to enable any other pages and actions under Device Settings Actions.
- Usage Settings: Set to Yes to see the Usage Settings for Device Management. To update this, you must have the permission to Update Device Settings.
- Message Templates: Set to Yes to view all the automated message templates relevant to Device Management. This is a pre-requisite to the actions - Add Message Templates and Delete Message Templates.
- Terms and Conditions: Set to Yes to view the Terms and Conditions of using EMM as shown to Users during enrollment. To update this, you must have the permission to Update Device Settings.
- Communication Configuration: Set to Yes to view the certificate details and communication server details for Device Management activities. To update this, you must have the permission to Update Device Settings.
- App Settings:
- App Settings: Set to Yes to view and access the Application Settings page from the left navigation panel. This is a pre-requisite to being able to enable any other pages and actions under App Settings Actions.
- Usage Settings: Set to Yes to see the Usage Settings for Device Management. This is a pre-requisite to the action - Update App Settings - Usage Settings.
- Policy Error Messages: Set to Yes to view all the Policy Error messages that Users would see on their devices if they violated any policies. This is a pre-requisite to the action - Update App Settings - Policy Error Messages.
- Encryption Key: Set to Yes to view all the encryption seeds generated. This is a pre-requisite to the action - Create Encryption Key.
- Certificates: Set to Yes to see all the app management related certificates uploaded to EMM for each of the different platforms supported. This is a pre-requisite to the action - Update App Settings – Certificates.
- Message Templates: Set to Yes to see all the message templates for App Management. This is a pre-requisite to the action – Edit Message Templates.
- VPP Apps: Set to Yes to see Volume Purchase Apps Settings. This is a pre-requisite for the actions - Update App Settings – VPP Apps and Sync VPP Apps.
- Directory Settings:
- Directory Settings: Set to Yes to view and access the Directory Settings page from the left navigation panel. This is a pre-requisite to view the tabs below and actions under Directory Settings actions.
- Directory Details – Definition: Set to Yes to see the Directory Details definition.
- Directory Details - Synchronization Schedule: Set to Yes to see the Synchronization Schedule for each directory. This is a pre-requisite to the action – Complete Sync.
- Enrollment Mode
- Enrollment Mode: Configure to Yes to enable enrollment mode features for a limited administrator. By default, this is configured to No.
- Geo & Time Fences:
- Geo and Time Fences: Set to Yes to view and access the Geo and Time Fences page from the left navigation panel. This is a pre-requisite to view the tabs (Geo-fences and time Fences) and actions under Geo and Time Fences actions.
- Geo-fences: Set to Yes to view the list of Geo-fences in the system. This is a pre-requisite to being able to view the page Geo-fence details and the actions – Add Geo-fences and Delete Geo-fences.
- Geo-fence details: Set to Yes to view the details of each Geo-fence. This is a pre-requisite for the action – Update Geo-fence details.
- Time Fences: Set to Yes to view the list of Time Fences in the system. This is a pre-requisite to being able to view the page Time Fence details and the actions – Add Time Fences and Delete Time Fences.
- Time Fence details: Set to Yes to view the details of each Time Fence. This is a pre-requisite for the action – Update Time Fence details.
- Branding:
- Branding: Set to Yes to view and access the Branding page from the left navigation panel. This is a pre-requisite to being able to view the tabs listed below and actions under Branding actions.
- Web Consoles: Set to Yes to view all the branding images provided for Web Consoles Logo and Favicon.
- Enterprise Store Download: Set to Yes to view all the branding images for the enterprise store Download page (across platforms).
- Enterprise Store Login: Set to Yes to view all the branding images for the enterprise store Login page (across platforms).
- Splash Screen: Set to Yes to view all the branding images for the Splash Screen as enterprise store loads (across platforms).
- Enterprise Store Springboard Icons: Set to Yes to view all the branding images for the Springboard icons for enterprise store (across platforms).
- Enterprise Resources:
- Enterprise Resources: Set to Yes to view and access the Enterprise Resources page from the left navigation panel. This is a pre-requisite to view the tabs for Wi-Fi, VPN, Certificates, Airplay and Airprint lists. It is also a pre-requisite for all actions under Enterprise Resources.
- Wi-Fi List: Set to Yes to see the list of Wi-Fi configurations created in EMM. This is a pre-requisite for the Wi-Fi Details page and the actions – Add Wi-Fi, Delete Wi-Fi and Update Wi-Fi Details.
- Wi-Fi Details: Set to Yes to see details of the Wi-Fi configurations created in EMM. This is a pre-requisite for the action - Update Wi-Fi Details.
- VPN List: Set to Yes to see the list of VPN configurations created in EMM. This is a pre-requisite for the VPN Details page and the actions – Add VPN, Delete VPN and Update VPN Details.
- VPN Details: Set to Yes to see details of the VPN configurations created in EMM. This is a pre-requisite for the action - Update VPN Details.
- Certificates List: Set to Yes to see the list of Certificates created in EMM (for distribution). This is a pre-requisite for Certificate Details page and the actions – Add Certificates, Delete Certificates and Update Certificate Details.
- Certificate Details: Set to Yes to see the details of certificates listed. This is a pre-requisite for the action – Update Certificate details.
- AirPlay Settings: Set to Yes to see the list of AirPlay Settings created. This is a pre-requisite to the actions – Add AirPlay Configuration, Delete Airplay Configuration and Update AirPlay Details.
- AirPrint Settings:Set to Yes to see the list of AirPrint Settings created. This is a pre-requisite to the actions – Add AirPrint Configuration, Delete AirPrint Configuration and Update AirPrint Details.
- Admin Email Settings: These Settings are required to send emails to Users. Several actions and policies are dependent on this setting.
- Admin Email Settings: Set to Yes to view and access the Admin Email Settings page from the left navigation panel. This is a pre-requisite to the action under Admin Email Settings.
- Custom Attributes:
- Custom Attributes Set List: Set to Yes to view custom attributes set list.
- Custom Attributes Details: Set to Yes to view custom attributes set details.
- Exchange Settings
- Exchange Settings: Set to Yes to view and access the Exchange Services page from the left navigation panel. This is a pre-requisite to the actions under Exchange Services.
- Event Log
- Event Log: Set to Yes to view and access the Event Log page from the left navigation panel.
- System Status
- System Status: Set to Yes to view and access the System Status page from the left navigation panel. This is a pre-requisite to perform actions under System Status.
- Health Check: Set to Yes to view the Health Check parameters for EMM. You can get the latest status of any of the parameters individually or all services at once.
- Job Monitor: Set to Yes to view the jobs running on EMM. This is a pre-requisite to the actions – Start Job and Stop Job.
- Log Levels: Set to Yes to view all the Log Levels.
- Content Settings
- Settings Action Permissions
- Device Settings
- Add Message Templates: Set to Yes to add new message templates or edit existing ones. These will show up when any admin user wants to send messages to devices or device sets.
- Delete Message Templates: Set to Yes to delete message templates you created. You cannot delete existing message templates as they are required for the functioning of EMM.
- Update Device Settings: Set to Yes to update Device Settings. If none of the Device Settings tabs are accessible, this is set to No and is inactive.
- App Settings
- Create Encryption Key: Set to Yes to create encryption keys which are used for encrypting app data.
- Sync VPP Apps: Set to Yes to sync VPP apps.
- Edit Message Template: Set to Yes to edit and modify any of the App Management message templates. None of the message templates can be deleted. If set to No, you can view the templates but not edit them.
- Update App Settings - Certificates: Set to Yes to edit and modify any of the certificates uploaded. If set to No, you can only view the tab.
- Update App Settings - Usage Settings: Set to Yes to edit and modify the Usage Settings for App Management. If set to No, you can only view the tab.
- Update App Settings - Policy Error Messages: Set to Yes to edit and modify the Policy Error Messages. If set to No, you can only view the tab.
- Update App Settings - VPP Apps: Set to Yes to edit and modify the VPP App Settings. If set to No, you can only view the tab.
- Directory Settings
- Add Directory: Set to Yes to add a new directory.
- Delete Directory: Set to Yes to delete any of the directories.
- Update Directory Details: Set to Yes to edit and update Directory Details and Synchronization Schedules. If neither of the tabs Directory Details – Definition and Synchronization Schedule are allowed, then this action will be set to No and will not be active.
- Complete Sync: If set to Yes, based on the Synchronization type, you can either sync imported users and groups or sync all users and groups from the active directory. If neither are allowed, you can only view the page.
- Custom Attributes
- Create Attributes Set: Setting this to Yes will allow a user to create a custom attribute set.
- Copy Attributes Set: Setting this to Yes will allow a user to copy an existing custom attribute set.
- Delete Attributes Set: Setting this to Yes will allow a user to delete an existing custom attribute set.
- Update Attributes Set details: Setting this to Yes will allow a user to update an existing custom attribute set.
- Exchange Settings
- Update Exchange Settings: Set to Yes to update the Exchange Services configuration and the Mail Clients which are Whitelisted or Blacklisted.
- Add Agent (Mail Client): Set to Yes to add new Mail Clients to the master list.
- Content Settings:
- Update Content Usage Settings: Set to Yes to can edit and modify the Usage Settings.
- Edit Message Template: Set to Yes to edit the message templates.
- Update Content Policy Error Messages: Set to Yes to edit and modify the Policy Error Messages.
- Branding:
- Update Branding Settings: Set to Yes to edit and modify the icon images in any of the tabs.
- Admin Email Settings:
- Update Admin Email Settings: Set to Yes to edit and modify Admin Email Settings.
- System Status:
- Start Job: Set to Yes to start the job if it is stopped.
- Stop Job: Set to Yes to stop a job that is running.
- Geo and Time Fences:
- Add Geo-fences: Set to Yes to add new geo-fences.
- Delete Geo-fences: Set to Yes to delete existing geo-fences.
- Update Geo-fence details: Set to Yes to update the geo-fence details.
- Add Time Fences: Set to Yes to add time fences.
- Delete Time Fences: Set to Yes to delete time fences.
- Update Time Fence details: Set to Yes to update time fence details.
- Enterprise Resources:
- Add Wi-Fi: Set to Yes to add new Wi-Fi configurations.
- Delete Wi-Fi: Set to Yes to delete Wi-Fi configurations.
- Update Wi-Fi Details: Set to Yes to update Wi-Fi Details.
- Add VPN: Set to Yes to add new VPN connections.
- Delete VPN: Set to Yes to delete existing VPN connections.
- Update VPN Details: Set to Yes to update VPN details.
- Add Certificates: Set to Yes to add new certificates.
- Delete Certificates: Set to Yes to delete existing certificates.
- Update Certificate Details: Set to Yes to update certificate details.
- Add AirPlay Configuration: Set to Yes to add new AirPlay configurations.
- Delete AirPlay Configuration: Set to Yes to delete existing AirPlay configurations.
- Update AirPlay Details: Set to Yes to edit AirPlay details.
- Add AirPrint Configuration: Set to Yes to add new AirPrint configurations.
- Delete AirPrint Configuration: Set to Yes to delete existing AirPrint configurations.
- Update AirPrint Details: Set to Yes to edit AirPrint details.
- Device Settings
- Dashboard: When Yes is selected, a user views the dashboard of EMM. If No is selected, the link for Dashboard is not visible in the left navigation panel.
- App Management:
In this section, if none of the permissions are set to Yes, this section does not display for the user.
- App Management Page Permissions
- Enterprise Apps: Set to Yes to view and access the Enterprise Apps page from the left navigation panel.
- App Details: Set to Yes to able to view the App Details page. This is a pre-requisite for the actions - Upgrade App, Add a Platform and Update App Details.
- App Policies: Set to Yes to able to view the link and access the App Policies page from the left navigation panel.
- App Policy Details: Set to Yes to able to view the App Policy Details page. This is a pre-requisite for the action – Update App Policy Details.
- Categories: Set to Yes to view the link and access the Categories page from the left navigation panel. This is a pre-requisite for the action under Categories.
- VPP Apps: Set to Yes to view the link and access the VPP Apps page from the left navigation panel. This is a pre-requisite for the tabs below (Purchased App List, Invited Users) and all the actions under VPP Apps.
- Purchased App List: Set to Yes to view the Purchased App List tab and its contents. This is a pre-requisite to the actions – Sync Now, Target Users and Recall Licenses.
- Invited Users: Set to Yes to view the Invited Users tab and its contents. This is a pre-requisite to the actions – Retire Users, Send Invite Again.
- App Management Action Permissions
- Enterprise Apps
- Add an App: Set to Yes to add a new Enterprise App.
- Upgrade App: Set to Yes to upgrade the version of the app.
- Add a Platform: Set to Yes to add a new platform for the app.
- Update App Details: Set to Yes to update app details for the apps you own and save the same.
- Target App(s): Set to Yes to target the app to Users and Groups. From the App Details page, you must also have the permission to update app details to save changes to targeting.
- Own App: Set to Yes to own the app if it is owned by someone else so that you can modify the same.
- Approve App: Set to Yes to approve an app.
- Publish/Unpublish App: Set to Yes to Publish and Unpublish the apps.
- Wrapping/Signing: Set to Yes to invoke a Wrap or sign action on an app where it has failed.
- Delete App: Set to Yes to delete apps.
- Assign Custom Attributes to Apps: Setting this to Yes will allow a user to assign custom attributes to an enterprise app.
- Update App Licenses: Setting this to Yes will allow a user to update app licenses for an enterprise app.
- Recall App Licenses: Setting this to Yes will allow a user to recall app licenses for an enterprise app.
- App Policies:
- Create a Policy: Set to Yes to create an app policy.
- Own Policy: Set to Yes to own app policies that are owned by someone else.
- Activate Policy: Set to Yes to activate policy.
- Publish/Unpublish Policy: Set to Yes to publish or un-publish policies.
- Delete Policy: Set to Yes to delete app policies.
- Update Policy Details: Set to Yes to update and save app policy details for the policies you own.
- Categories:
- Create Category: Set to Yes to create a new category.
- Delete Category: Set to Yes to delete categories.
- Edit Category: Set to Yes to edit categories.
- VPP Apps:
- Sync Now: Set to Yes to Sync the list VPP Apps available with the Apple Server.
- Target Users: Set to Yes to target the VPP Apps to Users and Groups.
- Recall Licenses: Set to Yes to Recall Licenses from Users to whom they are issued.
- Retire Users: Set to Yes to Retire Users from the Volume Purchase Program (VPP).
- Send Invite Again: Set to Yes to send an invite again to users that have not joined the VPP.
- Enterprise Apps
- App Management Page Permissions
- Device Management Page Permissions If none of the page permissions are Yes in this section, the section does not display for the user. Set the permission details for the Device Management page for the following fields:
- Device Management Page Permissions:
- Device List/Details
- Devices: Set to Yes to view and access the Devices page from the left navigation panel. This is a pre-requisite to view Device Details and perform any action under Devices.
- Device Details: Set to Yes to view Device Details. This is a pre-requisite to all tabs in Device Details (Overview, Locate, Messages, App Monitor, Asset Properties, Services and EMM Info) and all actions under Devices except View policies applied to a device and Delete Device.
- Overview: Set to Yes to view the overview details of each device. This is a pre-requisite to the action – Remove All Certificates.
- Locate: Set to Yes to view the current and last few locations of the device.
- Messages: Set to Yes to all the messages sent to the device. This is a pre-requisite for the action – Send Message.
- App Monitor: Set to Yes to view all the apps present on each device. This is a pre-requisite to the action – Delete App.
- Asset Properties: Set to Yes to view all the Asset Property details of the device.
- Services: Set to Yes to view all the services running on Windows 8.1 devices.
- EMM Info: Set to Yes to view all the information about the EMM as on device. This is a pre-requisite for the Purge action.
- Device Policy:
- Device Policies: Set to Yes to view and access the Device Policies page from the left navigation panel. This is a pre-requisite to view Device Policy Details and perform any action under Device Policies.
- Device Policy Details: Set to Yes to view Device Police Details. This is a pre-requisite for the actions Update Policy Details and Change Priority.
- Device Set
- Device Set: Set to Yes to view and access the Device Set page from the left navigation panel. This is a pre-requisite to view Device Set Details and perform any action under Device Set.
- Device Set Details: Set to Yes to view Device Set Details. This is a pre-requisite for the tabs below (Conditions, Current Devices, Messages) and the actions – Update Device Set Details and Apply Policies to Device Set.
- Conditions: Set to Yes to view the Conditions tab.
- Current Devices: Set to Yes to view the Current Devices tab.
- Messages: Set to Yes to view the Messages tab.
- Enrollment
- Enrollment: Set to Yes to view and access the Device Enrollment page from the left navigation panel. This is a pre-requisite to perform any action under Device Enrollment.
- Device List/Details
- Device Management Action Permission
- Device List/Details
- View Policies applied on Device: Set to Yes to view Policies applied to devices from the Devices page as well as the details page.
- Force Check-in: Set to Yes to force the device to connect with the EMM Server and respond.
- Lock Device: Set to Yes to remotely lock the device.
- Reset/Clear Password: Set to Yes to reset the device’s passcode.
- Wipe Wizard: Set to Yes to either Enterprise Wipe or completely wipe the device.
- Block/Unblock Email: Set to Yes to Block/Unblock Email for the device.
- Remove App Data: Set to Yes to remove app data for all enterprise apps.
- Resume Device: Set to Yes to resume suspended devices.
- Start/Stop Mirroring: Set to Yes to start and stop mirroring for iOS 7+ devices.
- Power Off Device: Set to Yes to remotely power off SAFE devices.
- Lock SIM: Set to Yes to lock a SIM to a SAFE device.
- Remove All Certificates: Set to Yes to remove all certificates on the device.
- Update Device Details: Set to Yes to update and save device details.
- Assign Custom Attributes to Devices: Setting this to Yes will allow a user to assign custom attributes on a device.
- Send Messages: Set to Yes to send messages to devices.
- Delete Apps: Set to Yes to delete apps on devices from App Monitor.
- Delete Device: Set to Yes to delete a device from the Devices list.
- Enrollment:
- Add a Device: Set to Yes to add a single device to be enrolled.
- Bulk Enroll: Set to Yes to invoke the bulk enroll command.
- Device Set:
- Create Device Set: Set to Yes to create device sets.
- Approve Device Set: Set to Yes to change device sets state.
- Publish/Unpublish Device Set: Set to Yes to change device set status.
- Copy Device Set: Set to Yes to copy the definition of a device set to a new one.
- Delete Device Set: Set to Yes to delete device sets.
- Apply Policies to Device Set: Set to Yes to apply policies to device sets.
- Update Device Set Details: Set to Yes to update and save device set details. If not, all device set tabs are read only.
- Device Policy:
- Create Policy: Set to Yes to create device policies.
- Activate Policy: Set to Yes to modify the state of device polices.
- Publish/Unpublish Policy: Set to Yes to modify the status of device policies.
- Copy Policy: Set to Yes to copy the definition of a device policy to a new one.
- Change Priority: Set to Yes to change the priority of a policy.
- Delete Policy:Set to Yes to delete device policies.
- Update Policy Details: Set to Yes to update and save device policy details. If not all policy tabs are read-only.
- Device List/Details
- Device Management Page Permissions:
- Content Management:
- Content Management Page Permissions
- Files: Set to Yes to view and access the link on the left navigation panel to the Files page. This is a pre-requisite for File Details and all actions under Files.
- Files Details: Set to Yes to view File Details. This is a pre-requisite to the tabs below (Description, Current Version, Past Version) and the actions - Update File Details, Rename File, Make File as Current Version, Download File Version, Update File Version.
- File Details - Description Tab: Set to Yes to view the Description tab.
- File Details - Current Version Tab: Set to Yes to view the Current Version tab
- File Details - Past Version Tab: Set to Yes to view the past version tab. This a pre-requisite to Make File as Current Version.
- Folders: Set to Yes to view and access the link on the left navigation panel to the Folders page. This is a pre-requisite for Folder Details and all actions under Folders.
- Folder Details: Set to Yes to view Folder Details. This is a pre-requisite for the tabs below (Details, Content, Targeting) and the actions – Copy From, Move From, Target Folders, Update Folder Details, Rename Folder, Add New File and Add New Folder.
- Folder Details - Details Tab: Set to Yes to view the Details tab.
- Folder Details - Content Tab: Set to Yes to view the Content tab.
- Folder Details - Targeting Tab: Set to Yes to view the targeting tab. This is a pre-requisite to the action - Target Folders.
- Content Policies: Set to Yes to view and access the link on the left navigation panel to the Content Policies page. This is a pre-requisite for Content Policy Details and all actions under Content Policies.
- Content Policies Details: Set to Yes to view content policy details. This is a pre-requisite for the actions – Update Policy.
- Content Management Action Permissions
- File
- Add New File: Set to Yes to add new files to EMM from either Files or Folder Details. If no, you cannot add new files from either location.
- Delete File: Set to Yes to delete files from EMM.
- Copy to: Set to Yes to copy files to destination folders.
- Move to: Set to Yes to move files to destination folders.
- Update File Details: Set to Yes to modify file details and save the same.
- Rename File: Set to Yes to rename the file.
- Make File as Current Version: Set to Yes to select an older version of the file and make it the current version.
- Download File Version: Set to Yes to be allowed to download the current version and older versions of a file.
- Update File Version: Set to Yes to update the file version.
- Folders:
- Add New Folder: Set to Yes to add new folders to EMM from the Folders list page and from Folder details.
- Delete Folder: Set to Yes to delete folders.
- Copy To: Set to Yes to copy the folder to a destination folder.
- Move To: Set to Yes to move the folder to a destination folder.
- Copy From: Set to Yes to copy files or folders from a source folder.
- Move From: Set to Yes to move files or folders from a source folder.
- Update Folder Details: Set to Yes to modify and save folder details.
- Target Folders: Set to Yes to target folders to users and groups.
- Create New File: Set to Yes to add new files to folders.
- Create New Folder: Set to Yes to create new folders within folders.
- Rename Folder:Set to Yes to rename folders.
- Content Policies:
- Add Policy: Set to Yes to add new content policies to EMM.
- Delete Policy: Set to Yes to delete content policies.
- Activate Policy: Set to Yes to modify the state of content policies.
- Publish/Unpublish Policy: Set to Yes to modify the status of content policies.
- Copy Policy: Set to Yes to copy the content of the policy to a new policy.
- Update Policy: Set to Yes to modify and save policies.
- Content Repository:
- Add Repository: Set to Yes to enable the user to add a new repository.
- Edit Repository: Set to Yes to enable the user to edit an existing repository.
- Delete Repository: Set to Yes to enable the user to delete an existing repository.
- File
- Content Management Page Permissions
- Click the Save button. In the message that appears, click OK to return to the main page. The updated permission set details appear in the list view.
Searching for Permission Sets
You can search for a desired permission set through the available search filters. You can apply a single or a combination of search filters to define the search criteria and get the refined outcome.

- Enter or select details for following search filters:
- Permission Set: Enter partial or complete name of the permission set in the Search Permission field.
- Description: Enter partial or complete description of the permission set in the Search Description field.
- Status: Select the required status from the drop-down list.
- Last Modified on: Select the required date on which the permission set was last modified.
- The list view is updated with respective permission set details, as per the search criteria. By default, the list view displays ten permission sets according to Display settings that you can modify through the Display drop-down list. You can also scroll the list view through Previous and the Next button.
Activating/Deactivating Permission Sets
If you do not want to apply a permission set to a User or a Group temporarily, you can deactivate it. Still the deactivated permission remains as applied on the respective user and groups but no permissions can be used as the permission set is in deactivated mode.
To deactivate a Permission Set, follow these steps:

- Select the Status as Deactivate for the required Permission Set in the list view.
The Change Permission Status window appears asking, if the permission set status be deactivated. Click Ok to continue.
- The System displays the confirmation message. Click Ok to return to the main page.
To activate a Permission Set, follow these steps:
- Select the Status as Active for the required Permission Set in the list view.
The Change Permission Status window appears asking, if the permission set status be activated.
- Click Ok to continue.
The System displays the confirmation message.
- Click OK to return to the main page.
Deleting Permission Sets
If a permission set is no longer required for a user or group, you can delete the permission set. Before the permission set is deleted, change the status of the permission set to a deactive state.
When a permission set is deleted, the status of its associated device set changes to unpublished. The device set state changes to draft.
To delete a permission set, follow these steps:

- Click the check box, next to the permission set that you want to deactivate.
The Delete button becomes active.
- Click the Delete button. In the confirmation dialog that appears, click Yes to proceed.
The system displays the confirmation message.
- Click Ok to return to the main page.
The deleted permission set is removed from the list view.
Resolving Permissions
Different user permissions may be applied to a designated user's individual account and a group account that includes the user. However, the user receives all the permissions that are granted to either the individual account or the group account.
For example:
- User John is granted the permission to Apps, Policies, and Categories.
- Group A is granted Permissions for Users, Groups, Approve Apps, and Publish Apps.
- Group B is granted permission for Users, Groups, Dashboards, and MAM Settings.
If User John is part of both Group A and B, then he receives the following permissions:
- Page Level Permissions
- Apps
- Policies
- Categories
- Users and Groups
- Dashboards
- MAM Settings
- Action Level Permissions
- Approve Apps
- Publish Apps
| Copyright © 2018 Kony, Inc. All rights reserved. |