
Content Repositories
In the Content Management section, before Kony Management Suite 3.5, Enterprise content is uploaded only by an administrator. To extend the enterprise content feature to include files and folders from the enterprise SharePoint, a new Repositories feature is introduced in Kony Management Suite 3.5 GA. The Repositories feature in the Content Management section of Kony Management Suite enables an administrator to connect the content section of the enterprise store on a device to the Microsoft SharePoint environment. The Sharepoint administrator determines whether an end user can access files and folders. The Repositories feature helps an administrator:
- Add a new SharePoint repository.
- Add folders from SharePoint to appear on a device with all folder contents.
Repositories
The rRepositories page displays the available repositories in Kony Management Suite. You can also create a new repository in this page.
The Repositories screen appears with the list of repositories.The list view displays a list of all repositories along with other details. You can search the repositories based on each column.
![]()
The Repositories list view displays the following columns:
| Column | Description |
|---|---|
| Repository Name | Displays the repository name. |
| Type |
Displays the repository type. Three types of repositories are supported:
|
| Server URL | Displays the server URL. |
| Last Modified By | Displays the user who last modified the repository details. |
| Delete | Selected repositories can be deleted. This button is only active if the check box next to Repository Name is selected or if the multi-select check box is selected. |
You can navigate the list view using the Previous and the Next buttons.
You can do the following from the Repositories page:
- Add a new repository
- Update a repository
- Search for a repository
- Delete a repository
Create a New Repository
To create a new repository, follow these steps:
- In Kony Management Suite, click Repositories under Content Management. The Repositories page appears.
- Click New Repository. The Create Repository page appears.
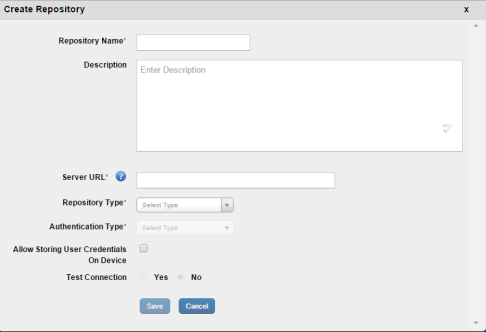
- Enter details for the following fields:
- Repository Name: Enter a repository name of your choice.
- Description: Enter a brief description about the repository.
- Server URL: Enter the SharePoint server URL.
- Repository Type: Select the repository type. Options are SharePoint Server 2010, SharePoint Server 2013, and SharePoint Online 2013.
- Site Relative Path: Enter the site relative path.
- Authentication Type: Select the authentication type. Options are Basic, Digest, and NTLM (NT LAN Manager).
- Use JCIFS Engine: Select this if you want to use JCIFS engine (available only for the NTLM authentication type). JCIFS is an Open Source client library that implements the Common Internet File System and Server Message Block networking protocol in Java.
- Allow Storing User Credentials on Device: Select this option if you want to allow storing credentials on the device.
- Test Connection: Select this option if the connection needs to be tested. Options are Yes and No. If you select Yes, the following options are enabled:
- Domain: Enter the SharePoint domain name.
- User Name: Enter your user name details.
- Password: Enter the password corresponding to the user name entered earlier.
- Click Save. A confirmation page appears.
- Click Yes. A confirmation page appears.
- Click OK. A new content repository is created.
Update a Repository
To update a repository, follow these steps:
- In Kony Management Suite, click Repositories under Content Management. The Repositories page appears.
- Click the repository you want to update. The Repository page details appear.
- Make the required changes and then click Save. A confirmation page appears.
- Click Yes. A confirmation page appears.
- Click OK.
Delete a Repository
To delete a repository, follow these steps:
- In Kony Management Suite, click Repositories under Content Management. The Repositories page appears with all existing repositories.
- Select the repository you want to delete. The Delete button is activated.
- Click Delete. A confirmation page appears.
- Click Yes. A success message appears.
- Click OK. The repository is deleted.
| Copyright © 2018 Kony, Inc. All rights reserved. |