Categories
From the Categories section, you add all the categories. Categories are not pre-defined. All the Categories must be added through this section and then only can be assigned to apps.
For example, financial applications can have a category named as Money Manager, which facilitates record keeping for the bank accounts, transactions entry and view the balance details. The other categories can be Banking Payment, ATM Finders, Insurance, and Taxes Portfolio and so on. You can update or delete or assign apps to these categories.
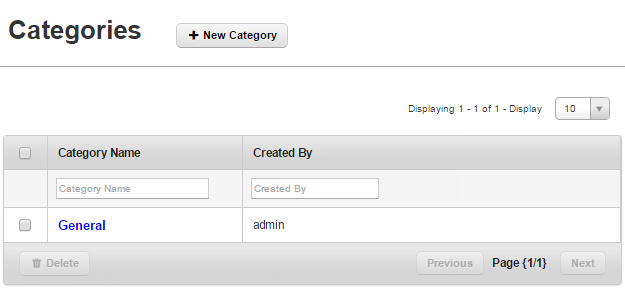
From the App Management section, click Categories from the left panel. The Categories page appears with a list of the Categories. You can search the categories based on each column and also sort on each column.

The Categories list view displays the following columns:
| Columns Description | |
|---|---|
| Name | Provides a list of all the categories. |
| Created By | Provides a list of all the administrators. |
You can perform following activities from this page:
Creating a New Category
Click the +New Category button on Categories main screen to open Add New Category window. To create a new Category, follow these steps:

- Category Name: Enter a unique name for the category.
- Click the Save button. In the success message that appears, click OK to continue.The newly added category appears in the list view.
Click the Cancel button to close the window.
Field with the red asterisk sign is mandatory.
Searching for Categories
You can search a desired category through search filters available. You can apply a single or a combination of search filters to define the search criteria and get the refined outcome.

-
To search a category, follow these steps:
- Name: Enter partial or a complete category name in the Category Name text field
- Created By: Enter partial or the complete name of the administrator in the text field..
- According to your search filters criteria, the list view is updated with respective category details. By default, the list view displays ten categories according to Display settings, which you can modify through Display dropdown list. You can also scroll the list view through Previous and the Next buttons.
Updating a Category
The primary purpose to a update a Category details is to fulfill the requirement of existing business rules.
To update details for the required fields, follow these steps:

- Category Name: If required, change the category name.
-
After all the updates, the Update button becomes active.
- Click the Update button.In the confirmation message that appears, click OK to continue.
Click the Cancel button to close the window.
Deleting a Category
If a category has been deprecated, or no longer required, you can delete it.

To delete a category, follow these steps:
- Select the category through check box next to it in the list view. This action activates the Delete button.
- Click the Delete button. In the warning message that appears, click Yes to confirm the deletion of the category.
- In the success message that appears,click OK to continue.
The category is no longer displayed in the list view.
| Copyright © 2018 Kony, Inc. All rights reserved. |
