Admin Initiated Enrollment
From the Device Management section, click the Device Enrollment from the left panel. The Device Enrollment page appears with a list of actions performed by the user. A user can add new devices from this page. A user can also search for devices based on each column.
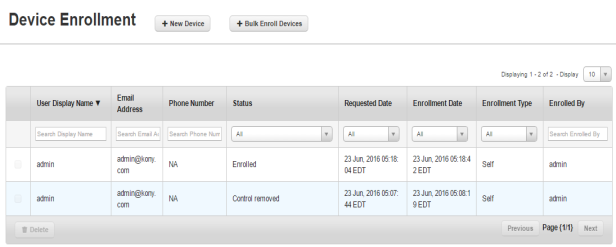
The Device Enrollment list view displays the following columns:
You can perform the following activities from this page:
- Adding a New Device
- Adding Devices in Bulk
- Device Enrollment - Post Confirmation Details
- Searching for an Enrollment Entry
Adding a New Device
This process falls under Admin Enrollment. These devices are enrolled to EMM Server.
The Add a Device window includes three steps to enroll a new device to EMM.
Step 1: User Information
To add a new device, follow these steps:
- To open the Add a Device window, click the + Add a Device button next to the Device Enrollment label at the top of the page.

The Add a Device window appears.
- Enter the following details under Step One:
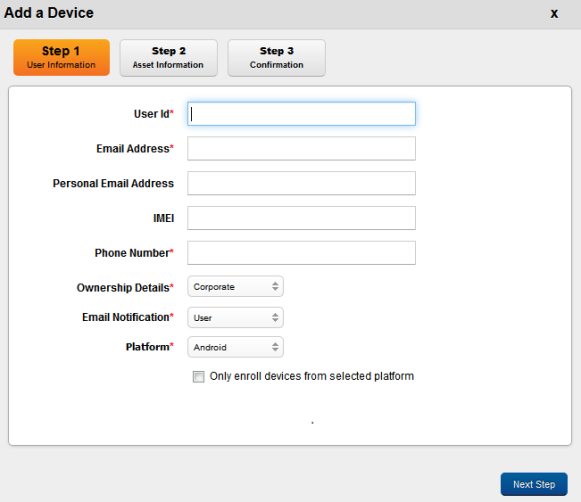
- User ID: Enter the partial name of the user and a pop-up window with a list of user names associated with Domains appears.
For example: Username[Domain]
Note: Only Users that are enrolled with EMM are shown. This includes Active Directory Users as well as Kony Database Users. Select the name of the User whose device you wish to enroll.

- Email Address: As per selected User name, the corresponding email address is populated in the Email address field.
The enrollment request and registration instructions are sent to the user on this email address. This Email address is auto-populated from User details (as recorded while the User was enrolled).

- Personal Email Address: The Admin must provide the personal email id of the employee - should they have it.
Personal email id of the user is required for additional contact details.
- IMEI: Enter the Mobile Equipment Identity Number.
Note: If you enter IMEI in incorrect format, the following warning messages appears:
• Please enter at least 15 characters.
• Please enter only digits. - Phone Number: Enter the Phone Number.
This is the phone number of the Device User as provided in User details; This is expected to be the phone number of the device. If you enter phone number in incorrect format, system displays warning message to enter at least 11 characters.
- Ownership Details: Choose the type of Ownership of the device. There are three types: Corporate, Employee and Shared.
This pertains to ownership of the device. The device can be owned by an employee, or Corporate, or shared. Shared refers to devices that are owned by the corporate but shared between multiple employees. An example is a device used by the testing team - different people use each device to test different aspects.
- Email Notification: Choose the type of email notification. There are two types, User and Admin and User. The enrollment notification is sent to the specified personnel.
Email notifications are sent to individual User regarding enrollment of the device and what further actions are required to accomplish the task.
- Platform: Choose the appropriate Operating System that the device supports,
If you wish to enroll devices from the selected platform only, then select the check box Only enroll devices from selected platform.
The platform on which the device resides. The supported Device OS are: iOS, Android, Windows 6.x, and Windows Phone 8, Windows Phone 8.1, Windows 8 Pro (Windows Tablet), and Windows 8 RT (desktop).
-
Click the Next Step button to open Step 2 window.
Important: If you provide IMEI number while adding a single device or adding devices in bulk, then the platform is immaterial.
For example, if you provide IMEI number of an iOS device but select Device OS as Android and select Only Enroll devices from selected platform option. In this scenario, the OS details are discounted and you can proceed to add your device to EMM.
Step 2: Asset Information
Asset information is not the basic information of the device. It is required if the device needs repair and so on. This step is useful, if there is an asset tracking mechanism in the organization. None of the details in this step are mandatory.
Enter the following details in Step Two:
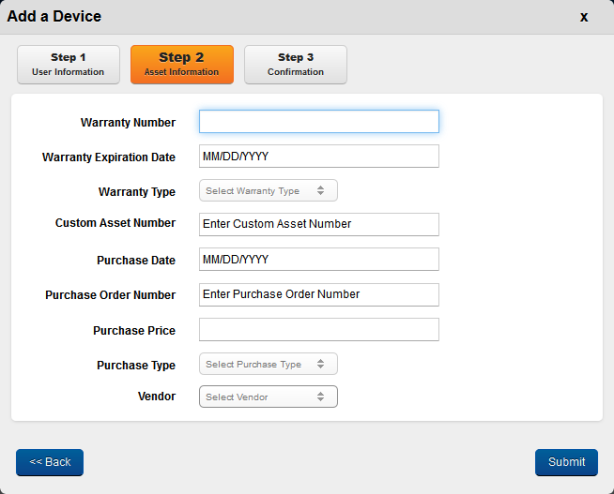
- Warranty Number: Enter the valid warranty number. This is the unique identification number to identify the warranty type.
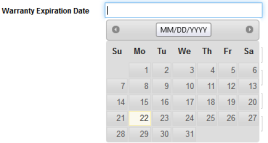
- Warranty Expiration Date: Enter the cursor in the Warranty Expiration Date field. A Calendar window with current month and current date as active, appears. Select the required date. The date is populated in the text field.
After this date, the warranty expires.
- Warranty Type: Select the appropriate warranty from the Select Warranty Type drop-down list.
There are three warranty types respectively, Manufacturer warranty, Seller Warranty and the Extended Warranty.
- Custom Asset Number: Enter the valid custom asset number in the Enter Custom Asset Number text field. This number is given by company to define asset information.
- Purchase Date: Enter the cursor in the Purchase Date field. A Calendar window with current month and current date as active, appears. Select the required date. The date is populated in the text field.
Purchase date cannot be in a future date.
- Purchase Order No: Enter the purchase order number of the device in Enter Purchase Order Number text field.
- Purchase Price: Enter a purchase order number is an alpha/numeric code that is assigned to a particular request to buy something. PO numbers are used internally to track purchases. valid purchase price for the device. If you enter wrong purchase price, a warning message to enter valid purchase price appears.
- Purchase Type: Select Purchase Type as Single Purchase or Volume Purchase from the Select Purchase Type drop-down list.
- Click the Submit button to open Step 3 window.
Click the Back button to navigate to Step 1.
Step 3: Confirmation
Step Three window displays confirmation message stating that the enrollment request and registration instructions are sent at the specified email address of the administrator.

- Click the OK button to proceed.
- Click the Add Another Device button to open Step 1 window to enroll a new device with EMM.
For a device where enrollment is initiated, if the associated user is deleted, the device enrollment status will change from Request Sent to Request Deleted.
Device Enrollment - Post Confirmation Details (Admin)
The next steps after receiving an email with a URL and details of how to
Enterprise Store Download
- The Device User (Employee) accesses the mentioned URL and downloads the device agent app.
- The Device User installs the app.
You can download an Enterprise store, in two ways of authentication.
- Using Kony Management suite user login credentials
- Using Kony Fabric Identity Service OAuth 2.0 user login credentials.
Authentication
- The Device User provides authentication details in the email message, through providing Company Name, AD User Name and Password.
- Submitted details are sent to the Server with device information.
- The EMM Server ensures that the device is not
- If Verification fails, device user receives a message. Device goes into the status based on type of verification failure.
Terms Acceptance
- Once the authentication and verification is successful, the device user receives the Terms and Conditions.
- Device Users must accept that they have read and agreed to the terms specified.
- If Device Users do not accept the Terms, the
- To resume activities, Device users need to close the enterprise store App.
Profile Download
- Once the terms and conditions are accepted, Device Users are informed to download the application and install it.
- Selecting to proceed automatically triggers the download and installation of the EMM Profile.
- Device Users are requested to confirm any prompts by the application.
- After completing the installation, Device Users receive a confirmation about installation of the profile and a success message about device enrollment.
- If profile installation fails, Device Users are informed and requested to try the Download and installation again.
Adding Devices in Bulk
This process falls under Admin Enrollment. This option enables you to enroll several devices at the same time. You need to create a .csv file with the User Name, Email Address, Phone Number, Email Notification, Platform and Ownership details and upload the same. You can also provide optional details. Multiple entries should be in separate lines.
The EMM system validates details in the .csv file to ensure that the specified User is a part of the Domain else displays one of the following error messages:
Note: Error messages are displayed against each enrollment entry at the last column in the .CSV based on the following situations:
- Unable to reach Directory (if unable to reach the Directory Server)
- Domain Deleted (if the Domain was recently deleted)
- User not part of specified Domain (If no entry of the User is available within the specified Domain)
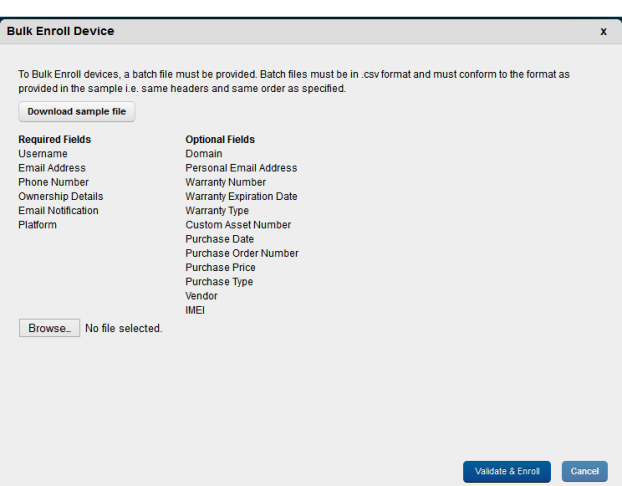
To enroll devices through Bulk Enrollment, follow these steps:
- To open the Bulk Enroll Device window, click the +Bulk Enroll Devices button next to the Device Enrollment label at the top of the page.

- Click the Browse button to find the .csv file in your system to add. Select it, and click Open. The attached file appears next to the Browse button.
- Click the Validate and Enroll button to import the same. The system displays the confirmation message. An Enrollment mail is sent to all the users listed in the csv file. The first line of the .csv is the column header and the columns can be in any order.
Click the Cancel button to close the window.
Searching for an Enrollment Entry
You can search for devices through search filters available. You can apply a single or a combination of search filters to define the search criteria and get the refined outcome. To search for a device, do the following:

- Enter or select details for following search filters:
- Display Name: Enter partial or complete name of the user in the Search user field.
- Email Address: Enter required email address in the Search Email field.
- Phone Number: Enter required phone number of the user in the Phone Number field.
- Status: Select the required Status from the drop-down list.
- Requested Date: Select the required requested date from the drop-down list.
- Enrollment Date: Select the required enrollment date from the drop-down list.
- Enrollment Type: Select the required type of enrollment from the drop-down list.
- Enrolled By: Enter partial or complete name of the Admin in the Search field.
-
According to your search filters criteria, the list view is updated with respective device details. By default, the list view displays ten devices according to Display settings, which you can modify through Display drop-down list. You can also scroll the list view through Previous and the Next button.
| Rev | Author | Edits |
| 4.1 | PK | PK |
| Copyright © 2018 Kony, Inc. All rights reserved. |