Geo and Time Fence List
This is a master list of all the Geo-fences and Time fences that can be used on MDM or MAM. Based on requirement, you can create multiple Geo-fences and Time fences.
From the Settings section, click Geo and Time Fence List from the left panel. The Geo and Time Fence List Page include two tabs: Geo-fence and Time Fence. The Geo and Time Fence List page appears with a list of all the Geo-Fences along with their Descriptions. You can search the Geo-Fence based on each column and also sort on each column.
Important: On Android devices, the Geo fence policy does not work as expected. This is a known issue.
Important: When you alter a Geo fence, a trigger is not sent to enrolled devices to update their device settings.
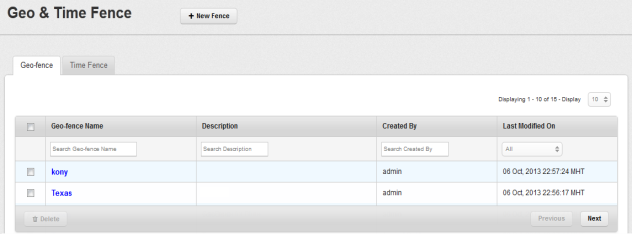
Geo- fence List view displays the following columns:
| Properties | Description |
|---|---|
| Geo-fence Name | Displays the name of the Geo-fence program. |
| Description | Displays the brief description of the Geo-fence program. |
| Created By | Displays the owner name. |
| Last Modified On | Displays the date on which the Geo-fence was last modified. |
You can perform the following activities from this page:
- Searching a Geo-fence
- Creating a Geo-fence
- Deleting a Geo-fence
- Searching a Time Fence
- Creating a Time fence
- Deleting a Time Fence
Searching a Geo-fence
You can search a Geo-fence through search filters based on all the grid columns. You can apply a single or a combination of search filters to define the search criteria and get the refined outcome.
To search a Geo-fence, follow these steps:
- Geo Fence Name: Enter partial or complete name in the Search Geo Fence Name field.
- Description: Enter the specific details in the Search Description field.
- Created By: Enter partial or complete name of the Administrator in the Search Created By field.
-
Last Modified On: Select the required option from the drop-down list.
- According to your search filter criteria, the list view is updated with respective Geo-fence details. By default, the list view displays ten Geo-fences according to Display settings, which you can modify through Display drop-down list. You can also scroll through the list view through Previous and the Next button.
Creating a Geo-fence
To create a new Geo-fence program, follow these steps:

- On the Geo & Time Fence List screen, click the + New Fence button.
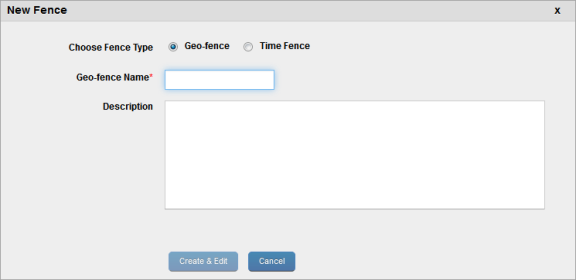
- The New Fence window appears. Enter the following details:
- Choose Fence Type: By default, this option is set to Geo-fence that you can modify to Time Fence.
- Geo Fence Name: Enter a valid name for the Geo-fence.
This action enables the Create and Edit button. - Description: Enter a brief description of the Geofence. The description should accurately describe the features and functionality of Geo-Fence.
- Click the Create & Edit button.
Geo-fence details page appears.
- . Enter details for the following fields:
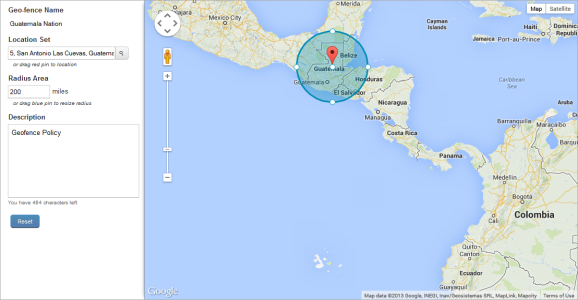
- Geo-fence Name: Displays geo-fence name.
- Location Set: Drag the red icon on map. Based on location position and entered radius area, location set details appear for example, 5, San Antonio, Las Cuevas,Guatemala.
The larger Geofence takes precedence. In the image displayed above, the bigger radius Geofence Guatemala Nation (200 miles) takes precedence over smaller radius Geofence Guatemala City (10 miles) when the device is kept in Guatemala City.For example, a device named ABC is part of two device sets DS1 and DS2.
On DS1, Passcode policy No. 1 is applied with Guatemala Nation (Allow).
On DS2 Passcode policy No. 2 is applied with Guatemala City (Allow).
When the device is kept in Guatemala City, Passcode policy No. 1 is applied because the Geofence attached to Policy No 1 is larger and completely encompasses the Geofence applied to policy no. 2.
- Description: This field is pre-populated with the existing details.If required, you can update this field.
- Click the Save button. In the success message that appears, click OK to return to the main page.
Important: Allow GPS Location Monitoring: Deny policy is not working for Android OS 4.1.1.
Deleting a Geo-fence
If a Geo-fence is no longer applicable to a device, you can delete it.

To delete a Geo-fence, follow these steps:
- Select the required Geo-fence through the check box next to it in the list view.
- Click the Delete button.
- In the warning message (Delete Geo-fences) that appears, click Yes to continue.
- In the success message that appears, click OK to return to the main page.
The deleted Geo-fence is no longer displayed in the list view.
Geo-fence Functionality for Windows Phone 8.x
The Geofence functionality for the Windows Phone 8.x is as follows:
Scenario 1
If a Geo-fence is already created before the
Scenario 2
If a Geo-fence is created or modified after a device is
It takes x amount of time, before it starts reflecting. This x amount is configurable at design time.
The Windows Phone 8 device has a heartbeat from the container app (Kony) and a sync interval from the inbuilt device app. In heartbeat, admin gives the location details to the service. In sync interval, the device app pulls in any new policies/commands and applies them.
The heartbeat when the app is in foreground is 15 minutes and when the app is in back ground is 30 minutes. The Sync interval can be set by the admin in device settings and has a minimum value of 30 minutes.
Since in every heartbeat, admin brings any new/modified Geo-fences (which is 30 minutes or less), the policies based on the Geo-fence certainly comes to the device that happens in every Sync Interval (it is a minimum of 30 minutes).
To summarize, if the admin modifies or creates a new Geofence, it is applied in the next immediate sync that is 60 minutes, by default.
Searching a Time Fence
You can search a Time Fence through the search filters based on all the grid columns. You can apply a single or a combination of search filters to define the search criteria and get the refined outcome.
To search a Time Fence, follow these steps:
- Time Fence Name: Enter partial or complete name in the Search Time Fence Name field.
- Description: Enter the specific details in the Search Description field.
- Created By: Enter partial or complete name of the Administrator in the Search Created By field.
- Last Modified On: Select the required option from the drop-down list.
- According to your search filter criteria, the list view is updated with respective Time Fence details. By default, the list view displays ten Time Fences according to Display settings, which you can modify through Display drop-down list. You can also scroll through the list view through Previous and the Next button.
Creating a Timefence
Time fences are created to indicate a duration of time during which certain activities must or must not be done. They are typically used with device and app policies.
From the Settings section, click Geo and Time Fence List from the left panel. The Geo and Time Fence List page appears with a list of the Geo-Fence(s) details. Click the Time Fence tab to open Time Fence page. The list view displays a list of all the Time Fences along with their description. You can search the Time Fences based on each column.
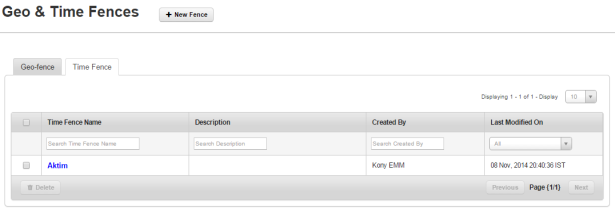
Time Fence(s) List view displays the following columns:
| Properties | Description |
|---|---|
| Time Fence Name | Displays the name of the Time Fence program |
| Description | Displays the brief description of the Time Fence program. |
| Created By | Displays the owner name. |
| Last Modified On | Displays the date on which the Time Fence was last modified. |
To create a new Time Fence program, follow these steps:

- To open the New Fence window, click the + New Fence button next to the Geo and Time Fence List label at the top of the page.
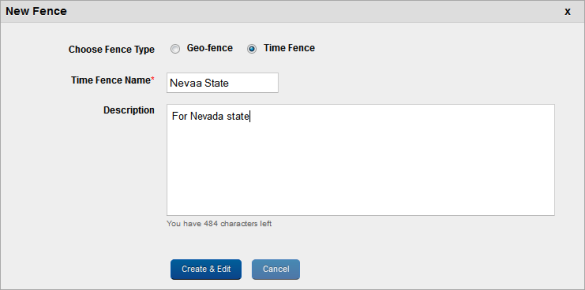
New Fence window appears.
-
Enter the following details:
- Choose Fence Type: By default, this option is set to Timefence, which you can modify to Geofence.
-
Timefence(s) Name: Enter a valid name for the Timefence.
This action activates the Create and Edit button.
-
Description: Enter a brief description of the Timefence. The description should accurately describe the features and functionality of the Timefence.
- Click the Save and Edit button to update the Time Fence immediately.
The Time Fence details page appears.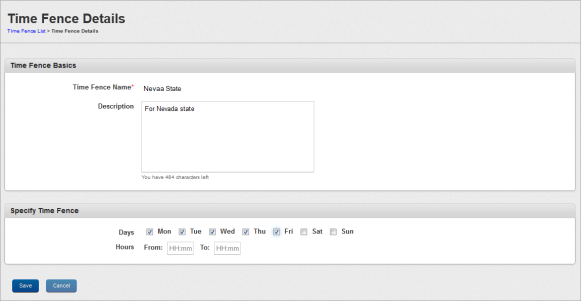
- Enter details for the following fields:
- Time Fence(s) Basics:
- Timefence(s) Name: Displays timefence name.
- Description: This field pre-populates with the existing details. If required, you can update the description.
- Specify Time Fence:
- Specify Days: Select the weekday, when you wish to specify the time fence.
- Specify Business Hours: If you select the Yes option, From and To fields becomes active.
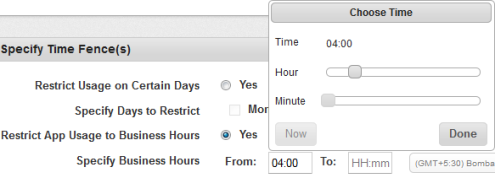
Click your cursor in the From field to open the Choose Time window. Use the slider to select the time in hours and minutes. Click the Done button to close the window.
Click the cursor in the To field to open the Choose Time window. Use the slider to select the time in hours and minutes. To set the current time, click the Now button. Click the Done button to close the window.
A timefence is created from a range of hours specified at the From and To fields. A timefence in applied only if at least a day is selected. If you have not selected a day for a timefence, the system does not allow you to save a timefence. A timefence always starts from your server time.
Example 1:
If a timefence is set for 8 p.m to 8 a.m for Monday, then the total number of hours in the timefence range splits into two parts for Monday as follows:Monday - 12. 00 am to 08.00 am
Monday - 08.00 p.m to 12.00 a.m
Example 2:
If a timefence is set for 8 p.m to 8 a.m for Monday and Tuesday, then total number of hours in the timefence range splits into two parts for Monday and Tuesday as follows:
Monday - 12. 00 a.m to 08.00 a.m
Monday - 08.00 p.m to 12.00 a.m
Tuesday - 12. 00 a.m to 08.00 a.m
Tuesday – 08.00 p.m to 12.00 a.m
When the administrator changes the time zone settings on the portal, the server does not update or resolve the policies immediately. Policy resolution occurs when a device submits the heartbeat.

Note: The time zone applied for the timefence is derived from the value specified in the Device Settings.
Even though you have From > To fields in terms of time, the server logic respects the To value untill 23:59 . If you enter values from 21:00 to 3:00, the server interprets values as 21:00 to 23:59 only
- Time Fence(s) Basics:
- Click the Save button. In the success message that appears, click OK to return to the main page.
Click the Cancel button to close the window.
When Admin changes the time zone settings on the portal, only the time zone changes, but the values of time zone remain the same. The time fence values are not automatically adjusted as per the new time zone provided.
Deleting a Time Fence
If a Time Fence program is no longer applicable to a device, you can delete it.
To delete a Geo-fence, follow these steps:
- Select the required Time Fence through the check box next to it in the list view.
- Click the Delete.
- In the warning message (Delete Time Fence) that appears, click Yes to continue.
- In the success message that appears, click OK to return to the main page.
The deleted Time Fence is no longer displayed in the list view.
| Copyright © 2018 Kony, Inc. All rights reserved. |
