
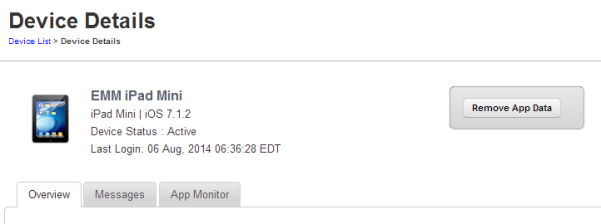
Device Details
The primary purpose of the Device Details page is to display complete information of a device and manage the device through various actions available.
The Device Details Page includes the following screen elements:
- Home Carrier: Displays the carrier details from whom the phone was purchased.
- Current Carrier: Displays the name of the current carrier network the device is on.
- Device Model:Displays the model details of the device.
- Device Jailbroken: Displays whether the device is jail broken or not.
Note: For iOS, even after the SIM card is removed from a device, the Home Carrier field and the Current Carrier field in the Device Details page under Overview tab display the existing carrier details.
The Device Details Page content is divided into the following sections.
Device Details Page Tabs
Device details page displays the following tabs:
Overview
By default Overview tab is set to active. This tab displays the various attributes of the device. You can update the ownership details only.
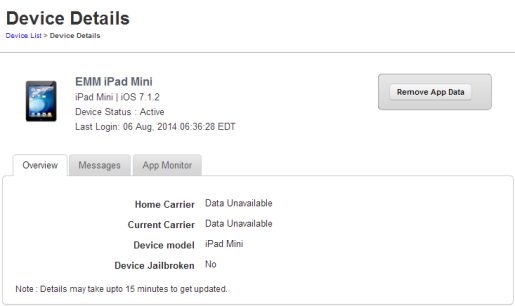
Overview for iOS
- Home Carrier: Displays the carrier details from whom the phone was purchased.
- Current Carrier: Displays the name of the current carrier network the device is on.
- Device Model:Displays the model details of the device.
- Device Jailbroken: Displays whether the device is jail broken or not.
Overview for Android
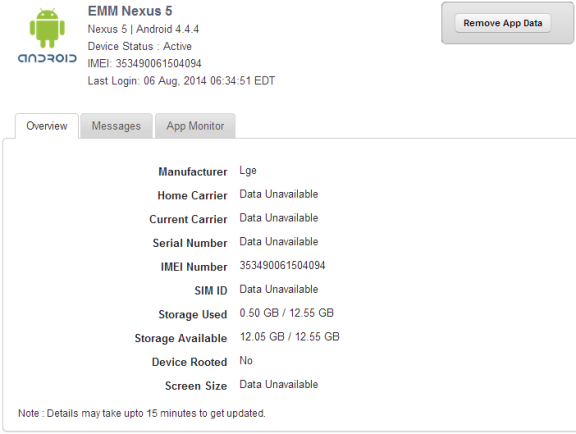
- Manufacturer: Displays the details of the manufacturer of the device.
- Home Carrier: Displays the carrier details from whom the phone was purchased.
- Current Carrier: Displays the name of the current carrier network the device is on.
- Serial Number: Displays the serial number of the device.
- IMEI Number: Displays the IMEI number of the device.
- SIM ID: Displays the SIM ID.
- Storage Used:Displays the amount of storage used by the device.
- Storage Available:Displays the amount of storage available.
- Device Rooted: Displays whether device root access is enabled.
- Screen Size: Displays the screen size of the device.
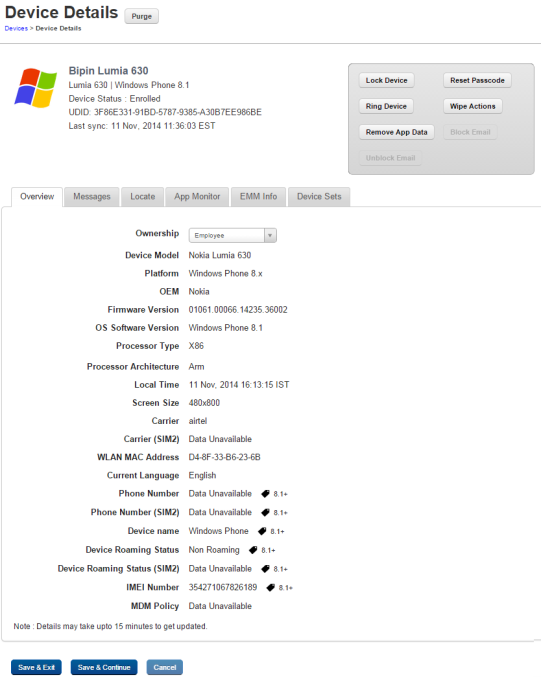
- Ownership: Displays the ownership of the device. Available options are Corporate, Employee, and Shared.
- Device Model: Displays the details of device model.
- Platform: Displays platform details of the device.
- OEM: Displays OEM details of the device.
- Firmware Version: Displays the firmware version of the device.
- OS Software Version: Displays the operating system software version of the device.
- Processor Type: Displays the details of the device processor.
- Processor Architecture: Displays the details of the device processor architecture.
- Local Time: Displays the device local time.
- Screen Size: Displays details of screen size of the device.
- Carrier: Displays the name of the carrier network the device is on.
- Carrier (SIM2): Displays the name of the current carrier network the device is on.
- WLAN MAC Address: Displays WLAN MAC address of the device.
- Current Language: Displays the device's current language.
- Phone Number: Displays the phone number of the device.
- Phone Number (SIM2): Displays the phone number of the second sim card of the device.
- Device Name: Displays the name of the device.
- Device Roaming Status: Displays details on whether the device is on roaming or not.
- Device Roaming Status (SIM2): Displays details on whether the device's second sim card is on roaming or not.
- IMEI Number:Displays the IMEI number of the device.
- MDM Policy: Displays details of MDM policy applied on the device.
-
Ownership: Displays details of ownership of the device. Options are Corporate, Employee, and Shared.
-
MDM Policy: Displays details of MDM policy applied on the device.
-
MAC Address: Displays the MAC address of the network adapter.
-
Manufacturer: Displays details of the manufacturer of the device.
-
Device Model: Displays device model details.
-
Total Physical Memory: Displays details of total physical memory of the device.
-
Username: Displays username of the device user.
-
DomainRole: Displays details of domain role of the device.
-
Current time Zone: Displays the local time zone details of the device.
-
HDD Manufacturer: Displays details of the HDD manufacturer.
-
HDD Availability: Displays details of HDD availability.
-
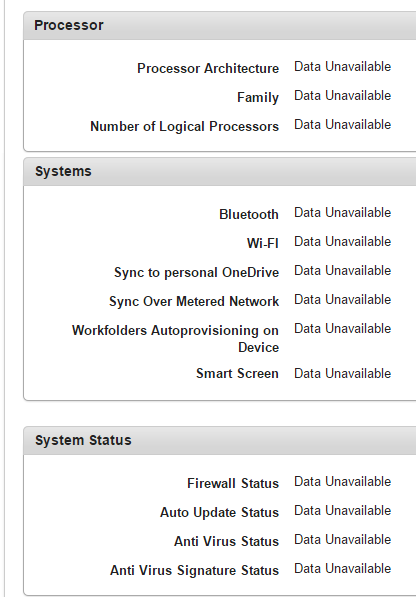
Processor Architecture: Displays details of processor architecture.
-
Family: Displays details of the processor family.
-
Number of Logical Processors: Displays details of logical processors available on the device.
-
Bluetooth enabled: Displays details on whether bluetooth is enabled.
-
Wi-Fi enabled: Displays details on whether Wi-Fi is enabled.
-
Sync to personal OneDrive: Displays details on whether the device is synched with personal OneDrive account.
-
Sync Over Metered Network: Displays details about whether the device can sync over metered network.
-
Workfolders Autoprovisioning on Device: Displays whether the device has auto-provisioning for work folders.
-
Smart Screen: Displays details about smart screen if the device has a smart screen.
-
Firewall Status: Displays details on the status of the firewall.
-
Auto Update Status: Displays details on auto update settings.
-
Anti Virus Status: Displays details on anti virus available on the device.
-
Anti Virus Signature Status: Displays details on the status of anti virus signature.
-
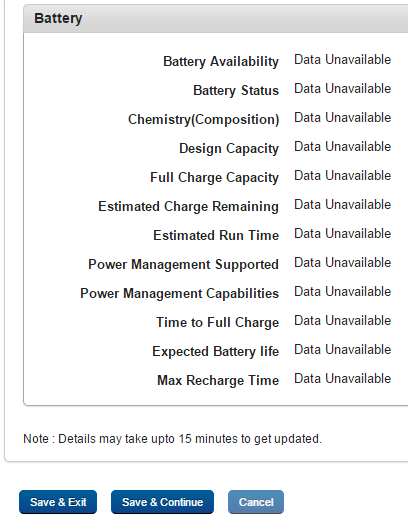
Battery Availability: Displays details on battery availability.
-
Battery Status: Displays details on status of the battery.
-
Chemistry(Composition): Displays details of the chemical composition of the battery.
-
Design Capacity: Displays details about the design capacity of the battery.
-
Full Charge Capacity: Displays details on the full charge capacity of the battery.
-
Estimated Charge Remaining: Displays details of the remaining charge on the battery.
-
Estimated Run Time: Displays details on how long the battery can run.
-
Power Management Supported: Displays details of power management if power management is supported.
-
Power Management Capabilities: Displays details of power management capabilities.
-
Time to Full Charge: Displays the time needed to fully charge of the battery.
-
Expected Battery life: Displays details on the expected battery life of the device.
-
Max Recharge Time: Displays details on the maximum amount of time needed to recharge the battery of the device.
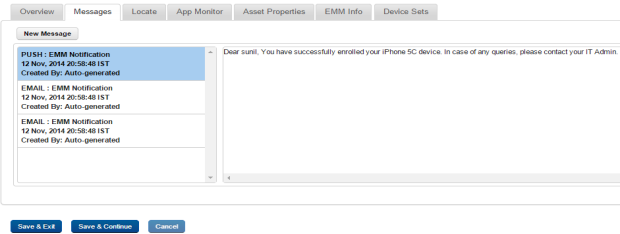
Messages
This option is used to send a message to a device user. The administrator can send a message to a Device User for various reasons, for example,
- Inform the user about a new requirement or development.
- Request the user to take an immediate action, for example, any compliance issue.
- Inform the user about completion of certain tasks.
- The Device Users receive the message in the mode specified and can view the same.
To compose a message, follow these steps:
- Click the New Message button to open the Compose Message window. Enter the following details:
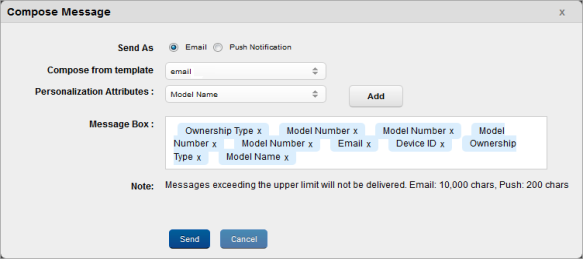
- Send As: By default this option is set to Email. You can modify it to Push Notification.
- Compose from Template: Select the required option from the drop-down menu.
To automate the work-flow process, you create message templates under Device Settings > Message Templates section. You can access these messages in Compose Message window through Compose from Template dropdown list.
- Personalization Attributes: Select the required attribute from the dropdown list. These details are populated through Active Directory.
The Personalized Attributes are predefined and system displays the related details as per the selected attributes. For example, if you select Device OS, Device Name, and the Device Model No from the dropdown list. The respective details are picked up from the device and appended in the sent message.
- Click the Add button. The details appear in the Message Box.
- Click the Send button to submit the message. In the confirmation message (Send Message – Success) that appears, click OK to continue.
The message appears in the message window
- Personalization Attributes: Select the required attribute from the dropdown list. These details are populated through Active Directory.
The Personalized Attributes are predefined and system displays the related details as per the selected attributes. For example, if you select Device OS, Device Name, and the Device Model No from the dropdown list. The respective details are picked up from the device and appended in the sent message.
- Click the Add button. The details appear in the Message Box.
- Click the Send button to submit the message. In the confirmation message (Send Message – Success) that appears, click OK to continue.
The message appears in the message window.
Locate
The Locate Tab displays the location details. You may wish to know the location of a device under several situations. For example,
- The device is out of compliance and you wish to take some action against the same.
- You receive an alert on the device.
- User is traveling.
- User is absent without notice for a while.
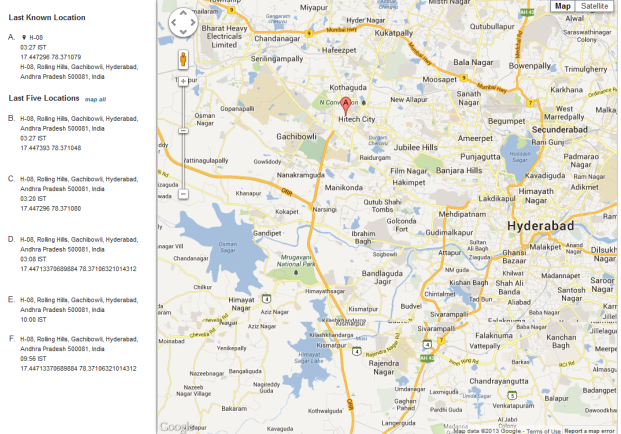
You can view the most recently polled location of the device both in terms of coordinates as well as the address as indicated by the used maps service.
You can also view the last 5 locations of the device as per the location samples collected.The system displays the following location information about the device:
- Current location
- Location Address (as provided by the maps software used)
- Time of Polling (Time specified in UTC)
- Map (with pinned location) with latitude and longitude details
- Past 5 locations
- Location Pin Name
- Location Addresses
- Time of Polling
You can zoom in and zoom out as required.
Important: If location is turned off on device, then portal does not display the map with last five locations.
Note: If you are using a free Google Maps license, when the limit is reached you will see an error - 'Geo coder failed due to:OVER_QUERY_LIMIT'. In such cases it is recommended to move to a business license.
App Monitor
The App Monitor displays the installed apps on a device. It does not display default apps that are installed with OS.
- Installed Apps: Installed Apps section displays all apps that are installed on the device. Details of installed apps and app details vary based on the operating system of the device. You can find more details on it in the sections below specific for each OS.
- Targeted Apps: This section displays all apps targeted to a device but not installed on the device.
There are types of Apps
App Monitor for iOS
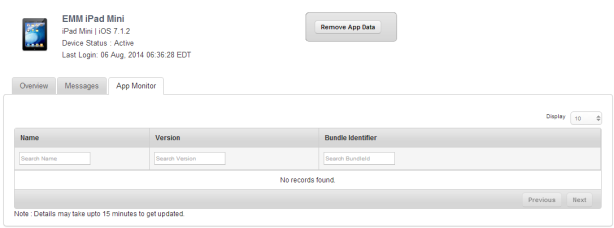
The App Monitor list view for iOS has the following details:
- Name: Displays the Name of the application.
- Version: Displays the Version of the application.
- Bundle Identifier: Displays the bundle ID of the application.
Note: In the App Monitor tab for iOS, Publisher has been replaced with Bundle Identifier.
App Monitor for Android
You can search a desired app through search filters based on all grid columns. You can apply a single or a combination of search filters to define the search criteria and get the refined outcome.
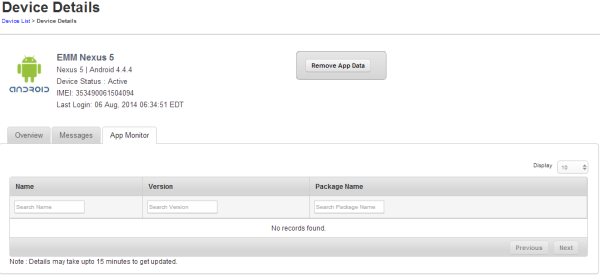
The App Monitor list view for Android SAFE devices has the following details:
To search for an app, follow these steps:
- Name: Displays the Name of the application.
- Version: Displays the Name of the application.
- Package Name: Displays the package name of the application.
Device Details Page Actions
You can perform the following activities from Device List page.
Searching for Devices
You search for devices through search filters based on all grid columns. You can apply a single or a combination of search filters to define the search criteria and get the refined outcome. To search a device, follow these steps:

- Enter or select details for the following search filters:
- Device Name: Enter partial or a complete device name in the Search Device Name text field.
- Status: Select the desired option from the drop-down list.
- Device Owner: Enter partial or a complete owner name in the Search Device Owner text field.
- Ownership: Select the required category from the dropdown list.
- OS: Enter desired operating system version in the Search OS text field.
- Last
- Date
- According to your search filter criteria, the list view is updated with respective device details. By default, the list view displays ten devices according to Display settings, which you can modify through Display dropdown list. You can also scroll the list view through Previous and the Next buttons.
Remove App Data
Remove App Data is only applicable to Enterprise Apps that are wrapped-signed and pushed through EMM and not for side-loaded apps. This action is performed to remove all the data from the apps. This action is performed by an enterprise store to retain the apps but remove the app data to retain safety.
To remove the data from the apps, follow these steps:
- Click the required device in the list view.
The Device Details page appears.
- Click the Remove App data button.
The System displays the warning message (Remove App Data) asking the user, if really wishes to remove all the corporate data from the device.
- Click the Remove button to remove the app data.In the confirmation message (Remove App Data)that appears,click OK to return to the page.
Note: For Windows Phone 8.x devices, the remove app data policy will not work if the app is in use. The policy command will apply when the app is closed and relaunched.
Note: If this is applied for non-supervised devices, the command will not execute.
| Copyright © 2018 Kony, Inc. All rights reserved. |