Configuring External Email Clients
You can configure external email clients in the Kony Management suite. Mail + supports iOS devices while the Android For Work client supports Android phones (supported devices only). You must have an email and calendar policy where you can configure external email clients.
Configuring Mail + Client
To set up Mail Plus for Enterprise, follow these steps:
- In Kony Management suite administrator web console, navigate to Device Settings.
- Toward the end of the page, enter license key details in the Mail + for Enterprise section.
- Click Save.
- Navigate to Device Management > Device Policies.
- Click on the Email and Calendar policy that you want to configure. The policy details page appears. If there is no policy, create one.
- Navigate to the iOS tab.
-
Select the check box to display Mail Plus for the Enterprise window. Various fields appear, for all the features, select an option or enter required details.
- User Name: The default value is %username%.
Note: If you have a single domain, retain the default value macro %username%. If you have multiple domains, provide %email% OR %username% in the User Name field.
- Exchange HostName: Enter your exchange host name.
- Email Address: The default value is %email%.
- Allow iTunes Backup: The default value is No. Select Yes to enable iTunes backup of the Mail Plus Enterprise App.
- Allow Passcode: The default value is No. Select Yes to enable a passcode on the Mail Plus Enterprise App.
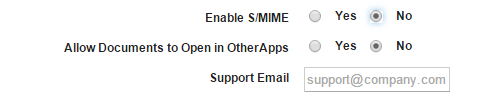
- Enable S/MIME:The default value is No. Select Yes to enable Secure/Multipurpose Internet Mail Extensions (S/MIME). When you select Yes, theAllow Same Certificate for Signing andEncryption feature appears.
- Allow Same Certificate for Signing and Encryption: The default value is Yes, which allows you to use one certificate for S/MIME signing and encryption. Select the S/MIME certificate from the list.

If you select No, the Encryption and Signing certificate fields appear.
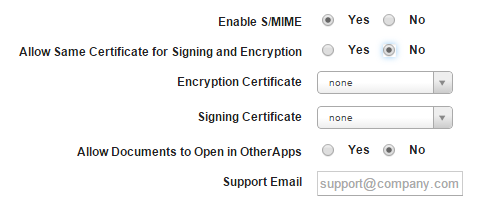
- Encryption Certificate: Select an encryption certificate from the list.
- Signing Certificate: Select a signing certificate from the list.
- Allow Documents to Open in Other Apps: By default, the setting is configured to No. Configure to Yes if you want to allow documents in the Mail Plus Enterprise app to open in other apps.
- Support Email: Enter the email ID of Mail Plus configuration support.
- Click Save & Activate.
Configuring Email for Android for Work
To configure Android for Work, do the following:
- In Kony Management suite administrator web console, navigate to Device Management > Device Policies.
- Click on the Email and Calendar policy you want to configure. The policy details page appears. If there is no policy, create one.
- Navigate to the Android tab.
- Select Email for Android for Work check box. Various fields appear, for all the features, select an option or enter required details.
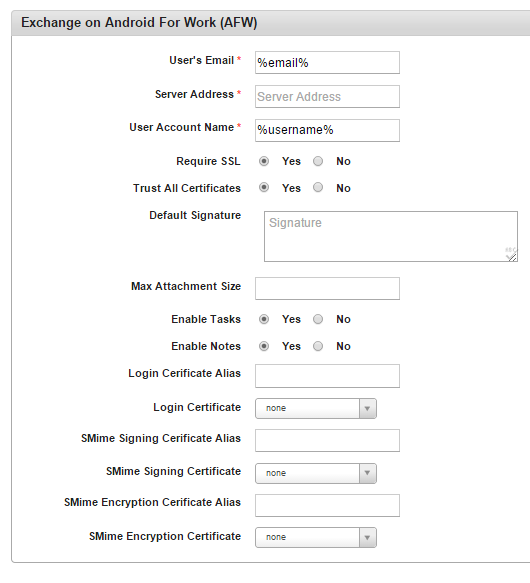
- User's Email: Enter the email of the exchange account.
- Server Address: Enter the email server address.
- User Account Name: Enter the user account name.
- Require SSL: By default, Require SSL is configured to Yes. If the email server does not require Secure Sockets Layer (SSL), configure to No.
- Trust ALL Certificates: By default, Trust All Certificates is configured to Yes. If you do not want to trust all certificates, configure the feature to No.
- Default Signature: Enter your email signature details that can be used as the default signature for the email being configured.
- Max Attachment Size: Enter the maximum size of the attachments that are allowed for the email.
- Enable Tasks: By default, Enable Tasks is configured to Yes. If you do not want to enable tasks associated with the email account to sync with the device tasks feature, configure to No.
- Enable Notes: By default, Enable Notes is configured to Yes. If you do not want to enable notes associated with the email account to sync with the device notes feature, configure to No.
- Login Certificate Alias: Enter an alias for the log-in certificate.
- Login Certificate: Select a certificate from the list.
- SMIME Signing Certificate Alias: Enter an alias for the SMIME signing certificate.
- SMIE Signing Certificate: Select a certificate from the list.
- SMIME Encryption Certificate Alias: Enter an alias for the SMIME encryption certificate.
- SMIME Encryption Certificate: Select a certificate from the list.
- Click Save & Activate.
| Rev | Author | Edits |
| 4.1 | PK | PK |
| Copyright © 2017 Kony, Inc. All rights reserved. |