
Upgrade Tomcat Manually from 6.5.x to 7.0.x
This section provides you the steps to upgrade Kony MobileFabric Integration Service manually from 6.x to 7.x on Tomcat on a single node setup.
Prerequisites
The following table displays the prerequisites for upgrading Kony MobileFabric Integration Service. Assuming that you have already installed Kony MobileFabric Integration Service and have setup the required Databases (Reports and Admin).
| Artifacts | Type | Purpose |
|---|---|---|
|
Respective Database and Flyway scripts
|
Database Scripts | To setup the required schema |
|
WAR files | To be deployed to Application Server |
|
version 3.2.1 | https://flywaydb.org/getstarted/download.html |
Backup
- Stop the Tomcat server.
- Take a backup of the following files. These file are available at <install-location>\install\webapps.
- .WAR files
- middleware.war
- admin.war
- services.war
- metrics.ear from <jboss-install-location>/jboss62_jms/standalone/deployments (applicable only for metrics).
- .WAR files
- After taking the backup, delete or uninstall the above files.
Migrating Database from 6.5.x to 7.0.x
Migrating database from 6.5.x to 7.0.x is done using flyway tool.
- Download your DB specific migration scripts of 7.0.
Migrating Admin Database
To migrate admin DB, follow these steps:
- Open V3_konyadmin-xxxx-7.0.0.0.sql. xxxx is the type of DB you are using.
- In the V3_konyadmin-xxxx-7.0.0.sql, replace all KONY_SERVER place holders with the actual values from your middleware.properties file.
- After editing, the V3-xxx.sql script, place all the scripts into SQL folder in flyway installation directory.
Example: \flyway-commandline-3.2.1-windows-x64\flyway-3.2.1\sql
-
Executing the scripts– Before executing the scripts, configure flyway to your database.
- Open flyway.conf from \flyway-commandline-3.2.1-windows-x64\flyway-3.2.1\conf
- Edit the following variables. Un-comment them after editing
flyway.url=<your jdbc URL> example for MySQL, it is flyway.url=jdbc:mysql://<IP>:<PORT>.
flyway.driver=<SQL DRIVER>
- flyway.user
flyway.password
- flyway.schemas= <your admin Database name>
flyway.baselineVersion=3
-
Open the command line and type cd to \flyway-commandline-3.2.1-windows-x64\flyway-3.2.1.
-
Execute the command flyway repair followed by flyway migrate. Below is the expected output after executing flyway repair and flyway migrate commands:
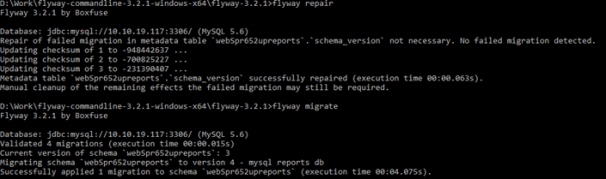
-
- You admin database is now migrated to 7.0.
Example: MS-SQL V3__konyadmin-sqlserver-7.0.0.0.sql. Similarly for My SQL, V3__konyadmin-mysql-7.0.0.0.sql etc.
Example: ‘${KONY_SERVER_RICH_CLIENT_DEPLOY}' => ‘corresponding_value_in_your_middleware.properties’
Note: If no values are assigned in middleware.properties, set those values to null in the SQL files.
Example: In middleware.properties, if you have
#Memcache configuration=
#memcache.cluster=
Then in SQL files, set the placeholders value as null.
Important: For null values, remove the colon ' '.
Migrating Reports Database
To migrate your reports database, follow these steps:
-
Download the flyway scripts with respect to the type of database you are using (Oracle, MySQL, SQL) of 7.0.
-
Place the downloaded scripts in \flyway-commandline-3.2.1-windows-x64\flyway-3.2.1\sql.
-
Open flyway.conf from \flyway-commandline-3.2.1-windows-x64\flyway-3.2.1\conf.
-
Edit the following variables. Un-comment them after editing and save the file.
-
flyway.url=<your jdbc URL> example for MySQL, it is flyway.url=jdbc:mysql://<IP>:<PORT>.
-
flyway.driver=<SQL DRIVER>
- flyway.user
-
flyway.password
-
flyway.schemas= <your Reports Database name>
-
flyway.baselineVersion=3
-
-
Execute the flyway repair followed by flyway migrate as you have done with Admin Database.
- Your Reports database in now migrated to 7.0.
Migrating WAR files
-
Download admin.war, middleware.war and services.war of 7.0.
-
Remove the data present in deployments folder from <installation_folder>\tomcat\webapps after taking the backup.
-
Place the 7.0 war files admin.war, middleware.war, services.war in <installation_folder>\tomcat\webapps
- Delete the middleware folder shortcut from the tomcat lib folder. Copy konycache-derby.jar to <install-location>\tomcat\lib.
-
Copy derby.jar and jboss-client.jar from the <middleware-home>\lib\middleware to <install-location>\tomcat\lib .Take the backup and delete the middleware folder from <middleware-home>\lib folder.
Migrating Metrics
If you are using metrics in 6.0.x / 6.5.x and would like to update the same to 7.0.x, follow the below steps:
- Download metrics.ear of 7.0.
-
Open metrics.ear in a ZIP editor and rename metricsJAR-0.0.1-SNAPSHOT.jar present inside it to metrics.jar.
Verification
Verify the upgrade process by logging into the console and look for Server Version and Health Check.
To verify the upgrade process
- Access the URL http://ipaddress:port/middleware/version.html in a browser.
- Navigate to the URL
http://ipaddress:port/admin/version.htmland look for server version. - Navigate to Settings and click Health Check and look for Report DB, Admin DB and Reporting Queue. Note that the status should be in PASSED state.
-
Navigate to Settings and click Configuration.

Note: Access to Reporting Queue will be green only if you have configured metrics and the JMS server is up and running.
| Copyright © 2013 Kony, Inc. All rights reserved. |