
Configure Style Constants in Quantum Visualizer
From Quantum Visualizer V9 SP3 GA, the Skins tab in the project explorer has been renamed as the Themes tab. In the Themes tab, you can configure new Style Constants for Colors and Fonts in addition to the existing Skin functionalities. By using the Style Constants feature, you can create and apply pre-defined styles for colors and fonts for use throughout the project. Using a Style Constant for Color, you can define the values for the type, color, and opacity for a background. Using the Style Constant for Font, you can define the values the for color, type, opacity, family, weight, style, and size for a font.
NOTE: From the V9 Service Pack 5 release, support to define Style Constants for Color with the Two Step Gradient and Multi Step Gradient Color Types has been added in Quantum Visualizer. For more information on how to configure the background type, refer Set the Skin Background.
For instance, the Infinity Retail Banking application is used as the base app on which customizations are made based on customer requirements. When a new prospect arrives, using the Style Constants feature, you can change the generic branding of the Retail Banking application with a branding that is specific to the prospective customer. Alternatively, an existing customer can use this feature to change their branding, if there have been any changes to their corporate branding. For example, a change in the logo or corporate branding colors, etc.
NOTE: If you delete a Style Constant that is applied in the project, the configuration remains as is, and the style constant is renamed as the Default style constant.
The following topics describe how to work with style constants and apply styles on skins:
- Create a New Style Constant for Color
- Configure a Style Constant for Color
- Create a New Style Constant for Font
- Configure a Style Constant for Font
- Apply Style Constants to Skins
- Rename a Style Constant
- Importing Style Constants
- Exporting Style Constants
Create a New Style Constant for Color
Using the Style Constant for Color feature, you can create a style constant based on the values of the Color, Type, and Opacity of the Background. Using these style constants, developers can instantly update the Skins present in a project. You can create multiple style constants for colors in a project.
To create a new style constant for color, follow these steps:
- From the Project Explorer, navigate to the Themes tab.
- Expand the Style Constants node.
-
Right-click Color, and select Add New from the context menu.
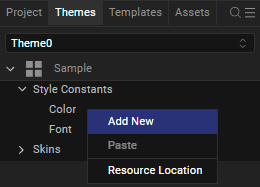
A new Style Constant for Color is added in the Color section with a default name, color1 .
Configure a Style Constant for Color
You can configure the Type, Color, and Opacity of a Style Constant for Color. The configuration changes made to the style constants are applied instantly in the project.
To configure the style constant for color, follow these steps:
- From the Project Explorer, navigate to the Themes tab.
- Expand the Style Constants node.
-
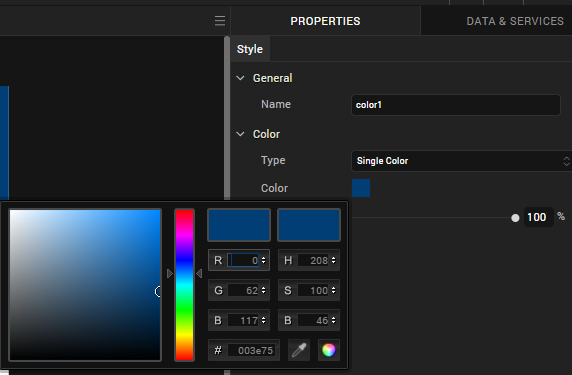
Expand the Color node, and select the style that you want to configure.
-
From the Properties panel, in the Color section, configure the following fields:
-
Select the background type from the Type list, and configure the background Color.
For more information on how to configure the background type and color, refer Set the Skin Background.
-
Select the Opacity for the background color.
The Style Constant for Color is updated.
-
Create a New Style Constant for Font
Using the Style Constant for Font feature, you can create or define style constants for fonts based on the values of the Font Color, Opacity, Size, Font Family, Weight, and Font Style. Using these style constants, developers can instantly update the Skins present in a project. You can create multiple style constants for fonts in the project.
To create a new style constant for fonts, follow these steps:
- From the Project Explorer, navigate to the Themes tab.
- Expand the Style Constants node.
-
Right-click Font, and select Add New from the context menu.
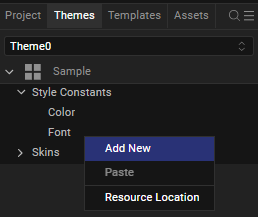
A new style constant for font is added in the font section with a default name, font1 .
Configure a Style Constant for Font
Using the Style Constant for Fonts, you can configure the Color, Opacity, Size, Font Family, Weight, and Style for a font. The changes made to the style constants are applied instantly in the project.
To configure the style constant for font, follow these steps:
- From the Project Explorer, navigate to the Themes tab.
- Expand the Style Constants node.
-
Expand the Font node, and select the style that you want to configure.
-
From the Properties panel, in the Fonts section, configure the following fields:
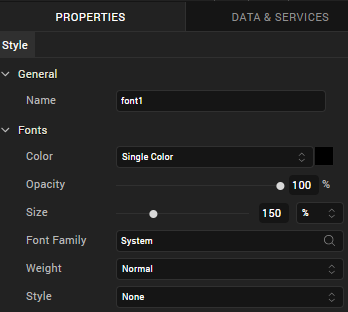
- From the Color list, select the desired font color.
- Configure the font size from the Size field.
- Select the font type from the Font Family list.
- Select the weight for the font from the Weight list.
- Select the style for font from the Style list.
- The Style Constant for Font is updated.
Apply Style Constants to Skins
By using the Style Constants feature, you can apply pre-defined styles for colors and fonts in Skins. When you configure a Style Constant for Color or Style Constant for Font, the style appears in the Style Constants section of the Color and Font Family lists in the Properties panel respectively. To apply a particular style to the Skin, you can select the style constant from the Styles list with a single click. Based on the style constants that you select, Quantum Visualizer updates the Skin accordingly. You can modify an existing style constant to instantly update the Skin or rebrand the app.
To apply the styles for skins, follow these steps:
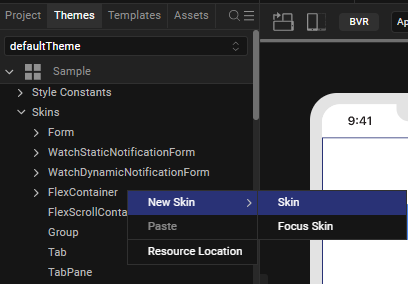
- From the Project Explorer, navigate to the Themes tab.
- Expand the Skins node.
-
Right-click the Widget for which you want to configure the skin style, and then select New Skin > Skin.
-
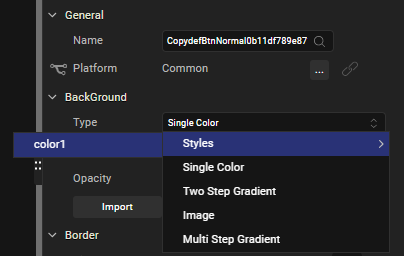
From the Properties panel, in the Background section, select the type of background from the Type list.
You can also choose to apply a Style Constant for Color that is available in the project. To do so, click Styles, and then select a Style for Color from the list of existing styles that appears.
Quantum Visualizer applies the background type, color, and opacity based on the style that you select.
-
From the Properties panel, in the Fonts section, select a font from the Font Family list.
You can also choose to apply a Style Constant for Font that is available in the project. To do so, click Edit for the Font Family, and then select a Style Constant for Font for each platform individually.
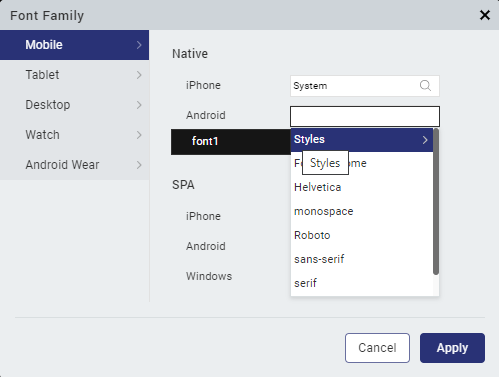
Quantum Visualizer applies the Font Color, Opacity, Size, Font Family, Weight, and Font Style based on the style constant that you select.
NOTE: Alternatively, you can select a Style Constant from the Token field of the Background and Fonts section of the Skin tab in the Properties panel.
Rename a Style Constant
When you create a new style constant, Quantum Visualizer generates a unique name for it. Temenos recommends that you rename the style constant as you might find it more useful and easily recognizable if you rename it.
To rename a style constant, follow these steps:
- From the Project Explorer, navigate to the Themes tab.
- Expand the Style Constants node.
-
Right-click the Style Constant that you want to rename, and then select Rename from the context menu.
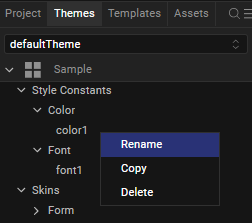
- Type a new name for the style constant, and then press Enter.
The Style Constant is renamed, and the new name appears in the Style Constants section.
Importing Style Constants
If you have exported Style Constants from another Quantum Visualizer project, you can import them into the current project.
To import a style constant, follow these steps:
- From the Project Explorer, navigate to the Themes tab.
- Right-click the Style Constants node.
- From the context menu that appears, click Import.
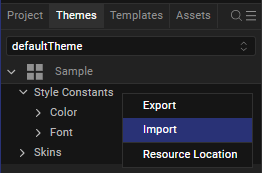
The Import dialog box appears. - Locate the file that you want to import, select it, and then click Open.
The style constants are imported into the current project.
NOTE: If a Style Constant with the same name already exists in the project, Quantum Visualizer appends a number to the name of the imported Style Constant.
Exporting Style Constants
You can export the Style Constants present in a project to import them for use in a different Quantum Visualizer project.
To export a style constant, follow these steps:
- From the Project Explorer, navigate to the Themes tab.
- Right-click the Style Constants node.
- From the context menu that appears, click Export.
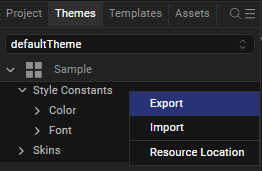
The Save As dialog box appears. - Navigate to the folder where you want to save the exported Style Constants, and then click Save.
Quantum Visualizer exports all the Style Constants for Color and Font (along with the resources, if there are any) that are part of the project in a .zip file.