Mobile applications typically perform operations on objects, such as getting a work order, updating it, and saving the work order. Object Services exposes the back end data using mobile friendly object APIs, including their rich metadata, so a developer can build client applications easily in a generic way that uses higher level constructs.
Object Services offers the following advantages for quickly mobilizing existing data and processes within LOB systems:
By using Object Services, a developer can define APIs for object access, object metadata access, object relationships, and binary data (for example, images and attachments). The following is the fundamental process for mobile app development with Object Services:
The key concepts of Object Services are the app model, the mapper, and the data adapter.
App Model
Mapper
Data adapter
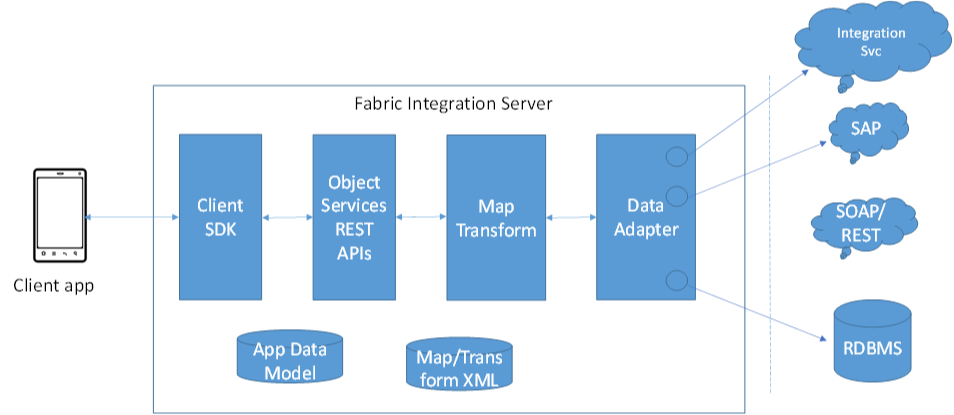
Objects Services has three primary components. The user-facing component is the REST APIs, exposing the application data model that the back end developer has either defined or imported from the back end. Data adapters are used to connect and access the back end data.
The data adapters understand the intricacies of the back end. The connectors are the key on how to talk to and fetch the data from the back end.
The bond between the data that comes from the back end via the data adapter and client facing APIs, is the map transformation engine. The three components are hosted in the Kony Fabric servers.
The following describes the primary components and features of Object Services.
Mapper
Data Adapters
Sync Auto Generation
Binary Data Support
An overview of the Objects Services architecture follows.
To
To create an object service, follow these steps:
To use an existing integration service, refer to How to Use an Existing Integration Service.
Click the Advanced tab.
The Offline Objects feature enables you to download objects data from a Kony Fabric object service into a mobile device. This downloaded data can be used while the device doesn’t have network connectivity and can be synced later with the Kony Fabric object services backend. The Offline Objects feature uses the OData protocol, an open-sourced protocol to connect directly with object services without the need of another sync server in the middle. A user can use the Offline Objects feature with apps created using Kony Visualizer as well as apps that are developed natively.
For more information on Offline Objects, see Offline Objects Getting Started Guide, and Offline Objects API Reference Guide.
In this procedure, you will
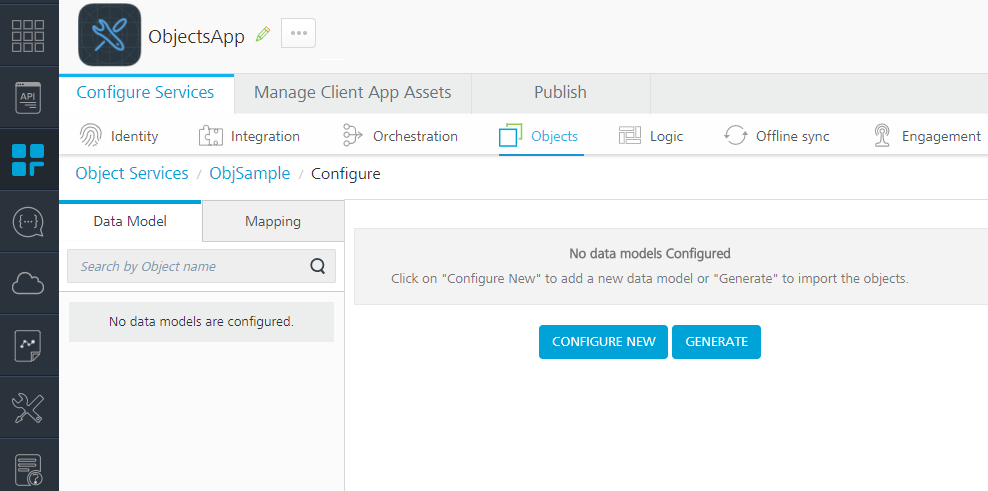
To generate a data model from back-end LOB objects, follow these steps:
The data model configure screen for the object service appears.
Importing the VTI_SAMPLE_ORDERS object also imports the objects related to VTI_SAMPLE_ORDERS in the object hierarchy on the SAP back end.
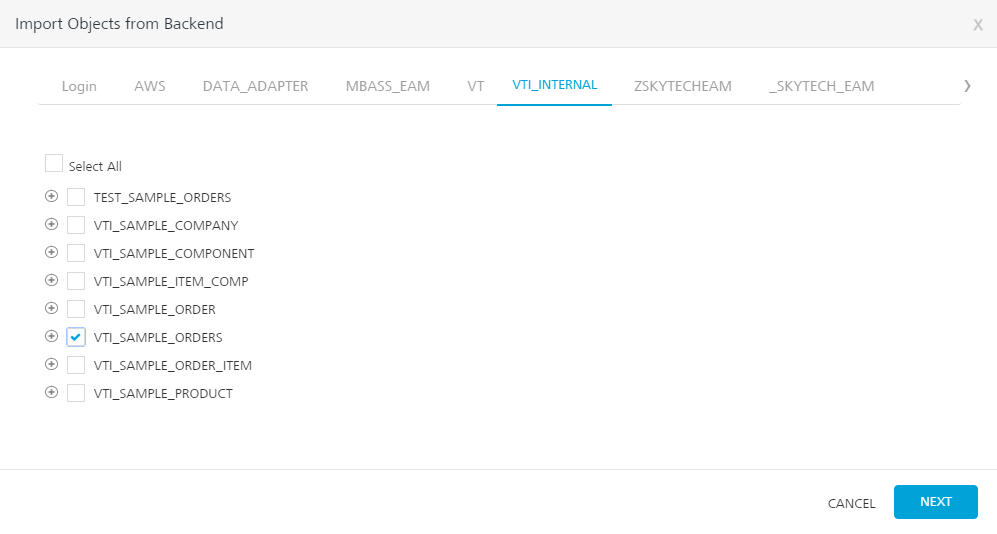
The Import Objects from Backend screen shows the imported back-end objects and the names of the imported objects for the data model. You can edit the names of the objects for the data model.
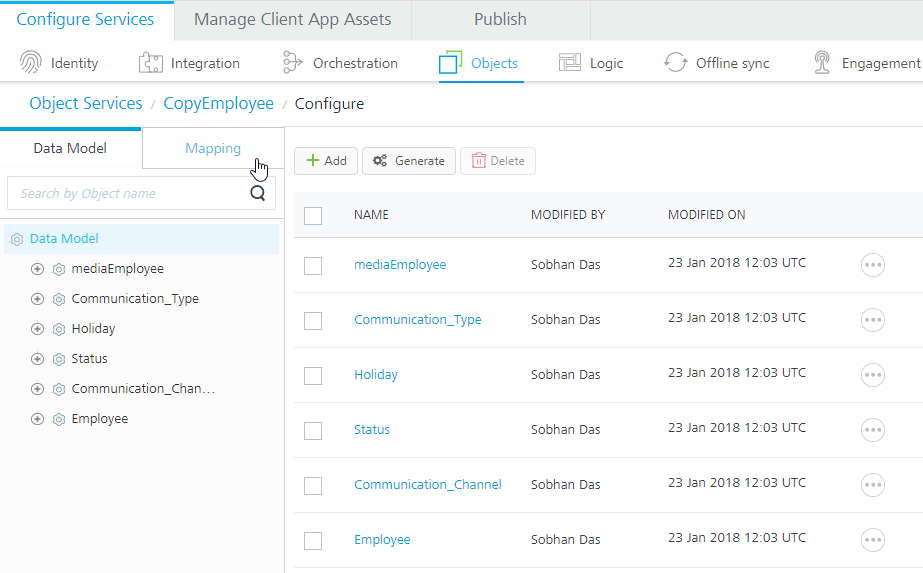
Kony Fabric generates the data model based on the back-end objects that you imported. The
The SAP back end maintains a single media object that is shared between different objects. Kony Fabric imports the binaries for all the objects that you selected from the SAP back end as one media object in the data model.
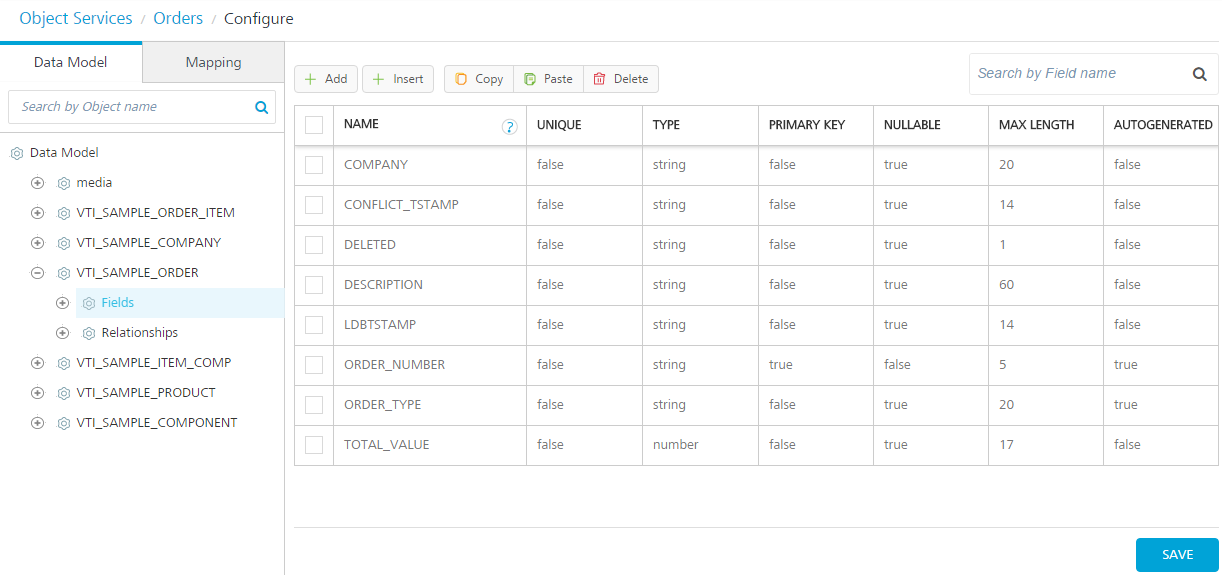
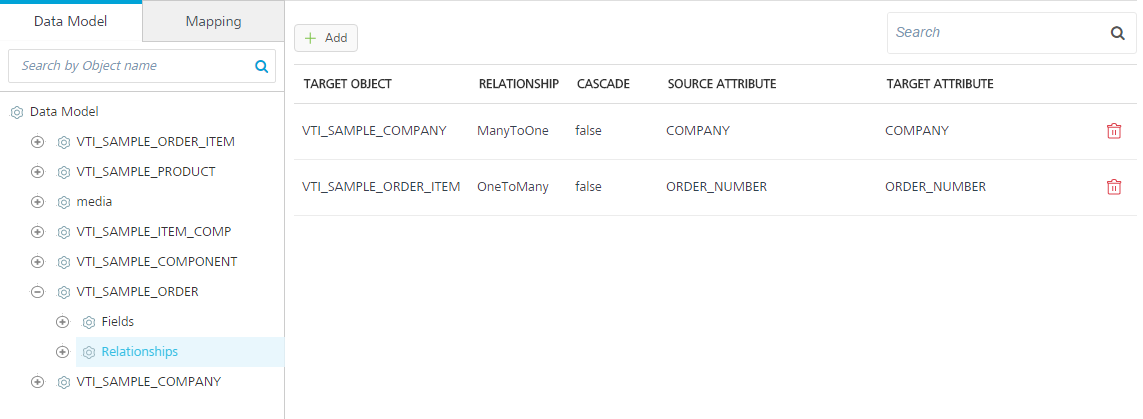
Fields and Relationships appear under the VTI_SAMPLE_ORDER object.
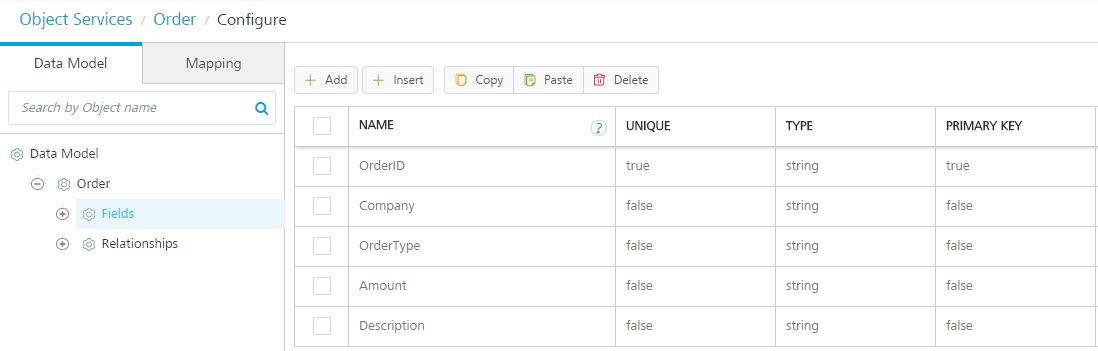
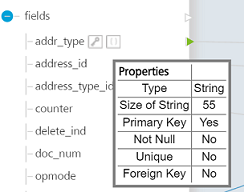
The list of fields in the VTI_SAMPLE_ORDER object appears in the Configure screen. You can change the name of the fields or modify the attributes . For example, you can change the primary key attribute. You cannot change the auto generated attribute.
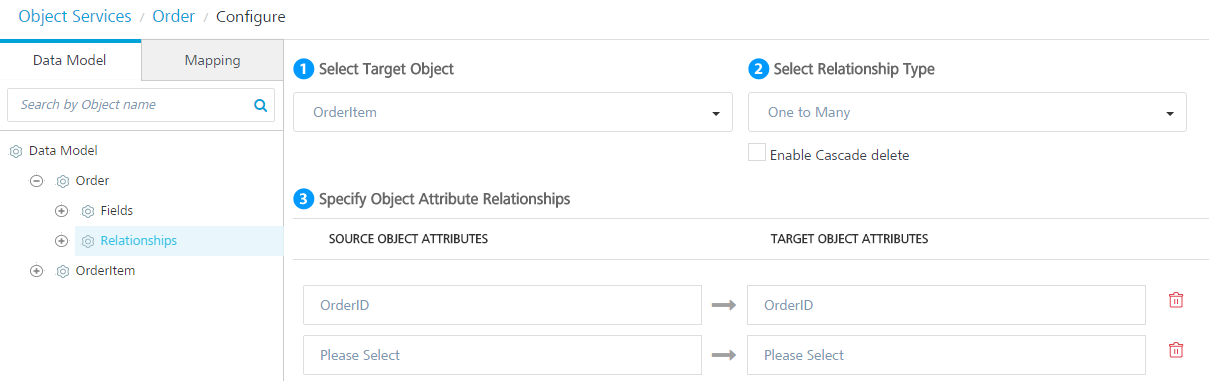
The list of relationships for the VTI_SAMPLE_ORDER object appears. The VTI_SAMPLE_ORDER object has a many-to-one join with the VTI_SAMPLE_COMPANY object and a one-to-many join with the VTI_SAMPLE_ORDER_ITEM object. You can edit or delete the relationships, or add new relationships.
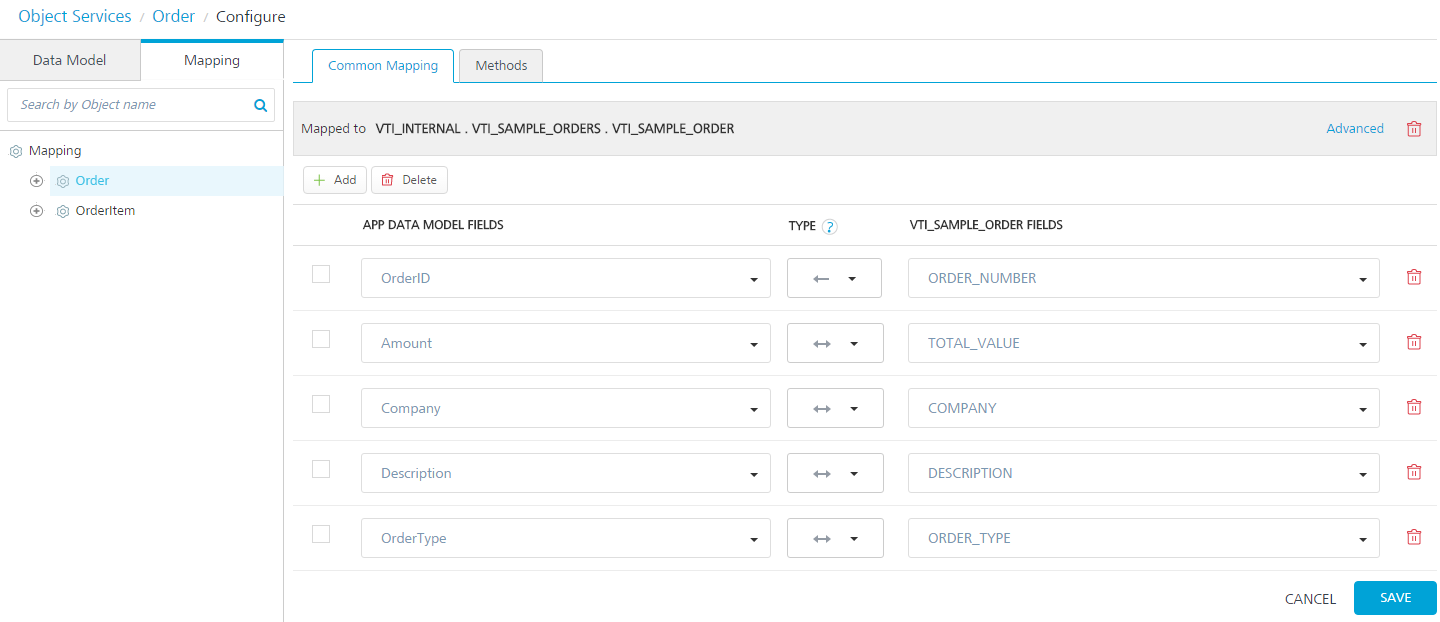
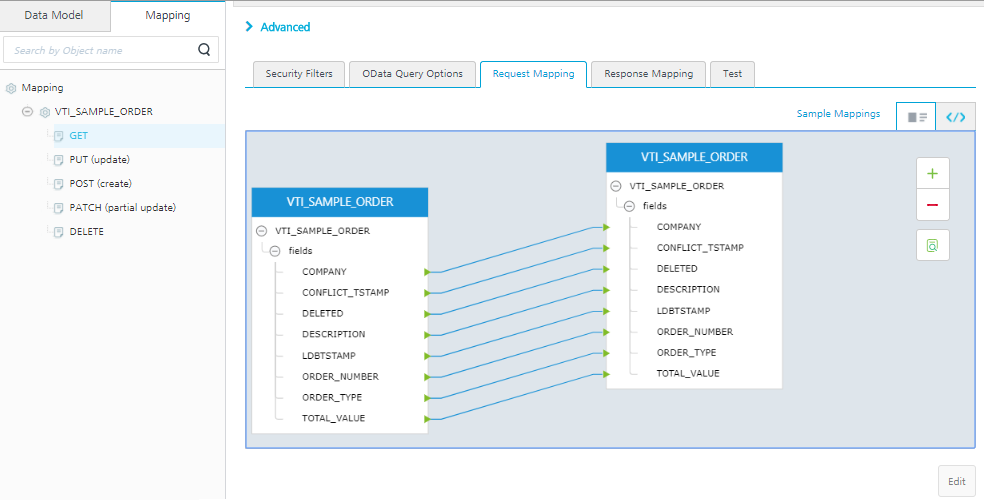
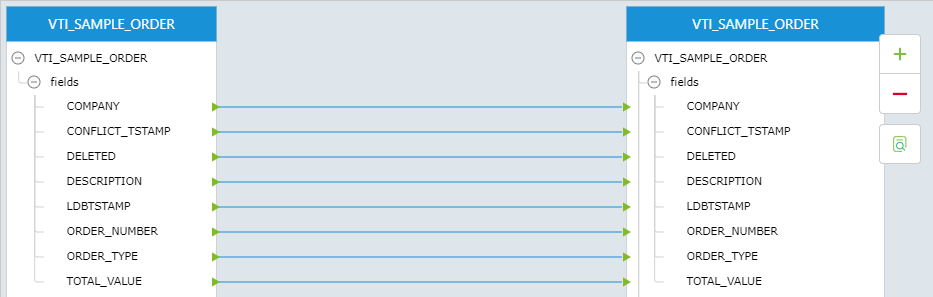
The Common Mapping configuration screen for the VTI_SAMPLE_ORDER object appears. The common mapping between a data model field and a back-end object field is applied to a transform request, response, or both, when methods are invoked on a back-end object. The double-headed arrow icon in the Type drop-down indicates that the mapping transformation is applied to both request and response. The right-arrow icon indicates only request mapping, and the left-arrow icon indicates only response mapping of the object.
You can now publish the Kony Fabric app as it is, or you can also configure the objects to be enabled for offline synchronization.
To enable
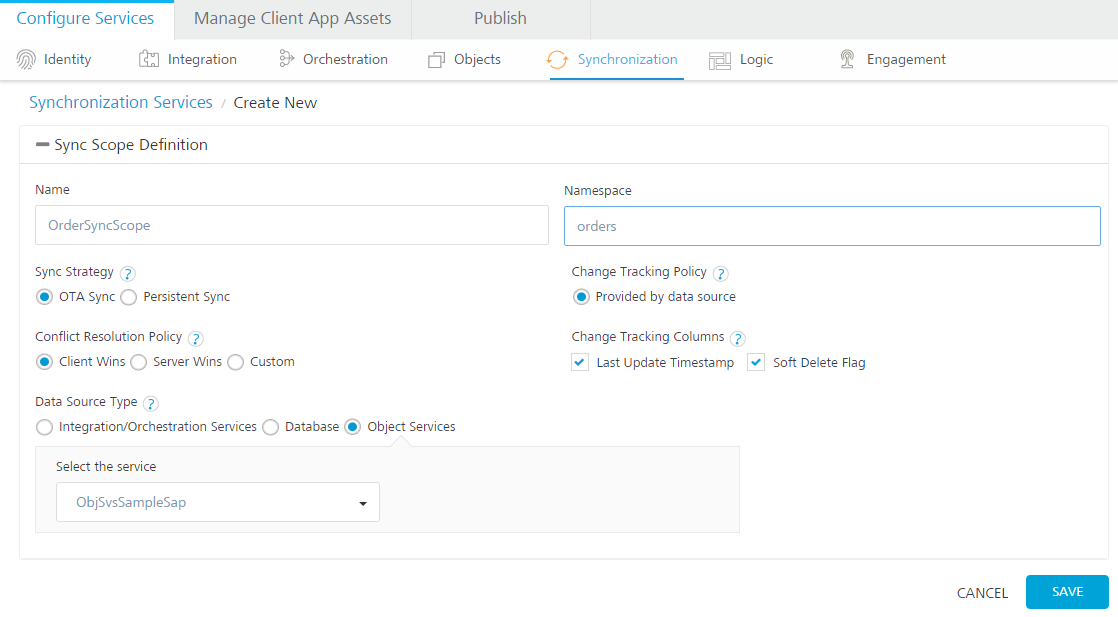
The Synchronization page appears.
A persistent Sync strategy is not supported for a Sync scope that uses an object service as the data source type.
The objects that you defined in the Orders application are now enabled for offline synchronization.
After you have generated the data model from the back-end objects that you imported, you can publish your app. Then provide the code that Kony Fabric generates to a mobile app developer. The mobile app developer integrates the code with platform SDKs and adds additional logic and modifies the presentation layer. The mobile app developer builds the client binary and publishes it to the enterprise app store.
At runtime, Kony Fabric is the middleware that talks to the back end, manages the integration, and filters, transforms and synchronizes the data it sends to the front-end clients.
Kony Fabric manages
To set the binary Sync to device policy for a Kony Fabric app, follow these steps:
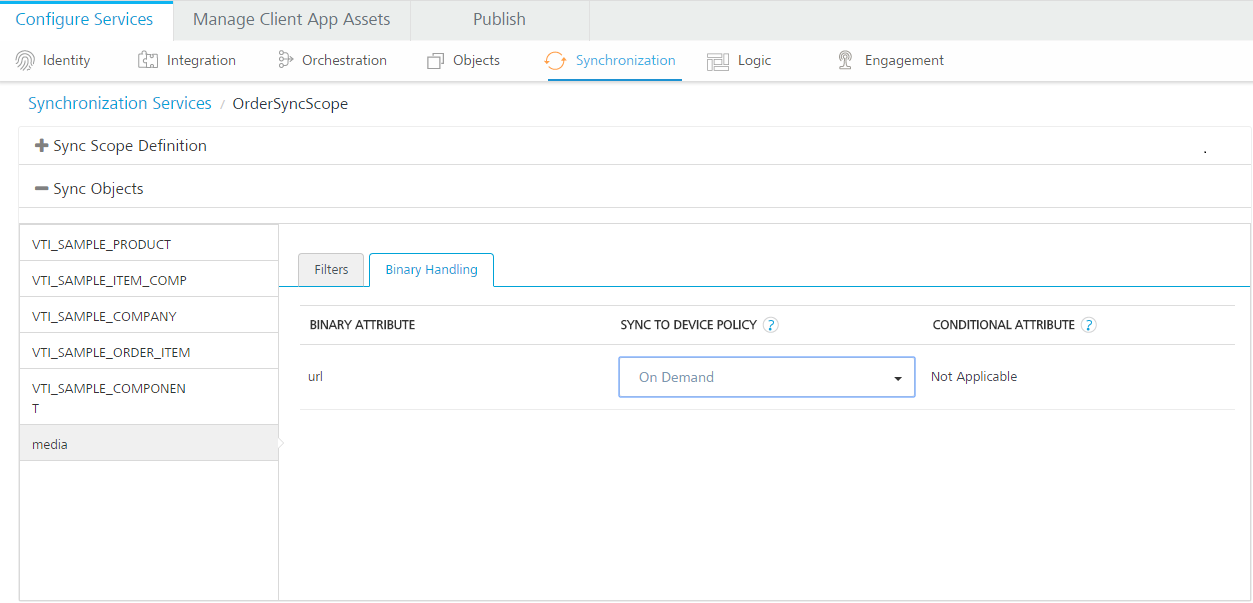
The possible values are
The sync will be triggered when the conditional attribute value is true.
The section shows you how to create a new data model, and then map the data model to the back end LOB.
The data model that you create is the data model that you want to provide to the client app developer. The data model will be provisioned on the end user's device, into which Kony Fabric will be pushing synchronized data. The mapping specifies how the app data model is populated from a back-end LOB system.
The advantage to creating a data model is that you can build a client application by using your preferred data model, and then populate the data model from a back end, regardless of the structure of the back end.
In this procedure, you will create a new data model, add objects to the data model, and then add fields to the objects.
To create a data model and add an object, follow these steps:
The Configure screen for the new object service appears.
In the Configure screen, the Order object appears in the list of objects.
Fields and Relationships appear under the Order object.
The empty fields list appears in the Configure screen.
A new row appears in the fields list.
To add the OrderItem object to the data model, follow these steps:
The list of objects appears in the Data Model screen.
The OrderItem object appears in the list of objects.
A new row appears in the fields list.

You can also clone an app data model of an existing object service. Refer to Actions in objects services.
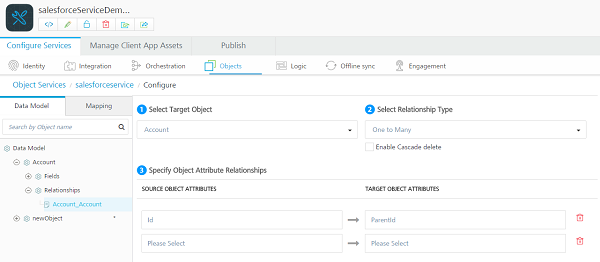
In this procedure, you will define the relationships between the objects in the Orders data model.
To configure the relationships, follow these steps:
The Relationships screen appears.
The screen for configuring the relationships appears.
The common mapping that you define between a data model field and a back-end object field is applied to a transform request, response, or both, when methods are invoked on a back-end object. The double-headed arrow icon in the Type drop-down menu indicates that the mapping transformation is applied to both request and response. The right-arrow icon indicates only request mapping, and the left-arrow icon indicates only response mapping of the object .
To configure the mapping, follow these steps:
The mapping configuration screen for the Order object appears.
The Common Mapping tab shows that the Order object in your data model is mapped to the VTI_SAMPLE_ORDER table of the VTI_SAMPLE_ORDERS database in the backend object VTI_Internal.
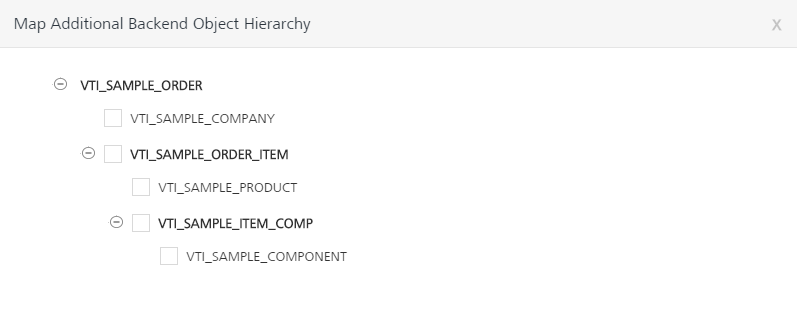
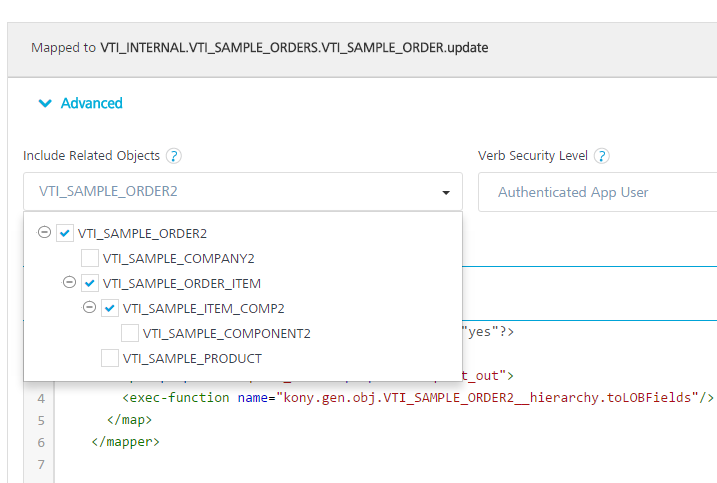
In Common Mapping, you can also map an object in your data model to additional child objects in the back-end object hierarchy. To map an object to additional child objects in the back end, click Advanced, and then select the child objects in the hierarchy.
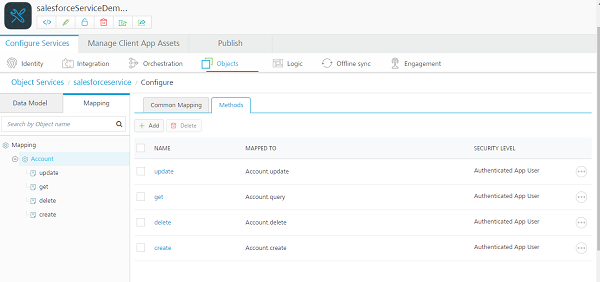
Methods mapping is where you configure what the system should do for all the methods the client app will use. For example, a work order will use the Get, Post (create), Put (update), and Delete methods. When you perform a Get on a work order object, the mapping specifies the target object in the SAP back end and the method you can use against that object. And you can control what gets mapped on the request to SAP, and what gets mapped on the response.
To configure the methods mapping, follow these steps:
The
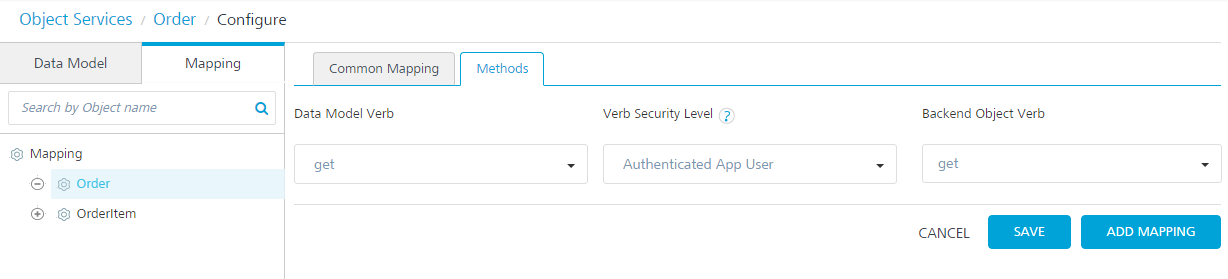
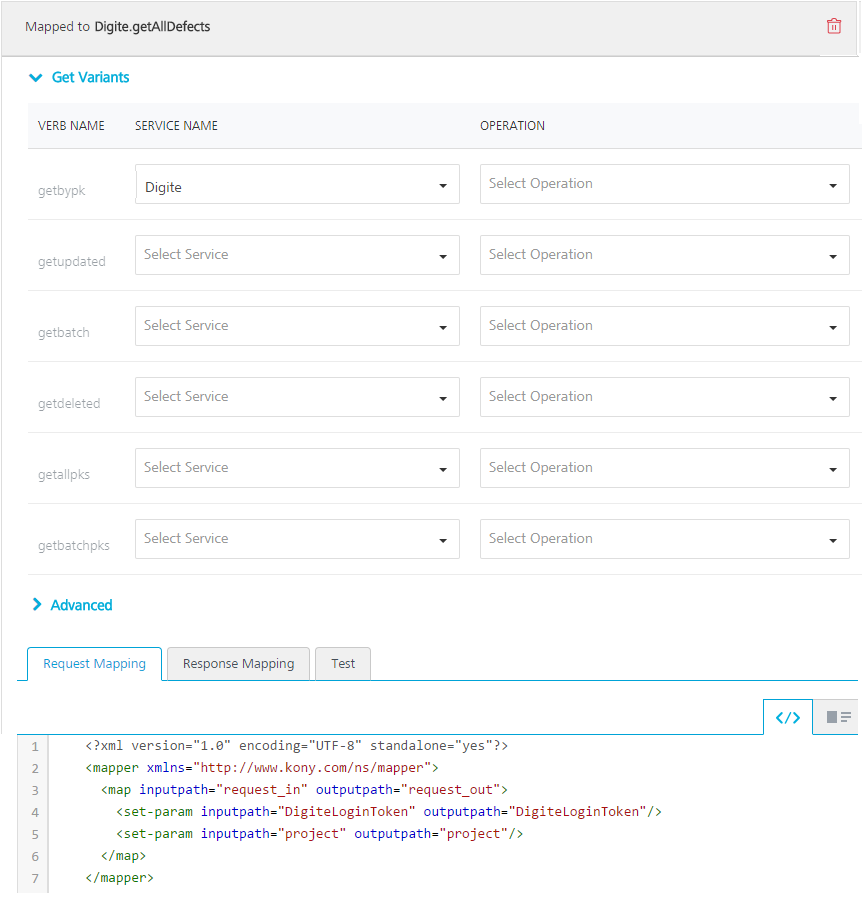
Object Services provides built-in variants of the get verb. Click the get verb in the navigation page to configure the mapping of the variants of the get verb. The built-in variants of the get verb are getAll, getbypk, getupdated, getbatch, and getdeleted. The get verbs are not mapped individually. All the get verbs have a common request mapping and a common response mapping.
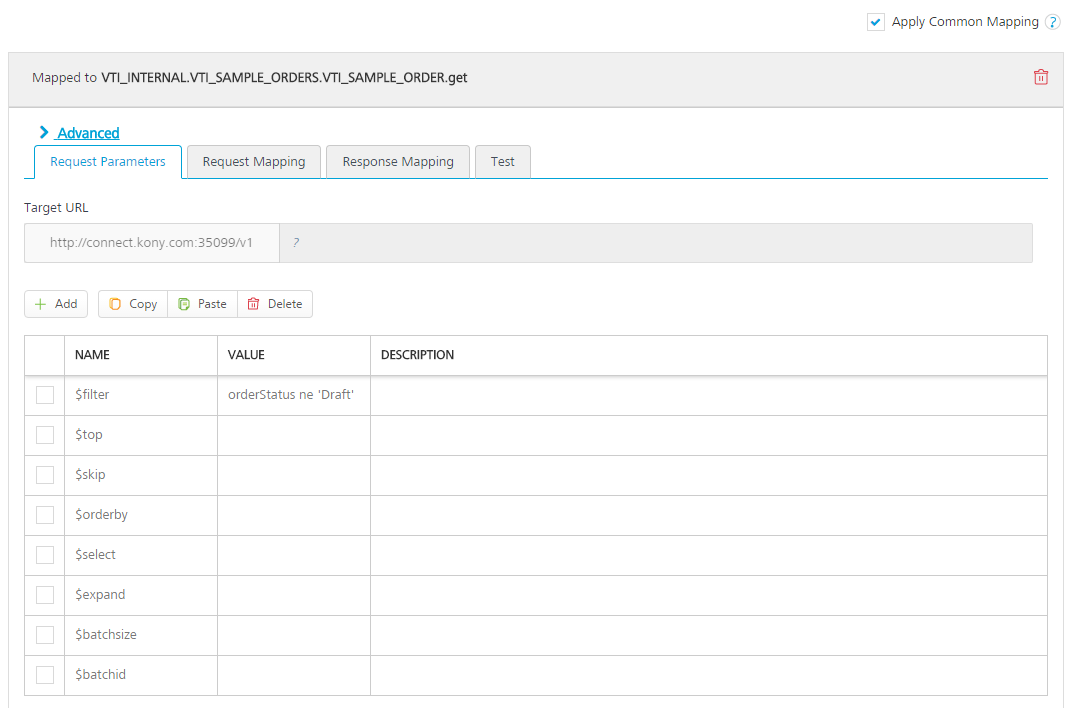
The method mapping configure screen appears. The Request Parameters tab lists the parameters of the method that you can use for the VTI_SAMPLE_ORDER object.
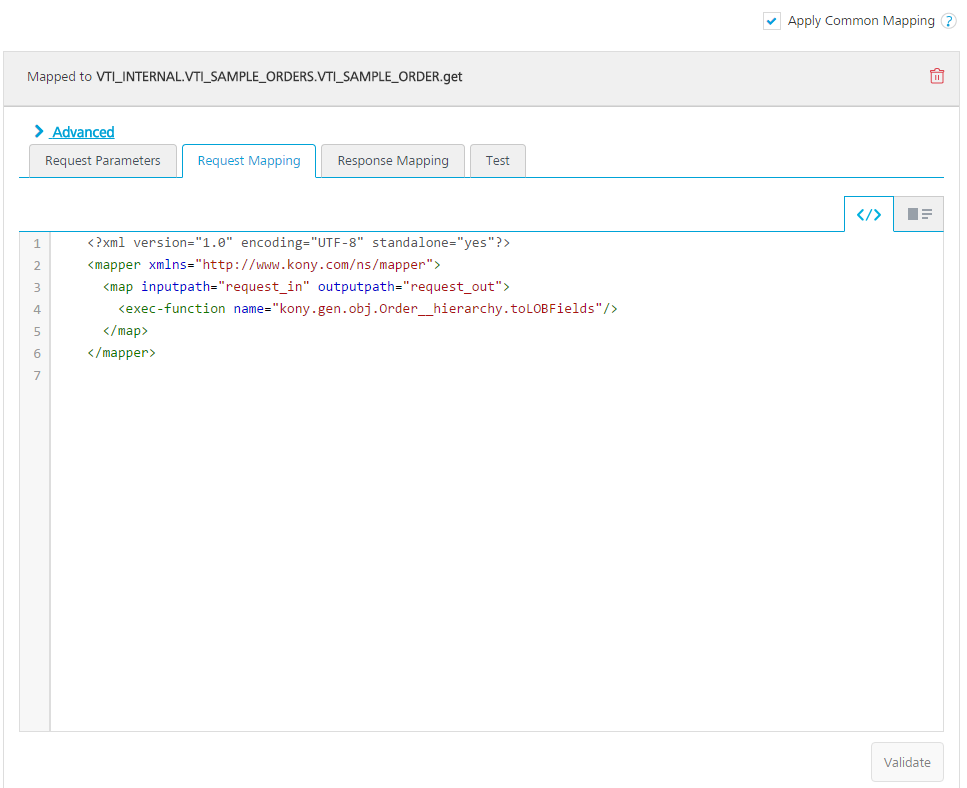
Selecting the check box applies common mapping of the object to this verb. To override the common mapping, clear the check box and specify a custom mapping in Request Mapping and Response Mapping.
The & and = operators are not supported in values for OData string key ($filter).
This will filter the orders that have an order status of Draft.
If you do not apply common mapping of the object to the get verb, this is where you specify a custom mapping on the request to SAP. Common mapping by default maps one-to-one the data model method to the method of the target object in the back end.
If you do not apply common mapping of the object to the get verb, this is where you specify a custom mapping on the response to SAP.
The
The Include Related Objects field and the Verb Security Level field appear. The Include Related Objects setting specifies which part of the App Model Object's hierarchy can be handled by the verb. This information helps in optimizing the number of calls to the back end in case the verb also deals with other objects in the hierarchy. You can multi-select multiple objects in the drop-down to specify the information.
You can enable the application for offline synchronization, publish the application, and then provide the code that Kony Fabric generates to a mobile app developer.
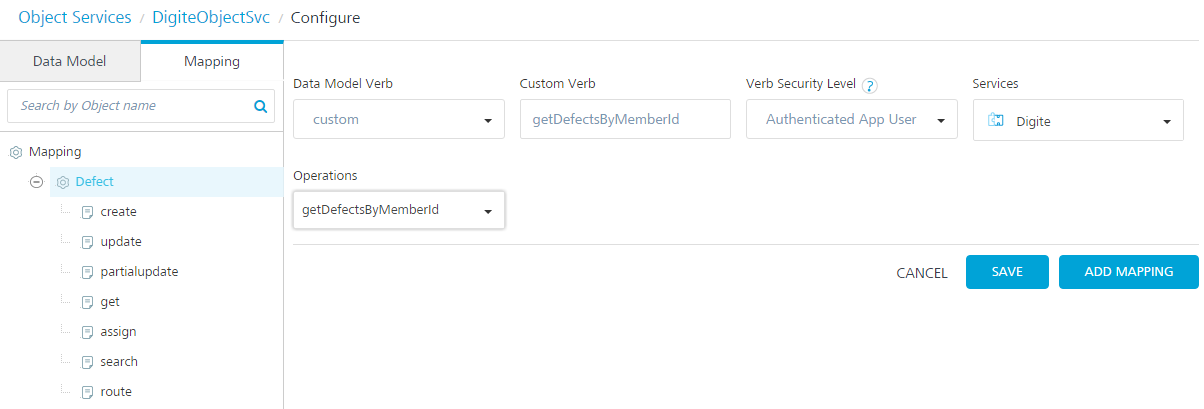
SAP Object Service has provided the ability to add custom verb names and map it to an operation of a backend object. You can now create your own custom verb in addition to the existing verbs (Create, Read, Update, Delete and Partial Update) and map to a backend business operation.
To create a custom verb, follow these steps:
Click the Add button.


The created custom verb is successfully added to the list of existing verbs.
The Apply Common Mappings check box is unchecked as the backend object being mapped is different from the mapped application model object. If the check box is unchecked, you should specify a custom mapping on the request to SAP to map the backend object to application model object. The custom verb will be available to the end users similar to the other verbs when the same app is published and tested from the rest client.
If you do not apply common mapping of the object, you should specify a custom mapping on the response to SAP.
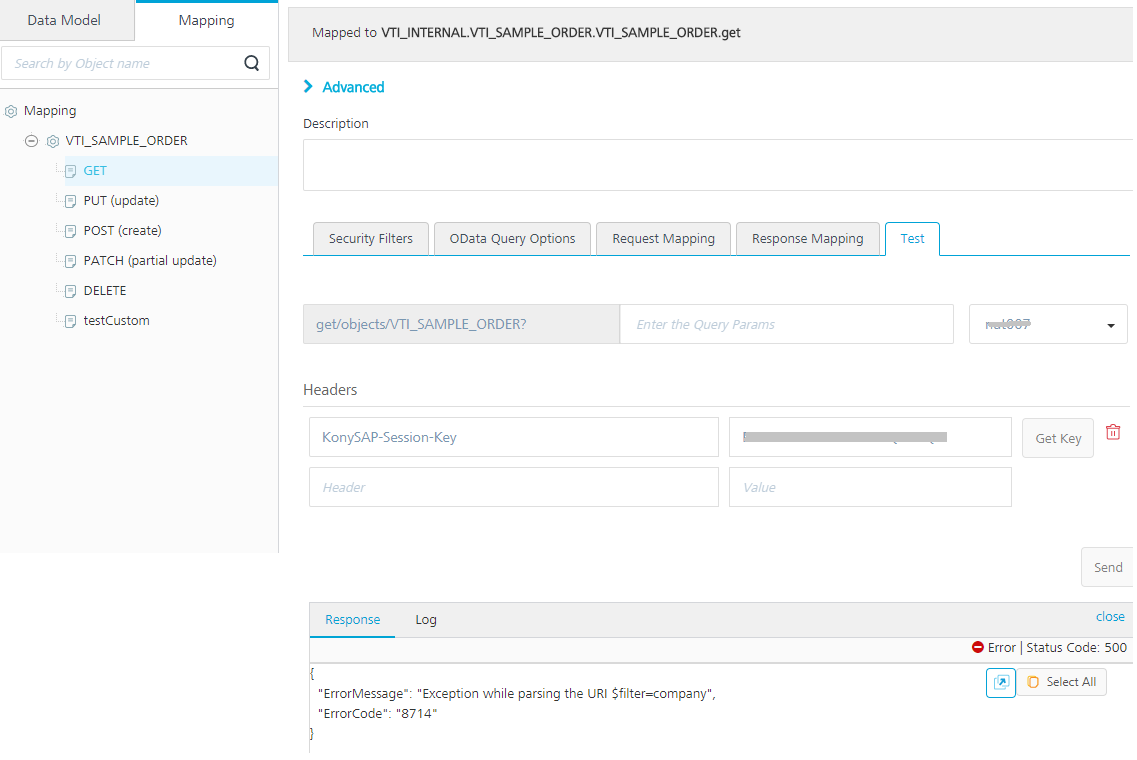
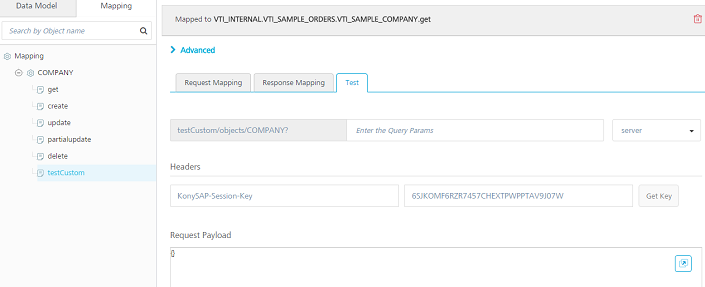
You can use the Test panel to test the mapping for a method. To test the mapping, enter the query parameters, select an environment, enter the headers and header values that you want to include with the test. Then, in Request Payload, enter the values for the fields for which you want to test the mapping, and then click Send.
If the test is successful, the end users can invoke the created custom verb from their app post publish.
You create a service-driven object from existing Kony Fabric Integration services or Kony Fabric Orchestration services. If you have built Integration or Orchestration services in Kony Fabric, you can use Object Services to build objects out of those services. A service-driven object service abstracts some of the API complexity by creating a layer in between the app data model mapped to Integration services on the back end.
Create a service-driven object by using an existing Kony Fabric Integration service or Orchestration service to connect to a back end. These are objects that you can define from existing API's; for example, REST, SOAP, and XML. You use one API to create the object in the back end, and one API to get the object from the back end.
For example, instead of the client developer having to call get accounts or modify accounts APIs, you generate client code to give the client developer who has an account object that has all that knowledge built into it. The client developer programs against the object and does not have to call APIs.
In Kony Fabric you see all the attributes the API returns, and then you generate or enter the fields of the objects that you map to the attributes from the API. If your application needs data that does not exist on any back end, the service-driven object can also be the storage provider for a mobile app.
The section uses an example to show and explain how a service-driven object works. In the example, a service-driven object is created for a defect tracking system. For example, you can work with an existing defect object or create a new defect object.
The first step in creating a service-driven object for the defect management system is to create the integration services. An integration service definition comprises the metadata or the configurations required to exchange data with the external data source. The defect management system is a SOAP service, so you upload the WSDL to create an integration service from that WSDL, and then choose the methods that you want to use.
With the integration services, you can develop a mobile app traditionally. You now have the REST APIs that you can use to build the mobile app by using the Kony Fabric SDK. To take it further, you can use Object Services to construct your data model, get the methods, and map those methods to the API. The object services layer is built on top of the integration services and gives you the generated object code, which reduces the amount of logic you have to write in your mobile app.
Scenario 1: For the Salesforce back end while hitting the Test tab in Object Services, which are created on top of the integration services by the identity provider, the following are the headers that are to be passed from the admin console:
x-kony-sfdc-access-token
x-kony-sfdc-instance-url
And for x-kony-sfdc-access-token: The token, which is generated from the integration service that has Bearer in the beginning should be removed and then sent the request.
Scenario 2: For Salesforce back end while hitting the Test tab in Object services, which are created on top of the integration services with specify endpoint, use Authorization in the headers that you can get from using log-in service.
To hit the both the above scenarios from the RestClient or PostMan, only X-Kony-Authorization should be sent as a header.
The app for the defect tracking system requires two integration services. The first integration service gets a token from the back end. This token is needed to access the data in the defect management system. The second integration service is for performing operations on the defect management system.
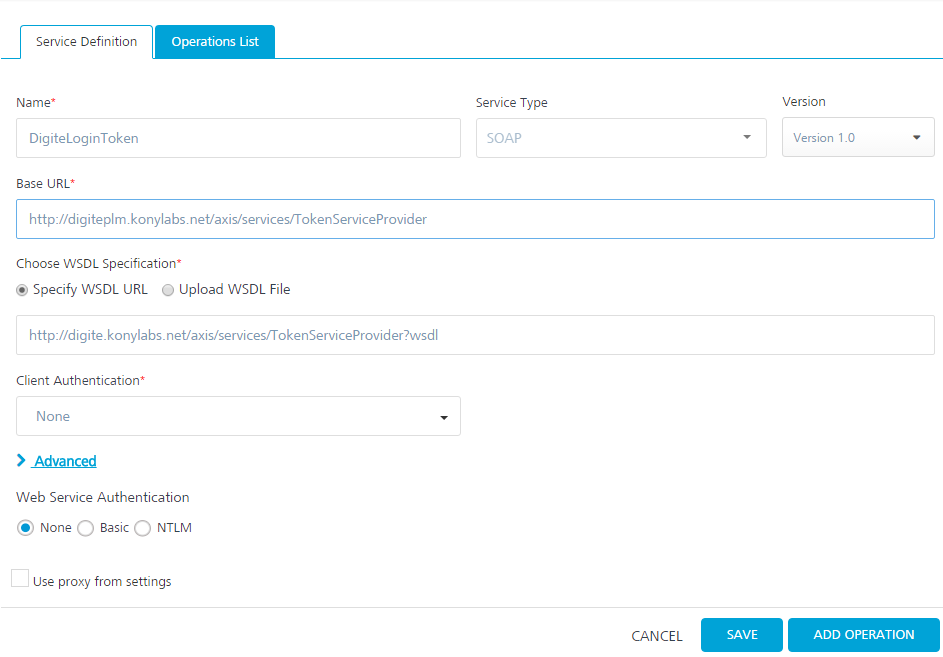
DigiteLoginToken Service
The first integration service is named DigiteLoginToken. The type of integration service is SOAP. The given base URL is specified, and the given WSDL URL is specified.
The DigiteLoginToken service has one operation, LoginForToken0. The operation provides the parameters for the username and password for the defect management system.
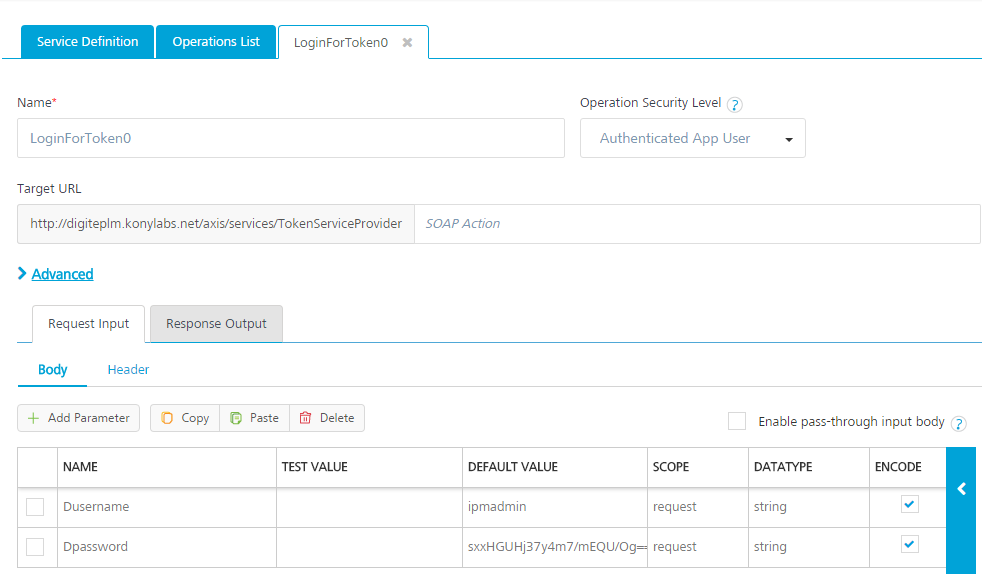
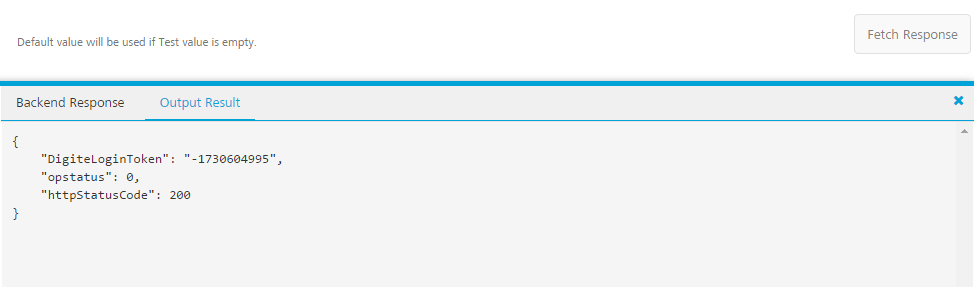
If you click Fetch Response, the defect management system back end returns a token in the output result. The token that must be sent along with every request to access data in the back end.
Digite Service
The second integration service is named Digite. The type of integration service is SOAP. The given base URL is specified, and the given WSDL file to upload to the Kony Fabric app is specified.
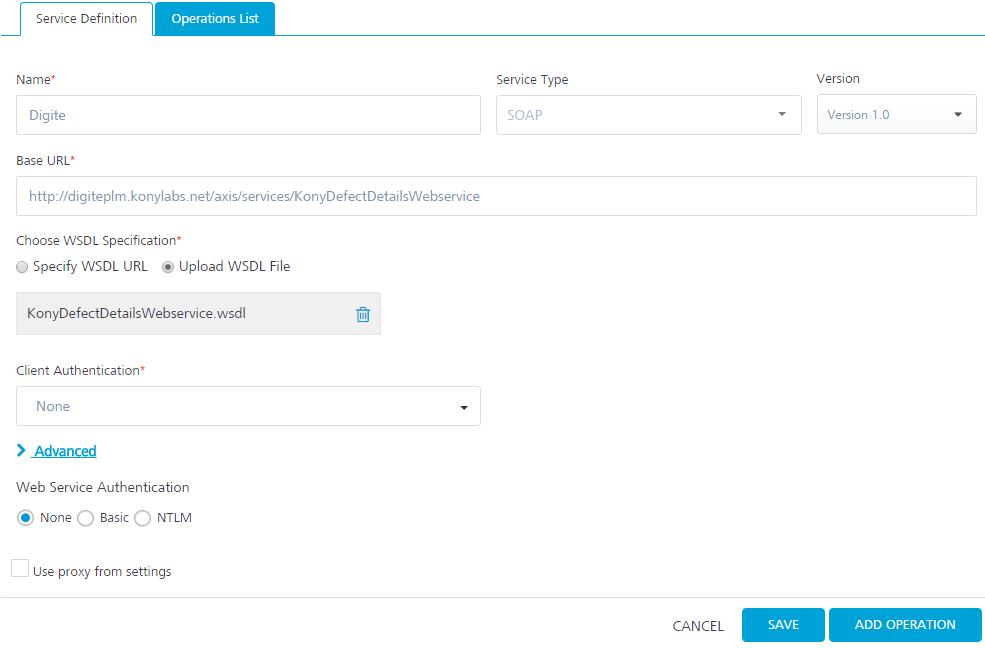
The Digite integration service has operations for accessing and performing actions on the defect management system.
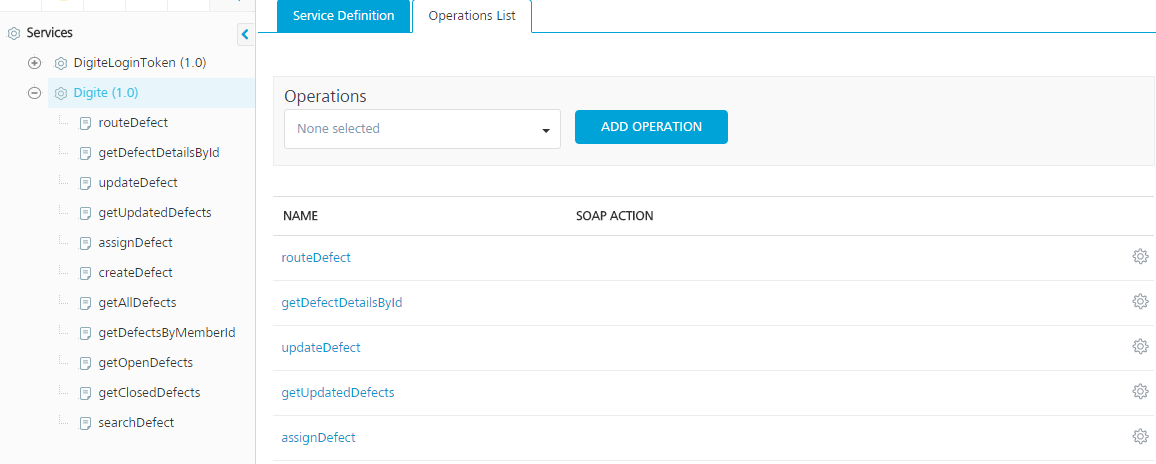
The getDefectDetailsById operation includes the DigiteLoginToken parameter for passing the token that the back end expects with every request. The scope of the DigiteLoginToken parameter is session. This means that Kony Fabric picks up the parameter up from the session that is created for the app.
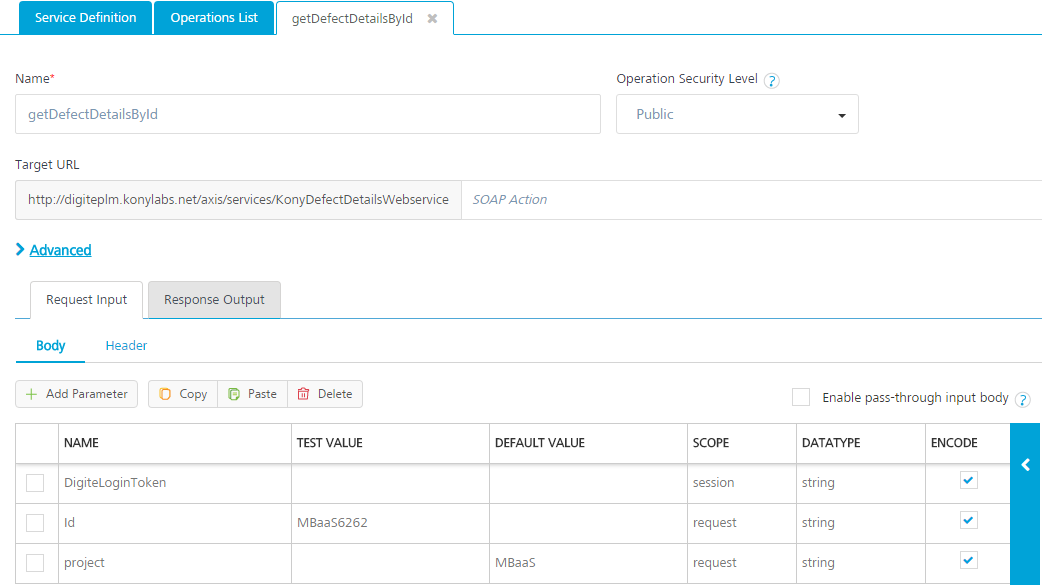
If you click Fetch Response, the service sends to the defect management system back end the DigiteLoginToken that was retrieved earlier. The service also sends the defect ID and project parameters. The back end will respond by sending all the details related to the specified defect ID, MBaaS6262, in the specified project, MBaaS.
Traditional App Development and
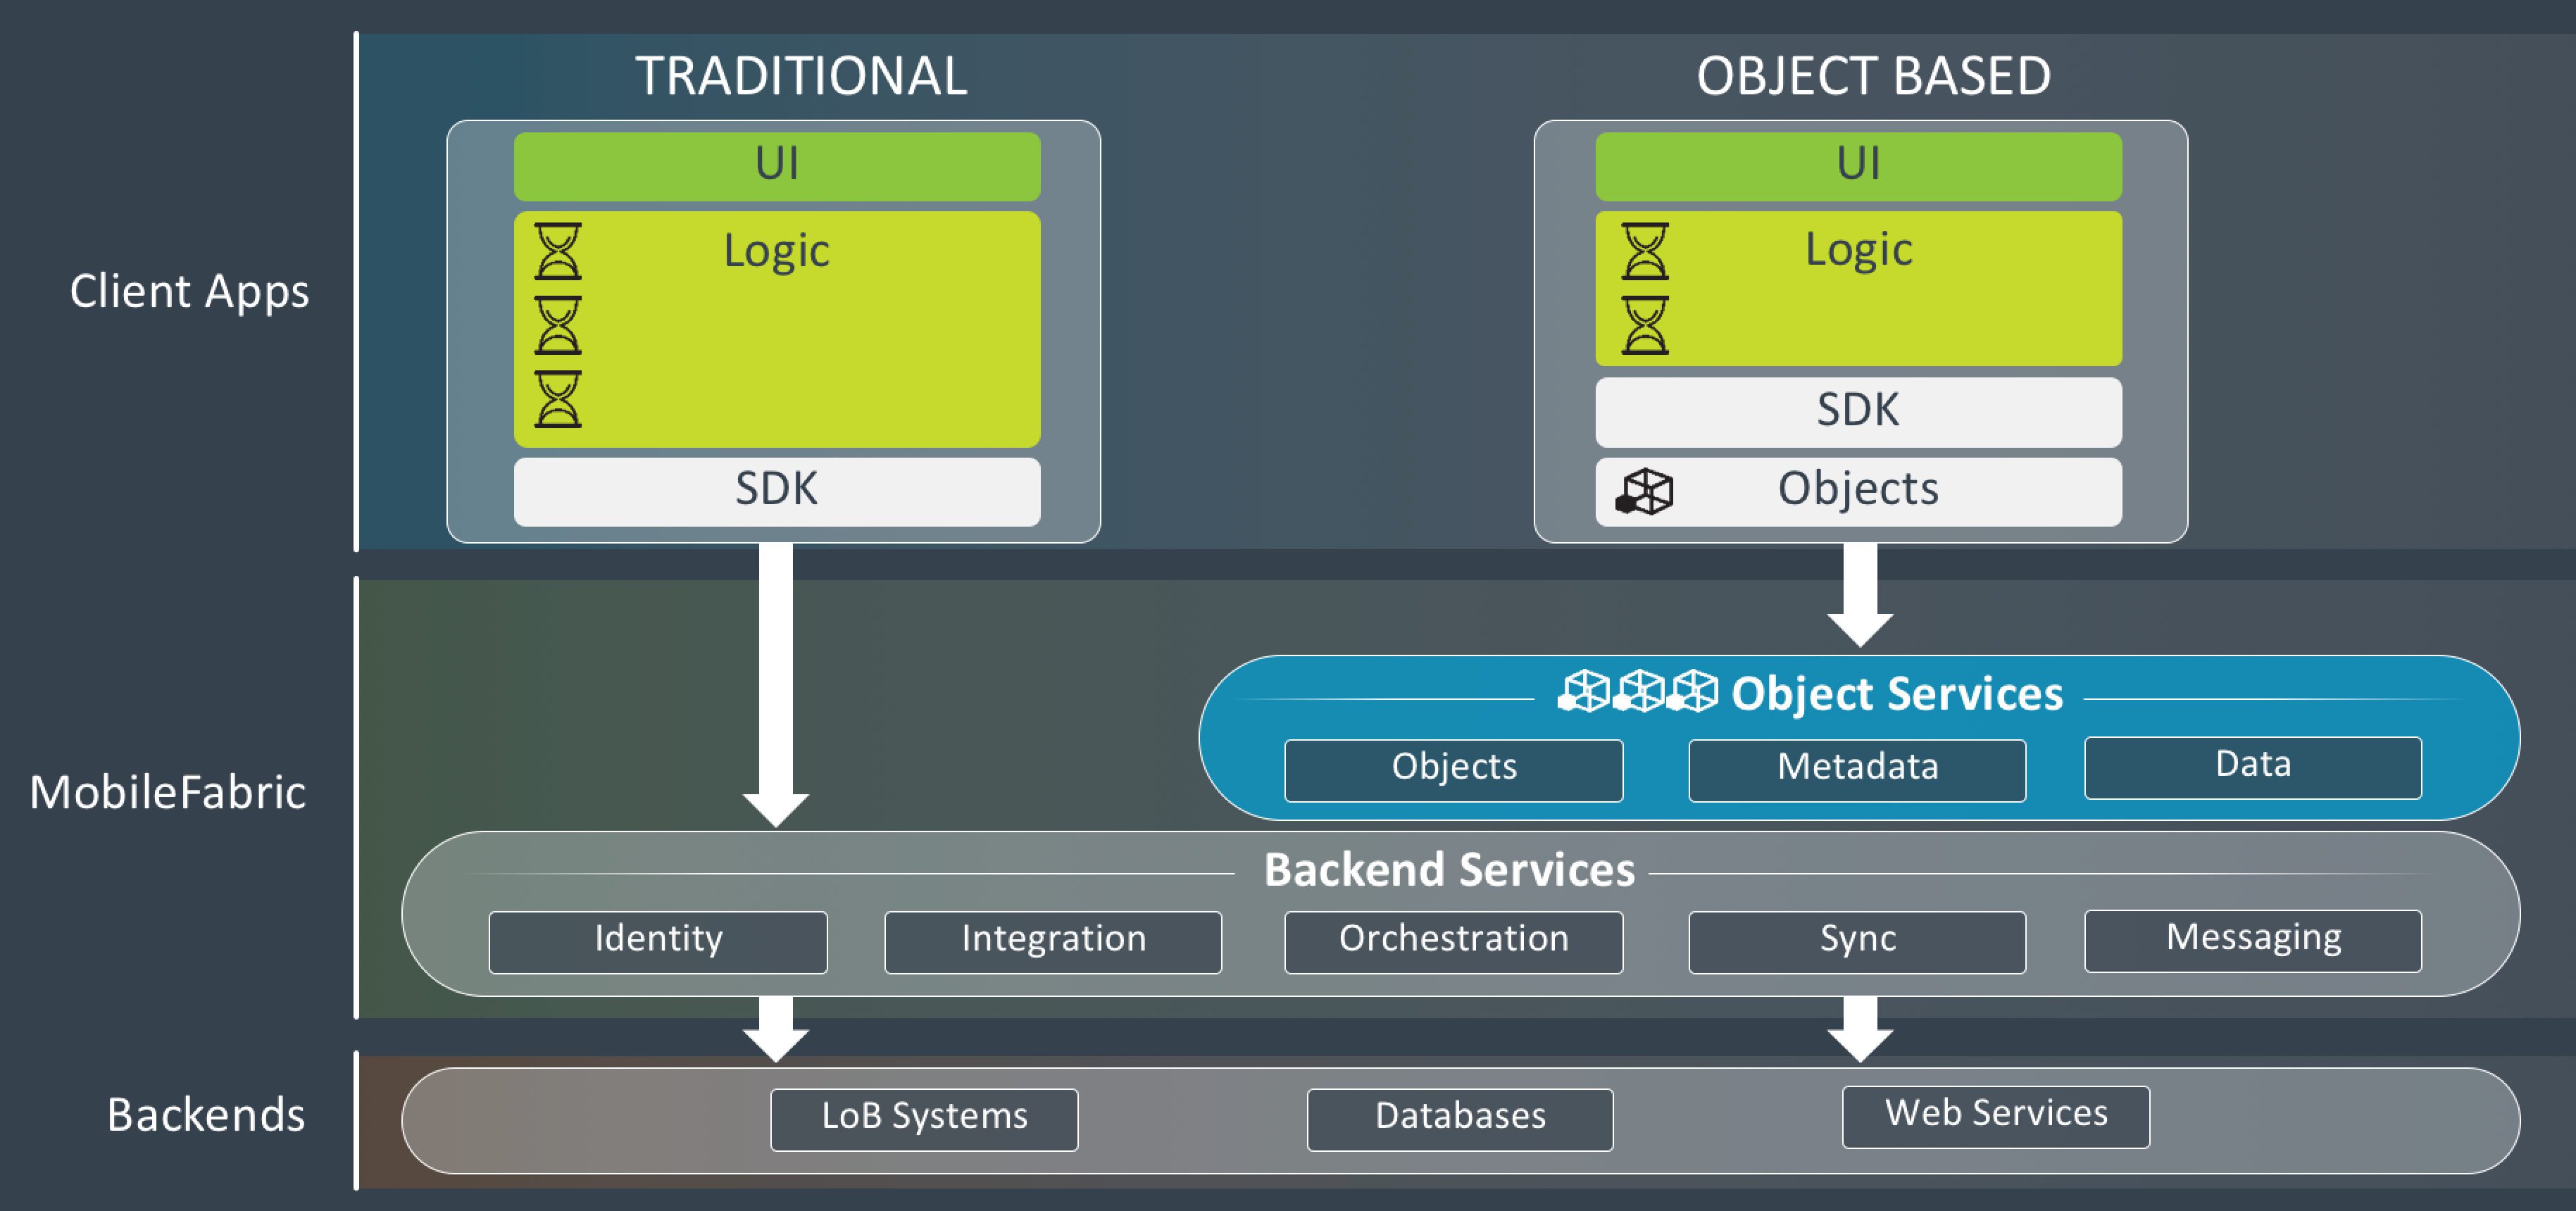
With the integration services complete, you have imported the WSDL from the defect tracking system and turned it into a REST API. You can stop at this point and proceed to develop the client app in the traditional way by simply calling those new REST APIs from the client app. Or you can go to the Objects tab and perform a few extra steps to turn the WSDL into a service-driven object, and reduce the amount of logic that you must write in the client app.
The following diagram shows the Object Services layer that is built on top of these other Kony Fabric services. When using Kony Fabric object services, the client developer is given an SDK and the generated client object code. This reduces the amount of logic that the client developer must write, and significantly reduces the effort required to develop the mobile app.
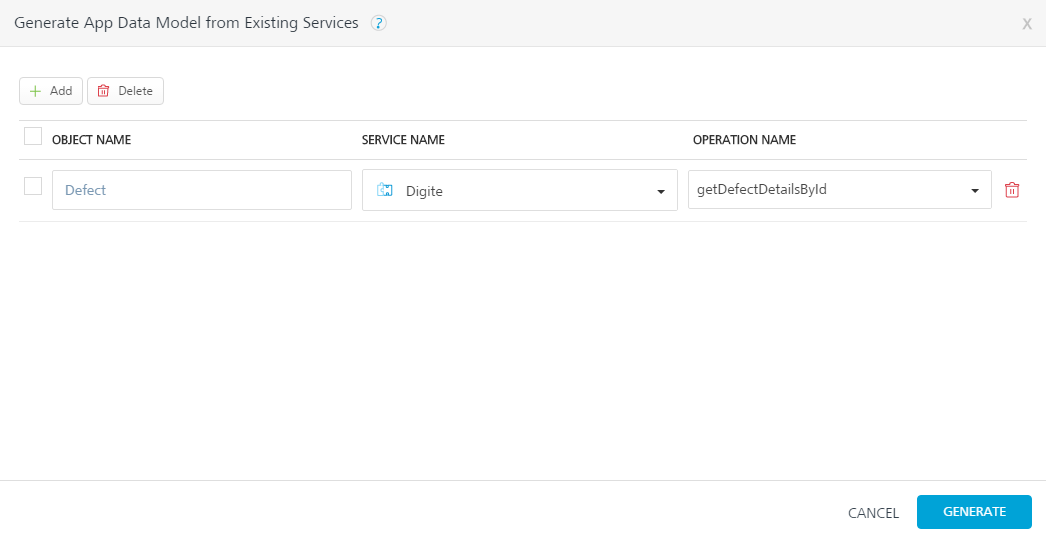
Now we will go to the Objects and create a service-driven object from the integration services. The first step is to create an object service.
To create the object service, follow these steps:
The Generate App Data Model from Existing Services screen appears.
Kony Fabric generates the objects and the data model based on the getAccount and getContact operations in the Salesforce integration service. All the fields for the objects are populated from the union of what is sent to the specified operation and what is returned from the operation.
Now add three additional fields to the Defect object for this defect management system.
To add fields to the Defect object, follow these steps:

Now configure
To configure the change tracking, follow these steps:
![]()
Now map the verbs for the Defect object. To perform operations beyond the basic create, read, update, and delete operations, you can create custom verbs.
To
The verb mapping configuration screen for the Account object appears.
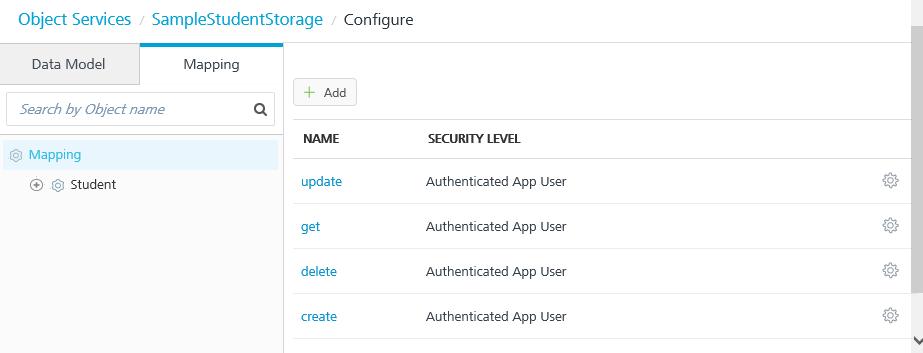
The Verb Security Level specifies how the client must authenticate to the create verb. Authenticate App User restricts access to the create verb to users that have successfully authenticated using an Identity service. You can also set the security level to Anonymous App User and Public.
The mapping for the verbs is automatically generated. Mapping is auto-generated only when the dataset name of integration services and object name matches. The mapping is populated in the Request Mapping and Response Mapping tabs based on the input and output of the operations. To specify custom mapping, clear the Apply Autogenerated Mapping check box.
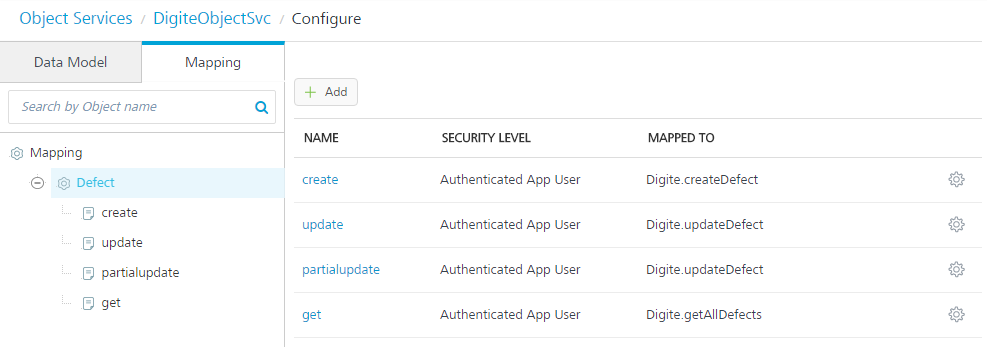
You can view the mapping for a verb by clicking the verb on the Mapping tab in the navigation pane. Request mapping is the parameters that are mapped from the device side to the back end. Response mapping is the parameters that the backend sends to the object's fields.
The mapping configuration for the get verbs appears. Object Services provides built-in variants of the get verb. The built-in variants of the get verb are getAll, getbypk, getupdated, getbatch, and getdeleted. The get verbs are not mapped individually. All the get verbs have a common request mapping and a common response mapping.
A green check mark indicates that the operation mapping has succeeded.
In addition to the built-in verb options, you can also create custom verbs for an object. For example, you can create the custom verb assign, and map it to the assignDefect operation on the back end.
To create and map the custom verbs for the Defect object, follow these steps:
The mapping for the verbs is automatically generated by default. The mapping tabs show the automatically generated mapping of the object applied to this verb.
To validate the object service, follow these steps:
To enable synchronization for the application, follow these steps:
The Synchronization page appears.
Note that a persistent sync strategy is not supported for a sync scope that uses an object service as the data source type.
The objects that you defined in the object service for application are now enabled for offline synchronization.
After you publish the app, you download the client-side object code for the sync-enabled app that Kony Fabric generates, and provide it to the mobile app developer. The mobile app developer integrates the code with platform SDKs, adds additional logic and creates the presentation layer. The mobile app developer builds the client binary and publishes it to the enterprise app store.
At run time, Kony Fabric is the middleware that talks to the back end; manages the integration; and filters, transforms, and synchronizes the data it sends to the front-end clients.
With Object Services, you can create an object on Kony Fabric for storing data for mobile apps. You can use Kony Fabric as a
For example, a Kony Fabric storage object is ideal for a restaurant survey mobile app. In the restaurant, the service staff request that a customer fill out the survey on a device provided by the restaurant. The survey data that the customer enters is stored in a database on the Kony Fabric back end. The service staff and customer cannot access the survey results. The restaurant manager can then retrieve the survey data and use it for analysis and reporting.
The Kony Fabric developer creates a storage object service and defines the data model with the fields that the mobile app requires. Upon publishing the Kony Fabric app, Kony Fabric creates a data schema in the back end based on the data model and instantiates a new self-contained database. The operations that the mobile app performs are performed on the database.
The following describes use cases for a Kony Fabric application with storage object services.
A home owners association that maintains rules to ensure the neighborhood always looks nice. For example, members of the association are required to cut their grass, maintain the landscaping, and keep up the appearance of their house. The association can fine a member any time for a significant violation, but what they typically do is conduct a house-by-house assessment every two years. A representative of the association walks around each house and inspects it. The inspector documents issues with pictures and provides the homeowner a report on what they have to fix.
To streamline this process, the association wants to create an iPhone and iPad app to help with the assessments. The inspector will go to the next house and create a new assessment record that contains:
The association representative then inspects the house and writes up any violations. Each record of violation contains:
To build this Kony Fabric app, the Kony Fabric developer first defines the data model that the mobile app requires. The following describes the definition of the data model.
The Assessments object has the following fields:
The Violations object has the following fields:
The ViolationImages object has the following fields:
The ViolationTypes object has the following fields:
The ViolationTypes object is used to populate a dropdown menu in the violation entry screen.
The following relationships are established between the objects:
A food service company that has several restaurants needs a way to get responses from customers to evaluate the performance of their products and services and benchmark the indices. A mobile survey app is an effective tool to get feedback from customers.
The responses generated from the survey app can help the company to target the right set of customer segments, and appropriately position their products for the target segments. These are key inputs for the go-to-market strategy for the company.
The following describes how the survey app is used by a restaurant:
There are two personas that use the survey app:
Survey App Data Model
The following relationships are established between the objects:
To build this Kony Fabric app, the Kony Fabric developer first defines the data model that the mobile app requires. The following describes the definition of the data model.
SurveyTable object:
SurveyTypeTable object:
QuestionTable object:
QuestionsChoiceTable object:
SubmissionTable object:
AnswerTable object:
CustomerTable object:
Building the Survey App
John is assigned the task of creating back-end services for the Survey app.
Restaurant service staff can now use their Google credentials to sign in to the survey app and the storage object service honors the authentication levels. Any object service that is configured as Authenticated allows access to only Authenticated users. Note that all the tables for the app are created when the Kony Fabric app is published.
Reuse the Storage Object Service
The Use Existing option copies the app data model to the new Kony Fabric app and gives access to the same back end (instance) of the storage object database. All the object services created here for the restaurant manager app will point to the same object and data that was created by the restaurant survey app.
Clone the Storage Object Service
You can also clone an app data model of an existing object service. Refer to Actions in objects services.
The following is an exercise that shows you how to create a storage object service for a Kony Fabric app. This Kony Fabric app is used by a mobile app for administering students, teachers, and the subjects that the students study.
Create a Kony Fabric App
The Configure Services Identity tab appears.
The following identity providers are not supported for Storage Services: Microsoft Active Directory, Open LDAP, Active Directory Federation Services (ADFS) over SAML, and Azure SAML.
This links the Identity provider to the object service.
The Configure page for the object service appears.
Create a Data Model for the Storage Service
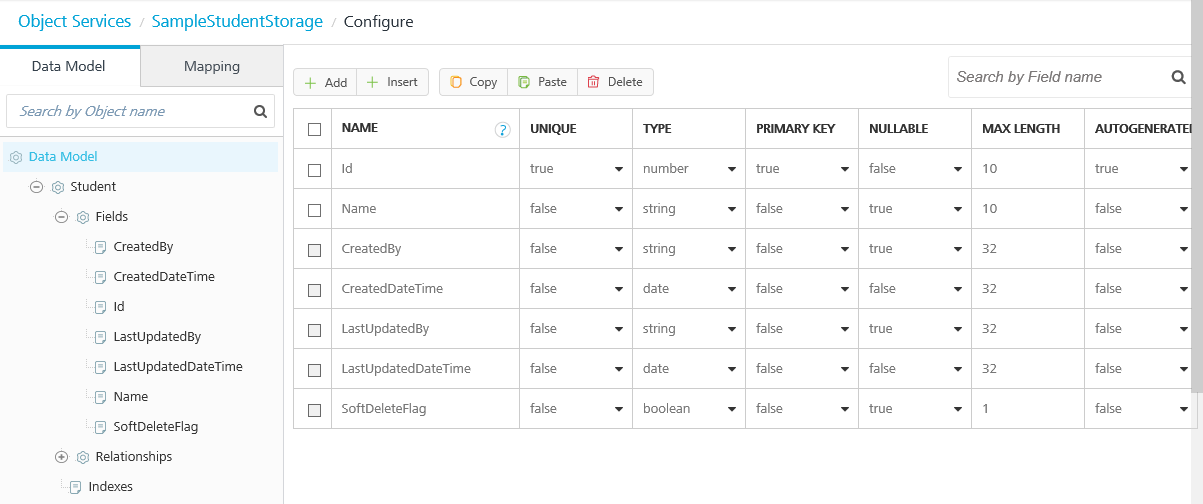
In the Configure screen, the Student object appears in the list of objects.
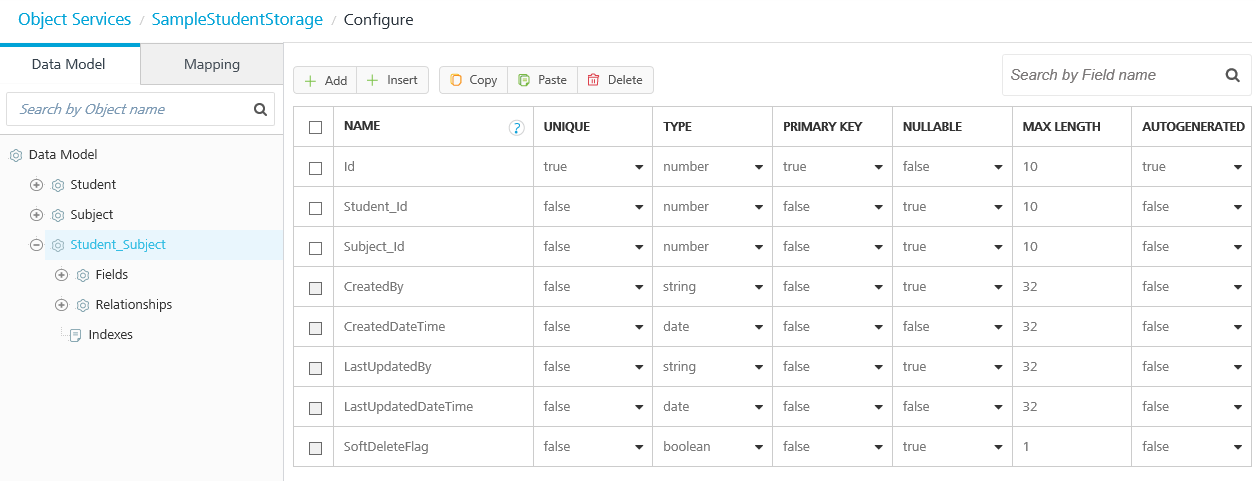
The fields that Kony Fabric generates by default appear. The fields are populated in the database when you save the object service.
The name of a field can be a maximum of 25 characters.
When you set the Primary Key attribute to true for a field, the Unique attribute is automatically set to true.
When you set the Autogenerated attribute to true for a field, the Type attribute is automatically set to number.
A new row appears in the fields list.
The list of corresponding verbs created for this object appears.
View the SQL Scripts
Test the Runtime Service
For example, in App Services, for Object Services, select the Student@create operation for the sample student app, and then click the service URL below the operation. In the Service Details, for Input Parameters, enter {name: "S1"} and click Get Response. In the Response Body, the return code indicates that the student record was created. To update a record, select the Student@update operation and enter {name: "S2". Id:1} in Input Parameters. To retrieve the student records, select the Student@get operation, and without specifying any filters, click Get Response. In the Response Body, the student records are returned. Note that the fields that Kony Fabric generates by default, CreatedDateTime and LastUpdatedDateTime, recorded when the student record was created and when the record was updated.
Add a Subject Object to the Data Model
In the Configure screen, the Subject object appears in the list of objects.
Fields and Relationships appear under the Student object.
The fields that Kony Fabric generates by default appear. The fields are populated in the database when you save the object service.
A new row appears in the fields list.
Now add an object that records the student to subject mapping; that is, which subjects a student is studying.
Add a Student/Subject Object to the Data Model
In the Configure screen, the Student_Subject object appears in the list of objects.
Fields and Relationships appear under the Student_Subject object.
A new row appears in the fields list.
Create an Index
You can performance tune the object service by creating indexes on the objects.
The index configuration screen appears.
The collection of records in the object are indexed by the fields that you select.

An index that has multiple fields is called a clustered index. A clustered index should have a unique key as the first field. For example, Id is a unique key.
Configure the Relationship Between Objects
The Relationships screen appears.
The screen for configuring the relationship appears.
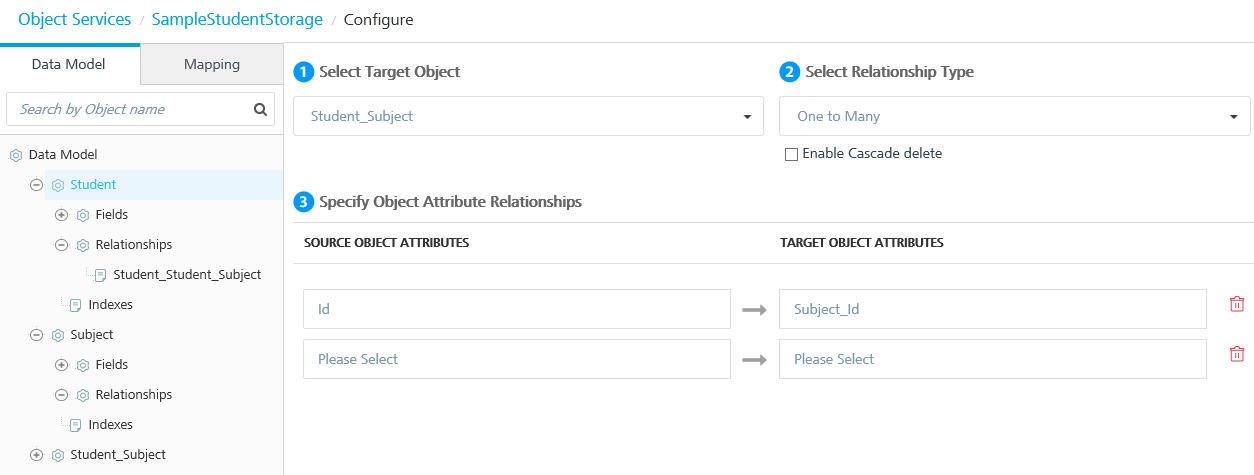
If you export the Kony Fabric app at this point, you will see the SQL scripts that correspond to the objects that you added and the relationships that you defined.
After you publish the app, you can use App Services to create a subject. For example, select the Subject@create operation and enter {name: "Physics"} in Input Parameters. Then you can select the Student_Subject@create operation and enter {name: "Student_id:1, Subject_id:1"} to add a record to the Student_Subject table. You can use the Student_Subject@get operation to query the Student_Subject table and verify that the record was created.
Add a Teacher Object to the Data Model
Fields and Relationships appear under the Teacher object.
A new row appears in the fields list.
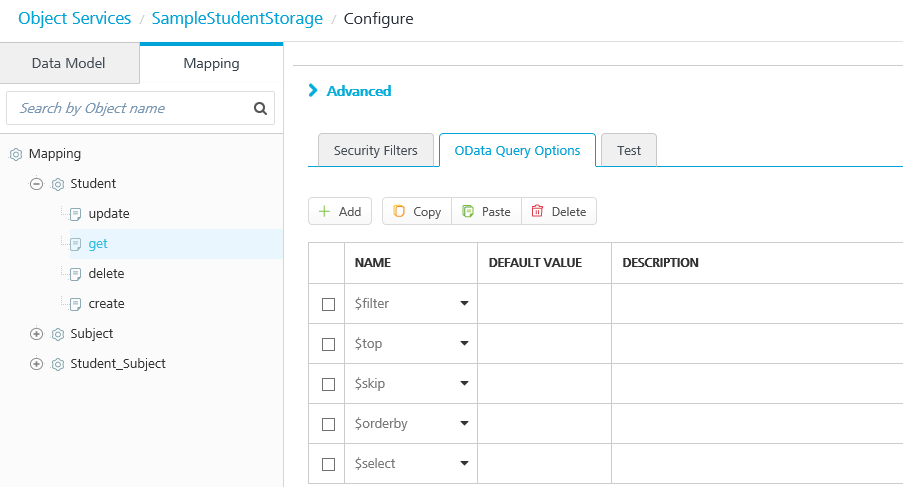
The OData Query Options that object services supports for the read operation appear in the Configure screen. For example, you can use the $skip option to return all records in the table except the top five, or you can use the $top option to return only the top five records.
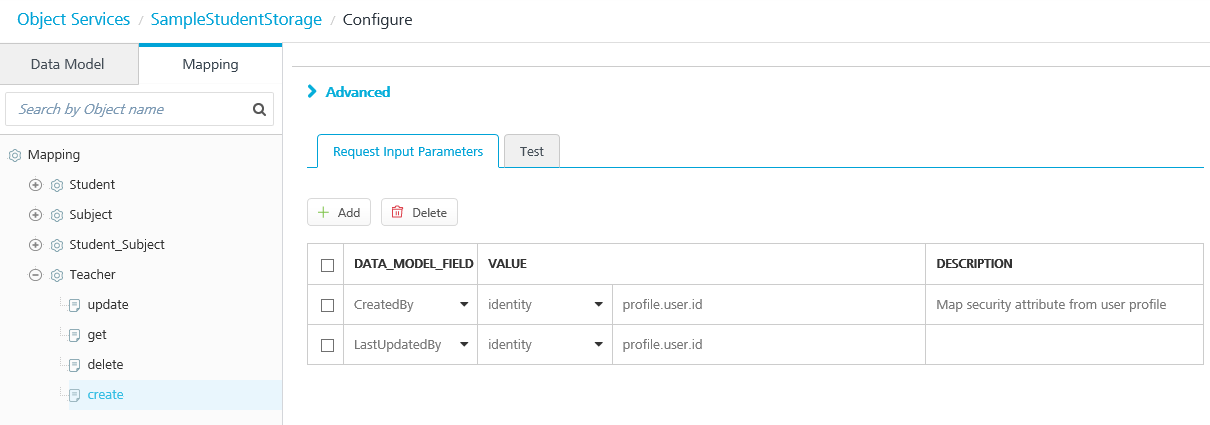
Add Security Attributes Profiles to the Request Input Parameters
When you link an object service to an identity service, the identity session parameter can be consumed in an object service. In Object Services, you can dynamically pick up the fields received in the user attributes of the logon response from the backend, and use those fields as input parameters for operations, such as create and update.
For example, you can add an input parameter for the create operation that uses the CreatedBy field in the data model. You specify that the value of the input parameter is an Identity type. This indicates that the input parameter uses an attribute of the user security profile from the identity service that is linked to the object service. When a user of the mobile app creates a Teacher record in the storage object, Kony Fabric picks up the user's user_id from the security profile in the identity service and adds it to the new record. Along with the Name, Id, and Subject for the Teacher, the record indicates who created the record.
To add an
The Request Input Parameters tab appears in the Configure screen. You define how to use the user profile data by selecting a verb and the data model field that you want to map to the user profile data.
An identity value indicates that Kony Fabric will retrieve the value specified from the user's security profile in the identity service that is linked to the object service.
This specifies that Kony Fabric will populate the value of the input parameter from the user's security profile.
After you publish the app, you can use an API testing program, such as Postman, and create a Teacher record to test the run-time of the storage service. You can then use the Teacher@get operation to query the Teacher table and verify that the record was created. The Response Body returns the Teacher record that you created. Note that Kony Fabric added the fields that you specified in the input parameters, CreatedBy an LastUpdatedBy, to the record with the identity of the user who created the record.
The following describes usage notes, guidelines, limitations, and workarounds for Storage Services.
The following identity
You use the fields that are received in the identity attributes of the logon response from the back end and use those security attributes as input parameters during any subsequent integration requests.
After you have published a storage service, you can test the service from Kony Fabric. Only the published state of the storage service is tested. Changes that you make in the service designer that you have not published cannot be tested.
To test a published storage service, do the following:
When you publish the Kony Fabric app, a SQL script file is created for each DDL statement. Each script file contains one statement. For example, before publishing, when you save the Kony Fabric app, Kony Fabric creates a SQL script file named V1_MYSQL. This SQL script file contains four statements. When you publish the app, Kony Fabric creates a SQL script file for each statement in V1_MYSQL. For example, V1.1_MYSQL, V1.2_MYSQL, V1.3_MYSQL, and V1.4_MYSQL.
Kony Fabric creates an individual script file for each statement because rollback support is not available. If a SQL script file fails, there is only one statement to troubleshoot and fix.
When you export a Kony Fabric app, you can see the SQL scripts that the storage service generated for the data model. In the exported app, in the ObjectService folder there is a _Flyway folder. Inside the _Flyway folder are SQL scripts that correspond to different database types. Currently, Storage Services supports only MYSQL. Flyway is a tool that Kony Fabric uses to run the SQL scripts on the server. In the MYSQL folder, you can find the corresponding schema file that Kony Fabric generated for the data model.
The following describes scenarios in which republishing a storage service will fail after making certain changes to the data model.
In these scenarios, you cannot roll back the changes that caused the publish to fail. To repair the data model so that you can republish the app, do the following:
If you delete a field from a data model and republish the storage service, any data in the deleted field is removed from the storage object.
The Kony Fabric
The following is the health-check URL format:
https://<Environment_Name>.konycloud.com/admin/healthcheck?output=json&force=true
The following is a sample JSON output from the health-check API. The properties that denote the health of published storage services are highlighted.
{
   "healthDetail": {
      "Static Resources Location": "PASSED",
      "Access to Cache": "PASSED",
      "Access to Deployment Storage": "PASSED",
      "Cloud Environment Identification": "PASSED",
      "Access to Reporting Queue": "PASSED",
      "Access to Device DB": "PASSED",
      "Security Credentials": "PASSED",
   },
      "healthCheck": "PASSED",
      "storage_health": [{
         "version_rank": 3,
         "success": true,
         "service_name": "StorageService1207t20",
         "schema_name": "StorageService1207t20_ee82885b",
         "version": "1.2",
         "script": "V1.2__MYSQL.sql",
         "installed_rank": 3
	}],
	"Console-Version": "MIDCloud-QA-7.1.0_v201607051517_r18",
	"Gateway-Version": "5.6.72.0"
}
You can download the data stored in a storage object through the admin server console. Users can upload their records and update the existing records using the export/import options.
To export or import data from storage objects, follow these steps


The file name the files of .csv files should be as <objectname>.csv.
For example: Employee and Department are two objects (tables). To update both the tables, modify both employee.csv and department.csv files. Archive the files into a single zip file.


Kony Fabric supports Salesforce as an endpoint in object services. The Kony Fabric developer creates a Salesforce object service and defines the data model with the fields required by the mobile app. Upon publishing the Kony Fabric app, a data schema is created in the back end based on the data model and a new self-contained database is instantiated.
A user needs to have a valid Salesforce login to perform any operation. Users can perform the following after the login is authenticated.
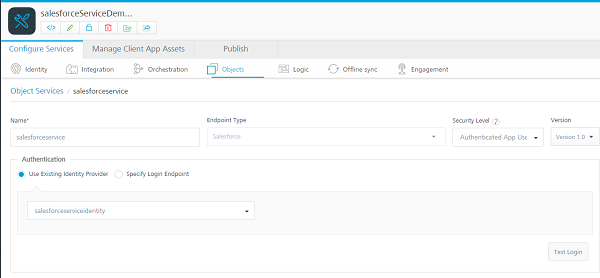
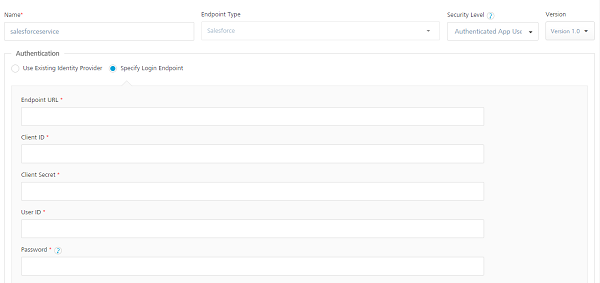
To create a Salesforce object service, do the following:
This links the Identity provider to the object service.
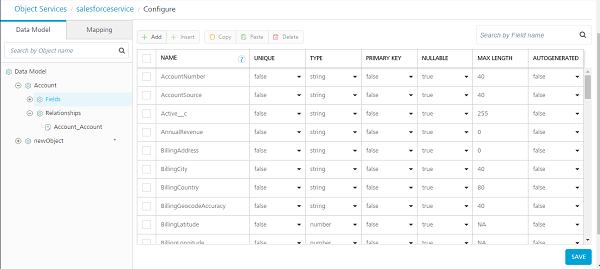
To create a data model, follow these steps:
The fields that Kony Fabric generates by default appear. The fields are populated in the database when you save the object service.
The name of a field can be a maximum of 25 characters.
When you set the Primary Key attribute to true for a field, the Unique attribute is automatically set to true.
When you set the Autogenerated attribute to true for a field, the Type attribute is automatically set to number.
A new row appears in the fields list.
If you select an existing identity provider while creating a service, you need to enter your Salesforce credentials to create mapping for the object service.
Now you can define the relationships between the objects in the data model.
In the Select Relationship Type field, a storage service currently supports only a One to Many relationship.
After you have published the service, you can test the service from Kony Fabric. Only the published state of the service is tested. Changes that you make in the service designer that are not published cannot be tested.
To test a published service, do the following:
With Object Services, you can create an object on Kony Fabric that uses MongoDB for storing data for apps.
MongoDB is a free and open-source cross-platform document-oriented database. Classified as a NoSQL database, MongoDB avoids the traditional table-based relational database structure in favor of JSON-like documents with dynamic schemas (MongoDB calls the format BSON), making the integration of data in certain types of applications easier and faster.
To create a MongoDB object service, do the following:
On the Apps page, click Add New.
Click the Edit App Name button to enter a unique name for the app. For example, SampleMongoDBApp.
Click the Objects service tab.
Click Configure New.
Click in the Name field, and enter a name for the object service. For example, SampleMongoDBObject.
Click in the Endpoint Type field. In the drop-down menu, select MongoDB.
Under Security Level, select Authenticated App Use. If you set the security level to Public, you are not required to enter the user name and password.
Click in the Hostname field. Enter the name of the MongoDB host.
Click in the Port field. Enter the port of the MongoDB.
Click in the Database Name field. Enter the name of the MongoDB database that you are using for the object service.
If you have set up an identity service that validates the authentication of the users before accessing your application, enter the user name and password for the Identity Service.
Optionally, enter the following properties for the MongoDB database: Connections per host (the total number of connections available for connection to the host), Maximum wait time (wait time in microseconds for the lock acquisitions), Connection timeout (the default is never timeout), Socket timeout (the default is never timeout), and Description.
On the Import Objects from Backend screen, select MongoCollection and MongoDocument, and then click Next.
Click the Mapping tab in the navigation pane.
Expand the MongoCollection object.
Click Create.
Click the Test tab.
In Request Payload, enter the name of a collection to create. For example, myTestCollection.
When a user logs on to a mobile app, the logon can invoke a custom Kony Fabric identity service. The response to the back-end logon contains identity or security attributes for the logged on user. For example, a user_id field. The storage service can use the
Update a Storage Object from the User Profile
A key advantage of identity filters is the ability to update certain parts of a storage object from the identity service and not the mobile app. With a storage object, the mobile app should not be able to update certain fields or elements of the object. For example, a field that identifies who created a record (CreatedBy) or who updated a record (LastUpdatedBy).
By using an identity filter in a storage service, the userID from the identity profile is mapped to the CreatedBy field as an input parameter. When the mobile app user creates a record, Kony Fabric sets the CreatedBy value from the identity provider and not the mobile app. The mobile app user cannot set the CreatedBy field because the mobile app does not include the CreatedBy field for data entry.
Constrain Data with an Identity Filter that the User Cannot Modify
Another key advantage of using identity filters to query data is that the mobile app user cannot access and modify these filters. For example, an employee that uses the mobile app can view and access only the records that she created, while the manager can access the records that all employees created. Kony Fabric maps a user attribute from the user profile to an input parameter for the storage service query. The mobile app user cannot modify the identity filter because the query was executed on the Kony Fabric storage service and not the mobile app.
Bill is the sales manager of an auto dealership that sells Steed brand cars. Bill uses a mobile app that is provided by Steed. Bill uses the mobile app to get sales reports, learn about special internal sales programs, and look up invoice prices for his dealership.
The sales manager has a user name that he uses to log on to the account. Steed maintains an internal dealerId in Bill's user profile that identifies the dealership that Bill is associated with. The dealerId is sensitive information and a sales manager is not privy to and cannot see his internal dealerId. All the backend APIs need this dealerID as an input parameter during any subsequent integration queries.
When Bill logs on to the mobile app, the response to the logon from the back end contains Bill's internal dealerId. The Kony Fabric identity service stores this identity attribute for the session. In the storage service, the get operation uses this identity attribute as an input parameter to filter the request for data that is sent to the mobile app. For example, when Bill looks up manufacturer dealer incentives or invoice costs, the storage service adds Bill's dealerId to the query. The query returns only dealer incentives and invoice costs for Bill's dealership. At no point does Kony Fabric send Bill's dealerId to the mobile app. This eliminates the possibility that Bill, or anyone else that gains access to Bill's mobile device, can use the dealerId to access incentives or invoice costs for other dealerships or breach company data.
The Oakway National Bank (ONB) has a mobile banking app. The mobile app uses a custom SOAP identity service configured on Kony Fabric. When a customer of ONB signs in to the app, the sign-in invokes the identity service. The response to the back-end sign-in contains a user security attribute, for example, CRM_Id.
After the user signs in successfully, every subsequent integration request to the back end must have the CRM_Id as an input parameter to identify the authorized user who is accessing the private bank accounts. A user's CRM_Id is sensitive and is not shared with the user. A hacker could use a CRM_Id to illegally access a user's personal financial information. By using an identity filter with the storage service, the CRM_Id is preserved on Kony Fabric itself and not sent to the user's mobile app. This reduces the possibility of an intruder gaining access to sensitive data on the mobile device.
You
To link a storage service to an identity service, do the following:
A list of object services appears. This is the list of object services that have been created for the Kony Fabric app.
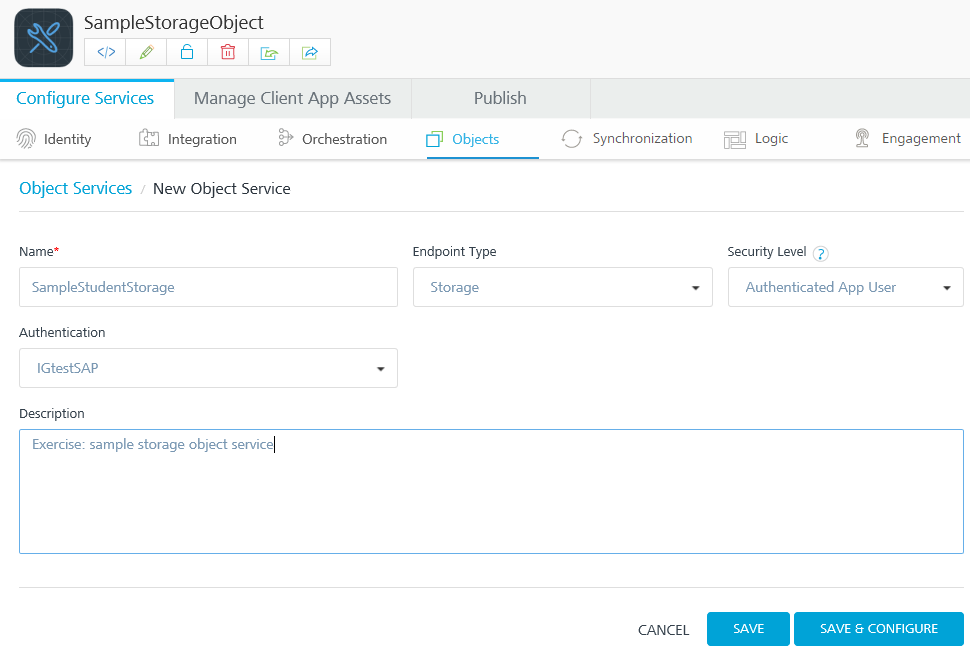
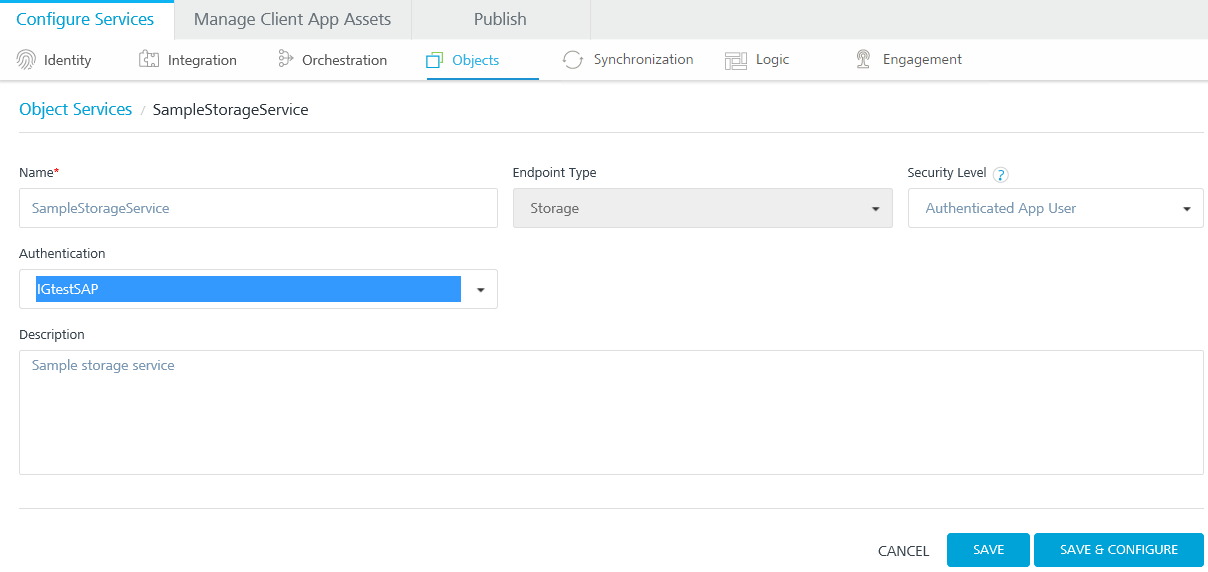
A storage service is an object service that you have configured to use storage on the Kony Fabric back end. When you create a storage service, you select Storage as the endpoint type.
Configure a Security Filter
To configure a
A list of object services appears. This is the list of object services that have been created for the Kony Fabric app.
The list of operations, or verbs, for the object appears.

The configure screen for the get verb appears.
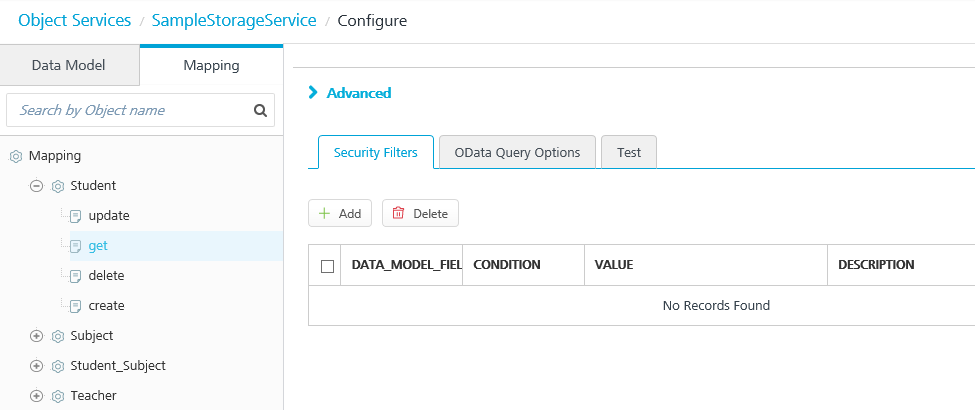
Select a field from the object that you want to use to filter the data returned by the query.
The available conditions are eq (equals), gt (greater than), and lt (less than).
This maps the user ID attribute from the identity service to the Id field in the storage object.
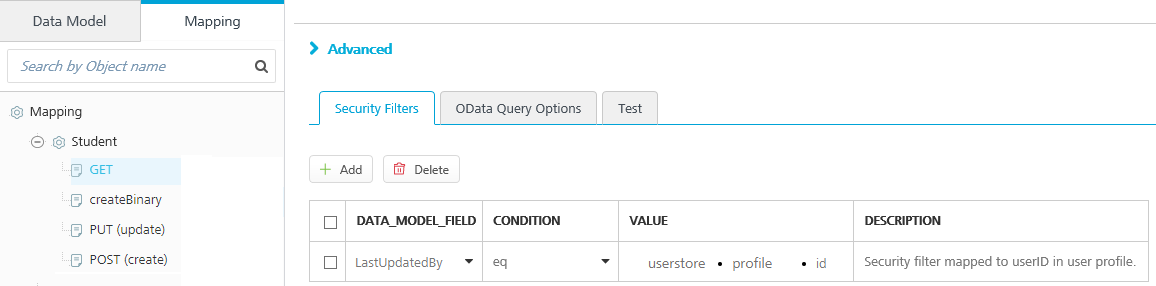
This security filter is added to any get operations performed on the Student object.
The security filter constrains the results of a get operation that are returned to the mobile app. For example, if the mobile app has an option to get a list of student records that the user had recently updated, Kony Fabric adds this security filter to the query. The mobile app retrieves only the student records that were updated by the logged on user. The field that Kony Fabric used to filter the results, LastUpdatedBy, is added to the query only in Kony Fabric and is not sent to mobile app with the results. The mobile app user cannot access this field and use it to retrieve records that were updated by another user.
Configure Identity Filters
To configure identity filters for a create operation in a storage service, do the following:
The Request Input Parameters tab appears in the Configure screen. You define how to use the user profile data by selecting a verb and the data model field that you want to map to the user profile data.
An identity value indicates that Kony Fabric will retrieve the value specified from the user's security profile in the identity service that is linked to the object service.
This specifies that Kony Fabric will populate the value of the input parameter from the user's security profile.
Object services enabled with security filters cannot be tested from Kony Fabric Console.
An identity session is read-only and cannot be modified in the preprocessor and postprocessor, or an integration service. Once the context is accessible, a Kony Fabric developer can refer to the identity session context.
The following identity providers are not supported for Storage Services and identity filters:
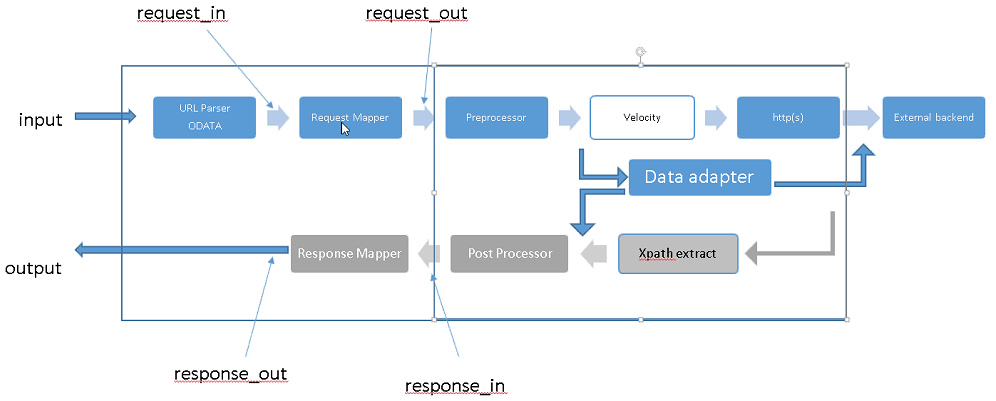
The core mapper engine is integrated into the Object Services pipeline. The mapper is an engine that logically takes in JSON, using the declarative XML that it is passed; modifies the JSON; and creates nodes in the JSON and updates existing nodes.
For the request that is coming in to the mapper, after basic URL parsing and ODATA parsing are performed, all the context is made available to the request mapper. The request mapper modifies the payload and sends it into the next stage of the pipeline, which goes to the back end, typically by using an integration connector.
After the response is picked up, the whole context is made available to the response mapper. The Response mapper makes changes to the data, and outputs the data after some formatting. The internal mapper logic is the same for both the input and output pipelines, but the context that is made available to the mapper changes.
The following diagram shows the Object Services pipeline:
On the input, when the mapper is applied, it is equivalent to the following:
mapper("input mapper xml", $current_input = data)
The $data is logically a blob with all the context made available to the mapper. You are passing in transformational XML to run on the current input. The mapper input can access any of the data that is passed to it.
request_in : Read-only, input payload JSON from API request.
request_out : Read-write, (a copy of input payload), transformed JSON that is sent to next stage.
vars : Empty. This is referenced using $vars and is used by mapper XML as a global variable store
On the output, when the mapper is applied, it is equivalent to the following:
mapper("output mapper xml", $current_input = data)
The $data is logically a blob with all the context made available to the mapper.
response_in : Response from back end logically represented as JSON.
response_out : Transformed JSON using the XML mapper sent in the "records" field of the API response.
vars : Empty. This is referenced using $vars and is used by mapper XML as a global variable store.
The mapper includes the following built-in variables, built-in functions, and blocks.
Built-in Variables
a/b/c /* An input path of a.b.c in the given object */
../b /* inputpath = "b" on $current-input.getParent() */
$current-input /* Input instance of current map block */
$current-output /* Output instance of current map block */
$mapper-input /* Mapper instance’s global input */
$mapper-output /* Mapper instance’s global output */
$vars/x /* Variables are stored in this hash. All variables are GLOBAL */
$args/<arg name> /* Arguments passed to a function */
On a function call, by default, $args.current-input is set to $current-input, and $args.current-output is set to $current-output.
input="myinput" inputpath="firstname"$myinput["firstname"]
inputpath="firstname" is equivalent to $current-input["firstname"]
Input="3" /* not starting with a $, it is constant value. To use $ as a constant, use the escape character, for example, "\$".*/
output="$myoutput" outputpath="lastname" is equivalent to $myoutput["lastname"]
Built-in functions
The Kony namespace contains a number of built-in functions that you can use with the mapper. The built-in functions are:
The kony namespace is reserved for Kony-defined functions only. User-defined functions cannot use the kony namespace.
Blocks
The following table describes the blocks available:
| Block | Description | Example |
|---|---|---|
| map | This is the main block in mapper. |
<map inputpath="x/y/z" input="$current-input"
|
| set-param | Sets an output parameter from input. |
<set-param
|
| set-arg | Variant of set-param to set the argument of a function. |
<set-arg
|
| set-variable | Variant of set-param to define and set a global variable. |
<set-variable
|
| exec-function |
Execute function. The return value of exec-function is written to the output/outputpath attributes of exec-function. |
<map inputpath="contact" outputpath="contact">
|
| choose-when-otherwise | When a "test" condition evaluates to true, then the "when" block is executed. If the "test" condition evaluates to false the "otherwise" block is executed. |
<choose>
|
| Create-lookup | Create-lookup loops on the inputpath array and creates a hashmap with a lookup-key parameter as key and value as “Node” object refers to corresponding customer row of the input object. | <create-lookup inputpath=”Customers” output=”$vars” ouputpath=”customerMap”> <lookup-key inputpath=”Id”/> </create-lookup> |
| Lookup | Retrieves the “Node” object from the hashmap and makes it available in the output. | <lookup input=”$vars” inputpath=”customerMap” outputpath=”customerRef” output=”$vars”> <lookup-key inputpath=”CustomerId”/> </lookup> |
| Create-group | Create-group generates an aggregate group of objects based on a key designated by the group-key block. Each object is contains multiple entries. Each entry is a key/value pair. | <create-group inputpath=”Time_Entry” output=”$vars” ouputpath=”customerMap”> <group-key inputpath=”Timesheet_Id”/> </create-group> |
| Group-key | Key used to group items for aggregation. | <group-key inputpath=”Timesheet_Id”/> |
|
javascript |
JavaScript element must occur one time only as a child element to the Function element. Then name of outputpath attribute represents a field in the app data model. |
<function name="NameConcat"> <javascript outputpath="FullName"> <set-arg name="firstName" inputpath="FirstName" /> <set-arg name="middleName" inputpath="MiddleName" /> <set-arg name="lastName" inputpath="LastName" /> |
| script | The Script element is a required child element in a JavaScript element. It must occur one time only. The JavaScript snippet should be written in CDATA section of this element. |
			<script>
			<![CDATA[
			  function concat(){
			   var result = firstName+’ ‘+ middleName + ’ ‘+lastName.substring(0, 1).toUpperCase() + '. '
			    return result;
  			    }
			   concat();
			 ]]>
			</script>
|
The following example shows the structure of the mapper in declarative XML.
 <mapper xmlns="http://www.kony.com/ns/mapper">  /* root element */
        <function name="field-map-a2b"> /* Function definitions */
        <set-param />
        <map input= output= inputpath= outputpath=></map>
        </function>
        <map input= output= inputpath= outputpath=> /* Mapper blocks */
        <set-param input= inputpath= output= outputpath = />
        <set-variable input= inputpath= output= outputpath=  />
        <exec-function name="field-map-a2b">
        <set-arg />
        </exec-function>
        </map>
        <map> </map>  /* another map node */
         </mapper>

        Example: Simple Mapping
        In this simple mapping example, the input is a list of records under A, and each record has P1 and P2 fields that we want to output to the API response by transforming P1 to Q1 and P2 to Q2.
        The back end is returning columns by the name P1 and P2, where the object on the client side has fields named Q1 and Q2. For example, the backend could be returning FName and LName, and these are mapped to fields with more friendly names on the client side, Firstname and Lastname. The mapper, in each of the records it gets, picks up the value of P1, put it into a key of Q1 in the output.
        The mapper is output-driven, so in the output, choose a path with the name A (outputpath="A"), and set up a parameter Q1 in output (set-param outputpath="Q1" inputpath="P1"), by taking the value from P1 from the input from a path with the name A (inputpath="A").
        Input
         {
        "A": [
        {
         "P1": "value1",
         "P2": "value2"
        }
        ]
         }
        Output
         {
        "A": [
        {
         "Q1": "value1",
         "Q2": "value2"
        }
        ]
         }
        Mapping
         <?xml version="1.0" encoding="UTF-8" standalone="yes"?>
         <mapper xmlns="http://www.kony.com/ns/mapper">
        <map outputpath="A" inputpath="A">
        <set-param outputpath="Q1" inputpath="P1" />
        <set-param outputpath="Q2" inputpath="P2" />
        </map>
         </mapper>

        Identity Support in Mapper
        The mapper can access identity security or profile attributes if they are needed by your service. For example your service requires an input parameter that is available from the identity profile attribute.
        To use identity support follow these guidelines:
The following example shows how to access the identity profile attribute using the mapper. The example is a request mapper that retrieves the value for the “PRODUCT” parameter from the “user_id” token of the “SAPIdentity” identity provider.
<?xml version="1.0" encoding="UTF-8" standalone="yes"?>
<mapper xmlns="http://www.kony.com/ns/mapper">
<map inputpath="request_in" outputpath="request_out">
<set-param inputpath="identity/SAPIdentity/profile/user_id" input="$mapper-input" outputpath = "PRODUCT "/>
</map>
</mapper>
Example: Accessing the Identity Security Attribute
The following example shows how to access the identity security attribute using the mapper. In this example, an identity security attribute value is mapped to a result parameter named "SAP-Session-Key-Value".
<?xml version="1.0" encoding="UTF-8" standalone="yes"?>
<mapper xmlns="http://www.kony.com/ns/mapper">
<map inputpath="response_in" outputpath="response_out">
<map inputpath="Sample_Object" outputpath="Sample_Object">
<set-param inputpath="identity/SAPIdentity/security/KonySAP-Session-Key" input="$mapper-input" outputpath="SAP-Session-Key-Value"/>
</map>
</map>
</mapper>
Visual Object Mapper
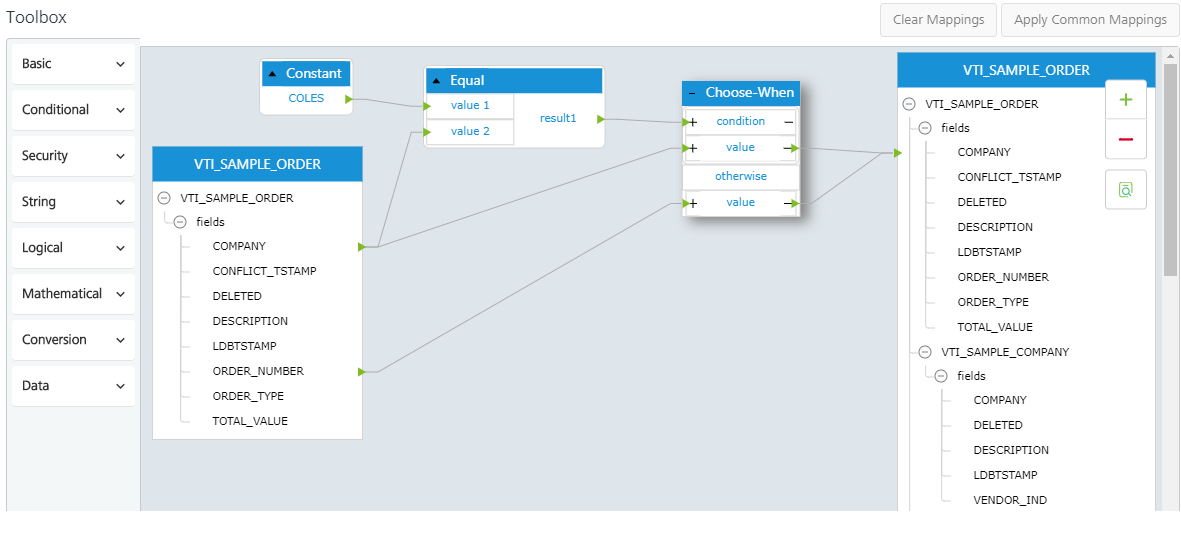
Kony Fabric Object Services includes a visual designer that lets you add, modify, and delete request and response mappings of any of your object services using a drag-and-drop interface.
The backend object, data model, and the other objects and functions that are associated with the service are each displayed in their own container. Each container has one or more items listed within it. Each item within a container has a triangle next to it that you can click and drag to another item in another container to create new mappings.
Each mapping has a corresponding color associated with it.
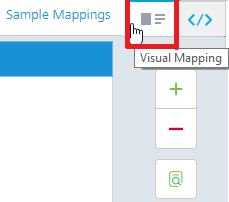
The design view is available along with a XML code view of your mappings. You can quickly switch between code view and the visual design view by clicking on the appropriate tab in the viewing pane.
The procedures in this section describe how to use the visual designer to manage your Object Service mappings.
You can examine any object service in visual design view that has request and response mappings. This section describes how to access visual design view for your services.
The default visual design view pane is view-only and cannot be edited.
After you are in visual design view, you can increase and decrease the zoom level of the viewing pane by clicking the + and - buttons in the upper-left corner of the pane. In addition, you can hide mappings by clicking the button below the zoom buttons and selecting which type of mappings you want to hide.
You can also edit your mappings by clicking the Edit button at the bottom of the viewing pane.
To access visual design view for a specific object service, do the following:
You can map objects to each other using your mouse to click on one item and then dragging to another item.
Depending on the type of item, the item can have multiple mappings from several different sources.
To map one item to another, do the following:
If you attempt to map items of differing data types, an error message will appear.
You can add other data models to your existing service, which you can then map to the existing functions and objects. Each data model that you add will appear as a collapsible list in the container you added the data model to.
To add a new data model, do the following:
Some of your services might include a large number of mappings that can clutter the visual design view. You can temporarily hide these mappings to make it easier to create additional mappings, and then show the mappings again after your changes are complete.
To hide and show mapping to an item, do the following:
You can right-click on each container or item to view a context-sensitive menu that you can access. The menu contains actions that you can perform on the item. These actions include
Containers also have an edit icon that you can click to edit the container.
If you want to view the properties of an item, hover your cursor over the icon next to the item.
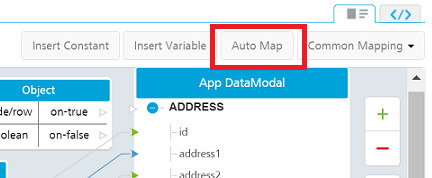
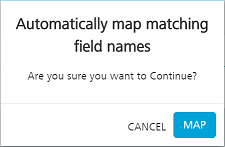
You can automatically map items that have the same field names with each other by using the Automap button in the visual designer.
To use Automap, do the following:
You can apply or remove common mappings in your service by clicking the Common Mappings button.
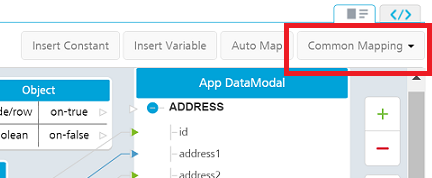
Then select either Apply or Remove from the drop-down menu.
You can add new constants or variables to your service, which you can then map to other items in your service.

To add a constant, do the following:
To add a variable, do the following:
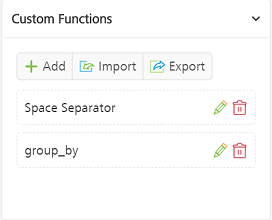
When the visual designer is in Edit mode a list of functions appears on the left side of the view.
The list includes all built-in mapper functions, as well as any custom functions you have created.
You can add new functions to your service by dragging and dropping the function from the list. You can also add, edit, import, export, and delete any custom functions you have.
To add a built-in function, do the following:
You can use any custom functions that you have created for this service by using the same procedure for adding a built-in function described in the previous section. In addition, you can take the following actions:
The following procedures describes each of these actions.
To Add a new custom function, do the following:
If you do not want to immediately add the function to your mappings, click the Save button.
To edit an existing function, do the following:
If you want to edit a custom function in mapping area, click on the Edit icon on the function's container.
To import a custom function, do the following:
To export a custom function, do the following:
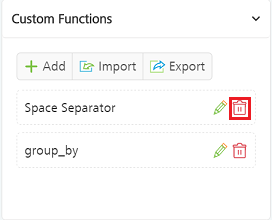
To delete a custom function, do the following:
To use actions for existing services such as edit, clone, clone app data model, unlink, delete, console access control, export, and validate, hover your cursor over the required service, click the Settings button to display the context menu. You can perform the following actions on an existing service:
To know more about publishing an app, refer to Publish an app.
If a service is part of a published app, you can rename that service only after the app is unpublished.
If you want to use an unlinked service, select the service from the Use Existing Integration Service dialog.
If a service is a part of a published app, you can delete that service only after you unlink the service from all the published app.
Console Access Control: Controls the access to the applications and services of apps.