
Use a Proxy Server
If your network configuration uses a proxy server, you can configure Kony Visualizer to recognize it, whether it is a Basic or NTLM proxy. If yours is an NTLM proxy server, you must follow the procedures for both the Basic proxy and the NTLM proxy.
Basic Proxy Configuration
Configuring Kony Visualizer to recognize a Basic proxy server involves the following procedures:
Add Proxy Information to the Eclipse Initialization File
Configure the Proxy Server in Kony Visualizer
Configure a Manual Proxy for Your Computer
Add Proxy Information to the Eclipse Initialization File
Kony Visualizer uses Eclipse, an open-source integrated development environment (IDE), for some of its underlying functionality. To use Kony Visualizer with a proxy server, you need to modify the Eclipse initialization file.
To add proxy information to the Eclipse initialization file, do the following:
- If it is currently open, close Kony Visualizer.
- Using your computer's file explorer, navigate to the Eclipse initialization file.
- On the Mac, the file name is
eclipse-orig.ini. It is located within the Eclipse.app folder, and can be accessed using the Show Package Contents command.
You can access the eclipse.ini file by doing the following:
a. Navigate to the Kony Visualizer Enterprise installation path.
b.Right click Kony_Visualizer-Enterpries and select Show Package Contents.
c. Navigate to Content > MACOS. Open the eclipse.ini in a text editor. - On a Windows computer, the file name is
eclipse.ini, and is located at the following location: - Using a text editor, open the Eclipse initialization file.
- Add the following entries to the file:
- Save and close the file.
- Restart Kony Visualizer.
<VisualizerEnterpriseInstallFolder>\_Kony Visualizer_installation
-Dkony.http.proxyHost=xxx.xxx.xxx.xxx
-Dkony.http.proxyPort=xxxx
-Dkony.http.proxyUser=xxxxxx
-Dkony.http.proxyPassword=xxxxxx
-Dkony.noProxy=xxx.x.x.x
Important: Configure Dkony.noProxy only if you want to bypass the proxy for the localhost domain.
For example:
-Dkony.http.proxyHost=10.0.0.100/host.example.com
-Dkony.http.proxyPort=8880
-Dkony.http.proxyUser=HannahSmith
-Dkony.http.proxyPassword=3y*ANjScw8BH
-Dkony.noProxy=127.0.0.1,localhost
Important: For an NTLM proxy server, use the following values for the proxyHost and the proxyPort:-Dkony.http.proxyHost=127.0.0.1-Dkony.http.proxyPort=3128
Configure the Proxy Server in Kony Visualizer
The following procedure configures Kony Visualizer to recognize the proxy server.
To configure the proxy server in Kony Visualizer, do the following:
- In Kony Visualizer, on the Window menu, click Preferences.
- From the left pane of the dialog box, double-click General, and then click Network Connections. Doing so displays the Network Connections options in the right pane.
- Set Active Provider to Manual.
- In the Proxy entries table, select the HTTP schema, and then click Edit.
- In the Host text box, enter the proxyHost value that you added to the Eclipse configuration file.
- In the Port text box, enter the proxyPort value that you added to the Eclipse configuration file.
- Click OK.
Important: For an NTLM proxy server, the Host value should be 127.0.0.1.
Important: For an NTLM proxy server, the Port value should be 3128.
Configure a Manual Proxy for Your Computer
In addition to configuring Eclipse and Kony Visualizer to recognize the proxy server, your operating system needs to be configured, as well. Doing so differs between Mac and Windows computers.
Configure a Manual Proxy for a Mac
Configure a Manual Proxy for Windows
Configure a Manual Proxy for a Mac
To configure a manual proxy for a Mac, do the following:
- Click the Apple menu, next click System Preferences, and then click Network.
- From the list, select the network service you are using, such as Wi-Fi or Ethernet.
- Click Advanced, and then click Proxies.
- From the Select a protocol to configure list, clear the check box for Auto Proxy Discovery and Automatic Proxy Configuration.
- From the Select a protocol to configure list, check the check box for Web Proxy (HTTP).
- With Web Proxy (HTTP) selected, in the Web Proxy Server text box, enter the proxyHost value that you added to the Eclipse configuration file.
- In the accompanying port text box, enter the proxyPort value that you added to the Eclipse configuration file.
- Repeat steps 5 through 7 for the Secure Web Proxy (HTTPS) protocol and the FTP Proxy protocol.
- Check the Exclude simple host names check box.
- Click OK.
Important: For an NTLM proxy server, the Web Proxy Server value should be 127.0.0.1.
Important: For an NTLM proxy server, the Port value should be 3128.
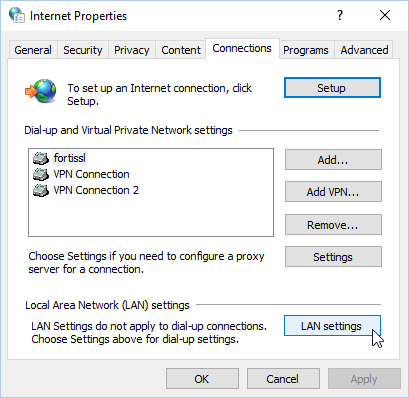
Configure a Manual Proxy for Windows
To configure a manual proxy for Windows, do the following:
- Click the Start menu, and then click Settings (for Windows 10) or Control Panel (for Windows 7 and earlier).
- In the search box, type Internet options, and then press Enter.
- From the search results, click Internet options. Doing so brings up the Internet Properties dialog box.
- Click the Connections tab, and then click LAN Settings.
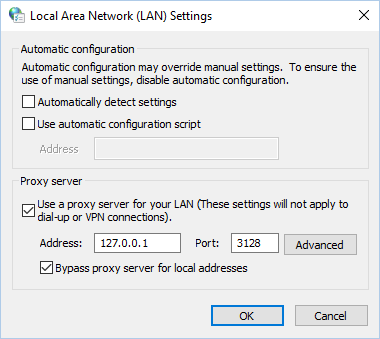
- Clear the Automatically detect settings check box.
- Under Proxy server, check the check box for using a proxy server for your LAN.
- In the Address text box, enter the proxyHost value that you added to the Eclipse configuration file.
- In the Port text box, enter the proxyPort value that you added to the Eclipse configuration file.
- Check the check box for Bypass proxy server for local addresses.
- Click OK, and then click OK again.
Important: For an NTLM proxy server, the Address value should be 127.0.0.1.
Important: For an NTLM proxy server, the Port value should be 3128.
Your settings should look something like this (settings shown are for an NTLM proxy server):
NTLM Proxy Configuration
To configure Kony Visualizer to recognize an NTLM proxy server, you must follow all the procedures related to both the Basic proxy and the NTLM proxy. If you have not yet followed the procedures for a Basic proxy, see Basic Proxy Configuration. Once you have done so, completing the NTLM proxy configuration involves two additional tasks.
Allow CONNECT Requests from Non-SSL Connections and Ports
Run a Cntlm Process
Cntlm is an HTTP proxy that efficiently provides NTLM authentication on the fly. Cntlm integrates TCP/IP port forwarding, SOCKS5 proxy mode, and standalone proxy configuration to allow intranet, Internet, and corporate web server access with NTLM protection.
You run the Cntlm process configured with the proper NTLM host and port information, and any additional needed authentication data.
For more information, refer to the following links:
The Cntlm Authentication Proxy web site
Allow CONNECT Requests from Non-SSL Connections and Ports
By default, proxies such as Squid and ISA do not allow http CONNECT requests from non-SSL connections and ports it deems unsafe. As a result, the proxy server has to be explicitly configured to allow such connections and ports. To do so, contact your system administrator and request that CONNECT requests from non-SSL connections and ports be allowed.
White-List Essential Domains
Kony Visualizer access particular domains that the proxy server must be configured to allow. Contact your system administrator and request that the following domains be white-listed:
https://manage.kony.com
https://api.kony.com
https://visualization.kony.com
https://prototypetransit.kony.com.s3.amazonaws.com
https://accounts.auth.konycloud.com
| Rev | Author | Edits |
| 7.2 | NMK | NMK |
| Copyright © 2013 Kony, Inc. All rights reserved. |