
Windows Phone and Tablet
Applies to Kony Visualizer Classic.
Using Kony Visualizer, you can develop applications on a number of Windows versions for different devices and channels. For instructions on how to do so, click one of the following options.
Windows 10 UWP Tablet
With Kony Visualizer, you can create an app that supports Windows 10 universal Windows program (UWP) tablets. Getting your system set up to build and test Windows 10 applications in Kony Visualizer involves the following tasks.
- The Windows 10 SDK works best on the Windows 10, Version 1511 operating system. However, it is also supported on the following versions of Windows, although not all tools are supported on these versions: Windows 8.1, Windows 8, Windows 7, Windows Server 2012, Windows Server 2008 R2
- If you want to use the Windows 10 tablet simulator, your computer must be running, at a minimum, Windows 8.0.
Getting your system set up to build and test Windows 10 applications in Kony Visualizer involves the following tasks.
- Confirm your system meets Windows 10 development requirements
- Create and/or sign in to your Microsoft account
- Install and Configure the Windows SDK 10
Confirm Your System Meets Windows 10 Development Requirements
To develop for the Windows Phone 10 platform and run its emulator, your computer needs to meet certain hardware and software requirements. The procedures in this section guide you through confirming that your system meets them. At a minimum, it needs to be capable of running Microsoft Windows 8.
Confirm that your computer's CPU supports SLAT.
Confirm other system requirements for Windows 10.
Confirm that your computer's CPU supports SLAT
To run the Windows 10 tablet simulator, your computer needs a central processing unit (CPU) that supports Second Level Address Translation (SLAT) .
Note: SLAT support is necessary to use the Windows 8 emulator. If your CPU does not support SLAT, you can still install and use the Windows 8 SDK in Kony Visualizer on a computer running Windows 8 Pro or greater, but you won't be able to use the Windows 10 tablet simulator.
To check if your CPU supports SLAT, do the following:
- Download Coreinfo.zip from the Windows Sysinternals web page.
- Extract the zip file to a folder, such as C:\Coreinfo.
- Click Start, and then in the Search programs and files text box, type cmd.exe.
- When it appears in the search results, right-click it, and then click Run as administrator.
- In the command window that launches, type coreinfo.exe -v, and then press Enter.
- Edit the system environments. Doing so opens the System Properties dialog box.
- Navigate to the path where you extracted the zip file.
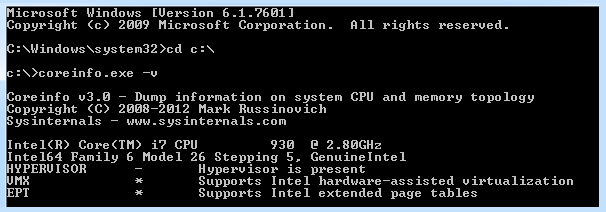
- In the command window that launches, type coreinfo.exe -v, and then press Enter. After a few seconds, a license agreement for Coreinfo appears. If you agree to the terms, click Agree. Coreinfo will then display the results of its analysis.
An asterisk (*) displays if the CPU supports the Windows 8 platform. If no asterisk displays, then the CPU does not support the Windows 8 platform.
For example, for an Intel CPU, if the processor supports SLAT, an asterisk (*) displays in the EPT row, indicating support for extended page tables, as seen here.
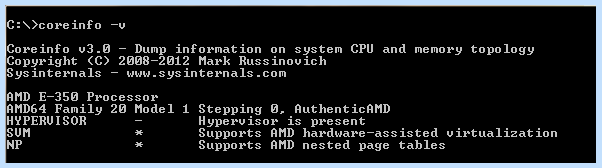
If you have an AMD processor, then an asterisk (*) is displayed for NP (Nested Page tables), as seen here.
Confirm Other System Requirements for Windows 10
To develop for the Windows 10 platform and run its tablet simulator, your computer needs to meet the following additional system requirements for hardware and software.
- 64-bit (x64) CPU
- 2.5 GB of internal storage
- 4 GB RAM
- Windows 8 Pro edition or greater
Create and/or sign in to your Microsoft account
While it is possible to download and install the Windows SDK 10 without a Microsoft account, getting additional resources, such as emulators, requires one. So if you don't already have an account, creating one at this point in the process will cause the least amount of disruption to you.
To create and/or sign in to your Microsoft account, do the following:
- Using a web browser, navigate to the Windows Dev Center.
- Click Sign in.
- Do one of the following, depending on which applies to you:
- You already have a Microsoft account. Enter the email address and password of your account, and then click Sign in.
- You do not have a Microsoft account. Do the following.
- Scroll down to the prompt that asks Don't have a Microsoft account?, and then click Sign up now. Doing so opens the Create an account page.
- Fill in the required fields, and then click Create account. A verification page appears informing you that Microsoft has sent you an email message to confirm your identity.
- Following the instructions on the verification page, check the email account you associated with your Microsoft account, and using the link in the email message Microsoft sent you, verify your identity.
Note: If you do not see the email message in your inbox, check your spam or junk mail folder.
- Once you have verified your Microsoft account, if you are not already signed in, do so now by following the initial steps of this procedure.
Note: If you are signed in, the email address you associated with your Microsoft account appears in the upper right corner of the web page.
Install and configure the Windows SDK 10
The Windows SDK 10 contains resources to develop universal Windows apps (UWA) for Windows 10, as well as apps and desktop applications for Windows Phone, including emulators.
To install the Windows SDK 10, do the following:
- Using a web browser, navigate to the Windows SDK 10 page on the Microsoft Download Center.
- Click Download the standalone SDK.
- Choose the language version you want to install, and then click Download. Doing so initiates the downloading of sdksetup.exe.
- Once sdksetup.exe has downloaded, launch it and follow the prompts to install the SDK.
Windows Phone 8.0 and 8.1
- The Windows Phone 8.0 and 8.1 emulators cannot be installed and tested on the Windows 7 operating system. Your computer must be running Windows 8.0 or 8.1
- To run the Windows Phone 8.1 emulator, your computer must be running Windows 8.1
- The highest version of Windows Phone for which you can develop using the Windows 7 operating system is Windows Phone.
Getting your system set up to build and test Windows 8 applications in Kony Visualizer involves seven tasks. This section describes them.
- Confirm your system meets Windows 8 development requirements
- Create and/or sign in to your Microsoft account
- Install and Configure the Windows Phone SDK 8.0
- Download and install Visual Studio Express 2013 for Windows
- Download and install the Windows Phone 8.1 Update 1 Emulators
- Configure the Windows Phone emulators in Kony Visualizer
Confirm your system meets Windows 8 development requirements
To develop for the Windows Phone 8 platform and run its emulator, your computer needs to meet certain hardware and software requirements. The procedures in this section guide you through confirming that your system meets them.
- Confirm that your computer's CPU supports SLAT.
- Confirm other system requirements for Windows Phone 8.
Confirm that your computer's CPU supports SLAT
To run the Windows Phone 8 emulator, your computer needs a central processing unit (CPU) that supports Second Level Address Translation (SLAT) .
Note: SLAT support is necessary to use the Windows 8 emulator. If your CPU does not support SLAT, you can still install and use the Windows 8 SDK in Kony Visualizer on a computer running Windows 8 Pro or greater, but you won't be able to use the Windows 8 emulator.
To check if your CPU supports SLAT, do the following:
- Download Coreinfo.zip from the Windows Sysinternals web page.
- Extract the zip file to a folder, such as C:\Coreinfo.
- Click Start, and then in the Search programs and files text box, type cmd.exe.
- When it appears in the search results, right-click it, and then click Run as administrator.
- In the command window that launches, type coreinfo.exe -v, and then press Enter.
- Edit the system environments. Doing so opens the System Properties dialog box.
- Navigate to the path where you extracted the zip file.
- In the command window that launches, type coreinfo.exe -v, and then press Enter. After a few seconds, a license agreement for Coreinfo appears. If you agree to the terms, click Agree. Coreinfo will then display the results of its analysis.
An asterisk (*) displays if the CPU supports the Windows 8 platform. If no asterisk displays, then the CPU does not support the Windows 8 platform.
For example, for an Intel CPU, if the processor supports SLAT, an asterisk (*) displays in the EPT row, indicating support for extended page tables, as seen here.
If you have an AMD processor, then an asterisk (*) is displayed for NP (Nested Page tables), as seen here.
Confirm other system requirements for Windows Phone 8
To develop for the Windows Phone 8 platform and run its emulator, your computer needs to meet the following additional system requirements for hardware and software.
- 64-bit (x64) CPU
- 6.5 GB of internal storage
- 4 GB RAM
- Windows 8 Pro edition or greater
Create and/or sign in to your Microsoft account
While it is possible to download and install the Windows Phone SDK 8.0 without a Microsoft account, getting additional resources, such as emulators, requires one. So if you don't already have an account, creating one at this point in the process will cause the least amount of disruption to you.
To create and/or sign in to your Microsoft account, do the following:
- Using a web browser, navigate to the Windows Dev Center.
- Click Sign in.
- Do one of the following, depending on which applies to you:
- You already have a Microsoft account. Enter the email address and password of your account, and then click Sign in.
- You do not have a Microsoft account. Do the following.
- Scroll down to the prompt that asks Don't have a Microsoft account?, and then click Sign up now. Doing so opens the Create an account page.
- Fill in the required fields, and then click Create account. A verification page appears informing you that Microsoft has sent you an email message to confirm your identity.
- Following the instructions on the verification page, check the email account you associated with your Microsoft account, and using the link in the email message Microsoft sent you, verify your identity.
Note: If you do not see the email message in your inbox, check your spam or junk mail folder.
- Once you have verified your Microsoft account, if you are not already signed in, do so now by following the initial steps of this procedure.
Note: If you are signed in, the email address you associated with your Microsoft account appears in the upper right corner of the web page.
Install and configure the Windows Phone SDK 8.0
The Windows Phone SDK 8.0 contains resources to develop mobile apps for Windows Phone 8 and Windows Phone, and contains the emulator for Windows Phone.
- To emulate Windows Phone 8.0, you need to also download and install Visual Studio Express 2013 for Windows, which is covered in the next procedure
- To emulate Windows Phone 8.1, after downloading and installing Visual Studio Express 2013 for Windows, you need to also download and install the Windows Phone 8.1 Update 1 Emulators, which is covered in the procedure following the installation of Visual Studio Express 2013 for Windows
- If your computer has a motherboard from Gigabyte and you have the USB 3.0 host controller enabled in the BIOS, when installing the Windows Phone SDK 8.0, your computer might stop responding when it restarts. You can avoid this by disabling USB 3.0 support in your computer's BIOS. For more information on Gigabyte motherboard models affected by this issue, see Installing Hyper-V on Gigabyte systems. To resolve this, disable USB 3.0 support in your computer's BIOS
- The Windows Phone SDK 8.0 installs side-by-side with previous versions of the Windows Phone SDK. You don't need to uninstall previous versions before beginning this installation
- The Windows Phone 8.0 emulator does not work on a computer running Windows 8.1. You need to install Visual Studio Express 2013 for Windows and the Windows Phone 8.1 Update 1 Emulators
- Each language version of Windows Phone SDK 8.0 is designed to function with the corresponding language version of the operating system and Visual Studio 2012
To install the Windows Phone SDK 8.0, do the following:
- Using a web browser, navigate to the Windows Phone SDK 8.0 page on the Microsoft Download Center.
- Choose the language version you want to install, and then click Download.
- Check the box for WPexpress_full.exe. If you want to download the release notes for Windows Phone 8, then also check the box for Windows Phone 8 Release Notes.htm.
- Click Next.
- Once WPexpress_full.exe has downloaded, launch it and follow the prompts to install the SDK.
Download and install Visual Studio Express 2013 for Windows
If you want to run your app on a Windows Phone 8.0 or 8.1 emulator, you need to download and install Visual Studio Express 2013 for Windows.
Note: This procedure assumes that you already have a Microsoft account.
To download and install Visual Studio Express 2013 for Windows, do the following:
- Using a web browser, navigate to the Windows Dev Center.
- If you are not already signed in to your Microsoft account, click Sign in, and then sign in to your account.
- Click Develop, and then click Downloads.
- Under the heading Visual Studio Express 2013 for Windows, click Get Visual Studio Express 2013 for Windows.
- Click the installation button for Microsoft Visual Studio Express 2013 with Update 4 for Windows - English.
- Under Your Selection, click Express 2013 for Windows. The file winexpress_full.exe downloads to your computer. Ignore the prompts and text fields for creating a project on Visual Studio Online.
- Once it has finished downloading, double-click winexpress_full.exe and follow the prompts to install Visual Studio Express 2013 for Windows.
Note: Your computer will restart at least twice during the installation process and may take a considerable amount of time.
- Once Visual Studio Express 2013 for Windows is installed, launch it.
- You need a developer license to test and evaluate the Windows Phone 8.0 and 8.1 apps that you create. When prompted to get a developer license, if you agree to the terms, click Agree, and then follow the prompts.
- After obtaining a developer license, close Visual Studio Express 2013 for Windows.
Download and install the Windows Phone 8.1 Update 1 Emulators
If you want to run your app on a Windows Phone 8.1 emulator, you need to download and install the Windows Phone 8.1 Update 1 Emulators package, which requires that you have already installed Visual Studio Express 2013 for Windows.
To download and install the Windows Phone 8.1 Update 1 Emulators, do the following:
- Using a web browser, navigate to the Windows Dev Center.
- If you are not already signed in to your Microsoft account, click Sign in, and then sign in to your account.
- Click Develop, and then click Downloads.
- Under the heading Windows Phone 8.1 Update 1 Emulators, click Get the Windows Phone 8.1 Update 1 Emulators. The file MobileTools_EmulatorWP81GDR1.exe downloads to your computer.
- Once it has finished downloading, double-click MobileTools_EmulatorWP81GDR1.exe and follow the prompts to install Windows Phone 8.1 Update 1 Emulators.
- In Kony Visualizer, click the Product menu, and then click Emulators & Devices Configuration. Doing so opens the Preferences dialog box.
- From the navigation pane on the left, double-click Emulators.
- Depending on the channel (i.e. type of device) you want to emulate, double-click either Mobile (for smartphones) or Tablet, and then click Windows. Doing so displays the Configure Windows Emulators settings.
- Create a Windows emulator configuration. To do so, click the green plus icon, and then in the Name text box, type an alphanumeric name for the emulator configuration that doesn't contain any spaces or special characters.
- From the Emulator Type drop-down list, select an emulator.
- Save the Windows emulator configuration by clicking Save.
- To create additional Windows emulator configurations, repeat steps 4 through 6.
- Click OK. The emulator(s) you created are now available by clicking the Product menu, and then clicking either Run As or Launch Emulator. Under both of these submenus, under the Windows heading, Kony Visualizer lists the emulator(s) you just created. The Run As feature builds your app and then launches the emulator of your choice. The Launch Emulator feature does not build the app but uses the existing build, launching it with the emulator of your choice. A prior build of the app must exist for the Launch Emulator feature to be available.
Windows Phone
Apps for Windows Phone devices are built in Kony Visualizer using the resources of the Windows Phone SDK, which also can build apps for Windows Phone devices. Getting your system set up to build and test Windows mobile applications in Kony Visualizer involves four tasks. This section describes them.
Confirm your system meets Windows 7 development requirements
To develop for the Windows 7 platform and run its emulators, your computer needs to meet certain hardware and software requirements.
- 4 GB of internal storage
- 3 GB RAM
- Windows 7 (x86 and x64) — all editions except Kony Visualizer Edition
- Windows XP with Service Pack 2 (x86 and x64) — all editions except Kony Visualizer Edition
- Graphics card with a WDDM 1.1 driver, and capable of supporting DirectX 10
Install the Windows Phone SDK
The Windows Phone SDK contains resources to develop mobile apps for Windows Phone devices.
- If a pre-release version of the Windows Phone SDK (Beta or RC) is installed on your computer, you need to uninstall it before installing the released version of the Windows Phone SDK.
- Each language version of Windows Phone SDK is designed to function with the corresponding language version of the operating system and Visual Studio 2010
To install the Windows Phone SDK, do the following:
- Using a web browser, navigate to the Windows Phone SDK page on the Microsoft Download Center.
- Choose the language version you want to install, and then click Download.
- Check the box for vm_web2.exe. If you want to download the release notes, then also check the box for Release Notes - WP SDK 7.1.htm.
- Click Next.
- Once vm_web2.exe has downloaded, launch it and follow the prompts to install the SDK.
Desktop Windows
The Desktop Windows channel in Kony Visualizer is for Windows 7 and is designed for contexts where customers access the app you create at a kiosk that has a video screen, such as an automated teller machine (ATM), movie rental kiosk, or coin sorter. As such, the Desktop Windows emulator isn't actually emulating a device; its running the app you build in a Windows 7 OS context, and so doesn't require that you configure the emulator. You simply build your app, selecting to build it for the Windows 7/Kiosk channel.
Note: If you have already installed the Windows Phone SDK, you can skip to the final procedure in the following list.
To build and run the sample HelloWorld app for Desktop Windows, do the following:
- Confirm your system meets Windows 7 development requirements
- Download and install the Windows Phone SDK
Confirm your system meets Windows 7 development requirements
To develop for the Windows 7 platform and run its emulators, your computer needs to meet certain hardware and software requirements.
- 4 GB of internal storage
- 3 GB RAM
- Windows 7 (x86 and x64) — all editions except Kony Visualizer Edition
- Windows XP with Service Pack 2 (x86 and x64) — all editions except Kony Visualizer Edition
- Graphics card with a WDDM 1.1 driver, and capable of supporting DirectX 10
Install the Windows Phone SDK
Note: If you have already installed the Windows Phone SDK, you can skip this procedure.
The Windows Phone SDK contains resources to develop mobile apps for Windows Phone and Windows Phone devices.
- If a pre-release version of the Windows Phone SDK (Beta or RC) is installed on your computer, you need to uninstall it before installing the released version of the Windows Phone SDK.
- Each language version of Windows Phone SDK is designed to function with the corresponding language version of the operating system and Visual Studio 2010
To install the Windows Phone SDK , do the following:
- Using a web browser, navigate to the Windows Phone SDK page on the Microsoft Download Center.
- Choose the language version you want to install, and then click Download.
- Check the box for vm_web2.exe. If you want to download the release notes, then also check the box for Release Notes - WP SDK 7.1.htm.
- Click Next.
- Once vm_web2.exe has downloaded, launch it and follow the prompts to install the SDK.
The Executable for the Windows 7 Desktop Channel
When you build an application for the Windows 7 Desktop channel, Kony Visualizer creates an installer (.msi) package. This .msi package is created based on the app ID defined on the Application tab, and the app Name defined on the Common sub tab of the Native tab, in the Project Settings dialog box. Modifying the values of the app ID and the app Name and then building the application impacts the .msi package also.
The following table lists items in the .msi package that are generated based on the app ID and app Name.
| Item | Description |
| Installer name | Based on the app ID |
| Executable file name | Based on the app ID |
| Shortcut icon on the Desktop | Based on the app Name |
| Folder name of the install location | Based on the app Name |
| Local folder name (in the App data folder) | Based on the app Name |
| Task bar (while running the app) | Based on the app ID |
| Copyright © 2013 Kony, Inc. All rights reserved. |