
Integration with Adobe Photoshop
With the Kony Visualizer extension for Adobe Photoshop, you can convert your Photoshop design into forms, widgets, and image assets that you can then open in Kony Visualizer. So even if you don't begin your app design in Kony Visualizer, if you're using Photoshop as a design environment, you can seamlessly continue the designing of your app in Kony Visualizer, picking up where you left off in Photoshop.
The Kony Visualizer plugin for Photoshop is compatible with Adobe Photoshop CC and above. Please note that in converting Photoshop layers to Kony Visualizer widgets, the extension has the following limitations.
Importing a Photoshop design into Kony Visualizer involves the following tasks:
- Install the Kony Visualizer Extension for Photoshop
- Export a Photoshop Design to Kony Visualizer
- Open an Exported Photoshop Project in Kony Visualizer
Install the Kony Visualizer Extension for Photoshop
To install the Kony Visualizer extension for Photoshop, do the following:
- Depending on your development environment, download from the Kony web site one of the following stand-alone Photoshop extension installers for Kony Visualizer:
- Install the extension. The installer leads you through the process of installing the extension to the correct location on your computer so that it is available in Photoshop.
Kony Visualizer Photoshop extension for the Mac
Kony Visualizer Photoshop extension for Windows
Export a Photoshop Design to Kony Visualizer
Using the Kony Visualizer extension for Photoshop, you export your Photoshop project as a Kony Visualizer app that you can then open in Kony Visualizer. In preparing a project for export, you set the global, default export options that you want, set the export options you want for individual layers (overriding the global settings for that particular layer), and indicate the channelDevice types available within a given platform. These include mobile (i.e. phone), tablet, and desktop. you want the project to be exported for.
This procedure assumes that you have already installed the Kony Visualizer Photoshop extension. For more information, see Install the Kony Visualizer Extension for Photoshop.
To export a Photoshop project to Kony Visualizer, do the following:
- In Adobe Photoshop, open the project you want to export to Kony Visualizer.
- If it is not already visible, display the Kony Visualizer extension by clicking the Window menu, next selecting Extensions, and then clicking Kony Visualizer.
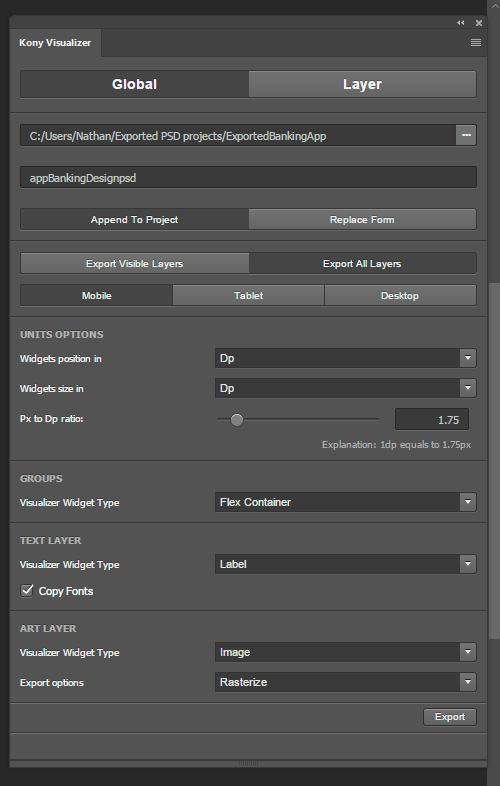
- From the Kony Visualizer extension, click Global. The extension looks like this.
- Specify the name of your exported project by setting its path. The folder you create or select becomes the exported project's Kony Visualizer project name. To set the path, click the ellipsis button (…) of the Project Name text box, and then navigate to the path where you want to save the exported project to, creating a new folder, if necessary. When you have finished, click OK.
- If you are saving the project to a folder that you have already exported to, indicate whether you want to append the project to the existing exported content as an additional form (or forms), or overwrite and replace the existing exported content. To do so, click either Append to Project or Replace Form. By default, the Kony Visualizer extension appends to any existing projects.
- Select whether you want to export only the visible layers (as set on the Photoshop Layers tab), or export all layers regardless of whether they're visible or not.
- Indicate the type of channelDevice types available within a given platform. These include mobile (i.e. phone), tablet, and desktop. that you want to export the project to by selecting either Mobile, Tablet, or Desktop. The default value is Mobile.
- Set the units options for the size and position of elements. You can select from the following:
- Px. Uses pixels as the unit for the dimensions and positioning of project elements for Kony Visualizer. Pixels are a fixed, physical unit and do not scale proportionately depending on the resolution of a devices screen. The rendering of an app on a low-resolution device will appear larger and more pixelated than it would on a higher-resolution device.
- Dp. Uses density-independent pixels, which is based upon the physical density of a device's screen. Ths allows the dimensions of the elements of your design to scale in size depending upon the screen resolution of your target device. Because the Dp unit is relative to a 160 dpi (dots per inch) screen, one dp is equal to one pixel on a 160 dpi screen. The ratio of dp to pixels varies with the screen density of the device. To accommodate this, you can set the dp-to-pixel ratio in the Kony Visualizer extension, which is described in the next step.
- %. Sizes the various elements of the project as a percentage of the parent container of the project. The horizontal value and vertical value of the parent container are designated as 100% for their respective dimensions.
- Set the ratio between pixels (Px) and density-independent pixels (Dp). This ratio is used only if you are using Dp as your unit of choice for element sizes or positioning. This ratio varies from device to device, depending on the physical density of pixels on the device's screen. Increasing the value of the ratio increases the number of pixels that equal one Dp. For instance, a value of 2.25 indicates that 2.25 pixels equals 1 Dp. To determine the ratio that you should use for your device, use the following formula:
Px = DP*(The device's dpi/160) - Set the kind of widget you want the Photoshop elements to be converted to on a default basis for Layer Groups, Text layers, and all other layers (i.e. Art layers). To simplify the conversion process from a Photoshop project to a Kony Visualizer project, you can globally determine the default type of widget that a given type of layer gets converted to. However, if you want to override the global value for a specific layer, you can do so (as described in step 12). The Kony Visualizer extension categorizes the layers available in Photoshop into three types of layers: Layer Groups, Text layers, and all other layers (i.e. Art layers). The following table illustrates the global values that you can set for each of these three types of layers.
- Select the global export option for Art layers. Depending on the Kony Visualizer widget type that you selected for Art layers, you can have such elements converted in either of the following two ways:
- Export as Shape. The Art layers are exported as the widget type selected in the Visualizer Widget Type drop-down list, and the layer styles are converted to the equivalent styles supported under Kony Visualizer skin properties. This option is not available if the Visualizer Widget Type you select is Image.
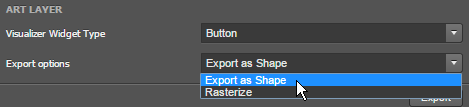
- Rasterize. The layer is rasterized (flattened to pixels) and cropped, and saved as a .png file. If the Visualizer Widget Type you select is either a Flex Container, a Scroll Flex Container, or a Button, the resulting converted widget uses the generated .png file as an image background in Kony Visualizer.
- Set export options for individual layers. For any of the layers you're exporting, you can override some of the global export options. This is especially helpful if, for example, you want to convert a particular layer into a Flex Scroll Container instead of a Flex Container, or to size a given layer as a percentage of the parent container rather than using whatever unit you selected as your global export option.
- Once you have set all the global and layer-specific export options for your Photoshop project, click Export.
- Once the exportation is finished, navigate on your computer to the folder where you exported the Photoshop project, copy the folder, and then paste it into the desired Kony Visualizer workspace folder. The default workspace folder for Kony Visualizer is:
C:\workspace
| Photoshop Layer | Kony Visualizer Widget Options |
|---|---|
| Layer Group. Defined as any layer that has layers, project elements, or other assets nested within it. |
Flex Container |
| Text Layer. Any layer created using a Photoshop Type tool. | Label (default) Button Text Area Text Box |
| Art Layer. Defined as any layer other than a Layer Group or Text Layer. An art layer may be a shape layer, or may consist of rasterized pixels. | Image (default) Flex Container Flex Scroll Container Button |
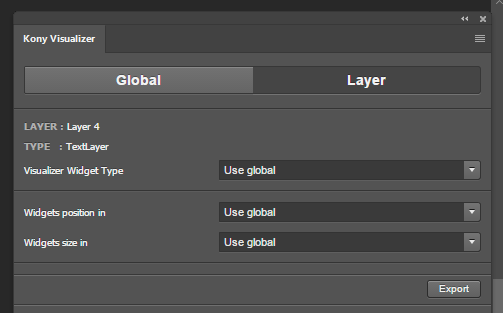
To set export options for individual layers, at the top of the Kony Visualizer extension, click Layer. Next, from the Photoshop Layer tab, select the layer you want to custom configure, and then select the export options you want for that layer for the Visualizer Widget Type, and the type of units you want to use for the converted widget's positioning and sizing. Select the next layer you want to customize, and repeat.
Open an Exported Photoshop Project in Kony Visualizer
Once you have exported a Photoshop project using the Kony Visualizer extension and have copied it to your Kony Visualizer workspace, you can open it in Kony Visualizer.
To open an exported Photoshop project in Kony Visualizer, do the following:
- If Kony Visualizer is already open, on the File menu (the Project menu in Kony Visualizer), click Refresh. Otherwise, launch Kony Visualizer.
- Do one of the following:
- On the Kony Visualizer launch screen, if Kony Visualizer is pointing to the workspace where you pasted the project, Kony Visualizer lists your exported Photoshop project among recent projects. Click it.
- On the File menu (the Project menu in Kony Visualizer), point to Open, and then select from the list of available projects the project you exported from Photoshop.
- On the Project Explorer, click the Project tab, open the channelDevice types available within a given platform. These include mobile (i.e. phone), tablet, and desktop. that you converted the Photoshop project to, open Forms, and then double-click any of the forms listed.
Limitations
The following Photoshop layer styles have no equivalent Kony Visualizer skin property and are ignored during the export process:
- Bevel and Emboss
- Satin
- Inner Glow
- Pattern Overlay
Best Practices
To optimize the conversion of Photoshop elements into Kony Visualizer elements, we recommend that you create your Photoshop project using the following best practices.
- Always use vectors / shape layers instead of pixels, since these will translate directly into Kony Visualizer widgets.
- Instead of pixels, use layer styles for gradients, color overlays, shadows, and borders, since these will all translate directly to Kony Visualizer widgets and skins.
- Only export images as needed, and avoid exporting .png files for anything other than icons or actual images and photos.
- Do not rasterize text layers, since these can be exported as labels, text boxes, rich text, or button widgets directly into Kony Visualizer.
| Copyright © 2013 Kony, Inc. All rights reserved. |