Settings - Kony Cloud
Using Settings in Kony Cloud, you can manage users and accounts based on your role, for example, inviting users, assigning roles to users, managing reports and environments permissions, deleting users, and exporting users.
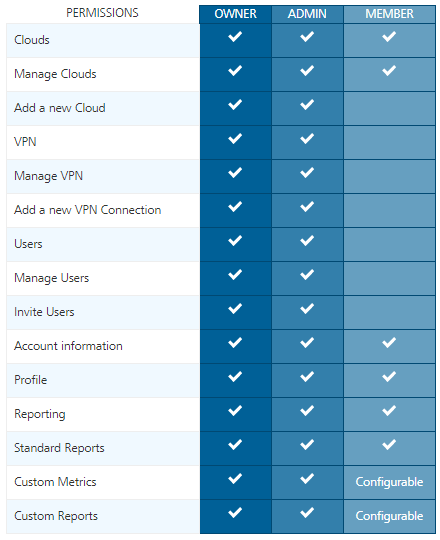
Roles Permissions to Access Fabric Console
Roles help to users to access Fabric Console and perform certain operations. There are four types of roles Fabric including the owner, admin, member, and Dev portal.
- Owner: An Owner role has access to the complete functionality of Fabric Console. An Owner has access to advanced configurations and operations such as external auth configuration, MFA for account level, and so on. An Owner is a super-set of the Admin role.
- Admin: An Admin role has access to the functionality of the Fabric Console.
- Member: A Member role has access to the limited functionality of Fabric Console.
- Dev Portal: Lets you create a Portal for exposing APIs created using Kony Fabric. Developers from internal and external partner teams can access the portal created to explore and test the APIs.
Refer to the following screen-shot for more details.
|
|
Note: The following features can be granted by using the Custom Access functionality: Note: The Feature Level Access Permissions (Custom Access) functionality supported only for Fabric Clouds. |
Environment Permissions - Fabric Clouds
An environment can have 3 types of access permissions to users.
- No Access: Users cannot access a Kony environment.
- Full Access: Users can access a Kony environment, which helps to build apps, publish apps, and Admin Console.
- Custom Access: The Feature Level Access permission is supported only for Fabric clouds. Based on these permissions set for a specific Fabric Cloud, users are privileged to access a specific set of features of Fabric accordingly.
Important: By default, all the roles have Full Access to Visualizer, Fabric Starter, and Cloud Build environments. For the remaining environments, all the roles have No Access by default.
Note: The Custom Access permission is supported only for Fabric Clouds.
Note: By default, all users have access to Fabric Console to create apps.
The following table details you about the features with access level permissions of an environment:
| Environment Permissions - Custom Access | ||
|---|---|---|
|
Features in an Environment |
Feature Level Access Permissions | |
| Disable Access | Enable Access | |
|
Build Client App – If this feature is enabled, users can view the environment configuration from Visualizer and build a client app that connects to the environment. It allows a user to only have Build Client App access, if the user is only allowed to build binaries pointing to an environment, but not publish or make changes to the server from Visualizer or from Fabric console. This feature is very useful when developers need to build binaries pointing to a production server. However, only admins are allowed to modify the server runtime by allowing the publishing capabilities. Important: You can build apps using Visualizer if you have access permissions to the Build Client App feature in the Cloud. |

|

|
|
App Services: If this feature is enabled, users can build apps using Visualizer and publish apps as well. This is a superset of Build Client App access and provides both the build and publish capabilities.
|
|
|
|
Engagement Services – Access to the Engagement Server’s admin console associated with this environment. |
|
|
|
Logic Services - Access to the Integrate Node.js Services to Fabric Applications. |
|
|
|
Logging Console - Access to the logs for this environment from the Log Console.
|
|
|
|
You can configure the Environment Permissions, as follows:
|
||
Users - Cloud
The Users tab in Kony Cloud helps you manage users in your account. Only users having an owner/admin role in the account can access this Users tab.
Manage Users
To manage users of an account, follow these steps:
- In the Kony Fabric Console, click Settings in the left pane. By default, the Users > Manage Users page is displayed.
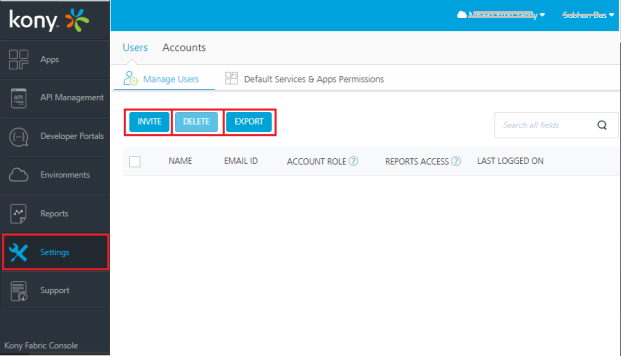
- In the Manage Users page, you can perform various actions such as inviting a user, deleting a user(s), exporting users, and controlling user access.
Invite User to an Account
A user invited to an account can access reports and clouds in that account based on the role. Follow these steps to invite a user.
- Go to Fabric Console, click Settings > Users > Manage Users.
- Click Invite. The Invite User dialog window appears. You need to fill the required user details such as email, account role, Reports Access, and environment permissions.
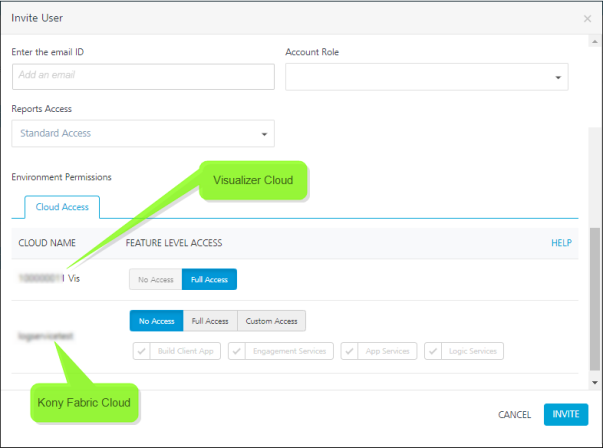
Note: This is a sample screen shot, which has Full Access for a Visualizer Cloud. The Full Access is also applicable for the following clouds: Licensing Cloud and AppFactory.
- Enter the following details in the Invite User dialog window:
Step Field Action a Enter the email ID Enter the user email address b Account Role Select the role available from the Account Role list.
- Admin/Owner: By default, a user with an Admin/Owner role has Full Access to reports. For example, Full Access (Standard Reports, Dashboard, Funnel Reports, Custom Reports, Custom Metrics, Custom Dashboards)
Note: An invited user cannot modify the Reports Access field of an Admin/Owner.
- Member: By default, a user with the Member role has Standard Access to reports.
Note: An Owner/Admin can change the Report Access permissions while inviting a Member role.
- Developer Portal Only: By default, a user with the Developer Portal Only role has Standard Access permission to reports.
Note: A user with account role Developer Portal Only will have the Reports Access as Standard Access. You cannot modify the Reports Access field of the Developer Portal Only user.
c Reports Access If you have selected Member as Account Role, select one of the following Report access permissions:
- Standard Access (Standard Reports, Dashboard). This is selected by default.
- Custom Access (Standard Reports, Dashboard, Custom Reports, Custom Dashboards)
- Full Access (Standard Reports, Dashboard, Custom Reports, Custom Metrics, Custom Dashboards)
Important: A user with Reports Access permissions as Full Access and Custom Reports Access can access these reports even if the user does not have access to any of the environments.
d Environment Permissions Displays the clouds under the CLOUD NAME column created for a specific account.
- Under the FEATURE LEVEL ACCESS permissions column, click the required tab, for example, No Access, Full Access, and Custom Access.
Note: For more information on the environment permissions, refer to Feature Level Access Permissions - Fabric Cloud.
Note: The Custom Access permission is supported only for Kony Fabric clouds.
- Select the required permissions for the Fabric Clouds:
- No Access
All features of this cloud are disabled for the selected user.

- Full Access
Access to all features of this cloud is enabled for the selected user. Each of these features is enabled with a tick mark.

- Custom Access - Supports from Kony Fabric V9 onwards only for Kony Fabric Clouds.
You can select all the features or specific ones of a cloud by using the Custom Access permission.
For example: When you select Custom Access, all features of this cloud are enabled to the selected user by default. Each of these features is enabled with a tick mark.
If you want to disable a specific feature, select that feature.
- Build Client App
- App Services
- Logging Console
- Engagement
Important: If a Cloud version below V9 and if it contains legacy features such as Sync Server and EMM, these features are not displayed in the Manage Cloud Access > FEATURE LEVEL ACCESS section. As a result, you cannot change these features.
Important: When you change the cloud access permissions, the cloud users must log in to Kony Fabric again. This is to ensure that these features are reflected in their environments.
For example,
Let us say there is a member user called Member1, and an admin user called admin1.
The Member1 has access to features in a specific Cloud, such as Build Client App, Engagement Services, and App Services.
1. Member1 logs in to Fabric Console.
2. Member1 is accessing the Fabric Console and Engagement Services Console.
3. At this point, Admin1 logs in to Fabric Console and removes access to Engagement Services for Member1.
Here, when the Admin1 removes access to a feature for the user, the user (here Member1) should have the access only to the modified set of features in that Cloud. - Admin/Owner: By default, a user with an Admin/Owner role has Full Access to reports. For example, Full Access (Standard Reports, Dashboard, Funnel Reports, Custom Reports, Custom Metrics, Custom Dashboards)
- Click INVITE. An invitation will be sent to the user. After the user accepts the invitation, the user is added to the users list.
Delete User from Account
Only users with the Admin role in the account can access the Users tab.
- Go to Kony Fabric and click Settings > Users > Manage Users. The existing users are listed on the Manage Users page.
- Select the check box for each user.
- Click the DELETE button. The Delete User(s) dialog appears for your confirmation.
Note: Click the More Options button next to the user and select Delete.
- Click DELETE.
Export Users of Account to Excel File
You can export the existing users of the account data to an Excel (.xls) file. The excel format contains users with record-level data in a tabular form such as the User Name, User Email, Account Role, Reports Access, and Last Logged ON.
- Go to Kony Fabric, click Settings > Users > Manage Users. The existing users are listed on the Manage Users page.
- To export all the existing users, click EXPORT.
Note: To export one or more users, select the required check boxes and then click EXPORT.
Managing Cloud Access of Existing Users
You can modify the existing cloud access permissions of a user, if required.
- Go to Kony Fabric, click Settings > Users > Manage Users. The existing users are listed on the Manage Users page.
- Click the More Options button next to the user. The options available are as follows:
- Delete
- Managing Cloud Access
- View User Activity
- Select Manage Cloud Access. The Manage Cloud Access dialog box appears and displays the available clouds for that user.
Managing Cloud Access of Existing User

- Under the Feature Level Access column, select the feature permissions of the Clouds.
- Under the FEATURE LEVEL ACCESS permissions column, click the required tab and select the features, for example, No Access, Full Access, and Custom Access.
Note: For more information on the environment permissions, refer to Feature Level Access Permissions - Fabric Cloud.
- Click SAVE to save the changes.
Default Services & Apps Permissions
As an Admin/Owner, you can configure the default access control for the new apps and services. So, when a new user is invited to an account or automatically added to an account using the master account setting, these default access control settings are applied to users. Refer to Default Services & Apps Permissions.
Accounts
The Accounts tab in the Settings menu helps you view the details of the account such as account name, location, company information, phone number, address and so on. It also allows you to configure external-user authentication and multi-factor authentication for the account.
Profile
Only users with the Owner role in the account can modify the account profile details.
All other users in the account can view account profile details in read-only mode.
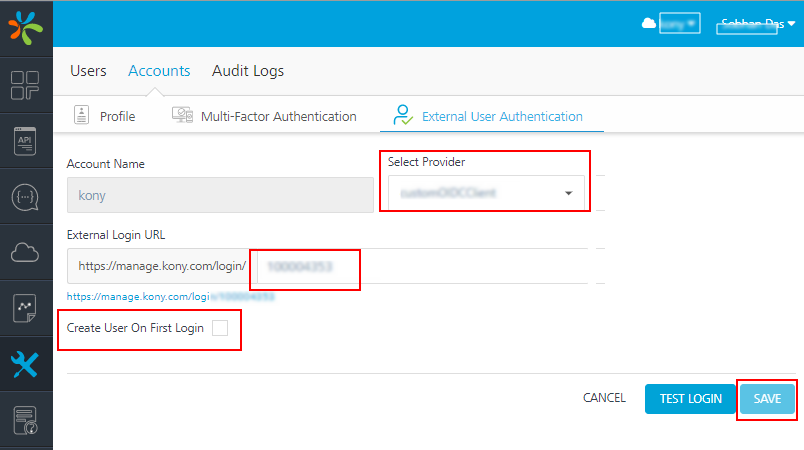
External User Authentication
Only users with the Owner role in the account can access the External User Authentication tab. You can enable the external authentication with users to access the Kony Fabric console. OAuth compatible identity services are supported for external authentication.
To enable the external user authentication, follow these steps:
- Create an OAuth based identity service in Kony Fabric.
- As an owner, go to Kony Fabric > Settings.
-
In the Accounts tab, click the External User Authentication.
- Click ENABLE EXTERNAL USER AUTHENTICATION.
- In the Select Provider list, select an existing identity service that you have created and configure it.
Note: OAuth compatible identity services will be displayed in the Select Provider list of the external authentication page.
-
Configure custom login URL, if required.
-
Select the Create User on First Login check box if you want the users to be created on the fly upon the first login.
Note: If you choose not to create the users on the fly, you will need to create them in Kony Fabric and in the IdP separately.
- Click SAVE.
Multi-factor authentication
Only users with the Owner role in the account can access this tab. For more information on multi-factor authentication, refer to How to Enable Multi-Factor Authentication.
Audit Logs - Cloud
The Audit Logs tab in the Settings menu helps you to capture all the user activities performed in a Kony Fabric Account. These activities are displayed as Audit Logs. Only users having an owner/admin role in the account can access the Audit Logs tab.
To view the user activities of an account in the Audit Logs page, follow these steps.
-
In the Kony Fabric Console, navigate to Settings > Audit Logs. The Audit Logs page displays the existing logs by default.
These logs are displayed based on the object categories such as apps, services, and users. The logs are displayed with the following details:
- OBJECT NAME: Displays the name of the object, such as: app name, service, and email ID of the user.
- OBJECT TYPE: Displays the type of the object, such as: Apps, Services, and Users.
- ACTION: Displays the CRUD operations performed for the object type, such as: created, deleted, modified, published, and unpublished.
- MODIFIED BY: Displays the email ID of the user that performed the action.
- MODIFIED ON: Displays the time-stamp of when the action was performed.
Note: By default, the logs are displayed for the last week.
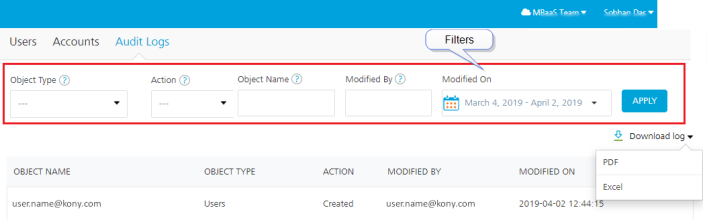
To apply filters and view specific user activities of an account, follow these steps.
-
In the Kony Fabric Console, navigate to Settings > Audit Logs. The Audit Logs page displays the existing logs by default.
-
You can apply the following filters for the Audit Logs:
- Object Type: From the drop-down list, select the options for which you want to view the audit logs.
 The drop-down list contains the following options:
Apps
Services
Users
- Action: From the drop-down list, select the options for which you want to view the audit logs.The drop-down list contains the following options:
Create
- Modify
- Delete
Publish
Unpublish
- Object Name: Enter the name of the object, such as the app name, service name or the email ID of the user.
- Modified By: Enter the email ID of the user that performed the actions.
- Modified On: From the drop-down list, select the date range for which you want to view the activities.The drop-down list contains the following options:
Today
Yesterday
Last 7 Days
Last 30 Days
This Month
Last Month
Custom Range
For the Custom Range option, select the start date and the end date from the date range picker.
- Object Type: From the drop-down list, select the options for which you want to view the audit logs.
- Click Apply to display the logs based on the filters.
To download the audit logs, click the Download log button and select the required option, such as PDF and Excel.
| Copyright © 2020 Kony, Inc. All rights reserved. |