
Walk-through of Kony Enterprise App Store (EAS) Source Application
EAS App Implementation
Kony Enterprise App Store (EAS) is a simplified app distribution service that enables an enterprise to securely and easily distribute and manage apps to the users. All features of Kony EAS are available on Cloud and On-Premises. For more information on EAS, refer to Kony Enterprise App Store (EAS) Service for Digital App Distribution.
From Kony AppPlatform V8 SP4 JuneFP onwards, Kony allows you to access the complete EAS App assets including the front-end project details and the back-end app. You can download the EAS App assets from the Kony Marketplace. These assets contain the source code of the Enterprise App Store, which is available for you to edit as per your requirement. You may choose to re-brand the app, or add specific forms to best suit your requirements.
For example, you can brand some of the following use cases:
- Name, Slogan, Style
- Graphics: Logo, app icon, splash screen, and visual image of the app
-
Look of the app
- Brand keywords
App Architecture under Kony Reference Architecture
- Kony Reference Architecture: Kony EAS App is built on the Kony Reference Architecture. Kony Reference Architecture encapsulates your app's code into Kony's implementation of the Model View Controller (MVC) software architecture. Under Kony Reference Architecture, the code for your app has a clear division between the domain objects that model the app's functional domain and the presentation objects that represent what the user sees on the screen. Therefore, domain objects work independently of the presentation objects and can support multiple presentations, even simultaneously. Both domain objects and presentation objects are encapsulated into specific modules that Kony Reference Architecture generates automatically for you from the user interface that you create in Kony Visualizer. For more information on Kony Reference Architecture, refer to A Deeper Look at Kony Reference Architecture.
-
Extensibility and Customization: While Kony EAS provide optimal functionality out of the box, Kony understands that each enterprise has unique requirements. The solutions can be easily extended to support business-specific applications and requirements by leveraging the power of the Kony platform. This allows customers to add their own functionality via third-party solutions or their own built-in modules on the Kony AppPlatform. For more information on Extensibility and Customization, refer to Extensibility.
Kony EAS is built by using the industry-leading Kony Visualizer and Kony Fabric tools, which allow enterprises to customize and extend the following:
- Look and feel of the application
- Business rules that define the application functionality
- Rules around the data flow between the device and the back end
Further, the solution includes an extension framework that allows implementation teams to do the following:
- Introduce a new form in an existing business workflow
- Replace an existing business logic method with new implementation
- Programmatically add new widgets to existing forms
- Update various properties of widgets
- Hide a feature that the bank does not need
Prerequisites to Configure EAS Source App in Visualizer
Before you start using the source of the EAS App, ensure you have access to the following:
- Access to a Kony Cloud account. If you do not have a cloud account, you can register for it at Kony Cloud Registration.
- Access to a Kony Cloud Build Environment, Kony Visualizer Starter, and access to Fabric App Server for publishing apps to EAS.

The following table details the supported versions of EAS source and Platform.
EAS Source App version Platform Supported Version Client App (Store.zip) Server App (Kony App Store.zip) Fabric Visualizer Middleware 1.0.0
Features- Initial Relese
1.0.0 NA V8 SP4 FP44 or lower 8.4.3.x. 1.1.0
Features- Support for Web apps
1.0.0 NA V8 SP4 FP44 or lower 8.4.3.x. 2.0.0
- Support for Android 10
- Support for iOS 13
- Push Notifications
2.0.0 NA V8 SP4 FP48 or higher 8.4.3.x 2.1.0
Features- Bug fixes
2.0.1 NA V8 SP4 FP66 or higher. 8.4.3.x - SP: Service Pack
- FP: Fix Pack
- Configure the various Project Settings.
- Go to Project > Settings and configure the build settings for each Native platform. For more information on Project Settings, click here.
- Platform specific prerequisites:
- If you choose to build an application for the iOS platform, you must provide the Mobile Provision, .P12, P12 password, and the Development method. To do so, go to Project Settings > Native > iPhone/iPad. For more details on the iOS configurations, click here.
- If you choose to build an application for the Android platform in Release mode, then the Android signing details are mandatory. To do so, go to Project Settings > Native > Android Mobile/Tablet. For more details on Android sign in details, click here.
- If you choose to build an application in Protected mode, then setting the public and private keys is mandatory. To do so, go to Project Settings > Protected Mode. For more details on how to generate public and private keys, click here.
Downloading EAS App Assets
The EAS App assets are divided as follows:
store.zipis the front-end source app of the EAS.kony_app_store.zipis the back-end source app of the EAS.
| Store.zip | Kony App Store.zip |
|---|---|
|
The Store project is associated with the Kony App Store App for the linked services. |
|
Downloading Front-end Project for EAS App for Kony Visualizer
Store is the front-end project of the EAS created based on the Kony Reference Architecture. You can download the EAS App assets from Kony Marketplace. The store.zip app contains details such as forms for supported channels, splash screen, client-side code, and modules and forms of EAS.
For Cloud, the Store app is bundled with the front-end and Server apps.
- Go to Kony Marketplace.
- Click Download. The
store.zipfile gets downloaded to your local system. For more details on EAS versions, refer to EAS and Platform Versions Compatibility Chart.
Downloading Server App (Kony App Store) for Kony Fabric
The Kony App Store is the Server app (Kony Fabric), which contains services linked to EAS. You can download the source app (Kony App Store) from Marketplace.
- Go to Kony Marketplace.
-
Click Download. The
kony_app_store.zipfile gets downloaded to your local system. For more details on EAS versions, refer to EAS and Platform Versions Compatibility Chart.
Configuring EAS App in Visualizer
Importing EAS Front-End Project in Visualizer
You can view the layout of the front-end app and the source code by importing the Store project to Kony Visualizer.
- Make sure you are logged into Kony Visualizer.
-
From the Project menu, click Import > Local Project > Open as New Project.
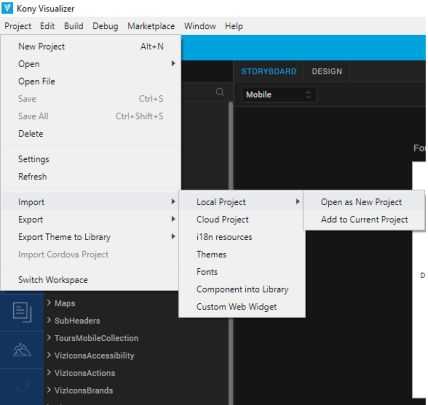
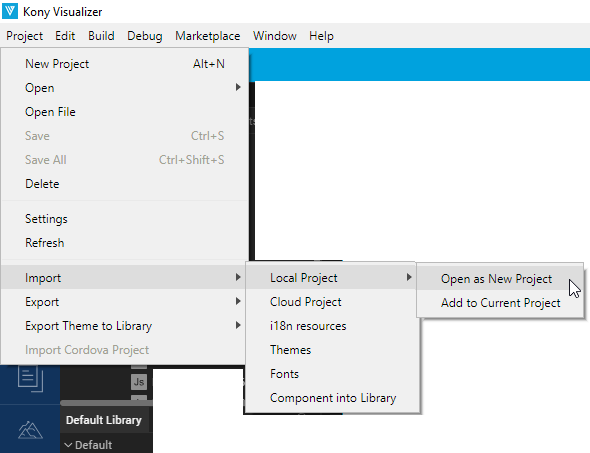
- In the Import dialog box, select Select archive files, and then click Browse to select the store.zip file that you have downloaded.
The Store project gets imported to your Visualizer. You can view the layout of the EAS project.
Importing Server App to Kony Fabric
The Kony App Store app is available in your account in Kony Fabric by default. The app should be existing always in your account for EAS to work. The Kony App Store app is configured with the required services to be used in an app for EAS, for example, Identity Services.
In case you want to import a different version of the app, you can re-import it from Kony Marketplace.
- Log in to Kony Fabric.
- In the Apps > Fabric App, click IMPORT, and drag and drop or browse for the
kony_app_store_v1.0.zipfile to upload. - In the Open dialog, select the Kony App Store app that you downloaded.
Important: Ensure the Kony App Store App must be published to Server before you build and publish the EAS App in Visualizer.
-
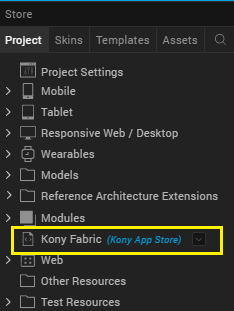
Associate the Store project with the Server app. For more information, refer to How to Link EAS Front-End Project with Back-End App.
Associating Front-end Project with Server App
To publish your app to Kony Fabric, your Kony Visualizer client app must be associated with a Kony Fabric app. After you import the Store project in Visualizer, you must associate it with the Kony App Store App.
- In Kony Quantum Visualizer, sign in to your Kony Cloud account. To do so, from the top right corner of the Visualizer window, click Login. The Kony Account sign-in window opens. Enter your Kony Cloud email and password credentials, and then click Sign in.
- In Visualizer, open the Store project.
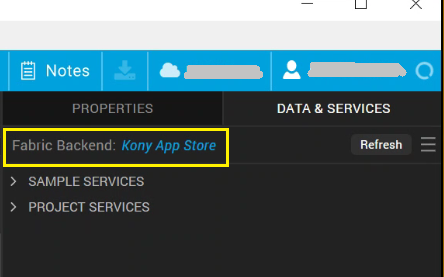
- From the Data & Services panel, click Open Fabric Console > Use Existing or Link to Existing App. The list of pre-configured services appears.
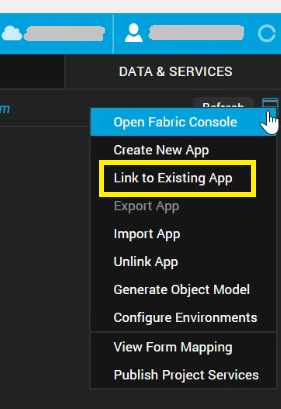
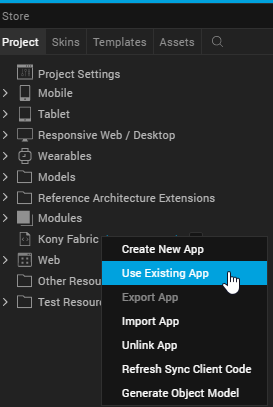
-
In the Kony Fabric Applications, search for Kony App Store, and then click ASSOCIATE.
The Kony App Store app is associated with the Store project.
Source of EAS App
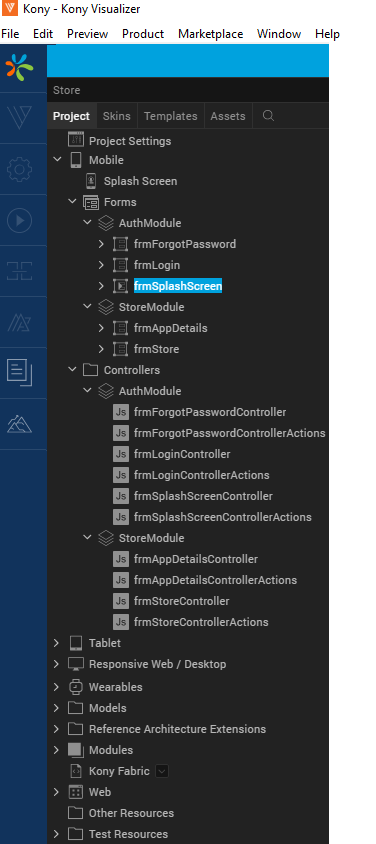
Structure of the EAS Front-end Project - Store Project
The Layout of the Front-End App
Kony EAS Source app is supported for Native channels: iOS and Android.
| Elements in the Store Project | Project Structure UI in Visualizer | |||||||||
|---|---|---|---|---|---|---|---|---|---|---|
| App Meta Data | 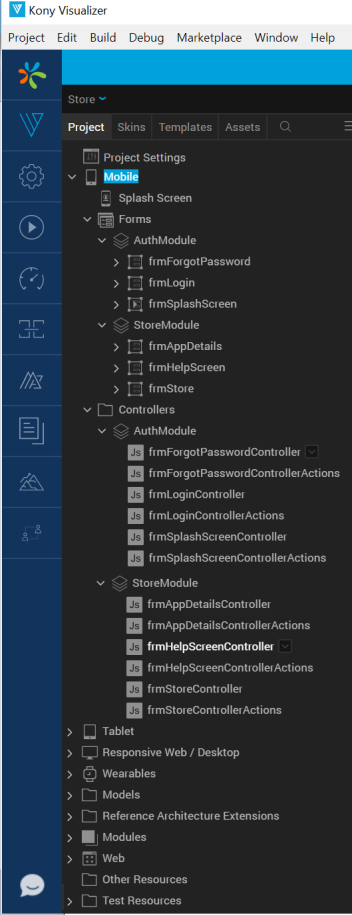
|
|||||||||
These details are displayed based on the metadata of the app. |
||||||||||
| Supported Channels in EAS | ||||||||||
|
||||||||||
| Forms and Controllers | ||||||||||
|
Forms (two modules)
Controllers
|
||||||||||
Supported Functionality and Forms - EAS Front-End Project
- The
frmSplashScreenform connects to the Server and fetches the login details of the Store app.- If the Kony User Store custom auth type is enabled, the
frmLoginform appears. - If the OAuth 2.0 auth type is enabled, the login screen for that service provider type appears.
The startup screen is displayed after the default splash screen.
- The
frmForgotPasswordform allows you to retrieve your login password for EAS.
- If the Kony User Store custom auth type is enabled, the
- The
frmAppDetailsform displays the metadata of an app. - If auth is not enabled, the
frmStoreform is displayed with the list of published apps.Note: For iOS apps, if the device displays the Untrusted Enterprise Developer pop-up message, you must trust your iOS certificates. The
frmStoreform displays with the Help button , which you can follow in your device to trust your iOS certificate. For more details, refer to Trust iOS Certificates.
Reference Architecture Extensions
- AuthModule supports end-user login.
- BusinessControllers: contains custom business logic for authentication for the complete Store project.
- PresentationController: contains auth success and failure cases. Based on each case type, the required actions are called in the form Controllers. This is a common controller for all the supported channels.
Important: For channel specific auth success and failure cases, you must use PresentationController_<Channel> to configure auth handles.
- StoreModule
- BusinessControllers: handles the fetching list of published apps, logic to download and launch apps; contains the list of apps and custom business logic for authentication for the complete Store project.
- PresentationController: handles the presentation of apps such as in-progress status of app downloads, success, and failure cases. Based on each case type, the required actions are called in the form Controllers. You can add filters to customize the order of apps list. This is a common controller for all the supported channels.
Important: For channel specific presentation of apps, you must use PresentationController_<Channel> to configure store handles.
Source Details of EAS Back-End App - Kony App Store App
The Kony App Store is the Server app (Kony Fabric), which contains the following services linked to EAS.
- Identity Services: By default, the AppStoreUserRepository Identity Service of User Repository type is configured to authenticate EAS. You can configure another service type, if required.
- Objects Services: By default, the EASDownloadBinaryService Object Service of File Store type is configured to store binaries of all the published apps. You cannot modify this service.
By default, the EASMetaServices Object Service of Store type is configured to store the metadata of all the published apps. You cannot modify this service.
- Contains uploaded app binaries to publish them to EAS.
- Contains environments for Server and Kony App Server (EAS).
Branding Enterprise App Store to your Requirements
You can use the source app of the EAS to brand it to suit according to your business requirements.
Kony allows developers to access complete suite of the EAS App source. You can view details of the source code of the app, structure, layout, forms, and functionality, and linked services, and can customize the brand according to business requirements as well.
For example, you can brand an app for the following business requirements:
- Name, Slogan, Style
- Graphics: Logo, app icon, splash screen, and visual image of the app.
-
Look of the app
- Brand keywords
Branding EAS App to your Company Logo and Splash Screen
Changing an App Icon
- In Visualizer Project, click the Splash Screen.
- Click the Assets tab, right-click Media, and then click Resource Location.
- In the
..\\Store\resourcesfolder, open common for the channel type, for example, mobile or tablet. - Change the image file of the app icon. Ensure the file name is same as the existing one. For example,
icon.png.
Replacing Image for the existing Splash Screen
The splash screen and the frmSplashScreen can be same or different. You can modify the splash screen in the following two ways:
To replace the existing splash screen, follow these steps:
- In Visualizer Project, click the Splash Screen.
- Click the Assets tab, right-click Media, and then click Resource Location.
- In the
..\\Store\resourcesfolder, open common folder. - Replace the new splash screen with the one existing. Ensure the file name is same as the existing one. By default, the image resource name is
splash_eas.pngsplash_screen.png
Adding New Image to Splash Screen
If you choose to add new image to splash screen, the new image name must be
- In Visualizer Project, click Splash Screen.
- Click the Assets tab, right-click Media, and then click Resource Location.
- In the
..\\Store\resourcesfolder, open common folder. - Add the new splash screen file to the common folder.
- Now, you must link the new image to the start-up screen in your store project as follows:
- In Visualizer > Store project, expand the channel type. For example, Mobile.
- Click Splash Screen.
- In Properties > Splash Screen > General, click Edit.
- In the Splash Image dialog box, select the new file.
- Go to Forms > AuthModules > frmSplashScreen, double-click the Splash Screen and select the new image file.
Important: All images must be maintained with the default set scaling.
Changing the EAS Package Name
If you want to build the EAS app with a custom Package Name and Bundle Identifier, you must configure the native settings in the Store project that you imported to Visualizer.
- iOS
- Ensure that you imported the Store.zip app into Visualizer project.
- In Visualizer, open Project Settings.
- Open Project Settings, click Native.
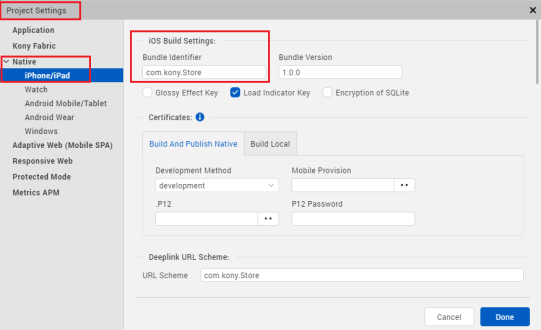
- Click iPhone/iPad > iOS Build Settings > Bundle Identifier, change the package name.
Important: The Bundle Identifier must match with the iOS Certificates that you configured in the Store project. For more details, refer to Platform specific prerequisites.
- Click Done.
- Android
- Ensure that you imported the Store.zip app into Visualizer project.
- In Visualizer, open Project Settings.
- In the Project Settings dialog, click the Native.
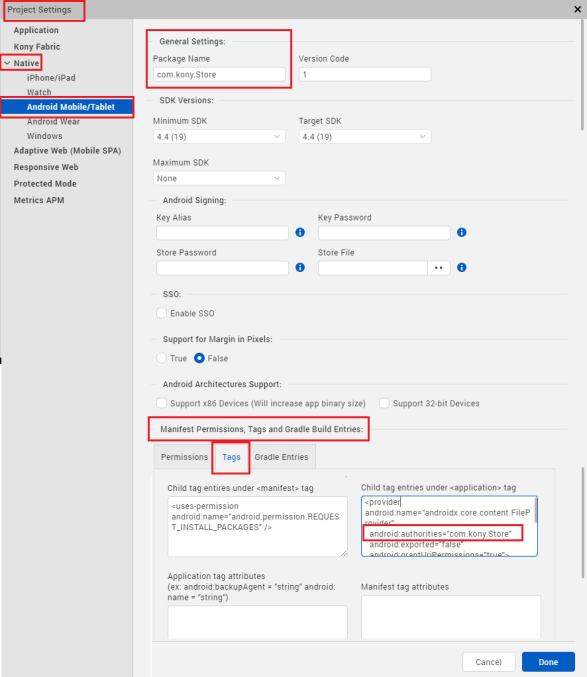
- Click Android Mobile/Tablet, and do the following:
- Under General Settings > Package Name, specify the desired package name.
- Under Manifest Permission, Tags and Gradle Build Entries, click the Tags tab.
- Under the
Child tag entries under <application> tagtext box, specify the same package name value forandroid:authorities="<package_name>".
- Click Done.
Adding Contact Us Form and Support Details
You can add new forms to your EAS App as per your business requirements.
For example, to add the Contact Us form to your EAS App and provide a link to the new form within the StoreModule > fromStore form. The following steps details how to add a Contact Us form, provide contact details, and links to the form for a Mobile channel. In this example, you will be using the sample component: privacypreferences, which contains ready-to-use text placeholder and action buttons to navigate between forms.
Important: While modifying the source app, ensure that you follow Kony Reference Architecture and Extensibility Guidelines lines to support product upgrades.
- Add new form to the project as follows:
- In Visualizer, open the Store project, and ensure you are in the DESIGN mode.
- Click Store project > Mobile, right-click Forms, and click New Group.
- Right-click the NewGroup and rename the new group to
ContactUS. - Right-click the ContactUS Group, and click New Form.
- Rename the new form to
frmContactUs.
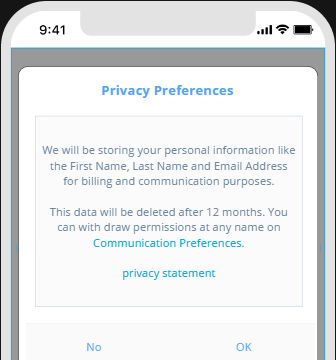
- Download the Privacy Preferences (GDPR) component from Marketplace. To do so, click Marketplace menu > Browse and search for Privacy Preferences (GDPR). Click Import to Collection Library.
- Click
frmContactUsform. - From the downloaded components section, drag and drop the privacypreferences component to the
frmContactUsform. The privacypreferences component is added to the form. You can change the caption, as follows:- In Properties panel, click Component.
- Change the ID to
ContactUsDetails.
Now, you will be modifying the actions and text in the component details section according to the your business requirement for the Contact Us form as shown in the following table.
Default text and actions in the Component Modified details in the Component section
for the Contact Us form

- Click
ContactUsDetailsto edit component properties.- In Properties > Component, do the following:
- In Header Text, change the text to
Contact Us. - In Message, specify the contact details.
For example, Kony Support URL:
<p>We welcome your feedback on our documentation. <br><br><a href="https://techpubs@kony.com/">Click here to write to us at</a>.<br><br>\n<a href="https://support@kony.com/">For technical questions, suggestions, and comments, or to report problems on Kony's product line, click here.</a>\n</p>
- In Header Text, change the text to
- To add the link to the OK button, do the following:
- On Properties, click Action.
- From onRightButtonClick, click the Edit button.
- From Action ID > Navigation, click Navigate to Form.
- Click the
Navigate to Form <Form Name>element. - Click
frmStore. By doing this, when you click the OK button on the Contact Us form, thefrmStoreform appears.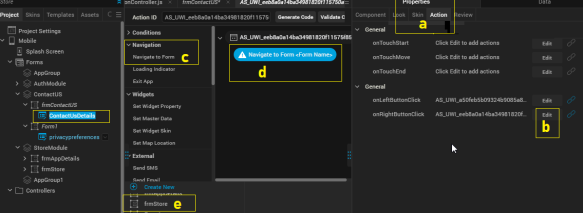
- For the Contact Us form, you do not need any action for the No button. So, you can hide the button by removing the text, as follows:
- From Properties panel, click Component.
- In Left Button Text field, delete the caption.
- In Properties > Component, do the following:
- Now, add the link to the new button widget in the frmStore form to navigate to the Contact Us form.
- Select the
frmStoreform. - From Visualizer > Default Library, drag and drop the Button widget to the form.
You can change the button properties such as skin and text.
- On Properties, click Action.
- From onClick, click the Edit button.
- From Action ID > Navigation, click Navigate to Form.
- Click the
Navigate to Form <Form Name>element. - Click
frmContactUs. By doing this, when you click the newly added widget on thefrmStoreform, thefrmContactUsform appears.You can build or preview the EAS App to view the customized results now.
- Select the
Modifying Server EAS App for Identity Services and Metadata of Binaries
Configuring Identity Services for EAS Authentication
You can configure new Identity Services and Object Services for EAS in the Kony App Store App. After you configure the new services, you must map the new services in the project and update the source code of the Store project.
Configuring Properties for Client Binaries
For information on how to configure basic properties such as the description of a client binary file, the icon of a binary, and the related screenshots of a binary file. refer to Configuring Properties for Client Binaries in Kony Fabric.
Publishing EAS App
EAS native apps need to be distributed in the same way as you distribute the other native apps. So, to distribute EAS native apps to end-users, you must publish your EAS native apps to the EAS Web app. End-users can access the EAS Web app to view and download EAS native apps on devices like any other native apps. By default, the EAS Web app is selected while publishing the apps to EAS.
Build and Publish App Binaries to EAS using Kony Visualizer
With Visualizer Starter, you can build client binaries and publish them directly to Kony App Server from Visualizer. For more information, refer to Publishing Native Apps to Enterprise App Store from Visualizer Starter.
-
For more information on how to build app binaries and publish them to EAS, refer to Publish to Enterprise App Store section in Publishing Client Binaries to Kony App Server from Kony Visualizer (for Cloud only).
Publish App Binaries to EAS using Kony Fabric
By using Kony Fabric, you can upload the client binaries and publish them to Kony App Server. After an app is published to Kony App Server, an authorized end-user can access the EAS Client app to view the available applications and download them using a mobile device.
- For more information on how to upload app binaries to the Server and publish them to EAS by using Kony Fabric, refer to Publishing Client Binaries to Kony App Server from Kony Fabric.
| Copyright © 2020 Kony, Inc. All rights reserved. |