
Language Settings
Kony Management 4.1 supports internationalization. Internationalization (i18N) is the ability of an application to show the content based on a locale, which is a combination of language and country, chosen in a user’s device settings.
In Kony Management 4.1, the enterprise app store supports i18N. The feature allows end users to use their enterprise app store in their native language or their language of choice. Using the i18N feature, an administrator can upload translations for text that appears in the Kony enterprise store (Launchpad). Administrators can upload separate files for translations for all languages that they want to support.
An administrator can export data with all keys that are translated in the enterprise store app with the appropriate description and English translation. An administrator can add a translation for each key individually. For child apps deployed in Kony enterprise store, the default file is generated based on what a user provides as the app name and description from the app details page.
In Kony Management 4.1, internationalization is supported for the following features:
- Application store (except Kony Enterprise App Store names)
- App details
- Push messages
- Policy alert and error messages
- Terms and conditions
Important: On iOS and Windows devices, terms and conditions might still appear in English irrespective of the locale. After device enrollment, if a user logs out of the enterprise store, and if terms and conditions are modified, when the user logs into the store, terms and conditions appear in English.
The Language Settings page contains two tabs. Enterprise Store, and Enterprise Apps. By default, the Language Settings page opens in the Enterprise Store tab.
Enterprise Store Tab
The Enterprise Store tab displays the details of locales along with other details. On the Enterprise Store tab, you can create new locales, modify existing locales, delete a locale, and download an existing locale configuration.

The Enterprise Store tab displays the following user interface features:
| Feature | Description |
|---|---|
| Add New Locale | You can create a new locale using this button. |
| Select Check Box | If selected at the row level, the particular locale is selected for further actions. Multiple rows can also be selected. Selection can only be done on a single page of records. You can choose to display up to 100 records (locales). |
| Locale ID | Displays the locale ID as provided by the administrator. The Locale ID is a combination of the language code along with the country code. The country code is optional. For example, for USA English, the locale ID is en_US. For British English, the ID is en_UK. For English as is, the language ID is en. The language ID is always lowercase while the country code is uppercase. |
| Locale Name | Displays the name of the locale as provided by the administrator. |
| Locale Name (Native) | Displays the name of the locale in the local language as provided by the administrator. |
| Created On | Displays the date and time when the locale is created. |
| Last Updated On | Displays the date and time when the locale is last modified. |
| Export | Downloads the current locale Excel file. |
| Delete | Using the delete button, you can delete selected locales. The button is active when the check box next to locale ID is selected, or if the multiselect check box is selected. |
| Previous | Clicking the button takes you to the previous page (if it exists). |
| Next | Clicking the button takes you to the next page (if it exists). |
Enterprise Apps Tab
The Enterprise Apps tab displays the details of existing enterprise apps in Kony Management server . On the Enterprise Apps tab, you can provide internationalization support to show app details of existing enterprise apps in the enterprise app store. For an existing enterprise app, you can add or modify the existing internationalization configuration.
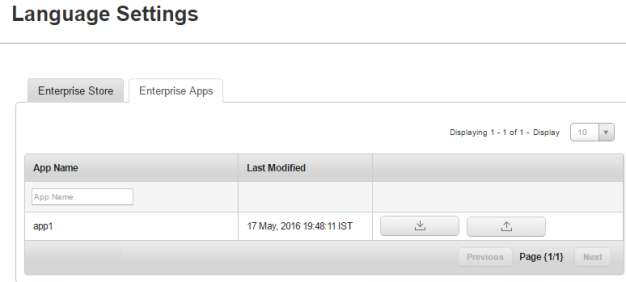
The Enterprise Apps tab contains the following user interface elements:
| Feature | Description |
|---|---|
| App Name | Displays the name of the app. |
| Last Modified | Displays the date and time when the app is last modified. |
| Export | Downloads the current app internationalization Excel (.xlsx) file. |
| Import | Uploads the app internationalization Excel (.xlsx and .xls) file to Kony Management server. |
| Previous | Clicking the button takes you to the previous page (if it exists). |
| Next | Clicking the button takes you to the next page (if it exists). |
Internationalization on Devices
A administrator creates a (on the Enterprise Store tab) is created in Kony Management server. If a device has a corresponding locale, when the user logs into the Kony Enterprise store (previously Launchpad), the locale is downloaded onto the device.
For example, the device’s default language is French. When an fr locale is created in Kony Management administrator console through the Language Settings page, the locale will be downloaded on the device during the first log-in of the device after the locale is created.
In another example, a new locale (applicable) is created when the enterprise app is in the foreground. When the app goes to the background and returns to the foreground, a message appears that locale assets are being downloaded. Once the download is complete, the language on the enterprise app store will change according to the new locale.
Additionally, when a locale is modified and a user logs into the enterprise store, the updated locale data is downloaded onto the device. When a user is using the enterprise store, and the device's locale is modified, the user gets a message on the screen that the enterprise language is modified and is applied on the device.
In cases where the device language setting does not have a corresponding locale, English is displayed as the default locale and language. When a user is using the enterprise app store or a child app and the locale is deleted, the language will not change. The change will appear when the app goes to the background and returns to the foreground.
Working with Internationalization
In the Language settings page, you can do the following:
- Create a new locale
- Modify an existing locale
- Delete an existing locale
- Work with the locale excel file
- Modify an existing Enterprise App locale
How to Create A New Locale
To create a new locale, follow these steps:
- In EMM management console, from Settings, click Language Settings. The Language Settings page appears. The Enterprise Store tab is open by default.
- Click the Add New Locale. The New Locale page appears.
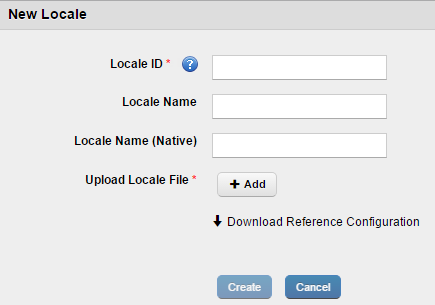
- Enter the following details:
- Locale ID: Enter the locale ID. For example, for Spanish for Mexico, the locale ID is es_MX or, es for Spanish.
Important: The language ID appears can be in two formats:
The Locale ID follows the format of <2 char language code>_<2 char country code>. For example, es_MX.
The Locale ID follows the format <two char language code>. For example, es.
If you do not give a locale ID in the standard format, the locale will not reflect on the device.
For more information on references, click here. - Locale Name: Enter the locale name. For example, Spanish.
- Locale Name (Native): Enter the locale name in the native language. For example, Español -es_MX .
- Locale ID: Enter the locale ID. For example, for Spanish for Mexico, the locale ID is es_MX or, es for Spanish.
- Update Locale File: To upload your locale file, click the Addbutton. File explorer opens.
- Navigate to the location of your locale file. For more information on how to work with a locale file, click here.
- Select the file, and then click Open. The file is uploaded.

- Click Create. A success message appears.
- Click OK.
Your locale is now created and appears on the language settings page.
Modifying an Existing Locale
To modify an existing locale, follow these steps:
- In the EMM management console, from Settings, click Language Settings. The Language Settings page appears. The Enterprise Store tab opens by default.
- Click on the locale you want to modify. The Edit Locale page appears.
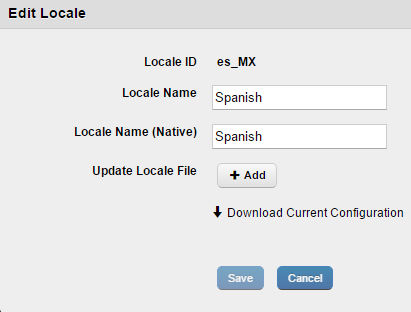
- You can modify the following fields:
- Locale Name: You can modify the locale name. For example, from Spanish to Mexican Spanish.
- Locale Name (Native): Enter the locale name in the native language. For example, Español Mexicano.
- Update Locale File: You can upload a new locale file. To upload your new locale file, click the Addbutton. The file explorer opens.
- Navigate to the location of your locale file.
- Select the file, and then click Open. The file is uploaded.
- Click Create. A success message appears.
- Click OK.
Your locale is now modified, and modification details appear on the language settings page. Every time you upload a new locale file, the version of the locale file is modified by one version. For example, from Version 1 to Version 2.
How to Delete an Existing Locale
To delete an existing locale, follow these steps:
- In the EMM management console, from Settings, click Language Settings. The Language Settings page appears. The Enterprise Store tab is open by default.
- Select the locale you want to delete. The Delete button is enabled.
- Click Delete. The Delete Locales message appears.
- Click Yes. A success message appears.
- Click OK.
Your locale is now deleted.
Working With the Locale Excel File
A locale file is an Excel file in a format where information entered can be read by the Kony Management server to display appropriate languages on a device when a locale is in force.
The Excel file contains the following tabs:
-
Enterprise Store UI
-
Enterprise Store messages
-
Policy error messages
-
Push message templates
-
Terms and conditions
In each tab, you can provide translation in the language you want to support. Each tab contains four columns by default. Do not change anything from columns A to C.
To work with an existing locale, follow these steps:
- In the EMM management console, from Settings, click Language Settings. The Language Settings page appears. The Enterprise Store tab is open by default.
By default, the English language locale (en)exists in the management console. - Click on the locale. The Edit Locale page appears.
- Click Download Current Configuration. The locale file downloads to your system.
- Open the locale Excel file in edit mode. The file opens.
Do not change anything from columns A to C. - In column D, rename the heading of the column to the language you want to support. For example, if you want to provide translations for French, replace Text in Current: 'en' with Text in Current : 'fr'.
- For all rows, provide translation for column C in column D. For example, for row three, for Access denied, enter your translation in French as Accès refusé.
- Once you are done with your translations, save and close the file.
It is recommended that the file name and your locale name be the same. For information on how to create a new locale, click here.Important: Ensure that you provide translation for at least one row in column D in the Excel file. Otherwise, the default text in column D will be considered as the translation. If you do not want to provide any translation, leave the fields blank.
Modifying an Existing Enterprise App Locale
When you upload an enterprise app to Kony Management, a locale (Excel file) is automatically created for the app to support internationalization. You can download the locale from the Export button in the Enterprise Apps name tab.
The Excel file will have the following sheets:
- App Data
- Android
- Android Table
- iPhone
- iPad
- Windows Phone 8.1+
The sheets display four columns by default: Version (not available in the App Data sheet), Key, Description and en. Based on locales in the language settings page, additional columns will appear. For example, if the French locale is added in the language settings page, a new column fr will be added to the Excel file.
You can download (export) the Excel file to your system, provide required translations for any language in the Excel file's locale column and upload the file in the Enterprise Apps tab.
You can modify the internationalization for an app that you own. You cannot update an app that you do not own. This is applicable to various app versions as well.
To modify a locale for an enterprise app, follow these steps:
- In the EMM management console, from Settings, click Language Settings. The Language Settings page appears. The Enterprise Store tab is open by default.
- Click Enterprise Apps tab. The Enterprise Apps tab appears.
- To update internationalization for the enterprise app, click export. An Excel file downloads to your system.
- Open the Excel file, update the required translations, and save the file.
- To upload the file to Kony Management console, click on the enterprise app's corresponding import button. The Localization page appears.
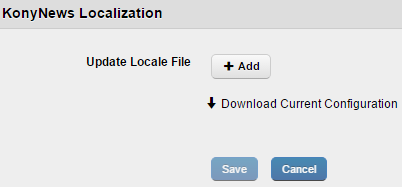
- Click Add. The File explorer opens.
- Navigate to the location of your locale file.
- Select the file, and then click Open. The file is uploaded.
- Click Save. A success message appears.
- Click OK. Your enterprise app locale file is now updated. Every time you upload a new locale file, the previous version of the locale file is replaced by the new version.
Important: Do not modify the order of the columns in the Excel sheets.
| Rev | Author | Edits |
| 4.1 | PK | PK |
| Copyright © 2018 Kony, Inc. All rights reserved. |