
Enterprise Resources
The Enterprise Resources settings in the Management Console configure Wi-Fi and VPN access for devices enrolled in your domain. There are three types of enterprise resources that you can configure: Wi-Fi, VPN and Certificates. These resources are made available to devices through the Network Policy and Certificate Distribution policy respectively.
From the Settings section, click Enterprise Resources List from the left panel. The Enterprise Resources page appears with a list of the enterprise resources details.

The Enterprise Resources List Page includes five tabs:
By default, Wi-Fi tab is set to active.
Wi-Fi
The list view displays a list of all the Wi-Fi networks along with other details. You can search Wi-Fi networks based on each column and also sort on each column.
The Wi-Fi List page displays the following columns:
| Columns | Description |
|---|---|
| Wi-Fi Name | The name of this Wi-Fi network entry. This field is for your reference and should not match the SSID of the network |
| Service Set Identifier | The Wi-Fi network's SSID. This is the name that a network broadcasts to identify itself, and that computers use to join it. SSIDs are case-sensitive. |
| Security Type | Displays the types of security. |
| Created By | Displays the names of the Administrators. |
| Last Modified on | Displays when the Wi-Fi connection was last modified. |
You can scroll the list view through the Previous and the Next buttons.
You can perform the following activities from the Wi-Fi page:
- Creating a Wi-Fi Connection
- Updating a Wi-Fi Connection
- Searching for Wi-Fi
- Deleting a Wi-Fi Connection
Creating a Wi-Fi Connection
To create a new Wi-Fi connection, follow these steps:

- To open the New Wi-Fi window, click the + W- Fi button next to the Enterprise Resources label at the top of the page.

The New Wi-Fi window appears.
- Enter the following details:
- Wi-Fi Name: Enter a valid name.
- Service Set Identifier (SSID): Enter a unique name for the SSID.
- Security Type: Select the required security type from the drop-down menu.
- Description: Enter a brief and appropriate description.
- Click the Create button.
The newly created Wi-Fi appears in the list view.
- Click the Create and Edit button to open the newly created Wi-Fi network.
The Wi-Fi details page appears.
Click the Cancel button to close the window.
Important: When an Android device is applied with a Wi-Fi policy that is a hidden network type, then the same hidden network is not configured on the device of a user.
Not all WiFi types are supported on all platforms. Based on the WiFi you select, features available for each platform may vary. See the table below for more information.
| WiFi Type | Platform | Features/Fields |
|---|---|---|
| Open | iOS |
Auto Join, Proxy Type, Proxy Server Username, Proxy Server Address, Proxy Server Port, Proxy Server Password, Is this WiFi a hotspot. |
| Android | No configuration required | |
| Windows |
Security, Encryption type, Network Security Key, Key Index, Connect automatically, Connect even if non-broadcasting. |
|
| WEP | iOS |
Password, Auto Join, Proxy Type, Proxy Server Username, Proxy Server Address, Proxy Server Port, Proxy Server Password, Is this WiFi a hotspot. |
| Android | Password | |
| Windows | This security type is not supported on the Windows platform. | |
| WPA/WPA2 | iOS |
Password, Auto Join, Proxy Type, Proxy Server Username, Proxy Server Address, Proxy Server Port, Proxy Server Password, Is this WiFi a hotspot. |
| Android | Password | |
| Windows |
Security, Encryption type, Network Security, Key, Key Index, Connect automatically, Connect even if non broadcasting, Enable FIPS (Federal Information Processing Standard). |
|
| Any (Personal) | iOS |
Password, Auto Join, Proxy Type, Proxy Server Username, Proxy Server Address, Proxy Server Port, Proxy Server Password, Is this WiFi a hotspot. |
| Android | This security type is not supported on the Android platform. | |
| Windows | This security type is not supported on the Windows platform. | |
| WEP (Enterprise) | iOS |
Auto Join, Proxy Type, Proxy Server Username, Proxy Server Address, Proxy Server Port, Proxy Server Password, Accepted EAP types, Identity Certificate, Username, Use per connection password, Password, Inner Authentication, Outer identity, Trusted certificates, Trusted certificate names, Is this WiFi a hotspot. |
| Android | This security type is not supported on the Android platform. | |
| Windows | This security type is not supported on the Windows platform. | |
| WPA/WPA2 (Enterprise) | iOS |
Auto Join, Proxy Type, Proxy Server Username, Proxy Server Address, Proxy Server Port, Proxy Server Password, Accepted EAP types, Identity Certificate, Username, Use per connection password, Password, Inner Authentication, Outer identity, Trusted certificates, Trusted certificate names, Is this WiFi a hotspot. |
| Android | This security type is not supported on the Android platform. | |
| Windows |
Security Type, Encryption Type, Connect Automatically Connect even if non-broadcasting, Network Authentication Method, Validate Server’s identity certificate, Connect to these servers, Servers, Trusted Root CAs, Notifications before Connecting, Use Windows Log On Name, Enable Fast Reconnect, Enforce Network Access Protection, Crypto-Binding, Enable Identity, Privacy Anonymous Identity, Use EAP, Client Authentication Type, Enable Single Sign On, Single Sign On Type, Maximum Delay, Allow additional dialogs, Use Separate virtual LANs for Machine and User Authentication, PMK Caching, PMK Time to Live (minutes), Number of entries in PMK Cache, Use Pre-Authentication, Number of pre-auth attempts, Enable FIPS. |
|
| Any (Enterprise) | iOS |
Auto Join, Proxy Type, Proxy Server Username, Proxy Server Address, Proxy Server Port, Proxy Server Password, Accepted EAP types, Identity Certificate, Username, Use per connection password, Password, Inner Authentication, Outer identity, Trusted certificates, Trusted certificate names, Is this WiFi a hotspot. |
| Android | This security type is not supported on the Android platform. | |
| Windows | This security type is not supported on the Windows platform. | |
| 802.1X EAP | iOS | This security type is not supported on the iOS platform. |
|
Android |
Use Two Factor Authentication, EAP Method, Phase 2 Authentication, CA Certificate, Identity Certificate, Identity, Anonymous Identity, Password. |
|
| Windows |
Security Type, Encryption Type, Connect Automatically Connect even if non-broadcasting, Network Authentication Method, Use Strong Cipher Kets, Don't reveal permanent ID if pseudonym present, Enable usage of Realms, Realms, Use Simple Certificate Selection, Use a different Username for Connection, Cache User settings, Validate Server’s identity certificate, Connect to these servers, Servers, Trusted Root CAs, Don't prompt user if unable to authorize server. Notifications before Connecting, Use Windows Log On Name, Enable Fast Reconnect, Enforce Network Access Protection, Crypto-Binding, Enable Identity, Privacy Anonymous Identity, Use EAP, Client Authentication Type, Enable Fast Re authentication, Enable Single Sign On. |
Updating a Wi-Fi Connection
To update a Wi-Fi, follow these steps:

You can update details under four tabs, Description, iOS, Android, and Windows Phone 8.x. By default the Description tab is set to active.
Description - Tab
- Enter the appropriate description for the Wi-Fi or if required, update the existing content.
iOS - Tab
- Set Wi-Fi configuration for iOS platform.
Wi-Fi settings enhanced support for enabling the device to become a Wi-Fi hot spot using the device’s data connection.

- Password: Enter the password.
- Auto Join: Based on prerequisite, select the option as Yes or No.
- Hidden Network: If Auto Join is set toNo, this field is enabled. You can select Yes or No.
- Proxy Type: Select the required option as None, Manual or Automatic from the drop-down menu.
-
Wi-Fi Hot spot 2.0
You can enable a Wi-Fi hot spot on your device by configuring the fields shown below.

- Is This Wi-Fi a Hot spot?: By default this option is set to No. You can modify it to Yes. If it is yes, only then will the following fields above become active.
- Domain Name: Enter the domain name.
- Roaming Consortium Organization Identifiers: Click the Add button to add identifiers.
Click the Remove button if you wish to remove added entries.
- Network Access Identifier (NAI) Realm Names: Click the Add button to add NAIs. Click the Remove button if you want to remove entries.
- Mobile Country Code(MCC) / Mobile Network Code (MNC) Must be a 6-digit code: Click the Add button to add MCC or MNC. Click the Remove button if you want to remove entries.
- Click the Save and Exit button to save the changes and exit the page. The updated Wi-Fi network appears in the list view on the main page.
- Click the Save and Continue button to save the details and update other details immediately.
Click the Cancel button to close the window.
Android - Tab
- Set Wi-Fi configuration for the Android platform for the following fields:

- Password: Enter the password.
- Click the Save and Exit button to save the changes and exit the page. The updated Wi-Fi network appears in the list view on the main page.
- Click the Save and Continue button to save the details and update other details immediately.
Click the Cancel button to close the window.
Windows Phone 8.x Tab
Set Wi-Fi configuration for Windows Phone 8.x platform for the following fields.

- Security Type: Select a security type from the dropdown list.
- Encryption type: Select an encryption type from the dropdown list.
- Network Security Key: Enter a network security key.
- Key Index: Select a key index value from the dropdown list.
- Connect Automatically: By default this option is set to No. You can modify it to Yes.
- Connect even if non-broadcasting: By default this option is set to No. You can modify it to Yes.
- Click the Save and Exit button to save the changes and exit the page. The updated Wi-Fi network appears in the list view on main page.
- Click the Save and Continue button to save the details and update other details immediately.
Click the Cancel button to close the window.
You can access the newly added Wi-Fi for both the operating systems through following links:
- Device Policy>Network Policy>Set Network Policy for iOS.
- Device Policy>Network Policy>Set Network Policy for Android
- Device Policy>Network Policy>Set Network Policy for Windows 6.x devices
- Device Policy>Network Policy>Set Network Policy for Windows Phone 8.x devices
Searching for Wi-Fi
You can search for a desired Wi-Fi through the available search filters. You can apply a single filter or a combination of search filters to define the search criteria.

To search for a Wi-Fi, follow these steps:
- Wi-Fi Name: Enter a partial or complete name of the Wi-Fi in the Search Wi-Fi Name field.
- Service Set Identifier: Enter a partial or complete name of the Service Set Identifier in the Search Service Set Identifier field.
- Encryption Type: Select the required encryption type from the drop-down list.
- Created By: Enter a partial or complete name of the administrator in the Created By field.
- Last Modified On: Select the required time period from the drop-down menu when the Wi-Fi was last modified.
- According to your search filters criteria, the list view is updated with the Wi-Fi connection details. By default, the list view displays 10 Wi-Fi connections according to the Display settings. You can modify the Display settings through the Display drop-down list. You can also scroll the list view through Previous and the Next button.
Deleting a Wi-Fi Connection
To delete a Wi-Fi connection, follow these steps:

- Select the required Wi-Fi from the list view.
- Click the Delete button. The deleted Wi-Fi is removed from the list view.
Virtual Private Network (VPN)
The list view displays a list of all VPN configurations along with other details. You can search VPN configurations based on each column and also sort the configurations based on each column.

The Enterprise Resources List page displays the following columns:
| Columns | Description |
|---|---|
| VPN Connection Name | Displays name for the VPN network entry |
| Host Name of VPN Server: | Displays full server host name of the server that provides access to the VPN |
| Created By | Displays the names of the administrators |
| Last Modified On | Displays when the VPN connection was last modified |
You can scroll the list view through Previous and the Next button.
You can perform the following activities from the VPN page:
- Creating a VPN Connection
- Updating a VPN
- Assigning Per App VPN for iOS
- Searching for VPN
- Deleting a VPN Connection
Creating a VPN Connection
To create a new VPN, follow these steps:
-
To open the Add VPN window, click the + New VPN button next to the + New Wi-Fi button at the top of the page.

The Add VPN window appears.

- Enter the following details:
- VPN Connecton Name: Enter a valid name for this VPN Network entry.
- Host Name of VPN Server: Enter the full server host name that provides access to the VPN.
- Description: Enter a brief and appropriate description.
- Click the Create button.
The newly created VPN network appears in the list view.
- Click the Create and Edit button to open the newly created VPN and edit the details.
Click the Cancel button to close the window.
Updating a VPN
You can update details under four tabs: Description, iOS, Android, and Windows Phone 8.x. By default the Description tab is set to active.
Description Tab

Enter the appropriate description for the VPN, or if required, update the existing content.
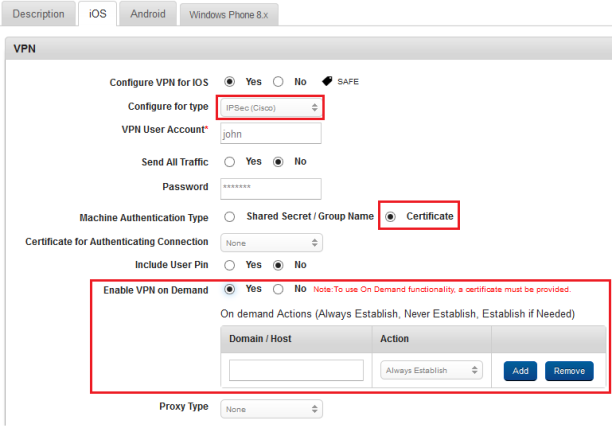
iOS Tab
The administrator can allow for On-Demand VPN to configure rules for VPN connections based on domains. Based on the domain accessed on a device, a VPN connection is established automatically.
The Following are rules for VPN connections:
Administrators must enable On-Demand VPN. The administrator must specify which action should be performed by default among four actions:
- Connect: Unconditionally initiate a VPN connection on the next network attempt.
- Disconnect: Tear down the VPN connection, and do not reconnect on demand as long as the specified conditions match.
- Ignore: Leave any existing VPN connection up, but do not reconnect on demand as long as the specified conditions match.
- Evaluate: Provide the list of Domains to Connect to if needed and ones to never connect. The list of DNS Server IPs and Failure URL (if the system tries to connect to this and fails, the VPN connection is invoked).
To configure OnDemand VPN, follow these steps:
- In Configure for Type, select from the list. Available options are L2TP, PPTP, IPSec(Cisco), Cisco AnyConnect, and IKEv2. For example, if you select CiscoAnyConnect, the following fields appear: VPN User Account, Group, and User Authentication.
- Enter VPN User Account details.
- Enter Group details.
-
In User Authentication, select the Certificate option.
- In the Certificate for Authenticating Connection drop-down list, select one of the options.
- For Enable VPN on Demand, select Yes.

- In the Domain/Host, enter domain details.
- In Action, select on of the actions from the list.
Click the Add button to add more domains. Click the Remove button to remove added domain details.
When you select the IKEv2 (Internet Key Exchange protocol) type from the VPN list, in addition to the fields that are available for every other VPN type, a new section IKEv2 appears. The fields in the IKEv2 section follow:
| Field | Description |
|---|---|
| Always-on VPN | Configure this to Yes if you want the VPN always on. |
| Disable Automatic Connection | Configure this to Yes if you want to disable a device from automatically connecting to the VPN. |
| Same Tunnel for Cellular & Wi-FI | Configure this to Yes to allow both the cellular and the Wi-Fi networks to use one tunnel. |
| Remote Address | Enter the remote IP address of the hostname of the VPN server. |
| Local Identifier | Enter details of the local identifier. |
| Remote Identifier | Enter details of the remote identifier. |
| Authentication Method | Select an authentication method for the VPN. Options are Shared Secret, and Certificate. |
| Shared Secret | Enter Shared Secret details. This option is available when you select Shared Secret from the Authentication Method type. |
| Certificate | Select the certificate from the available VPN certificates list. If you did not create any certificates, none will appear. This option is available when you select Certificate from the Authentication Method type. |
| Server Certificate Issuer Name | Enter the server certificate issuer name. This option is available when you select Certificate from the Authentication Method type. |
| Server Certificate Common Name | Enter the server certificate common name. This option is available when you select Certificate from the Authentication Method type. |
| Enable EAP (Extensible Authentication Protocol) | Select Yes to enable EAP. |
| EAP Authentication |
Select the EAP authentication type from the list. The options are: UserName/Password and Certificate. |
| Auth Name | Enter the authentication user name. This option is available when you select UserName/Password from the EAP Authentication list. |
| Auth Password | Enter the authentication password. This option is available when you select UserName/Password from the EAP Authentication list. |
| Certificate | Select the certificate from the available EAP certificates list. If you did not create any certificates, none will appear. This option is available when you select Certificate from the EAP Authentication list. |
| Select the interval time for Dead Peer Detection interval. Options are: None, Low (1 hour), Medium (30 minutes), and High (10 minutes). | |
|
Encryption Algorithm (IKE Security Association Parameters) |
Select the encryption algorithm from the list. Options are: DES, 3DES, AES-128, and AES-256. |
|
Integrity Algorithm (IKE Security Association Parameters) |
Select the integrity algorithm from the list. Options are: SAH 1-96, SHA 1-160, SHA 2-256, SHA 2-384, and SHA 2-512. |
| Diffie Hellman GroupThe Diffie–Hellman key exchange method allows two parties that have no prior knowledge of each other to jointly establish a shared secret key over an insecure channel. This key can then be used to encrypt subsequent communications using a symmetric key cipher.
(IKE Security Association Parameters) |
Select the Diffie-Hellman group from the list. |
|
Lifetime in minutes (IKE Security Association Parameters) |
Enter the lifetime of the IKE security in minutes. |
|
Encryption Algorithm (Child Security Association Parameters) |
Select the encryption algorithm from the list. Options are: DES, 3DES, AES-128, and AES-256. |
|
Integrity Algorithm (Child Security Association Parameters) |
Select the integrity algorithm from the list. Options are: SAH 1-96, SHA 1-160, SHA 2-256, SHA 2-384, and SHA 2-512. |
|
Diffie Hellman Group (Child Security Association Parameters) |
Select the Diffie-Hellman group from the list. |
|
Lifetime in minutes (Child Security Association Parameters) |
Enter the lifetime of the IKE security in minutes. |
Assigning Per App VPN for iOS

If a VPN is assigned by default, all communications to the Internet go through the VPN. VPNs are applied at the device level.
Per App VPN is an iOS 7 feature that allows administrators to assign VPNs at app level for enterprise apps, and public apps. If Per App VPN is assigned, all communications to the Internet go through the assigned Per App VPN.
Important: Per App VPN is available only for the VPN type Cisco AnyConnect.
To assign a Per App VPN to an app, the "Use Configuration for Per App VPN' must be Yes. Only then can Per App VPN can be assigned to an app.
To define Per App VPN to an app, follow these steps:
Per App VPN must be defined while creating a new VPN or updating a VPN. Ensure that a VPN is configured before defining Per App VPN. For more details, refer to Creating VPN.
- Click one of the VPNs in the VPN list page.
- In the VPN details page, click iOS tab.
Important: Ensure that the Configure for Type field is Cisco AnyConnect.
- Navigate to the Per App VPN section, and choose Yes for the Use Configuration for Per App VPN option.
Only if the Use Configuration for Per App VPN is set to Yes will system display the Automatically Use VPN options. By default the Use Configuration for Per App VPN is set to No. Admin can also choose whether the assigned VPN to be started automatically.
- If you want Per App VPN to start automatically, choose Yes for the Automatically Use VPN.
If the Automatically Use VPN option is set to No, the device user is asked to manually choose for the assigned Per App VPN while accessing Internet from the device.
Android Tab

- Configure VPN for Android: By default, this is set to No. To configure VPN for SAFE (Samsung Android 4.2+) enabled devices, select Yes. Setting this yes will enable options below.
- Configure for type: Two configurations types are supported. Select an option from the drop-down list.
- Encryption TYPE: Select an encryption type from the drop-down list.
- Username: Enter your VPN user name.
- password: Enter your VPN password.
- Shared Key: Enter your Shared Key details.
- Pre Shared Key: Enter your pre-shared key details.
Windows Phone 8.x Tab

- VPN
- Configure VPN for Windows: By default this is set to No. If you want to configure VPN for Windows, select Yes. Setting this value to yes will enable all the options below. If you set this value to No, you will not see the options below.
- Tunnel type: Select a tunnel type. For now, only IKEv2 is supported.
- Authentication: Select an authentication type from the drop-down list.
- Use Windows Log On Name: Select whether to use windows log on name or not. By default, this is set to Yes.
- Advanced
- Use Proxy: By default, this is set to Yes. If you do not want to use a proxy server, set this to No.
- Proxy Server: Enter your proxy server host name or IP address.
- Proxy Port: Enter your proxy port number.
- Use Proxy for Intranet Addresses: Choose whether to use proxy for intranet addresses or not. By default, this is set to Yes.
- DNS Suffix: Enroll DNS suffix details.
- Policies
- Use VPN for Secure Data only: By default this is set to No. If you want to use VPN for secure data, select Yes. Options below are enabled when you set this option to yes.
- Remember Credentials: By default this is set to No. You can select Yes.
- Split Tunnel: By default this is set to Yes. If you do not want to splint tunnel, select No.
Note: When you select No, a warning appears. All network traffic will be forced through this VPN. It is recommended to whitelist the EMM Server else if an invalid VPN configuration is pushed, all communication to and from the device will fail, leaving the device permanently offline.
- By Pass for Local Resources: By default this is set to No. Select Yes if you want to bypass VPN for local resources.
- Allow Trusted Network Detection: By default, this is set to Yes. You can select No.
- Connection Type: Choose a connection type from drop-down list. Available options are Triggering and Manual.
- Resources
- Network Allowed List/Excluded Network list: Enter network allowed or excluded list. If you chose Split Tuner to Yes, Allowed appears, if you chose No, Excluded appears.
- NameSpace Allowed List/Excluded NameSpace List: Enter name space allowed or excluded list here. If you chose Split Tuner to Yes, Allowed appears, if you chose No, Excluded appears.
- DNS Suffix Search List: Enter DNS suffix search list details.
Searching for VPN
You can search a desired VPN connection through search filters available. You can apply a single search filter or a combination of search filters to define the search criteria and refine the outcome.
To search for a VPN connection, follow these steps:
- VPN Connection Name: Enter a partial or complete name of the VPN in the Search VPN Connection Name field.
- Host Name of the VPN Server: Enter a partial or complete name of the Service Set Identifier in the Search Service Set Identifier field.
- Created By: Enter a partial or complete name of the administrator in the Search Created By field.
- Last Modified on: Select the required time period from the drop-down list when the VPN connection was last modified.
- According to your search filters criteria, the list view is updated with respective VPN connection details. By default, the list view displays 10 VPN connections according to the Display settings, which you can modify through the Display drop-down list. You can also scroll the list view through Previous and the Next button.
Deleting a VPN Connection
To delete a VPN, follow these steps:

- Select the required VPN connection from the list view.
- Click the Delete button.
The deleted VPN is removed from the list view.
Certificates
The list view displays a list of all the Certificates along with other details. You can search Certificates based on each column and also sort on each column.

The Certificates page displays the following columns:
| Columns | Description |
|---|---|
| Certificate Type | Displays the Certificate Name. |
| Certificate Name | Displays the type of Certificate, such as VPN. |
| Created By | Displays the name of the Administrator who created the Certificates. |
| Created on | Displays the date on which the Certificate was created. |
You can scroll the list view through the Previous and the Next buttons.
You can perform the following activities from the Certificates page:
Creating a Certificate
To create a new Certificate, follow these steps:

- To open the Add Certificate window click the + New Certificate button next to the + New VPN button at the top of the page.

The Add Certificate window appears.
- Enter the following details:
- Certificate Name: Enter a valid name for this Certificate entry.
Note: Ensure that the length of the certificate name is maximum 15 characters.
- Certificate Target: Select the required target from the drop-down list.
- Description: Enter a brief and appropriate description.
- Upload New Certificate: Click the Browse button to select the certificate from its location. The certificate with its name appears.
- Password: Enter the password to protect the certificate.
- Certificate Name: Enter a valid name for this Certificate entry.
- Click the Create button.
The newly created Certificate appears in the list view.
- Click the Create and Edit button to open the newly created Certificate to update any details.
The Certificate details page appears.
How to Update a Certificate
You can update details of certificates.
To update a Certificate, follow these steps:

- Upload New Certificate: To select the certificate from its location click Browse. The certificate with its name appears.
- Password: Enter the certificate password.
- Click Save & Exit to save the changes and exit the page. or
-
Click Save & Continue to save the changes and stay on the same page.
Searching for Certificates
You can search a desired Certificate through search filters available. You can apply a single or a combination of search filters to define the search criteria and get the refined outcome.
To search for a Certificate, follow these steps:
- Certificate Name: Enter partial or complete name of the Certificate in the Search Certificate Name field.
- Search Certificate Type: Enter partial or complete name of the certificate type in the Search Certificate Type field.
- Created By: Enter partial or complete name of the Administrator in the Search Created By field.
- Created On: Select the required time period from the drop-down list when the Certificate was created.
- According to your search filters criteria, the list view is updated with respective Certificate details. By default, the list view displays ten certificates according to Display settings, which you can modify through Display drop-down list. You can also scroll the list view through Previous and the Next button.
Deleting a Certificate
To delete a Certificate, follow these steps:

- Select the required Certificate from the list view.
- Click the Delete button.
The deleted Certificate is removed from the list view.
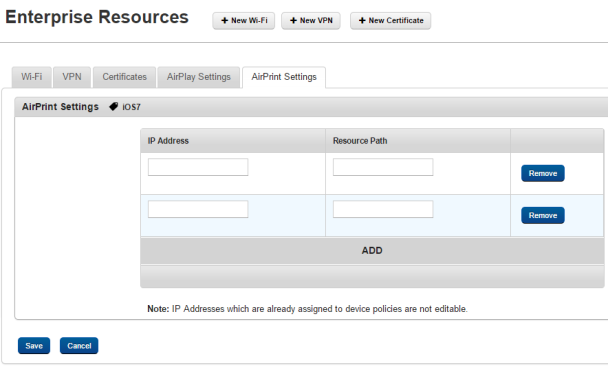
AirPlay Settings
Through Airplay, you connect screen sharing between your iOS 7+ device and Apple TV or Mac. Configure the settings for destination device ID and password.

AirPrint Settings
Using AirPrint, you can print from your iOS7+ device. Configure the settings for IP addresses and resource path.
| Copyright © 2018 Kony, Inc. All rights reserved. |