Device Settings
The primary purpose of the Device Settings section is to configure the devices based on existing business rules. Once you log into EMM Console, from the left pane, click Device Settings. The Device Settings page appears.
The device settings section enables you to configure devices based on existing rules in the Kony Management administrator console. The device settings section consists of the following tabs:
- Usage Configuration: In the usage configuration tab, you can configure various settings for the device for usage. You can do the following.
- Set the default time that is applicable to all applications on the device
- Configure the time in which data must transfer between the device and Kony Management administrator console.
- Email of the administrator to contact for any issues
- Configure enrollment settings where you can choose which enrollment modes are supported and which ones are restricted.
- Settings for Enterprise store.
- Tracking settings
- SAFE settings
- Device Logs
- Mail Plus for Enterprise
- Terms and Conditions: Terms and Conditions are customizable agreements created by your organization outlining the conditions and policies that apply to the enrolled device and user. When an administrator updates existing Terms and Conditions, an email notification and push notification is sent to all active device users.
- Message Templates: You can use message templates to send messages to an administrator or to the user. Administrators can use messages as is or can edit them. Administrators can build on top of templates to send messages to specific devices or device sets. There are two modes of sending messages - push notifications and email. You can create separate templates for each messaging mode.
- Communication Configuration: This feature helps the administrator to create a device certificate to enable managing the device through Enterprise Mobility Management (EMM). Without this certificate, EMM application cannot manage devices. EMM application cannot send any commands such as Lock, Locate, Wipe, and Push profiles to adhere to the rules. Following are the Communication Configurations provided for each device.
Device Settings page is used:
- To set Usage Configuration
- To set Terms and Conditions
- To set Message Template
- To set Communication Configuration
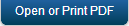
Usage Configuration
The following table provides a list of UI elements in the Usage Configuration tab:
| Feature | Description |
|---|---|
| Set Time Zone Setting | Setting your timezone ensures that all date time elements in the entire application are shown as per your timezone. Use the drop-down list to select your timezone. |
| Heartbeat Settings | |
| Sampling Frequency | To set the time period for collecting and storing the device data in the EMM enterprise store, select the value from the drop-down list. |
| Synchronization Time-Period | To set the time period to sync between device and the EMM server, select the value from the drop-down list. Heartbeat configured in EMM applies only to iOS, Android, Windows 6.x, and Windows Phone 8 devices. Note: If there is an insufficient memory on your device during transactions, enterprise store may stop communicating with EMM server. To resolve this issue, please ask users who faced this issue to restart the devices. |
| Administrator Contact Settings | |
| Support Email ID | Enter the email id that you desire to configure as a support email. The email is included in the device app for users to contact. This field accepts any email-id. You are recommended to provide your support team’s email ID. |
| Enrollment Settings | |
| Allowed
|
Select the required check boxes to set device |
| Admin initiated | If selected, the Admin can initiate the enrollment process. Single Device |
| Device Initiate | If selected, the device can initiate itself without administrator intervention. Selecting the Device Initiated field will enable the following option: Ownership: Using the ownership field, you can globally flag all devices enrolling into EMM. Options are Corporate, Employee, and Shared. |
| Self Service Portal | If selected, the users can send requests to enroll their devices through the Self Service Portal. |
| Verify User Presence in AD Group | If Yes is selected, only users from ADs are allowed to enroll to EMM. By default, it is disabled. |
| Enforce AD Group for
|
If the Verify User Presence in AD Group option is Yes, only then the Configure button is enabled here. You can configure or add those users present in multiple AD Group, and only the selected Groups are allowed to enroll. |
| Enforcement Denied List |
This contains a list of Devices that are not allowed to enroll and that are wiped from future enrollment. The administrator can modify this list accordingly. |
| Device Agent Settings | |
| Timeout Period | This sets the idle timeout for the device agent. Select the required timeout period from the drop-down list. If you choose Unlimited from the list, you will not be asked to authenticate on the enterprise store after initial sign in unless the password is changed. |
| Allow Log-in on Jailbroken/Rooted Devices | By default, this is set to No. Configure to Yes if you want to allow a jailbroken or rooted device from logging into the enterprise store. When a jailbroken or a rooted device tries to log into an enterprise store, the EMM server sends a notification with device details to the administrator |
| Allow offline access on rooted devices | This is available only when the Allow Login on Jailbroken/Rooted devices field is configured to Yes. Configure to Yes if you want to allow offline access on rooted devices. This is for Android devices. |
| Mask username on Enterprise Store | Configure to Yes if you want to mask the username on the enterprise store. Configuring this to yes will mask the user's username in the enterprise store login page and in the user profile. |
| Watchdog Settings | |
| Device Inactivity Limit | You can set the limit for a number of days a device can be inactive. You can choose from the drop-down list available. |
| Action | You can choose an action to perform on the device. |
| Action Based On | Select one of the options from the list. Options include MDM Agent/enterprise store and Enterprise App. |
| Tracking Settings | |
| Enable Device Location Tracking | Using this feature, you can capture a device location in EMM. If set to Yes, the device location is captured. By default, this is set to No. |
| Enable viewing device location | Using this feature, you can view the location of a device. If this feature is set to No, you cannot view device location. Maps in EMM console and on the device will be hidden. |
| Enable Geo-fence based policies | Using this feature, you can enable the create a geofence feature for a device. If set to No, the Geofence page in the management console will be hidden. |
| Allow Mock Location | Using this feature, you can enable the create a geofence feature for a device. If set to No, the Geofence page in the management console will be hidden. |
| Allow User installed applications that have mock location permission | Using this feature, you can allow the user to install applications that use mock locations. |
| Communication Logs | |
| Enable Device Communication Logs | Using this feature, you can enable EMM server to receive communication logs of a SAFE device. If configured to No, SMS and call logs cannot be collected from Samsung SAFE enabled devices |
| SAFE Settings | |
| Enforce Android SAFE (Samsung devices) | Using this feature, you can enforce the Android Safe feature on Samsung Android 4.2 and above devices. When configured to Yes, the Android Safe feature is enforced on applicable devices. When the feature is enforced, existing users are forced to log out. To continue using the enterprise store, users must log in again. |
| Device Logs (Call/SMS/App/Network Usage) | |
| Enable Device Logs | Using this feature, you can capture device logs for calls, SMS, app usage, and app network usage. Configure this to Yes to enable the fields below. |
| Enable Enterprise Application Usage | Configure this to Yes to capture an enterprise app's foreground usage details. Foreground app usage is the time an app is open on the device. |
| Enable Application Network Usage | Configure this to Yes to capture the network usage for an enterprise app. On Android devices, you can also capture the network usage details of public apps. |
| Enable Call Usage | Configure this to Yes to capture call logs on the device. |
| Capture all Phone Number | Configure this to Yes to capture phone number in the call log on a device. |
| Enable SMS Usage | Configure this to Yes to capture SMS logs on the device. |
| Capture SMS Phone Number | Configure this to Yes to capture phone number in the SMS log on a device. |
| Capture SMS Text | Configure this to Yes to capture the SMS text on a device. |
| App Network Usage Capturing Frequency |
App Network Usage Capturing Frequency: Select a time period from the list. The server will capture network usage per app in the period selected. This is available only for Android devices. Note: The App Network Usage frequency must be less than that of the app submission frequency. |
| Device Log Submission Frequency | Select a time period from the list. The enterprise store will submit device logs to the server in the interval selected. This is available for iOS and Android devices. |
| Enable AFW | |
| Enable AFW | By default, Android For Work is configured to No. If you want to use Android For Work for the Android devices, select Yes. This feature will not have any impact on the current configuration. This feature will impact the email device policy. Once the administrator saves the device settings, this will reflect on enrolled devices. |
| Mail + for Enterprise | |
| License Key | Enter the details of your Mail Plus license key. |
In the Usage Configuration tab, you can do the following:
- Configure Time Zone for Devices
- Configure Device Heartbeat Settings
- Configure Administrator Contact Settings
- Configure Enrollment Settings
- Configure Enterprise Store Settings
- Configure Watchdog Settings
- Configure Tracking Settings
- Configure SAFE Settings
- Configure Device Logs
- Configure Mail Plus for Enterprise
How to Configure Time Zone for a Device
To configure Time Zone settings, follow the steps below:
- In Kony Management admin console, under Settings, click Device Settings. The Device Settings page opens with the Usage Configuration tab open by default.
- Under the Set Time Zone Settings heading, from the Display all Date Time in list, select the time zone you want all the applications on the device to be in.
- Click Save. A confirmation message appears.
- Click OK. Your time zone settings are saved.
How to Configure Heartbeat Settings
In Kony Management suite, using the Heartbeat settings, you can synchronize data between an enrolled device and Kony Management suite at regular intervals. You can configure the heartbeat sampling frequency and the synchronization time-period.
To configure heartbeat settings, follow the steps below:
- In Kony Management admin console, under Settings, click Device Settings. The Device Settings page opens with the Usage Configuration tab open by default.
- Under Heartbeat Settings heading, from the Sampling Frequency list, select an option. For example, 5 minutes. The value configures the time period for collecting and storing the device data in the EMM enterprise store.
- From the Synchronization Time Period list, select an option. For example, 1 hour. The value configures the time period to sync between device and the EMM server.
- Click Save. A confirmation message appears.
- Click OK. Your heartbeat settings are saved.
Heartbeat configured in EMM applies only to iOS, Android, Windows 6.x, and Windows Phone 8 devices.
Note: If there is insufficient memory on your device during transactions, enterprise store will stop communicating with EMM server. To resolve this issue, you must restart the affected device.
How to Configure Administrator Contact for a Device
Using this feature, you can configure an email as a support email ID to contact an administrator for any queries that a user may have. The email is included in the device app for users to contact. This field accepts any email ID. You are recommended to provide your support team’s email ID.
To configure administrator contact settings, follow the steps below:
- In Kony Management admin console, under Settings, click Device Settings. The Device Settings page opens with the Usage Configuration tab open by default.
- Under Administrator Contact Settings heading, in the Support Email ID list, enter the email ID of the support that the user can reach to in case of any issues with the device. For example, support@yourcompany.com. This field accepts any email ID. Ensure that you provide the correct support team's email ID.
Important: If you do not provide this, the Contact Support feature on your device will not work.
Note: To add multiple contacts, provide commas to separate email IDs (i.e. john@abc.com, tim@abc.com).
- Click Save. A confirmation message appears.
- Click OK. Your administrator contact email IDis saved.
How to Configure Enrollment Settings
In this section, you can configure the enrollment settings as to which enrollment methods are allowed. You can also do additional tasks, such as verifying the presence of a user in an AD group, enforce a particular active directory group to enroll, and view the devices in the Enrollment Denied list.
To configure Enrollment settings, follow the steps below:
- In Kony Management admin console, under Settings, click Device Settings. The Device Settings page opens with the Usage Configuration tab open by default.
- Under the Enrollment Settings heading, configure the following:
- To allow Admin initiated enrollment, select Admin Initiated.
- To allow device initiated enrollment, select Device Initiated. A new Ownership list appears. Using the ownership field, you can globally flag all devices enrolling into EMM. The options are Corporate, Employee, and Shared.
- From the drop-down list, select an option. For example, Corporate.
- To allow Self-service portal initiated, select Self Service Portal Initiated.
- If you want to verify user presence in the Active Directory group, select Yes.
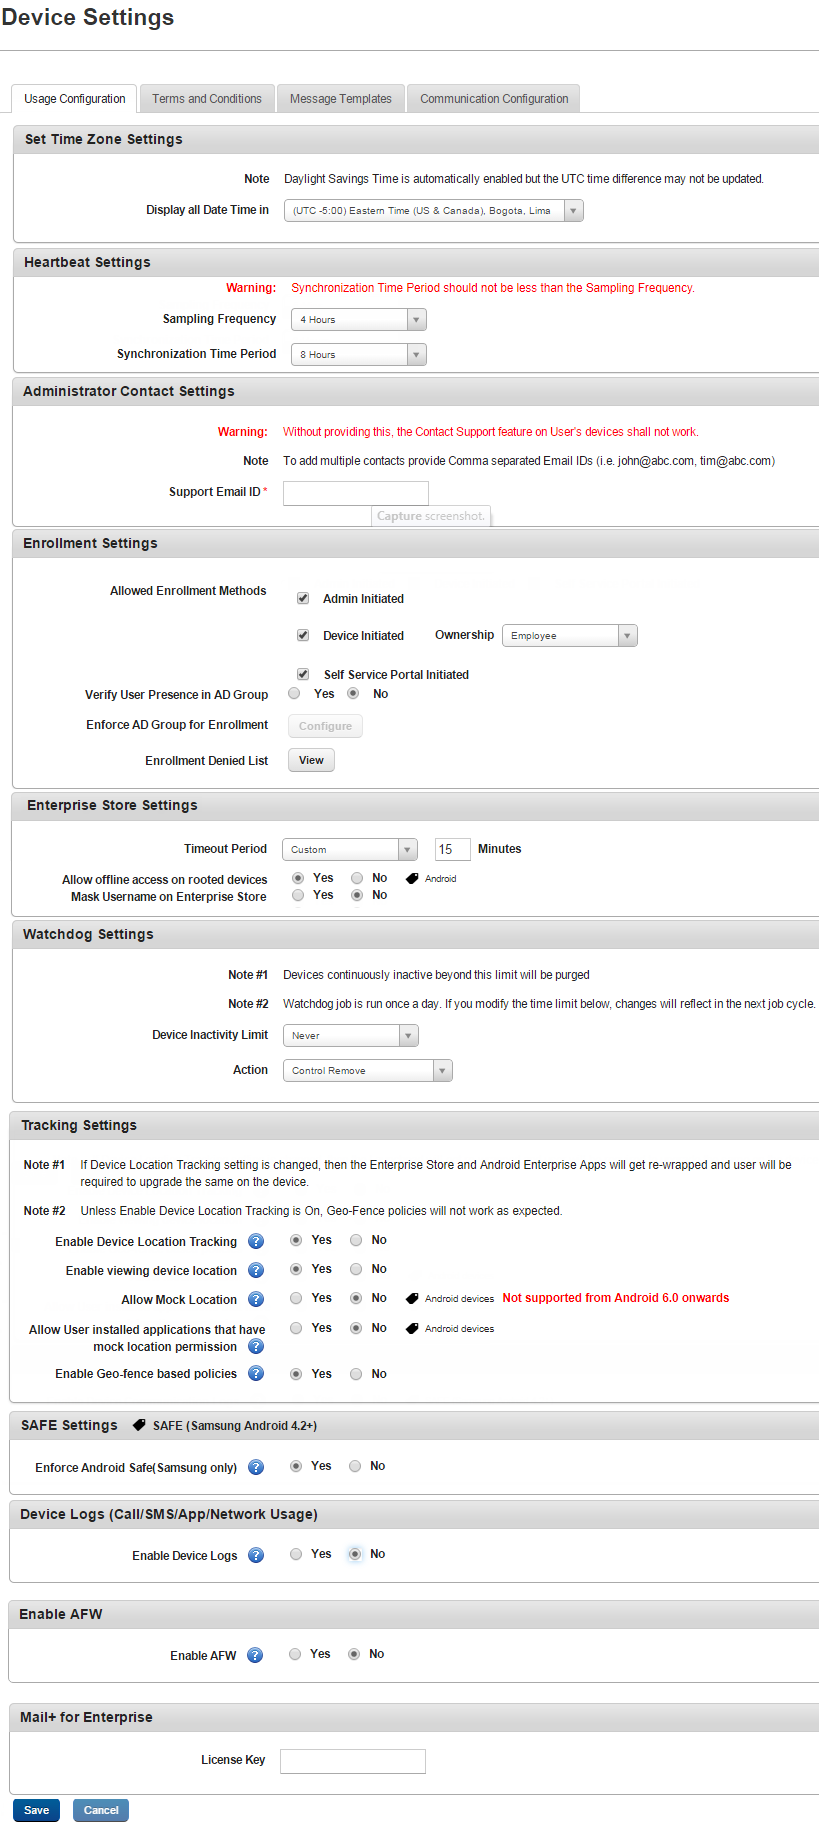
- To enforce active directory group for enrollment, click Configure. The Enforce AD Group for Enrollment window appears.
- From the All AD Groups column, move the group you want to allow enrollment to the Groups Allowed column.
Note: If you do not select any AD Group, then all users are allowed to enroll.
- Once you finish adding your groups, click Save. A success message appears.
- Click OK.
- Click View next to the Enrollment Denied list to view the devices that are denied enrollment. This contains a list of Devices that are not allowed to enroll and that are wiped from future enrollment. The administrator can modify this list accordingly.
- Click Save. A confirmation message appears.
- Click OK. Your Enrollment Settings are saved.
How to Configure Enterprise Store Settings
Using the Enterprise Store settings, you can configure the timeout period for the enterprise store and a few other settings related to installing enterprise store on rooted devices.
To configure Enterprise Store settings, follow the steps below:
- In Kony Management admin console, under Settings, click Device Settings. The Device Settings page opens with the Usage Configuration tab open by default.
- Under the Enterprise Store Settings heading, from the Time Period list, select Custom. A new field appears. Enter the number of minutes after which you want to log out the user for being inactive from the enterprise store.
- For the Allow Login on Rooted devices option, select Yes. This will allow a user with a rooted device to install enterprise store on it. Configure to No if you want to prevent a jailbroken or rooted device from logging into the enterprise store.
When a jailbroken or a rooted device tries to log in to an enterprise store, the EMM server sends a notification with device details to the administrator. - To allow offline access on rooted devices, in Allow offline access on rooted devices, select Yes. This is available only when the Allow Login on Rooted devices field is configured to Yes. Configure to Yes if you want to allow offline access on rooted devices. This is available for Android devices only.
- To mask the username on the enterprise store, in Mask Username on Enterprise Store, select Yes. Configuring this to Yes will mask the user's user name in the enterprise store login page and in the user profile
- Click Save. A confirmation message appears.
- Click OK. Your enterprise store settings are saved.
How to Configure Watchdog Settings
Watchdog is an electronic timer that is used to find any computer malfunctions and recover from it. In Kony Management suite, watchdog settings are used to configure a device's inactivity time, take action on those devices that do not comply with the set parameters.
To configure watchdog settings, follow the steps below:
- In Kony Management admin console, under Settings, click Device Settings. The Device Settings page opens with the Usage Configuration tab open by default.
- Under the Watchdog Settings, from the Device Inactivity Limit list, select Custom. A new field appears. Enter the device allowed inactivity in days.
Note: Devices continuously inactive beyond this limit are purged. Watchdog job is run once a day. If you modify the time limit, changes will reflect in the next job cycle.
-
From the Action list, you can choose an action to perform on the device.
- From the Action Based on list, select one of the options from the list. Options include MDM Agent, enterprise store, and Enterprise App. If you select Enterprise App, the following fields are enabled:
Note: If you do not select Enterprise app usage under Device logs, you receive an error message. Enable Enterprise App Usage under Device Logs and then select Enterprise App.
- Android: Select the enterprise Android app based on which the watchdog settings will trigger and the device will be marked as control remove.
- Android Tablet: Select the enterprise Android tablet app based on which, the watchdog settings will trigger and the device will be marked as control remove.
- iPhone: Select the enterprise iPhone app based on which the watchdog settings will trigger and the device will be marked as control remove.
- iPad: Select the enterprise iPad app based on which the watchdog settings will trigger and the device will be marked as control remove.
- Windows: Select the enterprise Windows app based on which the watchdog settings for enterprise corporate date wipe will be activated.
-
Click Save. A confirmation message appears.
-
Click OK. Your Watchdog settings are saved.
How to Configure Tracking Settings
In Kony Management suite, the tracking settings section helps you to know the location of a device, apply a geofence policy on a device, and to configure allowing mock location for apps.
To configure tracking settings, follow the steps below:
Note: When you modify Device Location Tracking settings, enterprise store will be re-wrapped. You must upgrade enterprise store on the device.
- In Kony Management admin console, under Settings, click Device Settings. The Device Settings page opens with the Usage Configuration tab open by default.
- Under the Tracking Settings heading, configure the following fields:
- Enable Device Location Tracking: Using this feature, you can capture a device location in EMM. If set to No, the device location is not captured and the location feature in the enterprise store does not work.
- Enable viewing device location: Using this feature, you can view the location of a device. If this feature is set to No, you cannot view device location. Maps in EMM console and on the device are hidden.
- Enable Geo-fence based policies: Using this feature, you can enable the create a geo-fence feature for a device. If set to No, the Geo-fence page in the management console are hidden.
- Allow Mock Location: Using this feature you can allow applications to use mock location on a device.
- Allow User Installed applications that have mock location permission: Using this feature, you can allow the user to install applications that use mock locations.
- Click Save. A confirmation message appears.
- Click OK. Your tracking settings are saved.
How to Configure Communication Logs
In Kony Management suite, the communications logs feature helps you to keep a log of various communication made by a device.
To configure communication logs, follow the steps below:
Note: This feature is applicable for Samsung SAFE-enabled devices.
How to Configure SAFE Settings (for Android)
In Kony Management suite, using the Android native SAFE settings, you can configure the Samsung SAFE feature for Android devices.
To configure SAFE settings, follow the steps below:
- In Kony Management admin console, under Settings, click Device Settings. The Device Settings page opens with the Usage Configuration tab open by default.
- Under the SAFE Settings heading, select Yes for Enforce Android Safe (Samsung only). This is applicable only for SAFE-enabled Samsung Android devices that are on Android version 4.2 onwards.
- Click Save. A confirmation message appears.
- Click OK. Your SAFE settings are saved.
Important: When the feature is enforced, existing users are forced to log out. To continue using the enterprise store, users must log in again.
How to Configure Device Logs
In Kony Management suite, the device logs feature helps you to keep a log of various activities on the device. The log information can include calls/SMS/app/network logs.
To configure Device logs, follow the steps below:
Important: Set all the fields to Yes to enable App Usage, Call Usage, SMS Usage, and App Network Usage reports.
- In Kony Management admin console, under Settings, click Device Settings. The Device Settings page opens with theUsage Configuration tab open by default.
- Under the Device Logs (Call/SMS/App/Network Usage) heading, select Yes for Enable Device Logs. More fields appear.
- To create logs for enterprise application usage, select Yes for Enable Enterprise Application Usage.
- To create logs for enterprise application network usage, select Yes for Enable Application Network Usage. Only android enterprise applications network usage can be captured using this field.
Note: The App Network Usage frequency must be less than that of the app submission frequency.
- To create logs of call usage, click Yes for Enable Call Usage. This is applicable only for Android devices.
- To capture the phone number of the device, select Yes for Capture Call Phone Number. This is applicable only for Android devices.
- To capture SMS usage, click Yes for Enable SMS Usage. This is applicable only for Android devices.
- To capture the number of the phone the SMS is sent to, select Yes for Capture SMS Phone number. This is applicable only for Android devices.
- To know the contents of the SMS text, select Yes for Capture SMS Text. This is applicable only for Android devices.
- You can configure the frequency at which the app network usage information is captured. From the App Network Usage Capturing Frequency list, select an option. For example, 4 hours. This is applicable only for Android devices.
- You can configure the frequency at which the device logs are submitted to the Kony Management administrator console. From Device Log Submission Frequency list, select 6 hours. This is applicable for Android and iOS devices.
- Click Save. A confirmation message appears.
- Click OK. Your device logs settings are saved.
How to Configure Mail + for Enterprise
To configure Device logs, follow the steps below:
- In Kony Management admin console, under Settings, click Device Settings. The Device Settings page opens with the Usage Configuration tab open by default.
- Under the Mail + for Enterprise Device heading, in the License key text box, enter your license key for Mail + for enterprise.
- Click Save. A confirmation message appears.
- Click OK. Your Mail + settings are saved.
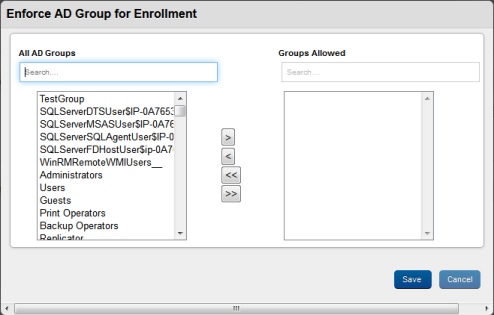
Terms and Conditions
Terms and Conditions are customizable agreements created by your organization outlining the conditions and policies that apply to the 
To define Terms and Conditions, follow these steps:
- Enter terms and conditions in the Employee Terms text box. The text toolbar allows you to edit text.
- To send a notification to the user, select one of the following options.
- Send Notification - Push
- Send Notification - Email
- Click the Save button. In the confirmation message ( Save Device Settings) that appears, click Yes to save changes. Another confirmation page appears.
Important: If you select No, the confirmation message closes and changes made are not saved.
- Click OK to return to the terms and conditions page.
The following are various conditions for Push and email notifications:
- When an administrator makes changes to Terms and conditions, he can click on Save. A confirmation message appears. The administrator can choose to proceed to IF the When an administrator updates the Terms and Conditions on the server, a push notification is sent to all active users who have active devices.
- If the user is logged out of the enterprise store, Terms and Conditions appear to the user on next log in.
- A user can accept the terms and continue to use the Enterprise store.
- An administrator can verify the reason for a device deactivation from Event logs.
Message Templates
Using Message Templates, you can messages to an administrator or to a user. Administrators can use messages directly or can use message templates after edit them. Administrators can build on top of existing templates to send messages to specific devices or device sets. There are two modes of sending messages - push notifications and email. You can create separate templates for the two modes.
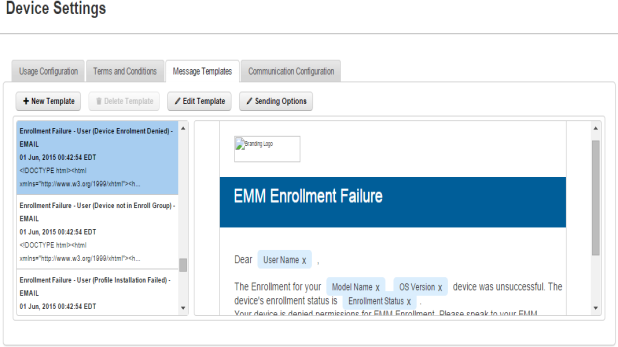
You can perform the following activities from the Message Template tab.
Creating a New Template
An administrator uses this template to tailor a message to each individual user or device. The administrator can create templates where certain attributes are populated at runtime based on a recipient. This ensures consistent messages to all recipients.
To create a new template, follow these steps:
-
Click the +New Template button under the Message Template tab.
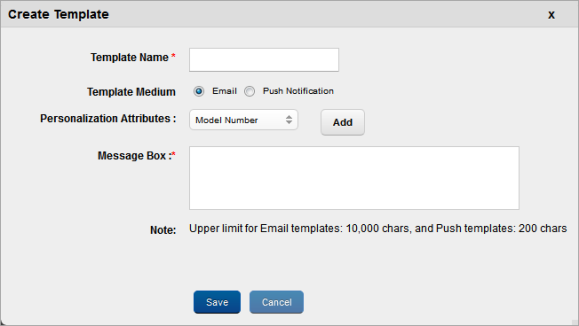
The Create Template dialog box appears.
- Enter the following fields:
- Template Name: Enter your desired name for the template.
- Template Medium: Select the medium as email or push notification.
- Personalization Attributes: Personalization attributes are pieces of information pertaining to a specific device or a user. Select the personalization attributes from the drop-down list and click Add. The following attributes are provided:
- User ID
- Company Name
- Device IMEI
- Device Model Name
- Device Model No
- Device Name
- Device OS
- Enrollment Rules
- Enrollment Status
- First Name
- Last Name
- Policy Name
- Time Limit
- Wipe Type
- Enter your message in the Message Box. Formatting toolbar appears on top of the editor to modify your look and feel of the text. Currently, HTML is not supported. Only plain text is supported.
- Click the Save button. The saved template details appear in the list view.
Editing a Template
To modify or edit a template, follow these steps:
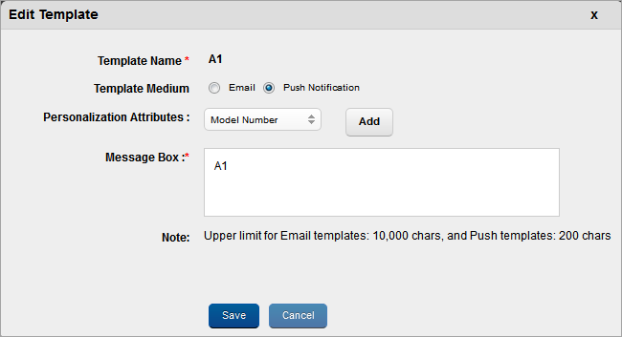
- Select the template from the list view and click the Edit Template button.
The Edit Template window appears.
- Enter details for the following fields:
- Template Medium: Select the option as email or push notification.
- Personalization Attributes: Select the personalization attributes from the drop-down list. You cannot change the Template Name.
- Enter your message in the Message Box.
- Click the Save button. The saved template details appear in the list view.
Configure Sending Options
This feature helps you enable or disable message-template notifications to users. If you send notifications, you can customize the audience for these notifications. You can customize sending options for each message templates based on the required audience. Messages can be specific to affected users, administrators, or all users.
Sending Options
The Sending Options window displays the following fields:
- Template Name: This field displays the message template name.
- Enable Sending Email: Select Yes to enable the Sending Email feature. The To, Cc, and Bcc fields are enabled when you select Yes. Select No to disable the Sending Email feature.
- To: Select the user who will receive the email. Options are Affected User and Email Admin.
- Cc: Select the user you want to copy when you send the email to a recipient. Options available are Affected User and Email Admin.
- Bcc: Select the user you want to blind carbon copy when you send the email to a recipient. Options are Affected User and Email Admin.
- Save: Click to save the changes you made.
- Cancel: Click to cancel the changes you made.
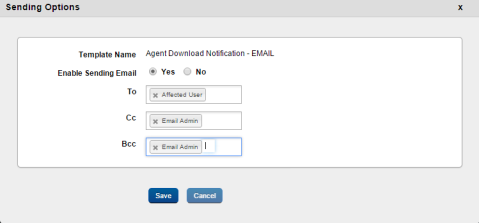
To configure Sending Options, follow these steps:
- Click Sending Options. The Sending Options dialog appears.
- From Enable Sending Email, select Yes.
- In the To field, select the user who will receive the email. Options are Affected User and Email Admin.
- In the Cc field, select the user you want to copy when you send an email to a recipient. Options are Affected User and Email Admin.
- In the Bcc field, select the user you want to blind carbon copy when you send an email to a recipient. Options are Affected User and Email Admin.
- Click Save to save the changes you made. A success message appears.
- Click OK.
Deleting a Template
To delete a Template, follow these steps:
- Select the template from the list view, and click the Delete Template button.
The system displays the warning message ( Delete Template) asking if you are sure you want to delete the template.
- Click the Yes button.
The template is removed from the list view.
Note: There is a known issue with the TextArea Widget in the Chrome Browser. The backspace may not always function properly.
Communication Configuration
This feature helps the administrator to create a device certificate to enable managing the device through Kony Management. Without this certificate, Kony Management cannot manage devices. Kony Management cannot send any commands such as Lock, Locate, Wipe, and Push profiles to adhere to the rules. Following are the Communication Configurations provided for each device:
- Organization Details
- Configure APNS for iOS
- Configure Windows 6.x for Windows Phone 6.x
- Configure Windows Phone 8.x and Windows 8.1 for Windows Phone 8.x and Windows 8.1
Organization Details
The user must provide the details of the organization in this section.
Company Name: You must enter the name of your Company.
Note: Company name changes will only affect new devices enrolled. There is no change on devices already enrolled. This is mandatory for Windows Phone 8.x and Windows 8.1 device enrollments.
Configure APNS
The Apple Push Notification Service (APNS) feature helps the administrator to create an Apple MDM certificate to enable mobile management through Kony Management. Without an APNS certificate, Kony Management cannot manage iOS devices. Kony Management cannot send any commands such as Lock, Locate, Wipe or Push profiles onto the iOS device. For more information on APNS, refer Apple Documentation.
To configure APNS, follow these steps:
-
Upload CSR for Kony Signing: Browse the file from its location. Select it and click Open. The file details appear. Click the Upload button to upload the CSR file.
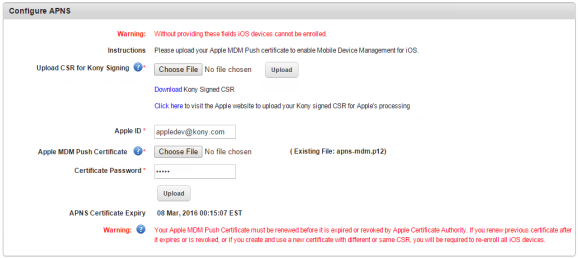
- Apple ID: Enter your email ID.
- Apple MDM Certificate: upload your Apple MDM push certificate. Browse the file from its location. Select it and click Open. The file details appear.
- Certificate Password: Enter the certificate password.
- Click the Upload button.
Note: The APNS Certificate Expiry field displays the expiry date of the APNS certificate.
- Click Save. A success message appears.
- Click OK.
Configure Windows 6.x
To know how to install Windows Server, refer the installation document. Two services: MDM setup and Group Policy setup
To configure Window 6.x, follow these steps:
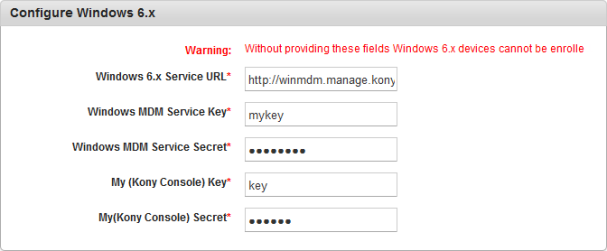
- Windows 6.x Service URL: Enter the URL where you have set up your Windows Server.
- Windows MDM Service Key: Enter the key that you provided while performing the installation process of MDM.
- Windows MDM Service Secret: Enter the secret password that you provided while performing the installation process of MDM.
- My (Kony Console) key: Use the same key that is used for MDM Service Key.
- My (Kony Console) Secret: Use the same Secret password that is used while installing process of MDM.
- Click Save. A success message appears.
- Click OK.
Important: Do not use the WinMDM server directly to send commands to devices or to configure policies. Use Kony EMM server only.
Configure Windows Phone 8.x and Windows 8.1
To configure Window 8.x and Windows 8.1, follow these steps: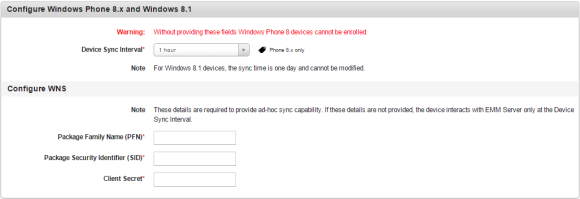
- Device Sync Interval (in minutes): Enter the duration in hours. Device Sync Interval should be at least one hour. For Windows 8.1 devices, the sync time is one day and cannot be modified.
If you want to use Windows Notification Service, you must enter details in the Configure WNS section. For more information on PFN, see the Pre-Install guide.
- Package Family Name (PFN): Enter the Package Family Name. The package family name you enter here will be validated during the device enrollment stage. Once you enroll a Windows 8.1 or Windows Phone 8.x device, a validation takes place. If the PFN you entered is not correct, a warning appears prompting you to enter a correct PFN.
Once a valid PFN is provided, it is valid until it expires (one year). Before the PFN expires, if it is replaced with another valid PFN, the new PFN is honored.
Note: If PFN is not provided, after device (Windows Phone 8.x and Windows 8.1) enrollment, MDM push will not work on the enrolled device. The enrolled device will communicate with the server only at scheduled intervals and not on demand. MDM policies will apply only at scheduled intervals. Once PFA is provided, when the device pings the server, MDM push will be enabled.
- Package Security Identifier (SID): Enter the package security identifier of the PFN.
- Client Secret: Enter the client secret of the PFN.
- Click Save. A success message appears.
- Click OK.
| Rev | Author | Edits |
| 4.1 | PK | PK |
| Copyright © 2018 Kony, Inc. All rights reserved. |