
Custom Attribute Sets
The Custom Attribute Sets feature allows an administrator to add new attributes to a user whom an administrator can access in an enterprise app through a query. Using a custom attribute set, an app developer can customize the experience of an app targeted to a user. You can do the following:
- Create Custom Attribute Sets
- Apply custom attribute sets for a user
- Apply custom attribute sets for a group
- Apply custom attribute sets for an app
- Apply custom attribute sets for a device
An administrator can create a new custom attribute set and add custom attributes for an enterprise app, specifically targeted to a user, a group, an app, and a device.
Note: There are no restrictions on custom attribute set name or attributes. A custom attribute set can be empty and repeated. As custom attribute sets are defined by an app developer, the app developer must take care of names and values.

The Custom Attribute Sets page displays the following:
- New Custom Attribute Set: Using this button, you can create a new custom attribute set.
- Custom Attribute Set: You can enter the name of the Custom Attribute Set.
- Description: This feature displays a description about the custom attribute set.
- Last Modified by: This feature displays the user who last modified the custom attribute set.
- Last Modified on: This feature displays the last modified date of the custom attribute set.
- Actions: You can select any action for a custom attribute set from the list of available options.
- Copy Custom Attribute: Copy a custom attribute set. You cannot have the same name for the copied custom attribute set.
- Delete: Delete files.
- Previous: Clicking this button takes you to the previous page (if it exists).
- Next: Clicking this button takes you to the next page (if it exists).
You can do the following in the Custom Attribute Sets page.
- Create a custom attribute set.
- Edit an existing custom attribute set.
- Delete an existing custom attribute set.
How to Create a Custom Attribute Set
To create a custom attribute set, follow these steps:
- In EMM management console, from Settings, click Custom Attribute Sets. The Custom Attribute Sets page appears.
- Click New Custom Attribute Set. The New Custom Attribute Set dialog appears.
- Enter a name in the Custom Attribute Set Name field.
- Enter a description for the custom attribute in the Description field.
- Click Save to create the custom attribute set, or click Save & Edit to create the custom attribute set and edit it.
How to Edit a Custom Attribute Set
To edit a custom attribute set, follow these steps:
- In EMM management console, from Settings, click Custom Attribute Sets. The Custom Attribute Sets page appears displaying existing custom attribute sets.
- Click the custom attribute set you want to edit. The Custom Attribute Set Details page appears.
- Modify the details of the custom attribute set.
- Click Save & Exit to save the changes you have made, and go to the Custom Attribute Sets page, or click Save & Edit to stay on the same page.
How to Delete a Custom Attribute Set
To delete a custom attribute set, follow these steps:
- In EMM management console, from Settings, click Custom Attribute Sets. The Custom Attribute Sets page appears displaying existing custom attribute sets.
- Click the custom attribute set you want to delete. A warning message appears asking you to confirm the delete.
- Click Yes. A delete success message appears.
- Click OK. The Custom Attribute Sets page appears.
Custom Attribute Set Details
The Custom attribute set detail page displays the following sections and fields.
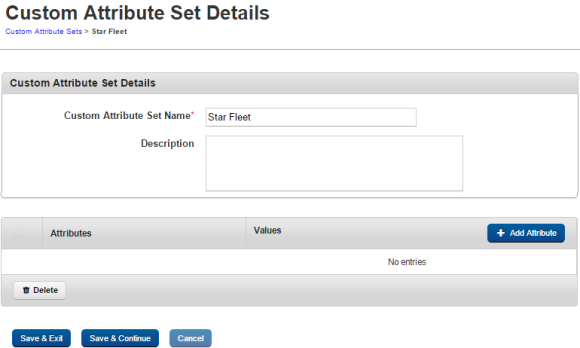
- Custom Attribute Set Details:
- Custom Attribute Set Name: Displays the Custom Attribute Set name.
- Description: Displays description about the custom attribute set.
- Attributes: Displays an attribute name.
- Values: Displays an attribute's associated value details.
- Add Attribute: Using this button, you can add an attribute.
- Delete: Delete files.
- Save & Exit: This feature allows you to save modifications you made on the Custom Attribute Set Details page and exit to the Custom Attribute Sets page.
- Save & Continue: This feature allows you to save modifications you made on the Custom Attribute Set Details page and remain on the same page.
- Cancel: The Cancel button allows you to cancel all changes you made in the Custom Attribute Set Details page.
How to Add an Attribute To a Custom Attribute Set
To add an attribute to an existing custom attribute set, follow these steps:
- In EMM management console, from Settings, click Custom Attribute Sets. The Custom Attribute Sets page appears displaying existing custom attribute sets.
- Click the custom attribute set, you want to add an attribute to. The Custom Attribute Set Details page appears.
- Click Add Attribute. A new row is added below.
- Enter the name in the Attribute field.
- Enter the corresponding value for the attribute in the Values field.
- Click Save & Exit to save the changes, and go to the Custom Attribute Sets page, or click Save & Edit to stay on the same page.
How to Delete an Attribute From a Custom Attribute Set
To delete an attribute from an existing custom attribute set, follow these steps:
- In EMM management console, from Settings, click Custom Attribute Sets. The Custom Attribute Sets page appears displaying existing custom attribute sets.
- Click the custom attribute set you want to delete an attribute from. The Custom Attribute Set Details page appears.
- Select the attribute you want to delete using the selection button. The Delete button is enabled.
- Click Delete.The attribute is deleted.
- Click Save & Exit to save the changes, and go to the Custom Attribute Sets page, or click Save & Edit to stay on the same page.
Applying a Custom Attribute Set to a User
To apply a custom attribute set to a user, follow these steps:
- In EMM management console, from Access Management, click Users. The Users page appears displaying existing users.
- Click on the user you want to apply the custom attribute set to. The user details page appears.
- In the User Details section, from Custom Attributes list, select the custom attribute you want to apply to the user.
- Click Save. A success message appears.
- Click OK. The Users page appears.
Applying a Custom Attribute Set to a Group
To apply a custom attribute set to a group, follow these steps:
- In EMM management console, from Access Management, click Groups. The Groups page appears displaying existing groups.
- Click on the group you want to apply the custom attribute set to. The Group details page appears.
- In the Group Details section, from Custom Attributes list, select the custom attribute you want to apply to the group.
- Click Save. A success message appears.
- Click OK. The Groups page appears.
Applying a Custom Attribute Set to a Device
To apply a custom attribute set to a device, follow these steps:
- In EMM management console, from Device Management, click Devices. The Devices page appears displaying existing devices.
- Click on the device you want to apply the custom attribute set to. The Device details page appears.
- Click Asset Properties tab. The Asset properties details appear.
- From Custom Attributes list, select the custom attribute you want to apply to the device.
- Click Save & Exit. A success message appears.
- Click OK. The Devices page appears.
Applying a Custom Attribute Set to an App
To apply a custom attribute set to an App, follow these steps:
- In EMM management console, from App Management, click Enterprise Apps or VPP Apps. The Enterprise Apps or VPP Apps page appears displaying existing apps.
- Click on the app you want to apply the custom attribute set to. The App details page appears.
- Click on the platform type tab - for example, Android or iPhone. The Platform tab details appear.
- From Custom Attribute Configuration list, select the custom attribute you want to apply to the app.
- Click Save & Exit. A success message appears.
- Click OK. The Enterprise Apps or VPP Apps page appears.
| Copyright © 2018 Kony, Inc. All rights reserved. |