
Application Settings
The primary purpose of this section is to configure Application Settings to maintain several particulars, such as Enterprise Certificates, Provisioning Certificates, Usage Settings
From the Settings section, click Application Settings from the left panel. By default, the Certificates tab is displayed. . The Application Settings Page includes five tabs:
- Certificates
- Usage Settings
- Error Messages
- Encryption Key
- VPP Apps (Volume Purchase Program for iOS 7+ devices)
- Message Templates
Certificates
The primary purpose to have certificates for iOS, Android, and Windows is to
In the certificates section, you can do the following:
- For iOS:
- Upload app distribution certificate
- Upload push notification certificate
- Upload a wildcard provisioning certificate
- Upload an enterprise provision certificate
- For Android:
- Provide your GCM details to configure notifications from your server to your Android apps and from your Android apps to your server.
- Provide details of your Keystore to ensure that your apps and your apps data are encrypted and secure.
- Link your Google Maps Android API key with your Google Maps-enabled Android enterprise apps.
- For Windows:
- Link your Windows apps with your Windows Symantec ID to ensure data and app security.
- For Two-way SSL:
- Link your apps with a two-way SSL certificate for mutual authentication in a secure manner.

iOS
Apple uses various authentication mechanisms to ensure the security of iOS apps. Apps are distributed to devices in various ways (through the Appstore, privately distributed by enterprises and distributed by a company/developer internally with their teams for testing).
There are three important components in the authentication mechanism of Apple,
- Distribution certificates: Certificates authenticate you as an entity. They can represent you as a company or a developer.
- Identifiers (device and app): Identifiers are unique IDs. These unique identifiers exist for your iOS app as well as your Devices.
- Provisioning profiles: Provisioning profiles associate your certificates with your IDs and ensures that all these devices and apps are authentic.
Each of the certificates has a passphrase associated with them. You must provide the details of the certificate’s passphrase when you upload any certificates to Kony Management. The certificate section for iOS allows you to add two certificates and two provisioning profiles.
Using the distribution certificate, you can distribute your apps across your team. Using the push notifications certificate, notifications will be sent to your apps from Kony Management administrator console. Kony Management uses your Apple distribution certificate to authenticate your apps.
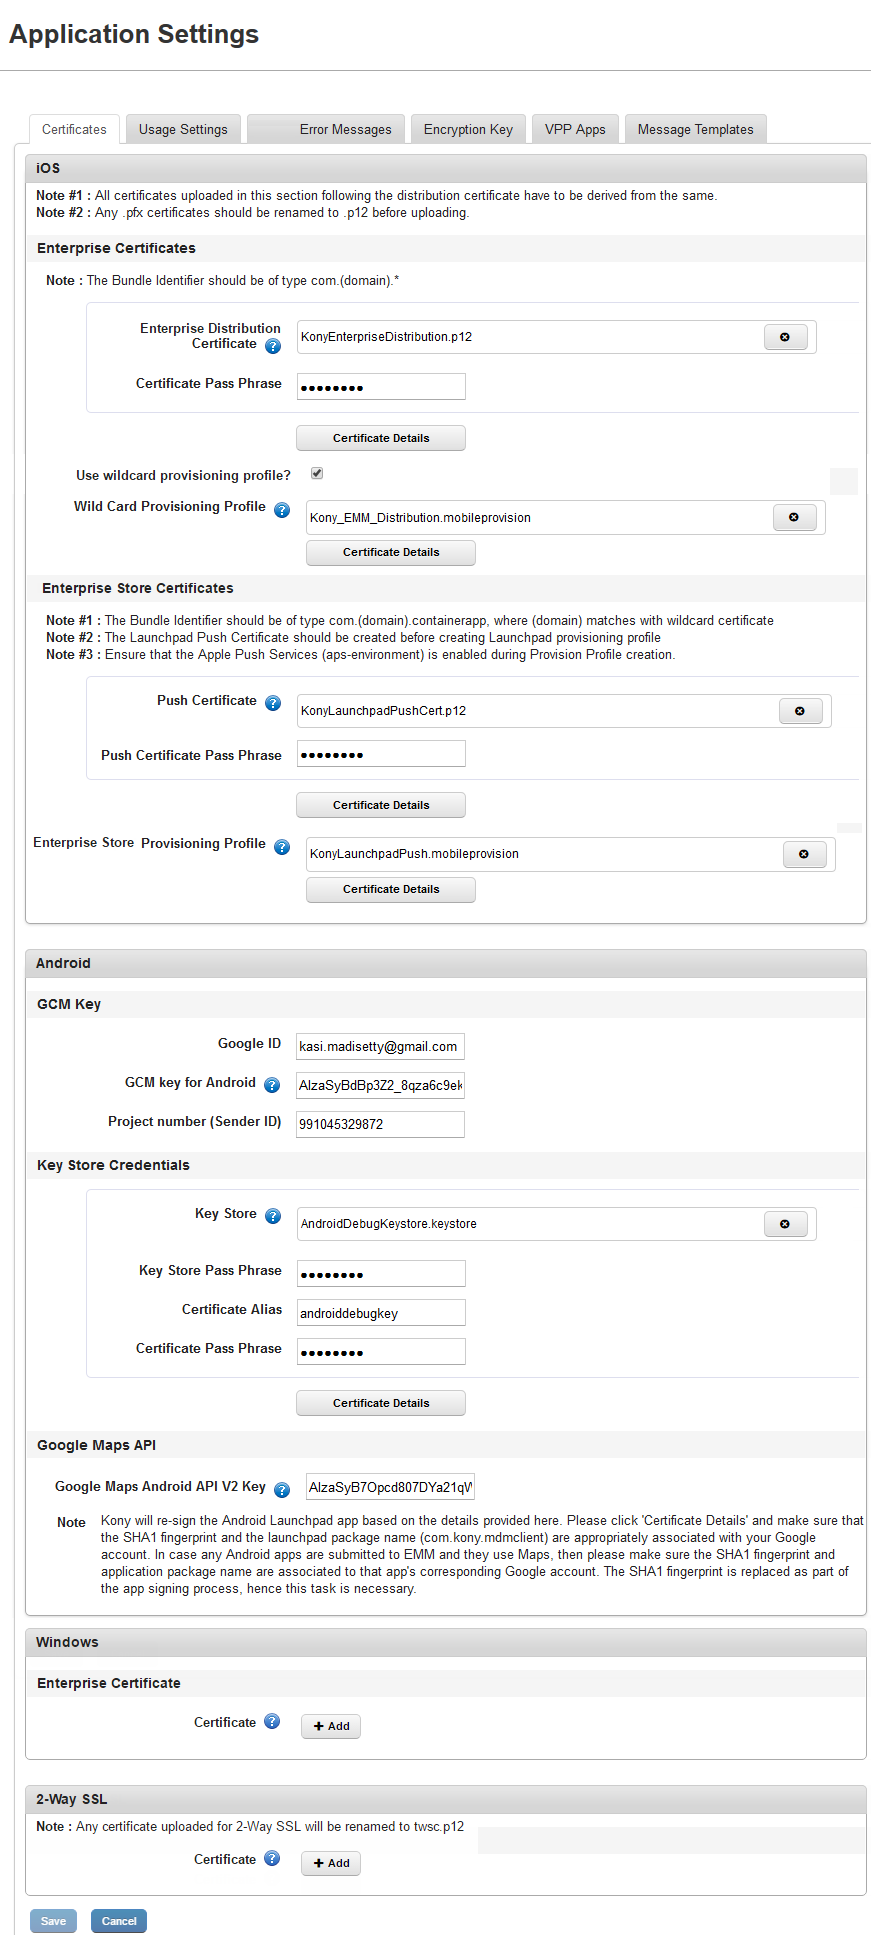
The iOS section view displays the following elements:
| Feature | Description |
|---|---|
| Enterprise Distribution Certificate | Using this feature, you can add your Apple enterprise distribution certificate to the Kony Management server. To add the certificate, click +Add to select the certificate from its location and then click Open. The selected certificate with size in KB appears next to Enterprise Distribution Certificate label. |
| Certificate Passphrase | Enter the password. While accessing, the certificate and the associated password must match. |
| Use wildcard provisioning profile? | Select this if you want to use the Wildcard provisioning profile. |
| Wildcard Provisioning Profile |
Using this feature, you can add your Apple wildcard provisioning profile to the Kony Management server. Click +Addto select the provisioning profile from its location and then click Open. Before uploading your app, you should have the distribution certificates for iOS. When the app is ready for publication, you can create the wildcard provisioning certificate. |
| Push Certificate | Using this feature, you can add your Apple push certificate to the Kony Management server. Click +Add to select the certificate from its location and then click Open. The selected certificate with size in KB appears next to push certificate label. |
| Push Certificate Pass Phrase | Enter the password. While accessing, the certificate and the associated password must match. |
| Enterprise Store Provisioning Profile | Using this feature, you can add your Apple enterprise store provisioning profile to the Kony Management server. Click +Addto select the profile from its location and then click Open. The selected profile with size in KB appears next to enterprise store provisioning profile. |
From the iOS Certificates section, you must add two certificates (Distribution and Push) and the Enterprise Store provisioning profile. You can add a Wildcard provisioning profile, optionally. Ensure that you have all the required certificates from your Apple developer account before you start configuring the iOS certificates section.
Configuring Certificates for iOS
To configure certificates for iOS, do the following:
- In Kony Management admin console, under Settings, click Application Settings. The Application Settings page opens with the Certificates tab open by default.
- Under Enterprise Certificates, click Plus Add. The file explorer window opens.
- Navigate to the location of your enterprise distribution certificate.
- Select the certificate and then click Open. The certificate is added. The selected certificate with size in KB appears next to the Enterprise Distribution Certificate label. The Certificate Pass Phrase field is enabled.
- Enter the passphrase for the distribution certificate in the Certificate Pass Phrase field.
Note: While accessing, the certificate and the associated password must match.
- If you want to use a wildcard provisioning profile, select the Use Wildcard Provisioning profile option. The Wildcard Provisioning Profile option is enabled. (Optional)
Note: Before uploading your app, you should have the distribution certificates for iOS. When the app is ready for publication, you can create wildcard provisioning certificate.
- Click Plus Add. The file explorer window opens.
- Navigate to the location of your wildcard provisioning profile.
- Select the provisioning profile and then click Open. The profile is added.
Important: The enterprise store app must be in conformance with the certificates uploaded. If the bundle ID prefix for the certificate is
com.XXX.containerapp, then the bundle ID of the enterprise store must becom.XXX.containerapp. It cannot becom.YYY.containerapp. If you change the certificates and update the prefix, then you must delete the enterprise store. You must also download on your device a new version of the enterprise store that reflects the updated certificates. For example, in our case, it should becom.YYY.containerapp. If you fail to do so, app management features will not work.Important: You can upload your own mobile provision files for child apps to use. If you use a provisioning profile with a bundle ID com.xxx.containerapp, wrapping will fail. Ensure that your child app bundle ID does not contain the text containerapp.
-
Under the Enterprise Store Certificates section, click Plus Add next to Push Certificate. The file explorer window opens.
- Navigate to the location of your enterprise push certificate.
- Select the certificate and then click Open. The certificate is added. The selected certificate with size in KB appears next to the Enterprise Distribution Certificate label. The Certificate Pass Phrase field is enabled.
- Enter the passphrase for the push certificate in the Certificate Pass Phrase field.
Note: While accessing, the certificate and the associated password must match.
- Click Plus Add next to Enterprise Store Provisioning Profile. The file explorer window opens.
- Navigate to the location of your enterprise store provisioning profile.
- Select the provisioning profile and then click Open. The profile is added.
Once you add all the certificates and provisioning profiles, the Save button is enabled.
- Click Save to save the certificates configuration for iOS.
For the distribution certificate and the push certificate, a new Certificate Details button is enabled. Click Certificate Details to view the respective certificate details.
Provisioning is the process of preparing and configuring an app to launch on devices. During development, you can designate the devices that can launch. When you submit your app to the store, you just provision your app. Provisioning iOS apps involves the creation of certificates, production, and distribution of provisioning profiles.
Android
Google uses various mechanisms to communicate and authenticate with Android apps. Apps are distributed to devices in various ways (through GooglePlay, privately distributed by enterprises, and distributed by a company/developer internally with their teams for testing).
For Android applications, Kony Management uses the following components to communicate with the applications. Specifically, Kony Management uses the following:
- Google Cloud Messaging: Using the Google cloud messaging, Kony Management sends to and receives messages from Android applications which are part of the Kony Management suite.
- Android Keystore System: Google’s Android Keystore mechanism allows a developer to store cryptographic keys in a container. This makes it difficult to extract cryptographic key information from the device.
- Google Maps API: Google Maps APIs allow developers to embed Google Maps in Android applications, among other things.
Ensure that you have the following information before you configure the Android certificates:
- A Google developer account
- A project - The project number is used in the Project Number field.
- GCM credentials key - The key is used in the GCM Key field.
- Google Maps Android API enabled in your project. This key is used in the API V2 Key field.
The Android section view displays the following elements:
| Feature | Description |
|---|---|
| Google ID | Enter your Google developer user name here. You must have a GCM key and a project in this user ID. |
| GCM Key for Android | Enter the Google Cloud Messaging (GCM) Key. For more information on GCM for Android, click here. |
| Project number (Sender ID) | Enter your Google project number or ID here. For more information on how to get your project number, click here. |
| Key Store |
Using this feature, you can add your Key store to the Kony Management server. Click +Add to select the key store from its location and then click Open. |
| Key Store Pass Phrase | Enter the required password to access the certificate. |
| Certificate Alias |
Enter an alternative name for the certificate. The keystore protects each certificate with its individual password. For example, when you sign an Android application using the Key Store passphrase, you are asked to select a keystore first, and then asked to select a single alias from that keystore. After providing the passwords for both the keystore and the chosen alias, the app is signed and the public key (the certificate) for that alias is embedded into the APK. |
| Certificate Pass Phrase | Enter the required password to access the certificate. While accessing, the certificate and the associated password must match. This button is enabled only when a certificate is uploaded to the Kony Management server. |
| Certificate Details | Click this button to view the respective certificate details and associated error, if any. |
| Google Maps Android API V2 Key | Enter your Google Maps Android API V2 key. For information on how to get Google Android API V2 key, click here. |

Configuring Certificates for Android
To configure certificates for Android, do the following:
- In Kony Management admin console, under Settings, click Application Settings. The Application Settings page opens with Certificates tab open by default.
- In the Android section, under the GCM Key section, enter details for the following:
- Google IDGoogle ID: Enter your email account ID.
- GCM Key for Android: Enter your GCM Key for Android.
- Project Number (Sender ID): Enter the Sender ID.
- In the Key Store Credentials section, enter the following:
- Key Store: Click +Add to select the certificate from its location and then click Open. The selected certificate with size in KB appears next to the Key Store label.
- Click the Close icon to close the selected certificate details.
- Key Store Pass Phrase: Enter the required password to access the certificate.
- Certificate Alias: Enter an alternative name for the certificate.
The keystore protects each certificate with its individual password. For example, when you sign an Android application using the Key Store Passphrase, you must select a keystore first, and then select a single alias from that keystore. After providing the passwords for both the keystore and the chosen alias, the app is signed and the public key (the certificate) for that alias is embedded into the APK.
- Certificate Pass Phrase: Enter the required password to access the certificate.

- Click Certificate Details to view the respective certificate details and associated error, if any.
- Key Store: Click +Add to select the certificate from its location and then click Open. The selected certificate with size in KB appears next to the Key Store label.
- In the Google Maps API section, enter the details for the following:
Google Maps Android API V2 Key: Enter the key value for your Google maps Android API.
- Click Save to save the entered details.In the confirmation message that appears, click OK to return to the main page.
Windows Phone 8.x
Windows Phone 8.x devices require a Symantec Code Signing Certificate. Symantec is the only provider of code signing certificates for the Windows Phone Private Enterprise program. You can use this certificate to enable and distribute your windows applications within your organization. This certificate ensures that the windows applications are safe to download and for internal distribution in the company.
You must ensure that you have your Symantec enterprise certificate available before you configure this section. For more information on how to obtain this certificate, click here.
To set Certificates for Windows Phone 8.x, follow these steps:

- Certificate: Click + Add. Windows explorer appears.
- Select your Symantec enterprise certificate and click Select.
- Click Add. The certificate is added. The passphrase option appears.
- Enter your passphrase and click Save.

For more information on how to obtain Windows Certificates, see the Pre-install guide.
Two-Way SSL Enterprise Certificate
An administrator can configure Kony Management suite to take a system level Two-way SSL certificate and securely bundle the Two-way SSL certificate with the Enterprise Store app.
Important: Two-way SSL feature does not work for the Enterprise Store and child apps for Apple iPad.
Note: If you want the two-way SSL to work on an iPhone, configure the Kony Fabric Identity service settings in the Authentication Settings page. Specifically, you must configure the Enable Reverse Proxy Basic Auth setting.
The SSL certificate is used to contact any server resource inside a customer's network that requires mutual authentication - for example, f5 load balancer. You must provide an x509 client side certificate (.p12 supported) for two-way SSL authentication, for the Enterprise Store to authenticate to a back-end. Mutual authentication through two-way SSL allows the client and the server to authorize each other so both parties are assured of each others identities.
See a sample reference for setting up the two-way SSL at https://support.f5.com/kb/en-us/solutions/public/15000/100/sol15137.html.
Note: Two-way SSL cert is also be shared with the child app if the Allow SSO option is selected during app deployment.
In the Application Settings page, an administrator can upload a two-way SSL certificate.
To upload an enterprise certificate for two-way SSL, follow these steps:

- Certificate : Click + Add. Windows explorer appears.
- Select your two-way SSL enterprise certificate and click Select.
- Click Add. The certificate is added.
- Click Save. A new passphrase field appears.
- Enter the passphrase associated with the two-way SSL certificate you uploaded in the field.

Important: The two-way SSL certificate name must not contain the dot character. For example, if the certificate name is client.one.p12, the Kony Management suite administrator console will not save the certificate.
Important: If you upload an incorrect two-way SSL certificate, a user log-in fails in the Enterprise Store.
Usage Settings
The primary purpose of usage settings is to define rules about how a user can log in to web console and devices, session time-out, and invite new users. Usage Settings is divided into the following sections:
Login Settings
Online Login: This section covers various authentication mechanisms for the Kony Management administrator’s console and the Enterprise Store. In this section, you can enable the Captcha feature based on a number of failed attempts, lock a user (from the administrator console or the enterprise store)
Console Settings: In this section, you can configure the idle timeout period for a user in the administrator console.
Offline Login: Using this section, you can configure the maximum failed attempts while the device is offline. If the user exceeds the allowed number of offline login fail attempts, an enterprise wipe is triggered on the device.
Device Limit: Using this section, you can configure the number of devices users can enroll on their user name.
Local EMM User Password Settings: This section allows you to configure password settings for a local EMM user. You can do the following:
- Reset password on the first login
- Configure complexity of passwords
- Configure expiry time period
- Configure re-usage of old passwords
New User Settings
Using this section, you can configure imported groups and users settings. You can configure the following settings:
- Whether to overwrite a local user with an imported user
- Whether to overwrite a local group with an imported group
- Syncing groups of Active Directory users after log in
- Creating or importing users without email IDs
Authentication Source Configuration
You can use the authentication mechanisms configured in the Authentication Settings page to configure Authentication types for various Kony Management suite interfaces. You can configure authentication for the following:
- Management Admin Console
- Self-service Console
- Enterprise Store download page
- Enterprise Store login
Enterprise App Licenses
In this section, you can configure the usage of enterprise licenses. Various settings that you can configure in this section include log in settings, console settings, device limit, local user password settings, new user settings, and enterprise app license settings.
User Interface Elements
| Feature | Description |
|---|---|
|
Log-in Settings |
|
| Require Captcha | The feature allows you to configure the captcha settings. By default, the option is set to Yes. If the selected option is No, then After How Many Failed Attempts field is removed. |
| After How Many Failed Attempts | Select the number of failed attempts a user can have. A Captcha feature will be activated to determine whether a user is human after a user exceeds the number of failed log-in attempts. |
| Lock User After | Select the number of attempts a user can have to log in to the application. A user will be locked after exceeding the allowed number of log-in attempts. This will control access to Enterprise Appstore. However, if the user is locked by the external authentication provider, user will still not be able to log in. |
| Trigger Enterprise Wipe Device After | Select the number of attempts a user can have to log in to the application. After a user exceeds the allowed number of login attempts, all enterprise data will be wiped from the device. After the enterprise wipe, the device will be in the Suspended mode. For Android devices, apps along with app data is removed. App data is removed before uninstalling the app. |
| Enable SCEP Enrollment | Configure the feature to Yes if you want to enable SCEP enrollment on Android devices. When you select Yes, Validate Client Certificate option is enabled. |
| Validate client Certificate (OCSP Revocation Checking) | By default, the setting is set to No. If you want to validate the client certificate, select Yes. The OCSP URL field is enabled. For more information on OCSP URL configuration, click here. |
| OCSP URL | Enter the OCSP URL in the field to validate the client certificate. |
| Notify User Before SCEP CA expire | Select the number of days from the list. Based on this setting, users will be informed for the specified number of days about the certificate expiration before the certificate expire date. |
| Console settings | |
| Console Idle Timeout Period | Select the timeout period for the console in minutes. After the limit is reached, the user must log in online to access the administrator console again. |
| Offline Login | |
| Maximum Failed Attempts Offline | Select the number of attempts a user can have to login offline to enterprise store. After the limit is reached, the User must log in online to access enterprise store again. For Android devices, if the user exceeds the maximum number of allowed attempts, enterprise wipe will be initiated on the device. |
| Trigger Enterprise Wipe on Device after Failed Attempts Offline | Select the number of attempts a user can have to log in to the application. After a user exceeds the allowed number of login attempts, apps along with app data is removed. App data is removed before uninstalling the app. This is applicable only for Android devices. |
| Device Limit | |
| Maximum number of Devices Per User |
Admin can limit the number of devices per user to be |
| Local EMM User Password Settings | |
| Reset Password on First Log-in | Configure this to Yes to force a user to reset the password on the first log in. This feature is not applicable on the Management console. The Reset password feature is applicable for the enterprise store and the self-service console. |
| Complexity of Password |
Select the complexity of the password from the list. Options are Any, Numeric, Alphanumeric, Alphabetic, and Complex. When you select Complex, the following fields appear.
|
| Minimum Length of Password | Select the minimum length of the password from the list. |
| Expires in | Select an option from the list. Options are Never and Custom. When you select Custom, a new field Days is available. Enter the number of days after which, the password must expire. |
| Unique Password Required Before Reuse | Using this field, you can restrict the reuse of a password. The user will not be allowed to reuse a password before a specific period. The available range is from one to ten. |
| New User Settings | |
| Overwrite Local User with Imported User | By default, this option is set to No If you want to overwrite a local user with the first imported user, click Yes. It will overwrite only if the user name is present in the local directory. |
| Overwrite Local Group with Imported Group | By default, this option is set to No. If you want to overwrite a local group with the first imported group, click Yes. It will overwrite only if the group name is present in the local directory. |
| Sync Groups for AD Users After Login | By default, this option is set to Yes. If you do not want to sync groups for active directory users after login, select No. |
| Create/Import Users Without Email |
By default, this option is configured to No. If configured to Yes, users can be created/imported into the EMM server without an email ID from both Active Directory and locally.
For a user imported without an email address:
|
|
You must be very cautious when enabling the Create/Import Users Without Email feature. For a super administrator, if the email address is empty (because the Create/Import Users Without Email feature is set to Yes), then the super administrator will not receive email notifications for the following:
A user with limited administrator permissions will not get Reset password information notifications. |
|
| Enterprise App Licenses | |
| Enable Enterprise App Licenses | By default, this is set to No. Configuring this to Yes will enable restricting enterprise app distribution through licenses. |
How to Configure Captcha Settings
Using the captcha feature, you can enforce extra security in the user log-in process. You can specify the number of failed attempts after which you can lock a user, wipe a device, etc.
To enable Captcha settings while logging into the management administrator console and the Enterprise store, follow the steps below:
- In Kony Management admin console, under Settings, click Application Settings. The Application Settings page opens with the Certificates tab open by default.
-
Under Login Settings, for the Require Captcha field, select Yes. New fields appear.
-
From the Display Captcha after list, select the number of allowed failed login attempts. For example, 3.
-
To lock the user after the allowed number of failed login attempts, from Lock User list, select an option. For example, Custom. A field appears next to the list. Provide a value from 1 to 30.
-
From the Trigger Enterprise Wipe on Device after field, select Custom. A field appears next to the list. Provide a value from 1 to 30.
-
Click Save. A success message appears.
- Click OK. Your captcha settings are saved.
Important: The captcha is displayed only when login attempts fail (based on login settings) to a device-user enrolled with the EMM server. For a user not enrolled with the EMM server, the captcha is not displayed. In such scenario, the system displays the generic warning message that the device is enrolled with another user.
How to Configure SCEP Enrollment
Simple Certificate Enrollment Protocol (SCEP) helps a user to request their digital certificate electronically to authenticate their identity.
To configure SCEP Enrollment settings, follow the steps below:
- In Kony Management admin console, under Settings, click Application Settings. The Application Settings page opens with the Certificates tab open by default.
- Click the Usage Settings tab. The usage Settings page appears.
- Under the Login Settings, from the Enable SCEP Enrollment select Yes. This is applicable only for Android devices.
- Click Save. A confirmation message appears.
- Click OK. Your SCEP enrollment settings are saved.
How to Configure Console Idle Timeout Period
Using the console idle timeout feature, you can force a user to log in to Kony Management administrator console after a specified time period.
To configure Console Idle Timeout period settings for the management administrator console, follow the steps below:
- In Kony Management admin console, under Settings, click Application Settings. The Application Settings page opens with the Certificates tab open by default.
- Click the Usage Settings tab. The Usage Settings page appears.
- Under the Login Settings, from the Console Idle Timeout Period list, select the number of minutes after which the admin console will log out a user if the user has been idle.
- Click Save. A success message appears.
- Click OK. Your console idle timeout settings are saved.
How to Configure Offline Login settings
To configure Console offline login period settings for the management administrator console, follow the steps below:
- In Kony Management admin console, under Settings, click Application Settings. The Application Settings page opens with the Certificates tab open by default.
- Click theUsage Settings tab. The Usage Settings page appears.
- Under the Login Settings, from the Offline Login section, select an option from the Maximum Failed Attempts Offline list. If you select Custom, a new text box appears. Enter a number in it.
Note: After the limit is reached, the user must log in online to access the Enterprise Store again.
- If you want to trigger enterprise wipe on a device after exceeding the allowed failed attempts offline, select Yes for the Trigger Enterprise Wipe on Device after Failed Attempts Offline field.
Note: This feature is available only on Android devices.
- Click Save. A success message appears.
- Click OK. Your offline login settings are saved.
How to Configure Device Limit for a User
To configure the number of devices allowed for a user to enroll, follow the steps below:
- In Kony Management admin console, under Settings, click Application Settings. The Application Settings page opens with the Certificates tab open by default.
- Click the Usage Settings tab. The Usage Settings page appears.
- Under Login Settings, from Device Limit section, select an option from the Maximum Number of devices per user list. If you select unlimited, users can enroll any number of devices.
- Click Save. A success message appears.
- Click OK. Your device limit settings are saved.
How to Configure Local EMM User Password Settings
To configure local Kony Management user password, follow the steps below:
In this example, we will create a complex password that needs to be reset at the first login, which expires in 30 days and the number of unique passwords before using an old password is three.
- In Kony Management admin console, under Settings, click Application Settings. The Application Settings page opens with the Certificates tab open by default.
- Click the Usage Settings tab. The Usage Settings page appears.
- Under Local EMM User Password settings, configure Reset password on the first login to Yes.
- From the Complexity of password list, select Complex. New fields appear.
- From the Minimum length of password list, select 8.
- From the Minimum Number of Letters list, select 2.
- From the Minimum Number of Lower Case Letters list, select 1.
- From the Minimum Number of Upper Case Letters list, select 1.
- From the Minimum Number of Non-Letters list, select 1.
- From the Minimum Number of Numeric Digits list, select 1.
- From the Minimum Number of Symbols list, select 1.
- From the Expires in list, select Custom. In the new text box that appears, enter 30. This is in days.
- From the Unique Password required before reuse list, select 3.
- Click Save. A success message appears.
- Click OK. Your EMM local user password settings are saved.
How to Configure New User Settings
To configure New User settings, follow the steps below:
- In Kony Management admin console, under Settings, click Application Settings. The Application Settings page opens with the Certificates tab open by default.
- Click the Usage Settings tab. The Usage Settings page appears.
- Under New User Settings, select an option for the following fields:
- Overwrite Local User with Imported User. If this is configured to yes, the local user with the same name will be overwritten with the imported user.
- Overwrite Local Group with Imported Group. If this is configured to yes, the local group will get overwritten with the first imported group.
- Sync Groups for AD Users after Login. If this is configured to yes,
- Create/Import users without email ID. If this is configured to yes, users can be created without an email ID from Microsoft Active Directory and locally. For Users created/imported without email addresses, email notifications cannot be sent (This includes Enrollment, Device Actions, App Updates). Email policy cannot be applied. The user cannot participate in VPP.
- Click Save. A success message appears.
- Click OK. Your new user settings are saved.
How to Configure Authentication Source
To configure Authentication Source, follow the steps below:
- In Kony Management admin console, under Settings, click Application Settings. The Application Settings page opens with Certificates tab open by default.
- Click Usage Settings tab. Usage Settings page appears.
- Under Authentication Source Configuration, select an option for the following fields from the drop down list. If you have configured any authentication mechanisms in your Authentication Settings page, they will appear in the list.
- Management Console
- Self Service Console
- Enterprise Store Download Page
- Enterprise Store Login
- Click Save. A success message appears.
- Click OK. Your new user settings are saved.
Once set, your respective login screen will take you to the configured authentication page.
How to Configure Enterprise App Licenses
To configure Enterprise App Licenses, follow the steps below:
- In Kony Management admin console, under Settings, click Application Settings. The Application Settings page opens with the Certificates tab open by default.
- Click the Usage Settings tab. The Usage Settings page appears.
- Under the Enterprise App Licenses heading, select Yes for Enable Enterprise App Licenses.
- Click Save. A success message appears.
- Click OK. Your Enterprise App license settings are saved.
Error Messages
Error Messages tab contains various pre-defined error message areas, where an administrator can enter appropriate messages that can be shown to an end user when an error occurs. The Administrator is expected to specify the messages for each of these situations.
The Error Messages tab includes the following sections:
- Network Permission Error Messages
- Device Storage Error Messages
- Clip Board Error Messages
- Application Features Error Messages
- Phone Features Error Messages
-
Direct and offline app launch Messages
Network Permission Error Messages

- Enter the customized error messages for the following fields:
- Network Communication is not Allowed
- Specified Network Domain is not Allowed
- Network Access through Wi-Fi is not Allowed
- Network Access through Current Active Wi-Fi is not Allowed
Device Storage Error Messages

- Enter the customized error messages for the following fields:
- External Secure Digital Card Read Access is not Allowed
- External Secure Digital Card Write Access is not Allowed
Clip Board Error Messages

- Enter the customized error messages for the following field:
Cut Copy and Paste operation is not allowed.
Application Features Error Messages

- Enter the customized error messages for the following fields:
- Document sharing from the application is not allowed
- Application idle timeout
- Application launch after expiry date
- Application is used in non-business hours
- Application is used in non-business days
- Application is used in non-designated location
- Application is locked and is inaccessible
Phone Features Error Messages

- Enter the customized error messages for the following fields:
- Usage of SMS is not allowed
- SMS to the specified number(s) is not allowed
- Email usage is not allowed within the application
- Email to the specified email address (es) is not allowed
- Phone dialer access is not allowed
- Phone call for specified number(s) is not allowed
- Camera access is not allowed
Direct and Offline App Launch

- Enter the customized error messages for the following fields:
- App Launch Restricted
- App Launch Restricted Offline
- Offline Authentication Failure Limit
- Offline Access for Messages
- Enterprise Store Deleted
Encryption Key
If an app that uses SQLite database is not encrypted, the app is prone to security threats when the device is lost, rooted, or jailbroken. To ensure that the SQLite database is secure, the database is encrypted with a key for security. An encryption key helps an app protect the security of digital data.
Prior to Kony Management 3.5 release, an administrator could generate an encryption key directly, and the user could specify the key. However, with the 3.5 release, Kony Management assumes the task of generating a unique encryption key for each app installed on any device. This change helps an administrator to automate and schedule encryption key generation.
When a new key is generated, all wrap and sign child apps are re-wrapped, including the enterprise store, and a user must upgrade all apps. If the schedule is left blank, the PKI key pairs are generated when the administrator provides the app signing certificates. These PKI key pairs continue to be used unless the administrator generates a new PKI key pair using the Generate Now button.

The Encryption Key tab has the following fields:
- Generate Keys: You can set the encryption key schedule in this section.
- Schedule: You can set the encryption key generation yearly or monthly.
- Yearly
- The: This field contains five lists. The first list has four options: First, Second, Third, and Fourth. The second lists weekdays. The third lists months. You can enter the number of years in the fourth list. The fifth lists years. An example of this schedule is: The Second Tuesday of February for every 2 years from 2015.
- Every: This field contains four lists. The first list has all months. The second list is a day list. You can enter the number of years in the third list. The fourth lists years. An example of this schedule is: Every February on day 10 for every 4 years from 2015.
- Monthly
- The: This field contains two drop-down lists and one text field. The first list has four options: First, Second, Third, and Fourth. The second lists weekdays. You can enter the month interval in the text field. An example of this schedule is: The Second Tuesday of every 2 month (s).
- Day: This field contains two text fields. The first one is for a day and the second one is for months. An example of this schedule is: Day 10 of every 3 month(s).
- Yearly
- Start Time: The start time field contains two lists. The first list contains the number of hours, and the second one is for minutes.
- Schedule: Clicking this button will schedule the encryption key generation.
- Schedule: You can set the encryption key generation yearly or monthly.
- Status: This section displays information on existing encryption key details for various platforms:
- Platform: Displays the platform name.
- Last Key Generated On: Displays the time the encryption key was generated.
- Next Key Generation Scheduled On: Displays the time when the next key generation is scheduled.
- Generate Now: Click this button to generate a PKI pair for iOS and Android immediately.
VPP Apps (VPP for iOS 7+ devices)
The VPP Apps tab is used to configure VPP settings for iOS 7+ devices.

To create a VPP, the admin must register to Apple’s VPP and procure a token. A VPP Program Facilitator can obtain a token by logging into the appropriate VPP website.
- For Business customers: https://vpp.itunes.apple.com/
Currently, Kony Management supports Apple's VPP for Business customers only through Managed distribution method.
Configuring VPP Settings
To configure VPP settings, follow these steps:
- Enter the Apple ID to run the VPP.
An Apple ID that is used for creating a VPP is different from a Developer Apple ID or an Apple Device ID. A user should have a separate Apple ID to create a VPP. Developer IDs are either individual or corporate. These IDs are not supported to create a VPP.
- Enter the token ID provided by Apple.
For Business customers, the Token is generated by logging into https://vpp.itunes.apple.com/
Each token is valid for one year from the time it is generated.
- In Applist Sync, select one of the time periods from the list to sync the latest list of purchased apps, VPP enrollment status, and licenses distributed. Based on the sync time, the system syncs with the Apple server and gets the latest status. You can configure one of the following:
- 1 hour
- 3 hours
- 6 hours
- 12 hours
- 24 hours
- Last Sync: Displays the last sync date and time details. Click the Sync Now button to start the sync immediately to sync the purchased app list and licenses distributed with EMM.
- Click Save to the save the settings.
Once the sync completed, the VPP apps page is updated in the App Management > VPP Apps page.
Message Templates
The Message Templates tab displays a list of all messages (Push and Email) that an administrator can send to users.

The Message Template tab displays the following fields:
- Edit Template: You can use this button to edit existing message templates.
- Send Me Test Email: You can send yourself a test email of any message template of your choice to view how the message template looks. Especially when you made any modifications to an existing template format.
- Sending Options: You can customize sending options for each of the message template based on the required audience. Some messages are specific to affected users, some can be specific to administrators, and some can affect all users. Using this button, you can choose the recipients of any given template.
Email messages can be of two types:
- Plain Text
- HTML
Push Messages are always plain text only.
Important: Do not modify the placeholders as fetching data required could fail. Ensure that you verify the changes to the HTML template before finalizing the template.
Pre-Defined Templates
The system provides pre-defined message templates for all known situations that help an administrator to create custom messages. Message templates have placeholders of various nouns from App Management. An administrator can also modify these message templates if required.
Editing a Template
The Admin can edit pre-defined templates. The placeholder tags must not modified, but can be shifted from one place to another. If tags are modified, the system can not fetch the data for that tag. Ensure that you only modify tags labels if required.
For example:
| Tag Labels | Placeholders |
|---|---|

|

|
To edit a template, follow these steps:
- Click the Edit Template button. The system displays the Edit Template dialog.

- Select either the Email or Push Notification as a Template Medium.
- Click in the Message Box area to make any necessary changes instantly if required.
There are two views that you can use when editing — HTML View (WYSIWYG) and Source View.
You can switch between the views by clicking the HTML View and Source View buttons. - Click Save to save the changes.
Sending a Test Email
Admin can preview and test HTML emails before sending them out to users.
To send a test mail, follow these steps:
- Click the Sending Me Test Email button.
The system displays sent email success message "A test email has been sent to admin@kony.com. Please verify."
- Click OK to confirm the same. The email will be sent to admin who currently logged into the EMM console.
Configuring Sending Options
This feature helps you enable or disable message-template notifications to users. If you send notifications, you can customize the audience for these notifications. You can customize sending options for each message templates based on the required audience. Messages can be specific to affected users, administrators, or all users.
Sending Options
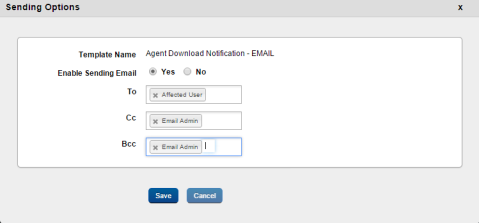
The Sending Options window displays the following fields:
- Template Name: This field displays the message template name.
- Enable Sending Email: Select Yes to enable the Sending Email feature. The To, Cc, and Bcc fields are enabled when you select Yes. Select No to disable the Sending Email feature.
- To: Select the user who will receive the email. Options are Affected User and Email Admin.
- Cc: Select the user you want to copy when you send the email to a recipient. Options available are Affected User and Email Admin.
- Bcc: Select the user you want to blind carbon copy when you send the email to a recipient. Options are Affected User and Email Admin.
- Save: Click to save the changes you made.
- Cancel: Click to cancel the changes you made.
To configure Sending Options,
- Click Sending Options. The Sending Options dialog appears.
- From Enable Sending Email, select Yes.
- In the To field, select the user who will receive the email. Options are Affected User and Email Admin.
- In the Cc field, select the user you want to copy when you send an email to a recipient. Options are Affected User and Email Admin.
- In the Bcc field, select the user you want to blind carbon copy when you send an email to a recipient. Options are Affected User and Email Admin.
- Click Save to save the changes you made. A success message appears.
- Click OK.
Deleting a Template
An administrator can not delete pre-defined templates.
| Rev | Author | Edits |
| 4.1 | PK | PK |
| 4.2 | PK | PK |
| 4.3 | PL | PK |
| Copyright © 2018 Kony, Inc. All rights reserved. |